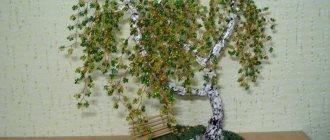
Wisteria is a very beautiful plant that can be made without leaving home. We are talking about weaving wisteria from beads. Such a tree will not only delight you with beautiful flowering, but can also be equipped with various kinds of devices such as a night light or a container for displaying fruit on the table. This article will provide detailed information on the step-by-step production of wisteria from beads.
What you need for the craft
Master class of wisteria from beads can be different, but the materials that will be needed for this or that craft are almost identical:
- Green beads for leaves. You can take two shades - light and dark, it will look more beautiful;
- Beads for creating flowers. Usually they take three shades - white, lilac and pink;
- You will also need glossy beads in three colors: pink, yellow and melange;
- Thin green and silver wire;
- The wire is thicker, about 1 millimeter in diameter;
- Brown floss threads;
- Gypsum;
- Glue;
- Acrylic paints;
- If you need decor to complete the craft, you will need it. For example, moss, small stones, grass.
Since trees made from wisteria beads do not require evenness and quality of details, you can take inexpensive Chinese beads, in which all the elements are not identical to each other.
What do we need and where to start?
First, you should prepare your work surface and see which of the listed materials you have and what you can work with. In addition to beads, we will need other consumables, and to bring the composition to mind and ideal, we can make an original stand for the tree.
Consumables:
- Beads.
- Wire.
- A thread.
- Ribbons for decoration.
- Gypsum.
- PVA glue or Moment.
- Nail polish or decorative varnish.
- Rhinestones, sparkles or other decorative elements at your discretion.
Tools:
- Lids or bottles for beads.
- Scissors.
- Ruler, centimeter.
- A checkered sheet of paper, multi-colored pens or markers.
Important: When working with glue and small parts, supervise children and follow safety precautions when working with materials.
How to make a flower
The diagram of the beaded wisteria shows that the tree consists of flowers and petals.
- First you need to make flowers, for which you will need beads of different light shades.
- If you look at a living plant or in a photo, you can see that the wisteria has a darker shade at the end than in the middle.
- Therefore, you need to repeat everything in the same way on a wicker product.
- To do this, take a silver wire and string 6 pieces of beads on it, for example, lilac, as described in the instructions for the necessary materials.
- Now you need to roll the wire into a loop and press it very tightly.
- Now the wire needs to be intertwined with both ends, you should get several turns.
- There should be about 5 or 6 of them, only after that you need to form another loop.
- Next, all the loops need to be made from one piece of wire.
Leaves
We take 50 cm of wire, put 11 green beads on it, place them 9-10 cm from the edge and make a loop.
Next, we put 11 beads on the long end of the wire and make a second loop.
In total you need to weave 11 loops.
Now we fold the wire with loops so that one loop is in the middle and the rest are on the sides. Then we twist them together. We weave 14 such leaves.
Weaving pattern
The weaving pattern should be as follows:
- Two loops of seven purple beads;
- Next come the same two loops of the same color, but with 9 elements;
- The next loop will already consist of two colors: three pink, three lilac and again three pink;
- Next come two loops consisting of 10 pink beads each, 2 light pink beads, 4 pink beads each, and the loop is closed with 4 light pink beads;
- Next comes a loop, also in two colors, but this time light pink and white: 12 and 13 pieces, respectively;
- This completes the first end of the wire. Now the steps should be repeated in the same order and the same color scheme and with the second end;
- The loops need to be turned mirror-image relative to each other. The tips of the branches with flowers are slightly bent.
- For a whole tree you need to collect 32 such tassels.
Wisteria color and color palette
Speaking of color, don't forget that wisteria has soft and pleasant tones of pink and purple, but you can also use other colors! Smooth transitions and variety in the overall color palette will only add gloss and sophistication to the product.
In total, for the master to understand the time required for the work, the minimum can be done in an hour. Further, usually the process takes you headlong and then you can’t stop! The main thing is to stock up on consumables, take an armful of inspiration and a creative impulse to make your products.
How to make leaves
In order to start weaving leaves, you need to change the wire. An easy master class for beginners says that the leaves should be larger than the flowers, and accordingly, the wire should be thicker.
When weaving leaves, you don’t need to follow a specific color scheme; you can simply mix beads of different shades in one container and randomly take any shade from there.
- This combination will be as close as possible to the real color of the tree.
- Green beads are strung on a wire. You need to leave about 10 centimeters from the edge, and each loop consists of 10 beads.
- For a twig you need to collect 10 loops.
- In total, the wisteria bead tree consists of 32 leaf branches, as well as tassel flowers.
Beaded tree decoration
There are many techniques and a master class for decorating this tree. Whatever you like, do it, there are no specific standards. Show your imagination, and if it doesn’t work out, then use the help of the World Wide Web, you will probably find valuable photos there.
The most common picture is an artificial lake. We will place our product in the center, and a tree will be formed on the shore of the lake.
To make this a reality, you need to take a deep stand. Fill it with gypsum dissolved in water. There will be a beaded tree on one side, and a small hill next to it. Place a piece of polyethylene nearby and make small indentations with your finger. In the future, these will be small waves. When the solution begins to harden, break off the excess along the edges of the pan.
We will need paint. Paint the future lake with it, and then the tree trunk again. You can make a decoration on the wisteria by painting its base with silver to make it more attractive. Do this with light and non-sharp movements.
After drying, we move on to processing the lake, the most interesting part of our craft. Using glue, we attach lush grass and loose sand around the lake. In the abyss, place a pebble. Our work is not finished; a small but no less important part of the picture remains. This is the creation of a small water lily flower. To weave it, the already known arc weaving will help you.
The flower should be made of glossy pink glass. Make the middle sunny. The base is made of 5 large and 4 small petals. Make an axle out of 5 pieces and tie it in a loop. The stamens will be yellow. String them 5 pieces at a time. Photos and diagrams can be found on the portal. Weave 2 buds.
If this doesn’t seem enough to you, make closed buds with your own hands. We will need pinkish glass, from which we need to make 4 petals. The stamens will be sandy and pink in color. Let's use the loop method again. Roll them up and twist their petals in a circle. If you want to create a closed flower, use pinkish and emerald beads. Create 3 emerald petals with an axis of 4 glass and wrap two buttonholes in a circle. Let one be the same size, but pinkish in color. Wrap the emerald parts around the pink ones, twisting the whole thing into a beautiful bud.
The turn of our water lily leaves has come. The axle will consist of six pieces of base material, which will wrap it with six buttonholes.
Now the water lily needs to be fixed on the lake. To do this, we need a steamed gel candle. Pour the resulting liquid onto a rocky surface and wait until it becomes thick. Immediately put our water lilies with leaves into it.
Our master class and beadwork can be considered complete, and the beaded wisteria is completely ready. In this lesson, all the phases of creating beautiful wisteria with your own hands were described in detail. From creating branches to securing the craft into a pallet. We considered options for decorating the product.
This procedure is very time consuming. But the result is simply amazing. Real flowering beaded trees will appear in your home, which will add a little touch of beauty to your abode. You can show it to those people who have never seen wisteria with their own eyes.
After this lesson, you can easily make beadwork of other various trees. After this, they will seem like an easy task to you.
Crafts trunk
When the branches with leaves and flowers of the tree are made, you need to assemble the element connecting them - the trunk.
- To do this, you need to take 4 elements - two branches with flowers and two with leaves, then twist them together.
- The next branches should be larger. To do this, you need to take some kind of rod or thick wire, and attach 2 collected branches to them.
- To assemble the next branches you need to step back about a centimeter. Then 4 pieces are attached at the same time, not two.
- To disguise the trunk, you need to wrap it with green floss threads.
- The largest branches on the wisteria trunk should be 4 pieces.
For the fifth one you need to make several small branches and collect them together.
Preparatory stage of beading
Before purchasing components, you need to select an image of a tree. If you are new to beading, take the option with a small number of elements as a basis.
Next, we make calculations and weaving patterns. On the selected sample, count and write down the number of branches and leaves, make a graphic drawing. Make a list of everything you need.
Assembling the craft
The most important stage is assembling the craft.
- You need to take two branches, which consist of 6 branches, screwing them to the trunk. This way the top of the plant is collected.
- Below the top you need to secure another branch, which consists of another 6 elements.
- As the craft progresses, the trunk needs to be wrapped with floss threads, especially paying attention to the joints so that they are well hidden by the threads.
- Next come large threads of six and eight branches. They are attached like this: a large branch, then a small one, then a large one again. The barrel is also precisely wrapped with threads.
- Once the craft is assembled, all that remains is to figure out where to put it. To securely fix it, plaster or wood is suitable.
- If the wisteria stands on a wooden stand, then it will serve as the final option.
- For gypsum, it is better to choose some kind of container and pour it into it to harden.
Forming a pallet
An important part in our tree is the diagram for creating a stand. To do this, you can use either a piece of wood or a plaster solution. If you don’t want to smear the main part of the wisteria, then cover it with a cloth or shiny paper.
First of all, lubricate the stem with alabaster and glue, spread it with your own hands. Brush well in hard-to-reach places. Let your craft dry a little aside. Use brown paint to open the trunk after drying. Go over the brush carefully so that there are no white spaces left. Wisteria is placed in a tray and decorated with decorative material.
After the work has been done, remove the protective material and straighten the branches thoroughly so that they are smooth and voluminous. Tilt it slightly to make it look like the original.