Beaded birch is an ideal object for the freshly-made handmaker. It does not require a large amount of material, and such a product is easy to weave. During the master class, the beginner gains initial skills in working with beads and learns the basic steps for making trees.
Green birch is an ideal option for learning. The ability to make and combine the main parts of wood, forming a plaster base for it, will allow you to proceed to more complex products in the future.
Rules for beginning craftswomen
There is a wide variety of options for creating this tree: it can be summer, winter, or autumn-spring. This is a step-by-step instruction on how to create a summer birch tree, which both beginners and experienced craftswomen can handle.
The big advantage of this kind of work is that there are no complex elements or details, and only a few shades of beads are needed for the work.
Preparatory stage
All materials presented in this master class are designed for a tree approximately 25 cm high. Of course, if desired, it can be made of any size, but the main thing is to correctly calculate the materials.
To create it you need the following:
- Mixed beads: need light or bright green shades.
- Pink and yellow beads for decorating individual parts of birch.
- Thick wire or wire to create the base of the trunk.
- Wire with a diameter of 0.3 mm for creating branches.
- Acrylic paints or gouache in black and white shades.
- Primer.
- Gypsum.
- Floss threads in green shades.
- PVA glue.
- Acrylic lacquer.
- Decorative container for wood.
- Alabaster.
Color selection
By making graceful green leaves, you will have a spring or summer beauty. Replace the color of the beads with golden shades, and a birch tree will show off in a prominent place, in a colorful autumn outfit.
Note!
- Crafts from beads - TOP-160 original ideas for creating crafts with your own hands. Bead weaving patterns for beginners with photo reviews
- Butterfly from beads: TOP-100 photos with simple patterns for weaving a butterfly with your own hands. Unusual bead ideas + step-by-step master class
- Weaving with beads - instructions for making it yourself. Clear weaving patterns and technology reviews + photos of finished work
Well, using a white shade of beads will allow you to get an illustration for Sergei Yesenin’s poem:
"White birch
Below my window
Covered with snow
Like silver."
Formation of branches
First you need to weave birch branches from beads. For them, it is necessary to cut 0.3 mm wire into pieces 30 to 40 cm long so that the branches turn out different. Next you need to weave the branches according to the pattern:
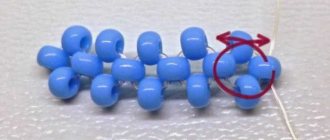
You need to put eight beads on the wire, make a loop and twist it several times. After the first loop is made, put eight beads on the same wire again and twist it several turns, connecting it to the first leaf.
Next, you need to continue weaving until the required number of leaves is reached. When the required number of woven parts is achieved, you need to twist the wire and cut off the excess ends. In these instructions for creating birch from beads, you need to remember that the number of branches must be a multiple of three.
When everything is ready, you need to make large branches from the resulting twigs. To do this, you need to connect all the parts in threes. After this, the top of the tree is assembled from large branches. The triple branches twist together again.
From ancient times
Many peoples treated the beautiful birch with special respect. Among the Celts, Slavs, and Finno-Ugric tribes, birch was revered as a cult tree. For all these northern peoples, the tree became a symbol of the transition from spring to summer and, in general, from death to the resurrection of nature.
In northern Sweden, the Birch Day holiday is still celebrated at the end of April. The Scandinavian goddess Mother Earth was associated with the birch tree among the inhabitants of the peninsula.
It was customary among the Celts to bury their dead in hats made from birch bark.
One of the runes of the Germanic alphabet means birch branch.
In folk medicine, decoctions of birch buds and catkins are still used to this day to treat:
- diseases of the cardiovascular system;
- gastrointestinal tract;
- tuberculosis;
- anemia;
- various skin diseases.
It should be noted that modern medicine does not deny the medicinal properties of birch decoctions.
Furniture made from Karelian birch belongs to the elite segment.
Note!
- Beaded trees: beautiful and unusual DIY beadwork. Detailed diagram of tree weaving + photo examples of finished work
Beaded keychain: patterns for beginners with a step-by-step master class. Weaving techniques + photo reviews of the best keychain ideas
Beadwork for beginners - step-by-step instructions for weaving with beads with your own hands. Tips for beginners + photo reviews
Decorating crafts
After the product has dried, black and then white paint is applied to it. The stand can be decorated with beads: drops of glue are applied to it to hold the beads.
For beginners, this option is also suitable: you can make small holes in the stand and stick branches of beads into them. This is where pink beads come in handy.
Video instruction
This video shows how to make a birch tree craft with a lamp. This craft is also available for beginners.
In this article, you learned how using the beading technique, birch turns into a real masterpiece. This is not only a decoration for your interior, but also a night light. Are you into beadwork? What products have you already mastered? Was this article helpful to you? Write in the comments.
Products made from beads captivate with their splendor and originality of execution. It's not just jewelry and paintings. Beads are used to create a beaded tree. Crafts made with careful adherence to the instructions look extraordinarily beautiful, fit perfectly into the interior, and can become a wonderful gift.
A complex version of making birch
If the previous bead tree turned out easy, you can try another option for creating a birch tree, a little more complicated, but just as interesting as the previous work.
On the Internet you can find many master classes on birch from beads with step-by-step photos for beginners, or try the following option on how to make a birch from beads.
Nuances of weaving autumn and winter birch trees
In order to make an autumn birch, just select bugles of the appropriate color: yellow, orange, lemon, brown, a little green. Everything else is performed exactly the same as in the previous master class. The decor for the clearing is also selected in an autumn theme.
The crown of winter birch is made using a completely different method. Iced branches are devoid of leaves; their imitation requires a different approach.
For a tree caught in frost, you will need small white, silver and transparent beads, as well as thin silver wire. Before work, the glass beads are mixed and strung in random order.
Scheme of weaving branches of an icy crown:
- 12 beads are strung on a wire. One remains free, and either end of the monofilament is pulled through the rest in the opposite direction. You get two tails, the length of which is 15–20 cm.
- Take any free end of the wire, onto which 12 more beads are placed, and the pulling operation is repeated.
- The edges of the monofilament are connected, and 8 beads are strung on them.
- One of the metal threads is bent and 20 beads are put on it, the wire is pulled in the opposite direction to the middle of the row.
- Another 9 pieces of glass are strung on the same edge, and the thread is brought back, first through 8 beads, and then to the adjacent edge of the wire.
- The ends are connected again, glass beads are strung on them, and branches are woven again.
In this way, patterned branches are created, covered with frost. For the top they are made short, for the lower rows they are woven longer. To decorate a winter meadow, it is better to use decorative white sand, which is poured over a layer of glue.
Materials for work
To create a birch tree from beads with your own hands you need:
- Variety of green shades of beads.
- Thick wire or wire for the base.
- The wire is a little thinner for branches.
- Acrylic lacquer.
- Gouache or acrylic paints.
- Floral ribbon.
- Alabaster.
- PVA.
- A stand or container for the finished product.
Forming tree branches
To form branches, you need to put eight beads on the wire and twist them several turns. This will be the tip of the branch. After this, step back one centimeter on both sides from the center and put seven beads on the wire again, again creating loops. Continue until there are six loops on each side, twisting the ends together.
For the top of the tree, you need to make at least fifteen branches, each of which has nine loops. For everything else - fifty-five branches with eleven loops.
Creating a Crown
Next, the branches need to be connected to each other. Connect branches with nine loops in triplets and in the same way connect branches with eleven loops in triplets.
In total, there should be five branches for the top and nineteen for the rest. Using threads, baste a thin wire to them.
Trunk
The next step will be the formation of the main part of the tree. Take copper or aluminum wire of the largest possible diameter. The tops, branches and twigs of birch are attached to it.
Using tape and adhesive tape, the trunk is “thickened”. Then follow the step-by-step instructions:
- mix alabaster with glue and dilute it to the consistency of medium thick sour cream. Using a brush, apply the resulting solution to the “trunk” of the tree;
- wait until it dries and apply a second layer of alabaster.
Important! The mixture must harden for at least six hours.
Forming the base of the tree
You can make a double birch, it will require two trunks. Double birch looks very beautiful; on the Internet you can find many photos of double birch beads.
For such a craft, you need to connect three branches in one part, and twist two branches together in the other part. This way you will get two tops. The two tops are wrapped with thread, and wire is attached to them.
After this, you need to attach the branches one at a time to the wire. For the main trunk, you will need three branches for the main part and twelve for the rest. For the second trunk you will need two branches for the top and seven branches for the rest.
Useful tips for beginners
Making a frame of branches from wire of different thicknesses gives the product a more natural look. When forming a crown from thin loops with stringed beads, when large branches are assembled from segments, it is necessary to twist the wire in one direction.
First, the finished loop petals are knitted in pairs, then the third and several subsequent ones are screwed to them.
It is advisable to mix beads of the same color, but different tones, in one container so that the order of their stringing is arbitrary. Iridescent shades will create the impression of leaves of a living tree moving in the wind.
Putting all the parts together
The trunks need to be fastened to each other using floral tape or floss threads. The base of the trunk should be slightly larger than the second. Line the tree container with polyethylene.
Dilute alabaster with water until a viscous consistency is obtained. Place the tree in a mold, secure it to its base and fill it with the resulting mass. Wait until the consistency hardens, then remove the wood from the mold and remove the plastic.
Mix alabaster and PVA glue in equal parts, you can also add a small amount of water. Apply the resulting consistency to the trunk and branches in several layers.
Before each application of the next layer, it is better to wait until the first one has dried. Use a knife to score the wood so that it looks real.
How to make it yourself
Making a birch tree from beads begins with the crown, which consists of many branches. Therefore, at the first stage, a large number of small parts with leaves are made.
Leaves
Weaving trees begins with making leaves. They are made using the air loop weaving method on wire with a cross section of 0.2–0.25 mm.
The beads are strung on a wire, and small loops are made at a distance of about 1 cm from each other. These will be the leaves.
Each loop contains 7 beads. The number of leaves can be different, it depends on the length of future branches: for the top they will be shorter, for the bottom - longer.
When you have the required number of leaves, you need to fold the branch in half and twist the wires together.
The work is not difficult, but painstaking. About 150 of these small parts are required. The tails also twist.
Assembling twigs
When the required number of small branches is ready, they begin to twist them together in 2-3 pieces, forming bushes of medium length.
Double and triple branches are wound with sewing threads to a wire with a diameter of 0.8–1 mm. The winding is carried out along a length of 2–2.5 cm. In order for the work to look attractive in the future, this must be done very carefully.
Formation of large branches
To make large branches when beading birch, use wire 1.5 mm in diameter.
The scheme for the formation of large branches is as follows:
One middle branch is taken, a thick wire and another branch are applied to it. They are connected together with a thread.
An indentation is made below 1–1.5 centimeters and a third branch is attached. The tail of the structure is carefully wrapped with thread or floral tape.
When manufacturing, all parts of a birch tree must be made different.
Connecting all the parts
Assembling the tree starts from the top and continues in a circle. At the very top one of the shortest branches is attached, a few more (from 2 to 4) are wound a little lower.
To strengthen and thicken the trunk, take a piece of wire with a diameter of 5 mm.
The entire structure is tightly wrapped with thread or floral tape.
The next branch is attached 5 centimeters below the previous level. The barrel must be wrapped with thick wire.
Next, the formation of tree roots occurs. At the bottom of the structure, the ends of the wire move apart to form a kind of stand.
When working at this stage, if there is no floral tape, it is better to take iris threads, they are stronger and thicker than sewing threads. To thicken the trunk of a birch tree 30 cm high, you will need at least three pieces of thick wire.
Working with the trunk and forming the base
The last stage of work is no less important. It includes “planting” the tree and decorating the trunk.
Scheme and features of DIY decorating work:
The container, which will be used as the form of the future base, is filled with a plastic bag. Alabaster or gypsum is diluted with water until it becomes a not too thick sour cream. The mixture is poured into the prepared container, then the tree is installed in it. It must be secured so that it does not fall or tilt.
After the mixture has hardened, the birch tree will need to be removed from the mold.
A thick mixture of PVA glue and alabaster is made, and then applied to each branch with a flat brush. After the first layer has dried, the branches are covered with the mixture again.
Using a toothpick or a sharp stick, grooves imitating bark are applied to the surface of the trunk. It is better to do this work in the evening and leave the product overnight so that the surface dries thoroughly.
When painting a surface, white paint is first applied. After which you need to wait two hours for it to dry thoroughly. Then, using a dry, wide, hard brush, black paint is applied to the barrel in dotted strokes.
After drying, the stand (bottom and sides) is painted over.
The clearing can be decorated with moss, beads, small pebbles, and special decor (ready-made birds, mushrooms, benches). After which the entire product is coated with acrylic varnish, and the branches are carefully straightened.
Making a plasterboard stand
There are more interesting options for making a base; they are more labor-intensive, but the result is impressive. For work you will need drywall. It is in this way that voluminous “roots on stones” are made, which have their own special beauty.
Method for making a plasterboard base:
- The desired shape is cut out and coated with primer.
- The place where the tree will be attached is determined, and thick plaster or putty is applied to it.
- The roots of the prepared model must be placed evenly and carefully in the putty.
- Another layer of thick mixture is applied on top. The desired shape is given.
- After the stand has dried, you need to decorate the model.
- Mix plaster and PVA glue in a 1:1 ratio. A little water is added to the mixture. The composition is applied to the branches. An imitation of bark and thick roots wrapping around the “stones” is made.
- Painting with white and black paints.
At the last stage, various decor is pasted. If you need to attach small flowers, then use a thin drill to make holes in the stand for them, into which glue is poured. For a larger stand, you will need several layers of drywall.
This method is very popular among specialists who make bonsai from beads. Using drywall, they create real rock foundations, with powerful roots and miniature trees clinging to them.
Final stage
Finally, the wood needs to be painted. The branches are covered with white acrylic or gouache. After they dry, you can paint the stripes using black acrylic.
You can create hills and depressions on the stand using polymer clay, or simply sprinkle it with beads as in the previous version. At the very end, the product can be coated with acrylic varnish.
