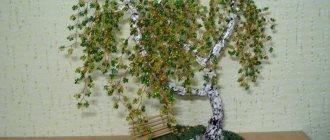
Home » Flowers » Delicate beaded daffodil
Flowers
Irina Vyshivaikina 07/17/2019
1
A bouquet of daffodils can lift your spirits even in cold weather. And the daffodil, which never withers and shimmers with all the colors of the rainbow in the sun, will improve your mood all year round. In this article you will learn how to weave daffodils from beads. The technique is quite simple, even beginners can handle it.
Preparing for work
Looking at photos of beaded daffodils on the Internet, you probably noticed that the middle of the flower and the petals look different for everyone. In our case, there will be no complications; the flower will look very beautiful in three colors - yellow, green and red. But choose for yourself what you like.
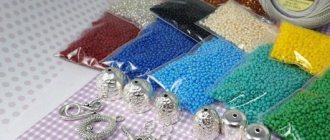
You need to purchase working materials:
- yellow, green, red beads
- wire
- green floral ribbon
- wooden sticks (toothpicks)
- gypsum
- pebbles
- pot
- scissors
The process will take place in this order:
- Core (yellow and red beads).
- Petals (yellow b.).
- Leaves (green b.).
Beaded daffodil Beaded flowers – Beads
Author of the competition work: Yulia Galimova
Spring has already arrived and the first flowers will soon begin to appear. I want to share a master class of one of these spring flowers with you. And this flower is a narcissus.
Materials https://handmademart.net:
- Chinese white beads - Chinese yellow beads - Chinese orange beads - Chinese green beads - white wire No. 0.3 - green wire No. 0.3 - thick wire for the barrel
- green floss threads
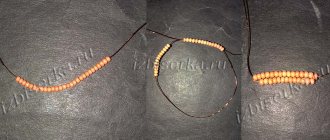
Flower: on a 55cm long wire. let's make a loop. (Fig. 1) One end of the wire is approximately 4-5, the other - 45. On the short end, this will be the axis of the petal, we collect 8 beads. (rice.
2) We put beads on the long end of the wire and screw it one turn to the axis in this way: the wire from the arc lies on top of the axial one, then goes under it and after a turn returns on top of the axial one. (Fig. 3,4) At the same time, keep the axis straight. We collect beads again and screw another arc parallel to the made arc. (rice.
4.5) Please note that after twisting the wire goes down parallel to the previously made arcs. For the flower we need to make 6 petals with an axis of 8 beads and five arcs.
Now let's start making the middle of the flower. We string it on a 50cm long wire. 25 beads (8 yellow, 9 orange and again 8 yellow) (Fig. 13). Make a loop and flatten it a little. (Fig. 14) We string the beads again and make a new loop. (Fig.15,16)
We will need to make 9 such loops. (Fig. 17) Next you will need to connect our loops. (Fig. 18) Now we connect the wires into a ring, (Fig. 19, 20) we twist the wires that were at the base, and we also twist and cut off those that connected the loops. (Fig. 21) Next, we compress the base to get a kind of bell. (Fig.22)
Leaves: take a wire 90-100cm. and make a small jam so that the beads do not roll off the wire. (Fig. 23) Next, we put 34-35 cm on the wire. green beads and make a loop. (Fig.24,25)
Now, we collect beads again, but 1-2 cm more than the previous value and make another loop around the loop. (Fig. 26, 27) To prevent the leaf from falling apart, we connect the wires with beads on the top and bottom of our leaf, in the same way as we connected the middle of the flower. You only need 2 of these leaves. (Fig. 27, 28)
And finally, we begin to collect our flower. First, take 3 white petals and connect them with wire. (Fig. 29, 30) Between them we add the middle (Fig. 31) and one by one we add between the petals, other petals (Fig. 32, 33)
Now we wrap our flower with floss threads to the trunk, i.e. to thick wire. (Fig. 34, 35) when about 3-4 cm remains until the end of the stem, add leaves. (Fig. 36) To prevent the thread from unraveling at the end, secure it with wire or a small piece of tape.
All that remains is to slightly bend the wire near the flower (Fig. 38) and the daffodil is ready.
799
Source: https://biserok.org/nartsiss-iz-bisera/
Core
The middle of the flower consists of pistils and stamens. Our core will look like two colors - red and yellow.
- We string ten yellow beads onto a wire 30 cm long.
- Having formed a loop, you need to twist the wire several times. And so continue to string the beads, fastening the loops together.
- We weave five loops from yellow bugles.
- With twenty red pieces we repeat the same procedure of stringing and weaving with twisting, but in larger quantities - 13 pieces.
DIY beaded daffodils
Beautiful beaded daffodils are easy to make yourself. You can weave a flower that is quite complex in shape by following the step-by-step instructions below.
Materials
To make beaded daffodils with your own hands, prepare:
- beads of white, green and yellow colors, No. 8;
- wire, 0.3 mm;
- green thread;
- a small vase.
You can use smaller beads if you want to get miniature and neat flowers.
Step 1. Weaving narcissus petals
To make one daffodil petal, you need to take a wire and cut a piece 60 cm long from it. If your beads are small, take a smaller wire.
You will need to weave the petals using the counter-weaving technique, in rows:
- for the first row, string 4 beads;
- for the second – 5;
- for the third – 8;
- for the fourth – 10;
- from the fifth to the eighth row, string 12 beads in each row;
- for the ninth - 10 beads;
- for the tenth – 8;
- for the eleventh – 6;
- for the twelfth – 5;
- for the thirteenth – 3;
- for the fourteenth – 2.
This completes the weaving of the petal. To weave one flower, you need to make six such blanks.
Step 2. Weaving the daffodil corolla
To make a whisk, you need pieces of wire 30 cm long. A total of 11 such pieces will be needed. String 15 beads onto the first wire and move them towards the middle.
Bend the wire in half so that the middle bead remains on top of the bent wire.
Wrap the ends of the wire several turns so that the beads do not fall apart.
Take another wire and thread it through the seven beads of the already made workpiece. String eight more beads onto the free end. Bend the wire so that the first bead of the row remains at the top of the resulting loop.
Twist the ends of the wire of the second loop together again.
Make 9 more of the same loops.
To complete the corolla, thread the wire through the outer row, string 1 bead on it and thread the second end of the wire through the first row of the workpiece. Tighten the wire and twist its free ends.
Step 3: Making Narcissus Leaves
For one daffodil you need to make one leaf. You can do two. The leaves of the narcissus are narrow and long; they will need to be made from two halves using the counter-weaving technique. To make one half you need to take a wire 90 cm long.
For the first row you need to string 1 bead. From the second to the fourth row, take 2 beads, from the fifth to thirty-seventh row - 3 beads. The thirty-eighth row is the final one; for it you need to string 2 beads.
For the second half of the sheet, take the same piece of wire. Start weaving from the second row, immediately connecting the two halves of the sheet with wire.
Step 4. Assembling the daffodil
Take a daffodil corolla and attach three petals to it. Distribute them at an equal distance from each other. Attach three more petals, placing them between the top three petals.
Twist all the wires together. To make a stem, wrap the wire with green thread. Attach a daffodil leaf at the bottom and continue wrapping the stem until the end.
In the same way, make a few more flowers and send them to the vase. Your beaded flower arrangement is ready!
Source: https://RukiKryki.ru/biser/cvety-iz-bisera/3500-narcissy-iz-bisera-svoimi-rukami.html
Petals
They are made using French weaving. To study this technique in detail, you can watch the video here. Now let's look at the manufacturing diagram.
It's simple!
- You need to take a 50 cm wire and create a loop, string approximately 13 beads along the edges on one side, and 8 on the other.
- Next, we form arcs with beads and scroll them, as shown in the diagram.
- The arcs are formed parallel to each other and approximately 5-6 arcs are performed in a circle.
You need to make 6 pieces of petals.
Beaded narcissus
- To create a daffodil you need the following materials:
- - white, yellow and green transparent beads;
- - steel, yellow and green wire.
The daffodil is woven using the French weaving technique; one flower requires six petals. One petal consists of six pairs of arcs and a center of seven beads.
The composition also contains small flowers, which require smaller petals, where the middle will consist of five beads.
To decorate the flower, you need to weave the cores on yellow wire. For each loop you need about forty beads, we make twelve loops in total to get the following design:
We compress and align the middles.
We sew the fabric of the loops in the center of the workpiece so that they are pressed against each other.
We connect everything into a tube and bend the upper edges of the loops to form the inside of the flower.
Let's make stamens for the daffodil, the height of which should be no more than six beads:
For the composition you need to make three large buds from petals, in which the central axis consists of seven beads, and wrap them in a spiral:
The leaves for the buds are also made using the French weaving technique, where ten beads are placed on the axis and three pairs of arcs go on the sides:
Wisteria from beads: master class with photos and weaving pattern. Step-by-step instruction
Master class from Natalia (Natka_M)
Greetings to all lovers of beadwork. I offer you a master class/instructions for making wisteria “The Tale of Wanderings”. I do not claim the authorship of all the techniques and techniques used. Many useful tips and diagrams are collected on the vastness of this site and the Internet. I put everything together and added tips from myself. You will need: 1.
Beads for green leaves (2 shades: light green transparent, yellow transparent with a blue line inside - green effect) 80-100 g.2. Beads for brushes lilac (light lilac matte mix, dark lilac matte mix, light lilac transparent, dark lilac transparent.) 60-80 gr.3. Beads for lilies pink glossy 15 g.4.
Beads for lilies yellow glossy No. 12 5 gr.5. Beads for lily leaves green melange 10-15 g.6. Wire for beads 0.3 mm silver, green.7. Rods for barrel 0.5 mm, 1 mm.8. Floss for winding to match the color of the barrel, 2 skeins.9. Architectural gypsum.10. PVA glue.11. Acrylic paints, colors.12.
Gel candles (yellow, green, blue - to choose from)13. Glitter.
14. Moss, decorative sand, grass, stones.
• Beads are strung on a spool and green tassels are woven according to the pattern. You need to weave about 70-80 green tassels. The number of loops in different brushes can (and should) vary so that the brushes turn out to be different sizes.
Lilac tassels are woven in the same way, only the loops do not bend outward. You need to weave about 50-60 tassels. (“Brushes for wisteria” Fig. 1-8)
• We begin assembling the branches of the “first order” 1P. Take a brush and attach another brush to it at a distance of 0.5 mm; 1 cm; 1.5 cm in any combination of three threads of floss. We collect all the woven brushes into branches (1P) of 2,3,4 5 pieces. (“Assembly” Fig. 1,2,3) • We begin to collect “second order” branches (2P). We use 0.5mm rods. We attach one 1P branch to the rod, wrap it with floss, attach the second one. Here it is entirely your imagination and creativity, what combinations of branches to make. (“Assembly Fig. 4).• We will have 4-5 main branches. We collect the branch like this. We take a 2P branch, place it on a rigid rod (1 mm) and attach 3-4 2P branches to it at a distance of 2.5/3.5 cm. The third-order branch turns out to be long and quite narrow. (I didn’t take a photo, sorry!) Two branches should be large, the other two smaller. As a result, there should still be a number of unused branches of the second order. They are needed for the final correction of the shape.• We beautifully bend large branches, apply them to each other and if you like the bend, fix the joints with floss. We bend the barrel in different ways to achieve natural turns. Let's look at our tree. Now you can use the remaining branches and carefully wrap them, filling the gaps and voids. Don’t forget to record all intersection points. (“Assembly” Fig. 5,6,7,8)
If the result is satisfactory, we move on to the filling stage.
• Find a suitable container for filling. We should have room for a tree and still have room for a pond. You need to prepare the place where you will beat off the edges of the plaster. Hammer, chisel, polyethylene bag. Dilute plaster with water to the state of liquid sour cream. The one in the photo is a little thick, I had to work VERY quickly. Pour it into a container, quickly level it, and plant the tree. Using a spoon, we “raise” the gypsum to the tree, forming a slide. Using a bag, we make a hole in the plaster under the water. I advise you to think about the shape of the reservoir in advance, form the banks and bottom. You must act quickly and carefully before the plaster hardens. (“Filling and coating” Fig. 1,2,3) • We wait for the plaster to set. Without haste, we carefully remove (I took it out by the trunk) the tree from the bowl. We put it in place to form the base. We beat the edges with a hammer and chisel. This can be done carelessly, then the chips will be beautiful. But you need to work gently so as not to break off an unnecessary piece and split the entire base. In the first tree I laid out my base...("Filling and Coating" Fig. 4.5)• The next stage is coating the trunk. We dilute the mixture of gypsum and PVA approximately 1:1. We begin to gradually coat the branches. We coat thin branches with more liquid, the trunk and base with thicker, forming bends and irregularities. The thinnest branches (1P) do not need to be coated; let it remain possible to bend them. You just need to coat the junctions of the branches. (“Filling and coating Fig. 7,8,9)
Lena Vorontsova | Profile
Master class from Olga Tomas. How to make any concrete fence beautiful using sculpting.
1. 2. 1.A drawing is applied to the plastered wall using a palette knife with a solution of CEMENT 0.4+GLUE FOR TILES 0.4+ SAND 0.2 3. 2.Prime the walls with a primer for facade work. 4. 3.Paint the entire surface with cream-colored acrylic facade paint. 5. 6. 4. Apply several other shades one by one to emphasize the sculpting. 7. 8. 9. 10. 11. 12. 13. Here
read more "
Joke
- Let's go to the bar, have a drink, pick up some girls, have sex! - What, right in front of the girls?
read more "
Joke
Three prostitutes are sitting on a bench. A new Russian comes up to them and says to two: “You and you.” And the third says: “Can I?” Can? Oh please? Can I do it too? Well, okay, so can you!!! F*cked off the bench)
read more "
Decorative skirts for the Christmas tree
marthastewart plaidonline hautelook ortsov plumperfectandme.blogspot neimanmarcus bhg potterybarn chicagolostandfound anwjohnston.blogspot michaels redheart homedepot MandaleighDesigns, etsy Source: https://hmhome.ru
read more "
Miracles of makeup – Makeup artist Vadim Andreev (part 2)
In the last publication, we introduced you to the skills of makeup artist Samera Khouzami, who is fluent in the art of makeup. And now we invite you to look at the results of the work of makeup artist Vadim Andreev from St. Petersburg, who showed no worse
read more "
DELICATE PEACH BLOUSE
read more "
A huge selection of knitted foot decorations. Ideas+schemes+mk
Little master class: Let's move on) Crocheted leg chain Decorated with small shells, sequins, beads and bugles! Before this, it is simply crocheted from melange ribbon. Tip: this chain can also be crocheted on vacation. In addition, for knitting you can
read more "
Joke
Teacher in class: - Children, name a word starting with a letter... And, looking warily at Vovochka, she finished: - The letter “X”, which does not have the letter “U”. Vovochka answered instantly: - Dick!
read more "
Geography
In the state of Togo, a man who compliments a woman is obliged to marry her.
read more "
DIY friendship bracelet made from floss threads
Nowadays, friendship bracelets have not lost their relevance, because friendship and love are eternal values that cannot be bought with money. As an accessory, friendship bracelets go well with jeans, bright dresses and hippie sundresses and are great to wear.
read more "
Fairytale snail house
read more "
Ring made of pearls and wire
In order to make such a stunningly beautiful and simple ring with your own hands, the author of which is the wonderful master Carol Ladine, you will only need wire and a couple of beads. Of course, in addition to the necessary materials, you will also need tools. You cannot do without thin-nosed pliers, round nose pliers and wire cutters. To make your work easier
read more "
My advice:
Tulle curtains can be washed in a washing machine after sewing them into a bag or pillowcase. And to prevent the curtains from twisting into a knot, the edges need to be basted to the pillowcase.
read more "
The world's largest virus has been discovered
Megavirus chilensis, found off the coast of Chile, has the longest viral genome ever sequenced. The discovery sheds light on the intersecting evolutionary paths of viruses and cellular organisms. The virus, extracted from sea water, is larger in size than many bacteria,
read more "
Joke
Izya comes to visit his neighbor Abram. And he rips the wallpaper off the walls. - What, Abram, are the repairmen up to? - No, we’re moving.
read more "
Animals
Giraffes can't swim.
read more "
Geography
Ulaanbaatar (Mongolia) is considered the coldest capital in the world.
read more "
Geography
In 1991, a monument to the ax was erected in Canada on a concrete pedestal. The weight of the monument was 7 tons.
read more "
Miscellaneous
A 23-year-old girl fainted in adolescence, after which she spoke 120 languages, many of which are already dead. She explains this as a memory from her previous lives.
read more "
Master Class. Wreath with peach flowers made of foamiran.
Parallel weaving technique
In this section we will look at another weaving option. This method is called the parallel weaving technique. You will need a lot of patience and perseverance, but the product will turn out neat and even.
For this you will need:
- beads (white, green, orange and red);
- wire (it is advisable to take a diameter of 0.3 cm);
- good light (you must do your crafting under good light. It is better that it is daylight, if this is not possible, then use a table lamp).
So, let's get started! Let's start our work with the petals. The whole process must be done according to the attached diagram:
Take the wire and use white beads to weave according to the pattern: one, three, six, eight, ten, twelve (do the algorithm three times). To make a small petal, use: tenth, eighth, sixth, fifth, third, second patterns (repeat three times). To make a large petal, use: twelfth, tenth, eighth, fifth, third, second.
For one medium daffodil you will need three small and three large petals. For the core, take a 60 cm piece of wire and place 1 green, 1 red and 3 yellow beads on it.
Now let's move on to the core. We take a thread of wire 60 cm long and put 1 green, 3 yellow, 1 red and 3 yellow beads on it. Pass the end of the wire through the first bead. Place 5 red beads on the working wire and pass the end through the top red one. To make sheets, just follow the suggested patterns: 12-10-8-5-3-2 (65 times); 10-8-6-5-3 and 2-4-7-10-12-14 (3 times); 1-3-6-8-10-12 (2 times).
All flower details are ready. Carefully assemble all parts. Our charming product is ready!
Beaded daffodils
Today's master class is dedicated to the spring flower daffodil. Many gardeners value this flower for its tenderness and fragile beauty. So let's make blooming daffodils from beads that will delight us with their beauty at any time of the year. You can see a complete description of how to make a daffodil from beads in this master class.
- To weave daffodils from beads you will need: beads No. 11 wire in diameter. 0.3 mm white beads - 100 g green beads - 80 g yellow beads - 40 g thick wire for assembling stem thread floss or iris or green floral ribbon.
For one flower you need to weave 6 pieces of these petals from white beads. Weaves in arcs. On the axis of 7 bis we make 6 pairs of arcs. The leaves are trailing pointed
For a smaller flower, we also weave 6 pieces of white leaves, but we make 5 pairs of arcs.
Stamens and core for beaded daffodil
Now we make the stamens for our flower. The stamens are made from matte yellow beads. We make bead stamens 5-7 beads high.
We are weaving the core for our flower. For larger flowers, loops are woven in the amount of 12 pieces, 40 beads in each loop.
We align and compress each bead loop (you can stitch it if desired). We connect it into a tube and bend the ends.
Beaded narcissus bud
If you want, you can also make buds for our beaded daffodils. We make them from large leaves with 6 pairs of arcs on the axis. We wrap the leaf in a spiral and you get a bud like this.
For the bud we weave 3 more green leaves. We make the leaves narrow and pointed
there are 10 beads on the axis, and only 3 pairs of arcs. Then we attach them to the bud.
For each flower stem we will make one yellow leaf. There are 10 beads on the axis, 4 pairs of arcs.
Beaded leaves for daffodil
For the bouquet we make long leaves. The leaf should be made of 4 or 5 pairs of arcs, with 55-65 beads on the axis. We make the leaf sharp, since the leaf turns out to be long, we stitch it in two places. how to stitch a sheet
We've made the blanks for the flower, let's start assembling. We use thick wire as a stem, to which we attach flowers and buds. We wrap the wire and then attach our additional sheet of yellow beads closer to the bud, squeezing it around the wire. We arrange the bouquet as you please, you can simply put it in a vase.
This completes the master class on weaving daffodils from beads. Now you know how to weave daffodils from beads and you can weave a wonderful bouquet of daffodils. You can see the finished bouquet of daffodils in this photo album.
Source: https://izbiserka.ru/narcissy-iz-bisera/