Master class on making a “Pet Farm” model
Ekaterina Saenko
Master class on making a model “Pet Farm”
Dear colleagues! I bring to your attention a master class on making a model from plywood “ Farm ”.
I want to warn you right away that our pupil’s grandfather made us a house, a corral for horses and a fence. For which I thank him very much! I just gave these amazing buildings an aesthetic appearance. Look what I got.
To make the layout we will need:
-Glue (PVA, Liquid nails, “Titan”)
;
-Newspaper, white paper, napkins;
-Blue fabric;
-Felt (white, green, yellow)
;
-Pet figurines ;
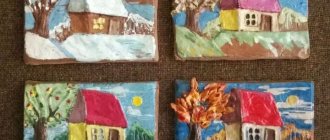
So, first I painted the house and the horse pen, which were made in advance, with gouache and varnished them.
Then these models (house, paddock)
I glued it to the plywood with Titan glue.
Let's start making trees . I used the papier-mâché technique. I drew stencils of trees on thick cardboard and cut them out.
Next, we cover our tree frame with newspaper, white paper and napkins using PVA glue. I waited until it was completely dry and started painting the trees, then I glued the leaves made with a stencil hole punch to the crown of the trees and coated them with varnish.
Gluing together a pen for pets . We paint it with gouache and varnish it, and then glue it to the plywood.
We sew a lake from blue fabric and fill it with padding polyester. We make decorative ornaments (felt water lilies)
and glue it all to the plywood.
We glue the trees to the plywood and cut out an artificial lawn in the shape of the plywood, to which we tie dandelions from floss threads. We cut a path from the house leading to the lake, fill it with millet, which we cover with varnish. We also glue all this to the plywood with glue.
We make reeds and line the lake with pebbles. This is such a beauty I got! Children love to play!
Summary of a comprehensive lesson on the topic “Farm. Drawing of domestic animals" for children of the preparatory group Program content: to develop an interest in the profession of farmer; expand the understanding of the work of rural residents; draw children's attention.
Master class on making a “Bedbed” model We came to the garden to see what was growing here. And various mysteries grow in the beds. Before we can solve the riddles, we need to assemble the garden bed. Master class on making a model of a roadway. Purpose: making a model for game modeling in working with preschool children. Children's interest in learning traffic rules. Master class on making a game model according to traffic rules Author: Anisimova Marina Aleksandrovna Educator, Municipal Budgetary Institution No. 162 “Olympia” Togliatti Purpose: Making a model for game modeling in. Master class on making a model from paper “Crocodile Nursery” Paper is the most accessible material for children's creativity. Original paper crafts are made on the basis of an accordion. I suggest making it. Master class on making a model “Primitive People” Master class on making a model “Primitive People” It is a tradition in our work that in kindergarten children should develop comprehensively. Master class on making a model of the “Russian Hut” Master class on making a model of the “Russian Hut” A review competition “Patriotic Corner” was announced in our garden. We decided for him. Master class on making a model of the “Fairy Tale “Mitten”” Master class on making a model of the Fairy Tale “Mitten” The model is both the result of constructive and creative activity and very attractive. Master class on making a model of the Solar System I present to your attention a step-by-step process for making a model of the solar system with your own hands. For work we need an ordinary hoop. Master class on making a model of the “Russian Hut” I bring to your attention a model model of the “Russian Hut”, for instilling in children respect for the history, culture, and Russian people. Work has begun.
Source
Requirements for a barn
The main requirement for livestock farming and livestock sheds is the availability of reliable and spacious premises. The inside of the building must be dry, clean and warm. According to established standards, the walls of the building must be at least 2.5 meters in height, and the roof - 3.5 meters close to the ridge. In addition, the building must be equipped with a ventilation system; window openings must be made slightly higher than the animals’ heads reach, so that daylight can enter the barn.
If these requirements are met, it is possible to make a good profit regardless of the period of the year. The owner of the farm will have to care for the herd, milk the cows, keep animals for meat, and sell the skins. This will ensure a stable material income, since these products are always in demand. To increase profits, you can expand your farm over time.
DIY toy farm, or making childhood dreams come true again
Hello, dear readers of the Domovenok-Art blog! I think there are very few people in the world who are indifferent to toys (even as adults). After all, we were all once children, and many of us not only received toys from adults, but also made them ourselves. As a rule, such toys were more expensive than all others.
When children appear in the house, there is an excellent opportunity to remember past skills. You can make, for example, interesting toys from cardboard
with your own hands.
Which? Ask the children what they want; they have plenty of imagination. So our idea generator (already known to regular readers of the blog, the author of the idea of an electric elevator is our son Sasha) dreamed up a toy farm
. True, for us it’s not just a toy, but almost a simulator for a real farm (he’s developing such a business plan here, but no one will talk about it :)).
Choosing the right place
To build a farm for cows without any problems, you need to choose the right piece of land. This should be a flat and well-trodden area. The presence of a small forest belt near the mini-farm will protect animals from drafts and/or strong winds.
Natural reservoirs and/or sources of drinking water, according to the legal norms of the relevant laws of the Russian Federation, must be at least 30 m away from places where mass livestock are kept, otherwise the owner may be fined a large amount. In this case, the mini-farm will have to be moved to another site.
An equally important point is the absence of residential and/or other buildings near the place where the mini-farm will be set up, cattle - this is an inevitable unpleasant smell. You should not create discomfort for residents of nearby settlements. On its own site, a mini-farm for cows is set up closer to the place where fruit and vegetable crops are planted. This will make it easier to use manure to fertilize the soil. A modern farm should be located at a distance of 15 meters or more from a residential building. Additionally, the main wind direction in the region should also be taken into account.
To build a farm for cows without any problems, you need to choose the right piece of land
DIY toy farm, master class
The preparatory stage of creating a toy farm with your own hands
The most difficult thing in creating this cardboard toy is making the truss. Therefore, I have already solved this problem especially for you and am offering my ready-made solutions. Here we will have 2 buildings: the toy farm itself and the farmer’s house. The scan is presented in PDF format and is intended for printing on A4 sheets.
Since the truss is quite a decent size, then, naturally, everything does not fit on one leaf, so on some sheets there is a fairly decent amount of overlap. This is done in order to accurately align all the parts. So don't be surprised.
I numbered all the parts of the toy farm, and their locations are marked on the general diagram. The places that should be glued to each other are also marked with letters.
The farmer's house is a separate object, its parts can be found at the end of the document.
So, let's print out the templates. We find sheets No. 1 and 2. We cut out the objects and join them (be sure to look at the overall layout), trim where necessary, and then glue them together. Now we glue the part from sheet No. 3 to this blank using the same algorithm. And so on. Until you have assembled the entire circuit.
In the development you will see a separate roof (letter A). We cut it out and glue it to the corresponding part (it turns out to be layered on a completely different part of the truss, which is why it was not possible to place it on the development itself).
Now carefully glue our thin scan onto the corrugated cardboard using a glue stick. We took what we could find, i.e. laminate packaging. I had to glue several sheets together into a single whole. It is better, of course, for the corrugated cardboard sheet to be solid.
This is what our scan looks like, glued to cardboard.
Making a toy out of cardboard
Further work will be almost jewelry-like, because... we need to carefully cut through all the windows, doorways, and also cut out the toy template itself from cardboard. As a result, we get the same scan, only this time dense.
Now let's work on the folds. Using a crease (in Russian, an object for bending. I showed you how to replace it here ) we go along the lines of our future toy farm, bending first inward, and then along the resulting fold - outward (with the corner towards us). Dotted lines indicate inward fold.
It's time to assemble the toy farm. I did this using double-sided tape, because... I didn’t want to soak the already delicate corrugated cardboard (and it would be faster this way). We start with the elements under the letter B, then C, etc. Find 2 identical letters and connect them.
Where the roof of the chicken coop meets the roofs of neighboring buildings, you may have to saw (or rather trim) a little more of the triangles of these buildings. It all depends on the thickness of the cardboard.
Assembling a farmer's house
Well, everything is much simpler here, although we designed the house to be two-story, well, to accommodate the whole farm family. The assembly principle is similar. The entire roof didn’t fit on the A4 sheet, so I placed it on a sheet that also had a balcony printed on it. We just cut out these pieces and stick them on our house. We glue all the parts to cardboard, cut out the windows, doors (I didn’t cut out all the window openings to make the structure stronger, because we also need to insert a balcony).
We will fasten the balcony in the slots indicated in the figure. When assembling the house, we first cut out all the places, and then fasten the house with double-sided tape. The balcony floor will run through the entire house and stick out 5mm from the outside. There is no need to glue here. But it is better to fix the side parts of the balcony from the inside using specially left tails.
Sensory box "Antarctica"
Very often, the concepts of the Arctic and Antarctica are not distinguished at all. I myself, until I started studying geography with my daughter, was firmly convinced that a polar bear and a penguin were swimming somewhere on neighboring ice floes, which is exactly how they are often depicted in pictures. Maybe, of course, for a three-year-old child there is no fundamental difference, but I decided that since it was time to educate myself, it was right to do so (so that later I wouldn’t have a mess in my head, like my mother), so we had a separate box dedicated to each pole of the earth.
This time the snow is made from starch (400 g) and shaving foam (200 ml); for the iceberg, I froze ice in a bowl in advance. I wasn’t able to come up with a lot of different details in Antarctica, which is essentially a wasteland, but it was still interesting to play (and more than once). Plus, we liked just messing around in the pleasant snow-starchy mass.
- Our penguins and seals fished, and also rode off an iceberg and jumped into the ocean at full speed.
- The little penguin kept getting lost, and then, with our help, he found his way to his grandmother.
- Scientists and travelers arrived in Antarctica. To shelter from the icy winds, they hastily built themselves a shelter from refined sugar.
And this, by the way, is a sensory box “on the road”
Game layout made from waste material. Farm. Master class with step-by-step photos
The farmer has a farm
Farmer holding piglets
Young children adore animals, especially domestic ones, and it will be even more interesting and educational for a child to play with a home farm. In toy stores you can often see small animal figurines made in a naturalistic manner. I suggest you make a farm for them. So, in my tutorial I will show you how to make a game layout from scrap Farm material.
Purpose: to introduce the process of making a farm model from a cardboard box for toy animals.
This master class is intended for preschool teachers, parents, and children.
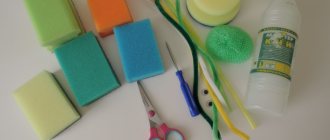
For work we will need:
We mark the windows by eye and cut them out (it’s convenient to cut them with a utility knife on a cutting board). We cut the roof so that fragments remain, but at the same time it does not interfere with free play. It turned out like this:
We lay out the box and prime it with acrylic primer to cover the inscriptions on the box. It is convenient to prime with a small paint roller.
You can replace the palette knife with a popsicle stick or use a plasticine modeling stack. You don’t have to make a relief, but simply paint the roof with a contrasting color. The result is expanded and assembled.
We paint the roof with acrylic brown paint.
Let's strengthen the weak points of our farm box with tape. We glue the folds, windows, roof (we glue everything from the inside). We do this so that these places do not get torn during the game.
We cut out fences for pens from the cardboard of any other box:
We got two identical partitions, one slightly lower. From a small box they cut out a pen for pigs and glued together a small feeder for piglets, from another small box they made a manger and cut out a circle for hay. We paint the fences and paddocks brown, a little loosely with a hard brush, so that it looks like a tree. We also tape it with tape for reliability.
Then we attach the fences to the truss. First, we coat the edges of the cardboard partitions and glue them to the floor and wall of the truss. Then we additionally glue the joints of the partitions with tape for strength. We divided the space into four pens: high partitions separated the pens for cows and horses (on the sides), the middle space was divided in half by a low partition for sheep and goats.
She lies flatter. It was also possible to paint with paints, but we wanted to give these areas a different texture and feel, which is also important for the development of sensory skills.
Making a pen for pigs. We glue a rectangle of cardboard with brown coated paper and glue stains of dirt from self-adhesive velvet paper onto it. We put a feeder for piglets. We glue regular Velcro to the pen door (sold in sewing accessories departments).
Sensory box “Arctic” (aka sensory box “Winter”)
Of course, the Arctic and winter are not exactly the same thing, but I believe that playing in an Arctic box with a child is a great way to show him life in the conditions of “extreme winter”, in the Far North. I wrote about this box in detail in an article dedicated to the thematic lesson “Arctic”, but I will repeat myself a little here so that everything is in one place.
The most burning question for winter sensory boxes is what to make snow out of? In fact, there are a lot of options, here are some of them:
- Semolina;
- Rice;
- Coarse salt;
- Cotton wool or cotton balls;
- Real snow from the street;
- Crushed foam;
- Shaving foam;
- A very pleasant consistency is obtained by mixing starch (400 g) and shaving foam (200 ml), which I used in the “Antarctica” box (see below). It is better to buy foam for sensitive skin. The only thing is that you and your baby need to prepare for the fact that after playing you will smell like your dad after shaving
The ocean here is made of jelly again. In order for the jelly to retain its shape, it will need to be kept in the refrigerator between games, but this has a big plus: during the game, your ocean will always be cool, which fully corresponds to its Arctic nature. Moreover, thanks to the jelly consistency of the ocean, ice floes (they cotton pads) stay on it perfectly.
In our games, the polar bear hunted for fish, attacked a seal, set up a den for himself,
Polar scientists who arrived on an icebreaker tried to get acquainted with the local Eskimos and photograph the animals,
The Eskimo arranged his home, rode a reindeer and also fished.
By the way, the igloo, as you probably already guessed, is made from a paper cup, with cut-up cotton pads used as snow blocks. We did it together with Taisiya.
Game layout "Farm". Photo
Author: Shvidkaya Lyudmila Fedorovna teacher of the speech therapy group of the MDOU kindergarten No. 345 of a combined type, Volgograd
Source
Summary:
1. investments - 5,585,000 rubles.
2. payback period – 32 months.
3. average monthly profit - 176,666 rubles.
Sources
- https://business-poisk.com/biznes-plan-molochnoj-fermy.html
- https://to-biz.ru/kak-otkryt-molochnuyu-fermu/
- https://vipidei.com/proizvodstvo/vyrashhivanie/otkrytie-molochnoj-fermy/
- https://agrobuilding.com/objects/livestock/barn/stroitelstvo-molochnoj-fermy-investitsii-i-okupaemost
- https://biznesovo.ru/biznes-plany/biznes-plan-molochnoj-fermy
- https://www.beboss.ru/bplans/185-biznes-plan-molochnoy-fermy-na-100-golov
- https://Proekt-sam.ru/proektzdanii/proekt-mini-fermy.html
- https://pokras-stroy.ru/ferma-dlya-krs-na-50-golov
- https://pokras-stroy.ru/stroitelstvo-molochnoy-fermy
- https://mirfermera.ru/688-tipovoy-proekt-korovnika-na-50-golov.html
- https://molferma.com/sozdanie_mol_fermi/stroitel-stvo-sovremennoj-molochnoj-fermy-kak-postroit-korovnik.html
- https://pokras-stroy.ru/kozya-ferms-na-50-koz
- https://BusinessXXL.ru/molochnaya-ferma/
Tools and materials
Before building a farm, you need to stock up on the necessary tools and materials. To work you will need:
- dry concrete mixture or cement and sand;
- brick, wood or blocks;
- slate;
- roofing felt;
- insulation;
- fasteners;
- beams and/or beams.
The set of tools must include:
- shovels - shovel and bayonet;
- construction tape;
- plumb and level;
- technical knife;
- hammer drill or electric drill;
- construction mixer or concrete mixer;
- containers for solution;
- saw and/or hacksaw;
- mason's tool;
- wire cutters and/or pliers;
- hammers and sledgehammers;
- workwear;
- rags.
To store supplies of materials and working tools, you can set up a small barracks or a fenced area with a canopy.
Business plan (to build a good wooden or frame barn, costs for young animals, feed)
The cost of maintaining and raising cows for meat is determined by many parameters. This is the area of the territory, the number of livestock, materials for the construction of the barn and the costs of feeding and servicing the animals. At the beginning, significant costs will always be required, which will begin to pay off only after several calvings, since proceeds from the sale of dairy products can only partially cover the costs of maintaining cattle.
Read the business plan for cattle breeding here.
Costs for the workover device
Setting up a farm and purchasing the first livestock of animals and feed for them requires significant financial investments. The primary costs for organizing a cattle breeding business are:
- Land lease . The price directly depends on the area. In fertile areas with a mild climate, the cost of rent for farming needs is always higher. It is advisable to acquire the necessary space over time, which will significantly reduce costs. To raise 100 heads of livestock, at least 1 hectare of territory is required.
- Construction and equipment of a cowshed . This is one of the largest expenses at the beginning of production. It is profitable to build a shed on your own without hiring third-party workers. The cost of construction depends on the area of the barn and the automation of the process. Most often they resort to modern prefabricated standard barn layouts, where all the necessary communications are connected: water supply, electricity, sewerage, ventilation, etc.
- Purchase of animals . Initially, it is advisable to purchase several adult cows and bulls, as well as 10-12 heads of young animals. You should not immediately buy purebred and breeding animals, since most often they require special maintenance;
- Purchase of feed . It is purchased based on the number of livestock, the season of the year, and also taking into account the required feed. In summer, food costs are lower, since grazing is possible. In addition, you should immediately purchase all vitamins and feed additives;
- Hiring workers and paying wages . Self-maintenance of a farm with more than 15 cows is physically impossible. Therefore, it is necessary to hire employees to clean the premises, care for animals and collect products. The cost of veterinary care must also be included in the estimate.
Read about the feeding diet for dairy cows here.
The costs of setting up a business vary greatly depending on the location. In the southern and eastern regions, raising cows is cheaper, but it is important to understand that there is more competition in the market in these areas.
Profitability
Raising cattle is a profitable business, but this condition applies only to large farms with established sales channels. In the early stages, you will need to invest at least 1 million rubles for the arrangement of premises, the purchase of animals and feed. On average, the farm's payback period occurs no earlier than in 1.5-2 years, provided that meat and milk are constantly sold and new animals are purchased. Profitability largely depends on the productivity and health of livestock. If you create the right conditions, you can subsequently receive a stable income from the sale of replacement young stock, especially when raising productive breeds of cattle.
Read about keeping a cow on a private farm here.