An ottoman in the interior is a useful, beautiful and functional thing.
It makes it much more convenient to put on shoes when leaving the apartment, it can be used as an additional seat, children can jump and play on it. Ottomans are also often used as decorative elements . They are distinguished by bright colors, interesting shapes and a variety of designs. Making a pouf out of tires with your own hands is quite possible even for a beginner - the main thing is not to be afraid and to show creative ingenuity!
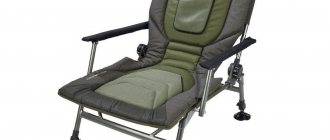
Tall poufs in the dining area of a private house
The two tires are connected with bolts or screws from the inside. Next, the structure is painted or left as is.
A wooden circle made of MDF or chipboard is nailed on top, which is also painted, and soft bedding is laid. Also, a wooden circle can be covered with foam rubber and fabric.
An excellent set will be made from high poufs and a table. The table is made according to the same principle, only its height is twice as large. Casual painting with white paint while maintaining a contrasting black tread pattern gives the furniture a stylish look.
What materials and tools will be required
To make an ottoman from a car tire, you need the following tools:
- electric jigsaw;
- screwdriver;
- furniture stapler;
- glue gun;
- knife;
- scissors;
- pencil;
- brush.
Materials you will need:
- plywood 10-12mm thick or chipboard;
- furniture wheels or legs;
- foam;
- fabric or leatherette;
- thick rope;
- self-tapping screws;
- colorless varnish.
Features of furniture made from tires
Handmade furniture always looks original and aesthetically pleasing. She is able to fill the house with a special atmosphere of warmth and comfort. The main advantages of making your own ottoman from old tires include :
It will be comfortable and convenient to sit on such an ottoman . Since the tires themselves are different:
Important : the only drawback of car tires is that when heated, they emit harmful substances. But for home furniture, this does not matter, since the ottomans will not heat up in the sun.
Photo
If you are not afraid to work with tires, you will get furniture that is stunning in beauty and functionality:
A few more original ideas for making armchairs and sofas
You can make spectacular designer furniture from tires and scrap materials. Here's some evidence. “Car”-chair made of 4 tires on a metal or wooden base. The techniques already described above are used in production. All elements are connected with bolts.
Low armchairs on legs with a soft back in the Art Nouveau style will fit perfectly into the interior of a spacious living room. To make one, one tire is cut in half along its diameter. This part will serve as the back. A strip of thick foam rubber is glued inside. To ensure that the back is beautifully raised, two slats-racks are nailed in the center.
For the seat, a wooden disc is cut out and lined with foam rubber. Then cover all the foam with leatherette. Screw on the back and seats and the chair is ready! The next option is done in a similar way. Only for the backrest a wide tire is used, which is attached tightly, without slats.
For a chair with a high back, the support will be thick wooden slats, which are covered with a piece of foam rubber and covered with fabric. As a result, the product does not even have a brutal base. Everything looks elegant and stylish.
For the garden, a chair with a wooden back is left without upholstery. Even without painting it looks very aesthetically pleasing. As a backrest, you can use several tires connected to each other and placed on an edge. They can be attached to the tire that serves as the seat using cables or elastic springs. Further techniques for transforming waste material into a comfortable resting place can be suggested to you by your imagination or our illustrative example.
Another interesting option for a chair for a private home made from large tires. In this case, a segment is cut out of the tire, a soft seat is arranged at the bottom, and the inner walls are sheathed, and they serve as a backrest. A stylish combination of materials and a selection of fashionable prints will allow you to get an excellent youth chair for watching TV.
Instructions for creating an ottoman from a tire
Plywood is cut to the diameter of the tire.
If desired, you can trim the edges with a jigsaw. Polyurethane foam is placed on top and fixed with glue (when used, the polyurethane foam will not slide to the edges). For aesthetics, a cover for the lid is made from fabric. The pattern is simple: measure the height of the resulting seat and the diameter. We cut out two circles and a ribbon from the material (the width will be equal to the height, the length will be equal to the diameter). Using a machine we sew the circles with the ribbon, leaving room for the zipper. We put the cover on the seat.
TIP: you can simply cover the lid with fabric and secure it with a stapler. It is recommended to cover the back side of the top of the ottoman with non-fabric.
The tires are fastened together. The holes are made with a drill and can be fastened with bolts or wire. For beauty, it is recommended to cover the rubber with fabric.
TIP: Another way to hide tires is to carefully wrap the product with rope and secure it with glue. The option is more suitable with one tire. If there are two wheels, you can first wrap them with fiberboard or thick cardboard from boxes.
To make an ottoman from a tire with your own hands, it is recommended to cover the lower platform (chipboard swells from moisture, the fabric serves as protection). If desired, you can attach legs or casters. Then the part is attached to the base with bolts or wire. We connect the lid to the base using hinges (it will open).
The pouf is ready for use. Creative types can spend a little more time to make the furniture more beautiful.
How to properly assemble and finish soft square and round ottomans on a rigid frame
More complex work will require a little more time and carpentry skills. But there is nothing difficult in such work, just look at a few of our step-by-step instructions and you can do everything yourself.
With a little work, you can make a more solid design - a square ottoman with a removable lid on wheels. This is also an additional storage space for household items, toys, and you can also store slippers for guests in it. For work you will need the following materials:
- sheet of plywood 12-16 mm thick. Sizes are for children and adults;
- wooden block 20×40 or 40×40 mm;
- wheels;
- piano loop;
- foam rubber for soft seats up to 100 mm thick;
- padding polyester;
- upholstery fabric;
- carpentry tools;
- glue.
An ottoman up to 40 cm in height is suitable for children, and up to 55 cm in height for adults. In the table we have prepared the dimensions of the parts for an ottoman intended for children and adults.
| Detail | Quantity, pcs. | Dimensions for children, mm | Dimensions for adults, mm |
| Front and back panel | 2 | 350×250 | 400×370 |
| Side panels | 2 | 326×250 | 368×370 |
| Bottom and top | 2 | 350×350 | 400×400 |
| Wooden blocks for sides | 4 | 40×40×250 | 40×40×370 |
| Blocks for the top | 2 | 350×1450 | 550×1650 |
| Upholstery fabric for side panels | 1 | 350×1450 | 550×1650 |
| Sintepon | 1 | 300×1410 | 450×1610 |
| Foam rubber | 1 | 350×350×50 | 400×400×100 |
| Cover material | 1 | 500×500 | 650×650 |
Step-by-step manufacturing process
- Cut out blanks from plywood.
- Sand the surfaces with sandpaper.
- Assemble the workpiece into a square structure using bars and glue.
- Fasten the parts with self-tapping screws, the heads of which are recessed at a distance of at least 1 cm.
- Cut out the material and padding polyester, then wrap it around the sides with an overlap. Secure the upholstery fabric on top, the edges of which are secured with a stapler in increments of 30 mm.
- Stop blocks should be attached to the bottom of the lid blank at a distance of up to 22 cm from the edge.
- Glue foam rubber onto the lid and then cover it with material. Fold the edges inward and secure with a stapler in increments of up to 30 mm.
- Screw the wheels to the bottom.
- Install a piano hinge at the top.
You can make a universal ottoman with your own hands at minimal cost.
Second life of an old stool
Do not rush to throw away an old, but still strong stool. Just a couple of hours and you will add an interesting designer piece of furniture to your interior. The manufacturing process is as follows:
- Remove the seat and secure the grosgrain ribbon.
- You can make a decorative seat from an old sweater. First, it must be cut into strips 4 cm wide, woven into braids and secured to the base.
- Another decorative option is to wrap the stool in foam rubber and cover it with bright fabric.
Detailed master class on making a pouf on a wooden frame
This ottoman can be made of any geometric shape. Let's consider one of the simplest ways: making a round product. For this we need:
- chipboard sheet with a thickness of at least 15 millimeters;
- wooden block 20×40 mm;
- Fiberboard is suitable for side walls;
- foam rubber and synthetic winterizer;
- artificial leather;
- sawing tools.
Before you make an ottoman for the hallway with your own hands, you need to make a pattern. The process works as follows:
- Cut 2 circles from chipboard according to the pattern.
- Make markings for the bars in increments of about 16 cm and drill holes for future fastening.
- Drill several holes in the lid in random order. This is necessary so that air can escape from the foam while sitting.
- Cut the bars to equal lengths and sand them.
- Secure the blocks with self-tapping screws along the previously drilled holes.
- Cut a rectangle from the DPV sheet. Its width should be equal to the height of the product, and its length should be equal to the size of the circle.
- Secure the plywood to all the blocks with a stapler.
- Wrap the structure with padding polyester and cut a circle out of foam rubber for the lid. Secure everything with glue.
- Sew a leather cover, put it on the workpiece and secure it with a stapler.
- Secure the wheels.
Custom solution for the bathroom
The tire can also be used as a base for a round sink. This way you can equip a bathroom in a private house or an open washbasin in a country house.
The selected ideas demonstrate the breadth of use of car tires in creating original furniture for home and garden. Having mastered the basic principles, you can develop your project and surprise with new ideas.
Decor ideas
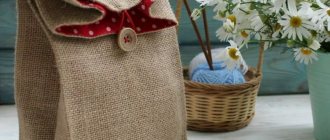
The appearance of the pouf depends on the design of the hallway and the entire apartment. For example, for a room decorated in eco-style, ottomans wrapped with hemp rope or twine in beige or grayish colors are suitable. Those who prefer a brighter color scheme should paint the pouf with quick-drying acrylic paint or use tinted ropes. A dark hallway will be refreshed by shades of turquoise, strawberry, and lemon.
Burgundy, purple, emerald green and deep blue poufs look stylish.
You can make a soft pouf out of car tires by putting a fabric cover on a rubber base and placing a round pillow in the hole. Such a product should be decorated with a frill or fringe; it will fit perfectly into a romantic or classic interior. It is better to use plain, dense fabrics with an interesting texture: tapestry, plush, velor, faux velvet or synthetic fur.
Homemade poufs made from tires are not only attractive, but also quite comfortable. Using this technique you can also make funny tables that will be useful on the veranda, balcony and even in the living room.
There are different ways to arrange “your” suburban area. Of great interest are the ideas of creating original objects from old things that have served their intended purpose.
Craftsmen make furniture from wooden pallets, polypropylene pipes, plastic and wine bottles. New uses are also being found for old car tires. They make armchairs, tables, ottomans and even sofas. Practical and durable furniture is used in the garden, to furnish the garage, and as an unusual accent in the interior.
Tires can be used without coating, but more often they are painted in bright colors, wrapped in jute, sisal, linen, cotton or hemp rope, and tied with fabric.
The rubber of car tires contains toxic substances, so you should not use it in a child's room or in a poorly ventilated area. But even without this, there is enough space left for improvement: in the living room of a private house, on the terrace, in the garage and utility room, in the open air.
First way
Pouf from an old tire (option 1)
You can make a pouf from one wheel, but it will be a little low for an adult. Therefore, we suggest trying to connect two tires together. To work you will need the following tools:
Required tools and materials
The materials you will need are two tires, plywood, foam rubber for laying, fabric for covering, a belt or hose. We wash the tires thoroughly to keep them clean. On the one that will be the top, we cut out four small holes for further fastening the seat.
Holes for attaching the seat
The wheels can be connected to each other using screws.
The seat is made of plywood. Draw a circle on a sheet of paper - the same diameter as the tire. Then cut it out with a jigsaw and file the edges.
Cutting out the base for the seat
Make a round pad from foam rubber.
Foam gasket
Cover the seat with fabric, securing it to the plywood with a stapler on the back side.
Use a belt or hose to secure the seat.
Attach it to the top wheel with screws.
Attaching the seat to the tire
The rubber part can be painted in your favorite color. This is one of the options for making an ottoman from a tire. As you can see in the photo, it looks quite original.
Step-by-step execution of work
How to do it? A used car tire can be used to make this item. You need to take twine, any other type of rope or small rope. It is necessary to cut 2 circles from plywood according to the size of the tire.
Then place plywood on top and bottom of the tire surface. Then secure the plywood sheets to the tire using self-tapping screws. Next, using a glue gun, glue the twine to the sheet of plywood.
In this case, the work must be done sequentially, pressing each turn against the turn and rotating in a circle, starting from the center, using the snail principle.
In the same way, they continue to lay the twine further, gradually moving to the end of the tire and gluing it until the entire tire is covered.
To make an ottoman, it is best to use hemp rope. It looks attractive, is not afraid of the sun, and is environmentally friendly. After gluing to the tire, you can coat the rope with varnish.
This will protect the ottoman from moisture and adverse weather influences. This way you can get a great design solution. The design of the ottoman is beautiful and economical. The ottoman can be placed in the garage, gazebo or veranda.
Return to contents
Round coffee tables
Tires are also used to create an unusual coffee table. There are many ideas: on wheels, with or without legs, with a glass or wooden surface, painted or natural. The option with a gold plated finish on chrome legs and a glass tabletop looks harmonious if it fits into the color background of the interior.
The option with a wooden tabletop and wenge-colored legs is perfect for a classic style. The legs are screwed to the lower wooden disk, and the tabletop is fixed with hot glue.
Original do-it-yourself ottoman made from wheels
Here's another good idea on how to make an ottoman from a wheel with your own hands. The first step is to properly prepare the tires.
Important! If you previously used them for a car, then first wash them with water using washing powder and a brush to remove any remaining clay and dust.
Prepare the following materials from the list:
You need to do the following:
Important! Check that the wheels are firmly connected to ensure a strong and secure frame.
Important! It is better to do this on a sewing machine with a double seam.
When decorating an ottoman, use available materials, your creativity and imagination.
Country chairs made from old tires
There are several options for creating a product. Let's focus on the most popular, spectacular and uncomplicated.
Another chair option:
It can be as in the photo or slightly modernized depending on the materials that are at hand.
Why not an impressive leather chair from a designer furniture showroom!
It’s not a shame to furnish not only a country courtyard like this, but also a creative interior
In Europe, such furniture in residential premises has long been not uncommon, because the environmental trend is gaining popularity every year.
Design options
Depending on the style of the room and the functional load of the item, the decor can be varied. Poufs can be used as garden or home furniture, so when choosing a material it is worth considering some nuances of use. For example, when creating a garden ottoman, practical materials are used - ropes, plastic .
In some cases, the piece of furniture is painted and equipped with a removable cushion.
If the interior item is intended for the home, then the range of design solutions expands:
- Upholstery with furniture fabric.
- Knitted covers (for those who like to knit and crochet).
- Patchwork or patchwork upholstery.
- Decoration with leather or its substitute.
- Poufs on wheels.
- Carved legs.
With your own hands, you can make a unique pouf from an ordinary tire, which will become a real highlight of your home. And its functionality will delight both guests and household members.
Leather ottoman for the cottage
If you are a lover of unusual and original things, then try making a leather ottoman from tires with your own hands. The master class given in this section will help you realize your dream of truly decorating your home or summer cottage.
You will need the following materials:
Make an unusual ottoman according to these instructions:
Important! Stretch the fabric tightly and attach it to the rubber with a stapler.
In the interior - something useful, beautiful and functional. It makes it much more convenient to put on shoes when leaving the apartment, it can be used as an additional seat, children can jump and play on it.
Ottomans are also often used as decorative elements.
. They are distinguished by bright colors, interesting shapes and a variety of designs. Making a pouf out of tires with your own hands is quite possible even for a beginner - the main thing is not to be afraid and to show creative ingenuity!
Handmade furniture always looks original and aesthetically pleasing. She is able to fill the house with a special atmosphere of warmth and comfort. The main advantages of making your own ottoman from old tires include
This ottoman will be comfortable and comfortable to sit on.
. Since the tires themselves are different:
: the only drawback of car tires is that when heated, they emit harmful substances. But for home furniture, this does not matter, since the ottomans will not heat up in the sun.
Advantages
Handmade furniture is always appreciated. Often it can become the main decoration of the house, because when making it, each craftsman puts his soul into his product and applies an individual approach. In addition, the work does not require any special skills or expensive materials. Often used wheels are simply thrown away as unnecessary. But it turns out that they can be given a second life!
This ottoman is quite comfortable to sit on as it is stable. In addition, it can be used as a coffee table. Such ottomans will look great in a gazebo, on the veranda or in the hallway. As you can see in the photo, they look quite original. There are at least three ways to make such simple furniture.
Upcycling for summer - we make a pouf for country gatherings from a tire and sisal rope
Our parents also asked themselves the question of what could be made from old car tires. Remember the flowerbeds made of tires at almost every entrance? Old tires should not be consigned to the dustbin of history. A couple of simple tricks can transform a used tire into a cute ottoman for your living room or garden. Let's watch a step-by-step master class on how to make comfortable country furniture out of unnecessary things.
Materials and tools:
Step 1.
To create a durable DIY tire ottoman, start with a base and seat. Cut both sheets of MDF in a circle - one will cover the tire at the top, and the other at the bottom.
To determine the size of the top of the pouf from old tires, you need to measure the inner diameter of the tire before it thickens (marked with a red arrow in the photo). Then divide the diameter in half and add 1.5 cm to the result. This number is the radius of the circle made from the MDF sheet.
Step 2.
Apply the radius calculated in this way using a compass or a nail and thread onto an uncoated MDF sheet.
Step 3.
Then use a jigsaw to cut out a circle according to the markings.
Step 4.
Secure the top MDF circle. Place the sawn circle on the tire and secure it with five screws.
Advice:
The screws just need to be screwed into the tire. They hold up excellently - my daughter thoroughly tested the future ottoman, jumping on a circle as if on a trampoline.
Step 5.
Cut out the bottom, laminated MDF sheet - it should be slightly larger than the top one. Therefore, first measure the diameter of the tire at the highest point, calculate the radius again, transfer it to the sheet and only then cut out the circle.
Step 6.
Secure the bottom, laminated plate with screws.
Step 7
. Now it’s the turn of the sisal rope. First, apply glue to the edge of the bottom plate and wrap the rope on top.
After the first circle, wait a couple of minutes to let the glue dry.
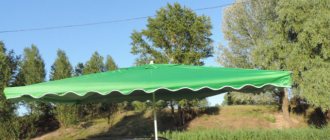
Wrap sisal around the entire tire, as in the next photo.
Advice:
You shouldn’t apply a lot of glue at once; it’s better to work on future furniture round by round. It is more convenient to work together - one can constantly ensure that there are no gaps in the product, and the other will continue to wind. If you work alone, it is easy to miss the gaps, and the rope can move from the surface of the tire.
Admire the result - an excellent DIY tire ottoman is ready!
Step 8
. So that a homemade tire ottoman can be used not only in the interior, it is worth covering it with transparent varnish. But keep in mind: you will need quite a lot of varnish, because they will need to carefully coat the gaps.
How to sew another chair with your own hands?
Here is the second option for making a piece of furniture. This is a rectangular bean bag chair. You need to stock up on these materials to sew it:
Please note that the two sidewalls are cut out in a mirror image. To do this, fold the fabric in half, place the corresponding pattern on top, and attach it with pins. Trace and cut out.
Using the same patterns, cut out the parts for the upper cover of the chair. Sew them in the same way, but do not sew up the junction of the back and bottom. Sew the zipper here and turn out the top cover through this hole.