Quote from Capella
Read in full In your quotation book or community!
Winter is coming soon and I want to insulate both my and my family’s feet as soon as possible. You can give such chuni as a gift under the Christmas tree for the New Year. And what could be more beautiful than a gift made with love by your own hands? And so, I offer you a selection of patterns and master classes found on the Internet, and you can choose for yourself, get inspired and choose the model that you like:
Author: Sytnikova Marina Nikolaevna
To sew chunya you will need a fabric cloth, about two meters, as well as two pieces of soles. If there are no ready-made ones, then they should be cut out of thick cardboard and covered on one side with leather or leatherette so that the shoes do not get wet if you stand in them on a damp floor surface, for example, after wet cleaning in the house.
Sewing chuni is not at all difficult - it can be done using an approximate pattern. To do this, on thick paper you need to trace the contours of the leg to the middle of the shin. It is advisable to do this with outside help. Having received the contours of your leg, the drawing should be increased by five centimeters. You also need to obtain a paper trail of your footprint. The resulting contours of the footprint should be increased by the same number of centimeters as the pattern for the top of the chun.
Next, we cut out the chuni and sew it in one of the following ways, making either two blanks for each chuni separately, or three. The top pattern for one chuni should be cut out of two pieces of fabric so that they look like a mirror image. Then make a pattern of the footprint, which should subsequently be placed on the sole. Sew the resulting parts together. Moreover, if the chuni are indoor, sewn from colorful fabrics, then the seams can be made both inside and outside the product. If you plan to wear chuni instead of leggings in the future, for example, in rubber boots, it would be better to make the seams outward so that they do not rub your feet when worn. The pattern of the upper part of the chuni can be made single. To do this, placing the pattern on the fabric, you should trace its outline and, without lifting it, turn it to the other side, tracing it, you will get a one-piece version for the top of the chuni. The chuni should be sewn in the same sequence as indicated above.
You can decorate the chuni with iron-on stickers or embroidery. These shoes are very warm and pleasant for the feet, so both adults and children will like them. |
Original: https://svoimi-rukami-club.ru/sew-chuni-for-your-loved ones/
Necessary tools for sewing chuni with your own hands
The list of tools and materials required for sewing can be viewed in the table:
| Tool | Purpose |
| Paper and pencil | You can use whatman paper, old wallpaper or other thick paper. It is needed to create a pattern. |
| Tape measure | Needed for taking measurements. |
| White soap or chalk | Needed to transfer the pattern onto the material. You can use special water-soluble markers. |
| Blade | You need to cut sheepskin or sheepskin with a blade. It is difficult to do this with scissors, and besides, the edges will turn out uneven. |
| Large needle | Needed for stitching parts. |
| Awl | Sheepskin or sheepskin coats are dense materials. They need to be pierced so that the needle passes through them more easily. You will also need an awl for turning parts. |
| Strong threads | You can use thick synthetic, nylon or silk threads that match the color of the material. |
You can sew a chuni from natural sheepskin, from a worn sheepskin coat (with natural or faux fur), as well as from an old quilted coat. Further in the article you can consider instructions for creating patterns and sewing chuns from different materials.
You will need it
- – kamus 2-3 pieces;
- – felt;
- – pieces of leather;
- – furrier’s knife;
- – hunting knife;
- - awl;
- – needle;
- – waxed nylon threads;
- – braid, beads, fur trimmings.
Before sewing high fur boots, you need to painstakingly make the kamus. This process consists of several operations. First, soak the kamus in a solution of salt and washing powder (or soap shavings). At the rate of one handful of salt and two pinches of powder per liter of water. You can add a little ammonia to the solution. Place the kamus and keep them in the solution for about 5-6 hours. Carefully remove the flesh with a hunting knife. Do this until the skin becomes elastic and soft.
Rules for sewing chuni from fur and sheepskin
Natural sheepskin fur is a universal material that is perfect for sewing outdoor and indoor warm boots. Sheep fur retains heat well. In winter, your feet will not freeze even outside if you make a chuni with a sole (you can buy it in sewing and hardware stores). Homemade chuni will come in handy during the off-season, when the heating in apartments has already been turned off or has not yet been turned on.
Chuni is also a good shoe for babies who are just learning to take their first steps. The sole of the shoe will not slide on the floor, and the child’s feet will not sweat.
Chuni is sewn by hand, without using a sewing machine. You can decorate the product with colored threads, which will be used to sew the parts together. During the cutting process, you need to monitor the position of the pile. On all parts it should look in one direction, preferably towards the toe. You can sew by turning the product inside out. In this case, you need to make the seams flat so that they do not cause discomfort when worn. After sewing, chuns need to be properly cared for.
How to wash a natural sheepskin product by hand:
- Before washing, brush off heavy dirt with a soft brush. There is no need to rub the material too hard. Enough to remove dust and stuck debris.
- Fill a basin with warm water (45 degrees).
- Dissolve wool cleaner in water. You cannot clean sheepskin with powder or gel for regular washing. The wool will mat and become coarse.
- Soak chuni in a basin for 35 minutes.
- Wash the chuni like regular socks.
- Rinse off chemicals. It is better to change the water 3-4 times. The water for rinsing must be at least 40 degrees, otherwise the wool will become matted due to a sudden change in temperature.
- Without screwing, gently squeeze out the chuni.
- Straighten the products and place them on a terry towel.
- Absorb excess moisture on top with another towel.
- Leave to dry at room temperature. Do not dry sheepskin on a heater or radiators. The wool will deteriorate. It will become rough and lose its shine.
How to wash in a washing machine:
- Clean the chuni with a soft brush.
- Pour wool cleaner into the washing machine.
- Place the chuni in the drum. It is not recommended to mix products of different colors. Artificially dyed wool may fade.
- Select a mode on the control panel for washing wool or cashmere items. If such a function is missing, then it is better not to risk it and wash your boots by hand in a basin.
- The water temperature in the machine should not exceed 45 degrees. The spin speed also needs to be adjusted. The drum should rotate no more than 600 revolutions per minute.
- After finishing washing, the chuni should be straightened and laid out on a towel to dry.
When the products are dry, you need to comb the fur with a grooming comb. If you use an old sheepskin coat for sewing, then perhaps the condition of the wool on the lining leaves much to be desired.
In what ways can you restore the former beauty of fur:
- Moisten a cotton pad with walnut oil and wipe the wool. This technique will help restore its shine and silkiness. You can also chop the nuts and put them in cheesecloth. Rub the fur with a bag of nuts.
- 3 tbsp. l. baking soda and 2-3 drops of any essential oil will help get rid of the unpleasant odor. The ingredients need to be mixed and distributed evenly over the fur. After a day, the soda needs to be knocked out of the wool.
- Glycerin mixed in equal parts with water will help restore the elasticity of the leather part of the sheepskin. Rub the solution onto the smooth side of the material and leave for 12 hours.
- 1 tbsp. l. Vaseline, 1 chicken egg yolk and 450 ml of warm water will help restore softness to the wool. This mixture should be applied to the skin, not the fur.
Important: all these manipulations are carried out before washing.
What kind of warm shoes are burkas?
Burkas are winter shoes made of felt, felt or suede. They are indispensable in cold climates.
The lower part - the toe, vamp, heel, as well as the lining along the boot - are often made of leather.
The sole is traditionally rubber or leather.
Reference! For the first time, mass production of burkas was opened in Tsarist Russia at the end of the 19th century.
During the early USSR, burkas were part of the uniform of senior officers of the Soviet Army.
Stages of sewing chuni
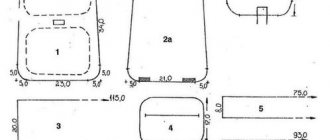
Do-it-yourself chuni (patterns can be seen later in the article) are sewn in 4 stages:
- taking measurements from the feet;
- drawing up a drawing;
- transferring the pattern to the material;
- stitching parts.
Further in the article you can read detailed instructions on all stages of sewing chunya.
Constructing a pattern
Do-it-yourself chuni (patterns can be drawn by hand, or you can download pictures with drawings and change them, taking into account the size of your feet) by first measuring your feet. You cannot make a pattern “by eye”. Shoes that are too small or too loose will be uncomfortable to wear.
How to take measurements:
- Take 2 sheets of thin cardboard or thick paper.
- Stand on them and trace the outline of your feet. This will be the basis of the pattern.
- Add 1 cm to the outline on each side.
- Take a measuring tape and measure the volume of your foot in the place where the base of your big toe is located. Record the result.
- Measure the volume of your leg in the instep area (you need to find the highest part).
- Measure the volume of your ankle.
- Measure the distance from the sole to the ankle. This will be the level of the boot.
- Measure the length of the mark that is drawn on the paper.
- Half the length of the foot length measurement is the basis of the upper part of the boot.
- The height from the sole to the ankle will need to be divided in two. Mark this distance on paper.
- Draw a line from the bottom of the base up. The size of this part will be equal to half the volume of the foot at the instep, as well as half the volume of the foot at the base of the big toe.
- All parts must be traced, creating seam allowances of 1 cm.
The pattern is ready now it needs to be transferred to the fabric.
Pattern transfer
With your own hands you can sew high-quality chuni that will last more than 4 years. The main thing is that the patterns are made to size. Experienced seamstresses advise sewing a trial version of the boot from some other material. The finished product needs to be measured. The foot should fit freely into the boot. The seams should not stick out and cause discomfort. It is also important to pay attention to how the boot looks, whether the seams are deformed, and whether the product was sewn smoothly.
If the sample has passed the test, then you can start sewing real warm boots.
If you plan to make a chuni with a fabric lining inside, then the front part should be slightly wider than the inside. The size of the seam allowances will depend on the density of the fabric and wool from which the boots are made. For example, you can make the inside of your chuni out of fleece.
In this case, you will need to allocate 4 mm allowances along the contour. That's not a lot. For sewing from quilted material, sheepskin or sheepskin, seam allowances should be larger (from 7 mm to 1.5 cm). For 1 boot you only need 1 sole piece and 2 upper parts.
How to transfer a pattern:
- Turn the material fur side down.
- Circle all the details. If the seam allowances were taken into account in the drawing, then nothing else needs to be added.
- Mark the heel with small strokes. The line should follow the contours of the footprint with an extension to the instep.
- Cut out parts from the material using a sharp blade.
Remove fluff and threads sticking out at the edges, if any.
Turning parts
Do-it-yourself chuni (patterns cut from material need to be processed along the edges) are sewn after preliminary turning of each element. To work you need a special awl designed for tailoring work. This tool has a special hole where you can insert the thread.
How to grind parts:
- Move about 3-5 mm away from the edge of the part.
- Pierce the material with an awl, leading the tip from the wrong side.
- Insert thread into the eye of the sewing needle. Pull it out a little.
- Bring the tip of the awl out, pulling the thread through.
- Insert the thread that was pulled into the eyelet and bring the awl to the opposite side.
- Pull the thread and pull it out on the other side.
- Turn the workpiece over to the other side.
Repeat these steps until the turning process is completed.
Sewing the top and cuff pieces
How to sew the top parts:
- Place them on top of each other with right sides facing inward.
- Sew along the edges with small stitches.
- Turn out the bottom of the chuni.
- Sew the shaft to the bottom of the boot using the inside seam.
Lapels are an additional part of warm shoes. It is sewn over the top. The seam should be made internal. The fur on the lapels remains on the same side as on the base of the chuni. The lapels can be lowered or raised as desired. When unfolded, the boots will be slightly higher. If the material for sewing is dense, then it is better to use an awl to fasten the parts of the pattern.
How to create durable slipper soles
What you will need to create the soles of house boots:
- cardboard;
- a simple pencil;
- stationery knife;
- chalk or soap;
- remnants of sheepskin or sheepskin;
- thin foam rubber (you can use padding polyester, which is sold in rolls);
- hard felt;
- artificial leather or raincoat fabric.
Instructions:
- Stand on the cardboard. Outline the legs with a simple pencil.
- Align all lines.
- Add 5 mm to the contours.
- Cut out the blanks.
- Attach the templates to the remaining sheepskin and cut out 2 insoles.
- By analogy, cut insoles from foam rubber, felt and artificial leather, or a raincoat.
- Now you need to lay the layers of fabric in the correct order: 1st layer - sheepskin (fur side up), 2nd layer - foam rubber, 3rd layer - felt. The leather or raincoat fabric is laid last.
- Sew along the edges of the layers of fabric using an awl.
If the shoes have rubber soles purchased in a store, then there is no need to sew on the leatherette (or raincoat). The remaining layers should remain the same.
Connection of the upper solid part with the sole
The process of joining the fabric sole and the upper part of the boots:
- Attach the blanks to the lower parts of the boots.
- Make sure the insoles are not mixed up.
- Using a thick needle, sew both pieces along the edges using the inside seam.
- Fasten the thread, hide the knot and cut off the excess.
If the sole was purchased in a store:
- Sew the lining to the bottom of the boot.
- Inspect the sole for puncture holes. If they are not there, then pierce them with an awl.
- Sew the sole to the boots using a running or machine stitch.
How to decorate boots:
- bright threads (for this you need to sew with an outside seam);
- wooden beads;
- tassels made of woolen threads;
- embroidery (option for short-pile material);
- inserts made of synthetic fur, dyed in bright colors.
When the shoes are ready, the boot should be turned with fur on the front side.
We sew high boots for Frodo
We already have a fur coat for Frodo, now we need shoes.
These will be unti. We need a rectangle, its dimensions are 12 - height, 18 - length.
We cut it out from the remains after cutting the sheepskin coat into a fur coat for Frodo.
We connect our rectangle, turning it into a cylinder.
We bend the upper edge and sew it to the main part, securing it in this state.
Sticking fur can be trimmed with regular scissors.
And we insert a round rubber band so that our boots don’t fly off our paws.
We cut out the sole, the leather on the sheepskin coat was quite thick, so we will cut it from the same. Find a circle or a suitable lid and circle it. Leather is a fairly elastic material, so you don’t have to look for the perfect circle.
We sew the sole with the skin facing out, and trim the protruding fur.
We do the rest of the boots in the same order.
I decided to make the boots on the hind legs a little longer.
I hope you liked the master class and found it useful. If something is not clear, ask questions, I will answer.
Source
How to sew a chuni from an old sheepskin coat
The sheepskin coat can be made from natural sheepskin or from artificial materials. Both options will be good for sewing indoor boots, but for street boots it is better to give preference to natural sheepskin. It is more wear-resistant and warm.
Do-it-yourself chuni (patterns should be transferred to the smooth side of the sheepskin coat) are sewn from the sleeves. Experienced craftsmen believe that the structure of the sleeve will facilitate the process of creating a pattern and sewing some parts of the boots. In addition, there are always few different accessories and unnecessary seams on the sleeves.
DIY chuni. Patterns and instructions follow.
How to sew a chuni from a sheepskin coat:
- Carefully tear off the sleeves from the sheepskin coat. To do this you need to take a blade. The seams should be pulled apart with your fingers and the threads should be cut 1 at a time. You must act carefully so as not to damage the material.
- Then you need to measure the circumference of the ankle and the length of the footprint.
- Make a drawing of the pattern.
- Transfer the pattern to the material.
- Use a blade to cut out all the elements.
- Sew the edges of each piece.
- Sew the side seams together so that the threads are inside the chuni.
- Sew the remaining elements of the boot with a seam that will stick out.
- Assemble the sole lining and sew it on. For house boots, you can use leatherette or rubberized fabric. For outdoor shoes you need a high-quality rubber sole that will not freeze in the cold and slip. You can tear off the sole from other boots or felt boots.
By analogy, you need to sew a second boot.
Bend back the boot of the finished product and straighten the fur. You can decorate the chuni with accessories or embroidery.
Useful tips
- Boots should not be used by children, since at their age the bones of the foot are not yet fully formed. This may result in their incorrect development. This is due to the fact that ugg boots do not have a fixed hard back.
- Products can be decorated with various decorative elements, which will emphasize your individuality and beauty.
- In order for your ugg boots to maintain their quality and attractive appearance longer, you should treat them with special disinfectants.
- Soft boots should never be washed under running water and gels, detergents or shampoos should not be used for cleaning. For cleaning, you need to use a brush and sponge, previously wrung out of water.
A “fixed idea” arose :))) Is it really possible to make something similar to the popular UGG “bast shoes” at home? Has anyone done this in real life? Is it possible to walk around in something like this without causing ridicule and excessive interest in your person? Are there any patterns/diagrams/sewing tips somewhere? Well, and the like. The idea is fixed, so that it is. PS Boots, sandals, clogs, slippers - I sewed them quite successfully for myself :))))
How to sew a chuni from an old quilted coat
Only homemade chuni can be sewn from a quilted jacket or coat. On the street, such shoes will wear out quickly. In addition, it will not retain heat as well as natural sheepskin.
What else is needed for sewing:
- scissors;
- fleece;
- hard felt;
- foam;
- artificial leather or rubberized fabric;
- needle and strong threads.
Procedure:
- On paper, make a drawing corresponding to the size of the legs.
- Transfer patterns to fleece.
- Cut out the boot parts.
- Sew a fleece lining. The seams should be flat.
- Turn the coat inside out. For sewing, you can use sleeves or a back piece. The desired part must be carefully cut off with a blade.
- Transfer the patterns to the wrong side and cut out the details.
- Sew all the details of the boots from the coat. The seams must be internal. If the material is not very thick, you can use a sewing machine.
- Turn fleece linings inside out.
- Turn the blanks sewn from the coat right side out.
- Sew the tops of the fleece blanks and the tops of the chunya with a hidden seam.
- Tuck the linings inside the boots.
- Cut insoles from foam rubber, felt and leatherette.
- Place felt in 1 layer, the next layer will be foam rubber. Apply artificial leather to the bottom.
- Sew the sole along the edges using a blanket stitch.
- Sew the sole to the boots.
The boot can be sewn separately from fabric with fur, and then sew it over the boots so that the fur remains inside when straightened. You can also make cuffs from fleece. Before this, the patterns will need to be overlocked. You need to sew on cuffs made of any material using an internal seam.
If the coat or jacket was not quilted, then chuni can be made yourself. To do this, you will need to cut out each element 2 times. Between the layers of fabric you will need to make a lining of padding polyester or wool. Fasten the parts with pins and sew them on a sewing machine, setting the stitch size to medium. You need to make several parallel lines, and then sew the material on the other side, making perpendicular lines.
You can sew a chuni with your own hands from an old sheepskin coat, coat or jacket. Step-by-step descriptions will help novice seamstresses understand how to correctly construct patterns and in what order to sew the parts of boots.
Taking measurements
To create a pattern we will need the following measurements:
- Foot length.
- Foot width. We measure along the contour of the foot outlined on paper. If you are not using a ready-made sole, it is better to take several measurements. If you have special features of the foot – a protruding bone, a non-standard shape.
- Boot height. Determined from the floor level to the expected height of the product.
- Foot circumference. There are several options, if you need the most comfortable boots, then we use all three measurements. It is also advisable to measure at what distance from each other you laid the measuring tape.
Working with the sole
Before you sew slippers from old sheepskin coats, you need to take into account that the convenience and ease of use of house shoes almost entirely depends on the functionality of the sole. This part of the slippers must be non-slip, warm and moderately hard. Naturally, you can make it only from natural fur, but to create an additional thermal insulation layer, it is best to use felt. The tops from old felt boots fit perfectly . If you don’t have them at home, you can buy thick shoe insoles on the market. Their size is adjusted to the sole, from which excess allowance will be cut off.
It is necessary to strengthen the part to the workpiece before sewing the slippers; to do this, both elements should be glued together with waterproof glue. It is necessary to apply the composition on the sides and in stripes in the center to leave room for ventilation.
It is recommended to take into account the property of felt to release small fragments of wool. To prevent home-made fur slippers from leaving debris on the floors, the insole should be covered with cotton fabric (A collection of different and interacting tissues form organs)
dark color.
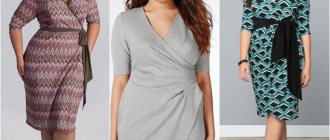
Fashion trends
Several large shoe companies are engaged in the production of fashionable ugg boots around the world. These are well-known and expensive brands (Nordman, Keddo, Ugg, Nadasa and others), which produce shoes according to the classic canons - the use of natural suede, sheep wool and flat thickened soles (photo).
- They make a choice in favor of other materials for the top of the UGG boots. Such as genuine leather, suede and their imitation, felt, wool (coarse knitted fabric), various synthetic-based fabrics that are not afraid of moisture, since their uppers are treated with a special compound.
- Expand the color palette. All the colors of the rainbow were added to the basic shades. Nowadays, UGG boots can be matched to any outerwear or hat and scarf.
- The products are complemented with various shoe accessories. Locks, rivets, buttons, chains. Rhinestones, beads and beads, decorative embroidery and logos are a fashion trend often found on modern models.
- Various sole shapes are used. Maybe flat, thick, with a wedge or heel.
- Change the height of the boot. The length of the boot can be from the ankle to the middle of the calf.
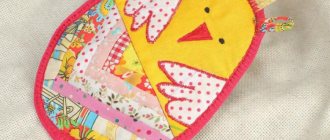
And another master class from Alena Maslova’s Handicraft Workshop:
Author: Alena Maslova
It's time to warm up and today I will show you a simple way to build house slippers and boots. I had been using natural sheepskin on a knitted base for a long time; such knitwear is used for sewing blankets and children's products; I found a piece for two pairs of slippers. Having searched the Internet for patterns, I found a large number of them, but none for my size, and I’m too lazy to remake them, and the result will not always be as expected. That’s why I made everything very simple; this pattern can be made to fit any size, even a child’s.
These are the boots we will make by hand.
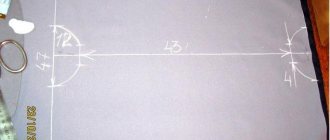
And so the leg, remember how in the movie “Office Romance”, such a simple leg. I didn’t want the boots to be clingy, so I put on a knitted footprint and wrapped a scarf around my shin, otherwise I would have to insert a zipper or change the pattern, which I don’t like; long-time visitors to my site remember my love for simple recipes.
With tape, as in the case of making a mannequin, wrapping the foot and lower leg in several layers, it is important to remember that the foot must be placed with an “iron”, or rather, check the angle of the foot as if standing.
Next, place your foot on the paper and circle the foot, then moving parallel to the floor, draw a line on the wrapped foot. Draw a mark in the middle of the heel, on the sides and on the front of the toe.