Benefits of working with beads
Fine motor skills of the fingers are one of the most important ways to develop memory, attention and abstract thinking. Beading is very useful for children - this activity allows you to fully use the motor skills of your fingers.
In addition, the advantages of choosing a creative activity include:
- A large amount of beads from which you can weave a wide variety of crafts.
- A huge selection of instructions and diagrams for making crafts.
- Beautiful external design of finished products.
- For an adult, bead weaving is also a very useful and exciting activity that helps relieve stress after a hard day at work. And interesting creative activities together with children will give both parents and the younger generation maximum positivity and joy.
A special advantage is the fact that the master does not need to learn special techniques and weaving techniques. It is enough to learn a few basic techniques and stock up on consumables.
Chick
Such crafts are usually made for Easter. To make this you will need yellow and red beads. It is advisable to choose a matte and large base, in this case the bird will turn out voluminous and beautiful.
In order for it to stand quietly on a table or shelf, you need to string the beads on a large fishing line. If you choose the right base material, no difficulties will arise.
Materials for work
For subsequent work, the master may find it useful:
- Copper or chenille wire.
- Quite strong threads.
- Needles.
- Decorative stones for decoration.
- Accessories (cuts, forms for fastening wickerwork).
- For additional decoration, you may need glue, artificial stones (for example, carnelian), and metal cuts.
- When working with metal wire, you need wire cutters.
The master develops weaving patterns independently or can find ready-made options. If necessary, you can always watch video instructions on the work being carried out.
Types of beads for weaving
Today, several types of beads are known, differing in shape, size, color design, type of texture, eye location, and material of manufacture.
In most stores you can find ready-made kits with wire, certain bead sets and patterns. The choice in each specific case depends on the product, its purpose, and size.
The following types of material are distinguished:
- Glass option.
- Plastic beads.
- Ceramic beads.
The craftsman has to choose in each case: the ceramic version is quite heavy, while the plastic one slides easily, which is difficult for novice craftsmen.
Note!
- Beaded trees: beautiful and unusual DIY beadwork. Detailed diagram of tree weaving + photo examples of finished work
- Beaded keychain: patterns for beginners with a step-by-step master class. Weaving techniques + photo reviews of the best keychain ideas
Crafts from beads - TOP-160 original ideas for creating crafts with your own hands. Bead weaving patterns for beginners with photo reviews
Helicopter
The product can be given to your brother or father on February 23rd. The helicopter flies using the usual parallel technique (a crocodile is made on its basis). The smaller the bead crystals, the more interesting and brighter the final version will be. Wire is used as a base; it is this that adds stability to the structure. The upper part (spinner) can be made of plastic using glue.
Color selection
The color design of bead particles is far from the only criterion for evaluation and selection. The texture of the surface also matters. Craftswomen can find the following shades for beads on store shelves:
- Matte option.
- Grated beads.
- Completely transparent or with original haze.
- Rainbow model.
- With gold or silver plating.
- With a metallic sheen.
- Nickel beads.
- Option with a bronze finish.
A separate option is cutting beads, which have a large number of edges on the surface. Due to the iridescence of light, an interesting pearlescent sheen is formed, and the color shade acquires bright, saturated tones.
Material designs are constantly changing, thanks to the ingenuity of manufacturers and artists.
Examples of using ready-made jewelry
Depending on the type of decor, beads can be used as a finishing material, or included in the design of figurines, figurines, and other crafts.
Embroidery on fabric
It is mainly used to decorate tablecloths (holidays), napkins, sofa decorative pillows, and capes. Here you will need not only the ability to work with material, but also embroider. Such jewelry always looks amazing and original.
Feng Shui painting “Wealth and Prosperity”
Choosing a bead shape
For various products and crafts, you may need a round or cylindrical type of material. The following forms are distinguished:
Round beads, better known as rocaille. The most common type of beads. It has a perfectly smooth surface, can be made in two versions (matte or glossy), and is suitable for all weaving techniques.
Cylindrical model. It is light in weight due to its special structure (thin walls, but a fairly large hole). Excellent for brick weaving techniques and creating panels.
Note!
- Butterfly from beads: TOP-100 photos with simple patterns for weaving a butterfly with your own hands. Unusual bead ideas + step-by-step master class
- Beaded birch: beautiful and original DIY products. Detailed technology of weaving with beads at home + photos of finished works
- Weaving with beads - instructions for making it yourself. Clear weaving patterns and technology reviews + photos of finished work
Bugles. Another popular material model. It can be round, with edges, or with chopped relief.
Structural features may differ even among the same group. Characteristics depend on the manufacturer and country of manufacture.
Bunny
To make it you will need several matte shades: red (nose), gray (base of the body), white (paws), pink (inner part of the ears). Also made on a wire base. The larger the beads, the larger the volume of the product.
Known weaving techniques
Having chosen the materials and patterns, you can start working directly. However, the master should know that there are several weaving techniques:
- Mosaic technique.
- Brick technique.
- Circular weaving.
- Weaving in parallel rows (flat and volumetric techniques).
- Needle technique.
Each technique is unique in its own way, has a lot of supporters, disadvantages and advantages.
Weaving in the form of a mosaic
Features of this technique:
- Very dense arrangement of parts in a checkerboard pattern.
- Using one thread in the work.
- Use only an even number of beads.
Step-by-step instructions for weaving:
Note!
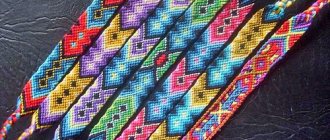
Beaded bracelets: TOP-120 photos with simple weaving patterns for beginners. Ideas for ready-made beaded jewelry + step-by-step master class
- How to embroider with beads: TOP-200 photos with simple patterns for beginners. Bead embroidery technologies + step-by-step master classes
- A so-called “blocking” part is put on a thread or wire, which is tied several times with one thread.
- The next step is to assemble an even number of parts onto a thread or wire.
- Starting from the second row, a mosaic weaving is formed: the thread from the next bead is threaded through the eye of the second element in the first row.
Further work is carried out according to a similar principle. The bead fabric turns out to be very dense, and the pattern is slightly embossed, which is used to create panels.
Workplace organization
Preparing for class is not a difficult task. It is very important to properly organize the workplace, especially if classes are held with a child. It should be not only convenient, but also safe.
You need to follow several rules to make beading with your child comfortable and safe:
- free up space from unnecessary things;
- the table should be well lit;
- the working surface must be flat;
- cover the surface with a plain non-slip tablecloth;
- roll up the edge of the tablecloth;
- arrange the beads by color;
- pour it in piles or in containers with low edges;
- do exercises for the eyes and all muscle groups every 30 minutes;
- place a box for small garbage next to the table;
- works better in daylight;
- use special applications or formulas to calculate the required material.
Do not leave your child unattended. The smaller the child, the larger the beads should be. Also, do not forget about exercise; at 6-7 years old, children should not sit for more than 40 minutes, and at 12 years old, exercise should not exceed one and a half hours a day.
Brick working method
The fabric produced according to this method has even greater density. Beading master class for beginners:
- Place two pieces on a fishing line or thread.
- Once again, thread the fishing line (or needle) into the eye of one of the elements so that the working thread is closed into a ring with oppositely located “bricks”.
- Place the next element on the fishing line, and for a strong fastening, re-pass the fishing line through the eye of the adjacent bead.
Following this pattern, complete the row. Lead all rows according to the proposed pattern, and after finishing weaving, draw a single thread through all rows (use the first and last columns for this).
Chamomile
A bouquet of daisies can take first place at a school exhibition. It is enough to study the presented master class in detail to create a beautiful product in a few evenings.
To work, you will need several types of beads, shades: brown (for the pot), white (for the petals), yellow (for the center), green (for the stem and leaves). Only thin wire is used as the base.
Beading for kids involves creating large, simple designs that add excitement to the process.
Circular assembly technique
For some needlewomen, this method is known as French weaving. Performed using metal or chenille wire. Beading instructions for beginners:
- Bend a small loop at one end of the prepared wire, which will serve as a lock.
- Several parts are assembled onto the free end of the base.
- The remaining piece of wire is folded in half and twisted into a loop.
- The craftsman should have two blocking ends, one of which is equipped with a wire twist.
- The remaining free end of the wire is used as a basis for stringing beads.
A metal thread with strung parts is wrapped around the first row until the desired shape is obtained (petal or flower bud).
Mouse
The mouse is woven in several layers. The work is very reminiscent of the usual crocodile, so if you have previously had experience with it, you will definitely be able to weave a funny keychain. A fishing line is used as a base, which will give the product “ductility”. The color palette is determined by the imagination of the master.
Parallel flat weave
Do-it-yourself beadwork can become a real decoration in the interior, a demonstrative craft for a creative exhibition, or a gift for a loved one. These can be both flat and voluminous products. It's worth learning both methods. The best flat beading instructions:
- Three beads are strung on a metal wire.
- One end of the wire with 1 part is brought up and a metal thread is threaded through the ears of the two elements towards the other end of the wire.
- Four more parts are threaded onto one of the free ends, and the wire is passed through the holes of the previous row.
As a result, the master receives a triangle made of beads with a constantly increasing number of elements. Volumetric weaving is achieved by building beads over the main fabric.
Snowflake
Boring plastic toys on the Christmas tree can be replaced with a real work of art. Snowflakes are made using thin wire and bead crystals. Such a decoration will reflect the garland and will definitely be remembered by the guests.
By the way, beading with your own hands is good for developing motor skills after fractures and injuries.
Original crafts made from beads
Having studied all the basic weaving techniques, you can begin to create various figures, panels, and beautiful paintings from multi-colored materials. The most interesting options for independent work:
- Bouquet of braided daisies. All parts, including the core and petals, are woven using the circular technique. Round beads with a glossy texture are perfect for this work.
- A huge collection of flat shapes is used to create brooches, hairpins, necklaces and earrings. The work uses the most common weaving technique (parallel or brick model).
You can make a beautiful beaded necklace with your own hands, but you will need maximum attention and a certain level of weaving experience.
Questions and answers
What to do if the thread suddenly runs out during weaving?
There are two options: either start again, taking a much larger thread, or lengthening it. Extension techniques can be viewed in the diagrams; each method is appropriate in a given situation.
I wove a simple bracelet, but I just can’t get the knot to work. The line stretches, the knot diverges. What can be done?
Try tying the line in 2 knots, pulling it tight. Next, cut the ends 1 cm from the knot. Take matches and carefully burn the knots so that the fishing line begins to melt. Wait for it to cool and hide the bundle inside the product.
Is it possible that the pattern will not work out according to the diagram if the beads are of different sizes?
Yes, not only beauty, but also density depends on the shape of the beads used. The more even and regular it is, the tighter the beads will fit together and the smaller the gaps will be. If the beads are uneven, then there is a risk that what was planned will be completely different from what was completed. When it comes to different colors, it is worth choosing them from the same manufacturer.
To summarize, it is worth noting that before moving on to more complex patterns, learn from simple ones. First, master different weaving techniques, then, using them, weave the most primitive products. This way you will develop a skill that will help you understand circuits in a matter of seconds.
Practical advice for beginners
The quality of the base material is of paramount importance for optimal performance, producing beautiful beadwork. What you should pay attention to before starting creative activity:
- The beads should be inspected for defects.
- When working, use only strong fishing line or wire.
- Pay attention to the number on the bead packaging: the larger the number, the smaller the diameter of the bead particles.
It is imperative to correlate the dimensions of the central hole and the wire, fishing line, or thread used. Beginning craftsmen should begin their work by using detailed instructions.
Dolphin
Making a dolphin is no longer as easy as making a mouse and a dragonfly. This requires skill and a little experience. The volumetric keychain is made on the basis of thick fishing line, which guarantees the stability of the structure. In order for the product to hold well and not stretch, the hole in the beads should be slightly larger than the thickness of the base thread.
If you have thin wire, you can use that too. In this case, it is not recommended to wear a key fob on your keys, since a break in the base will destroy the structure while still in your pocket or bag.
Weaving starts from the bow. The further to the fin, the more beads will be strung on the wire or fishing line. In the middle, the design decreases towards the tail.