I want to share my Easter egg making tutorial. For these purposes, it is better to use Czech beads, they are of higher quality. And blanks for eggs are made of foam or wood. I usually use wooden eggs.
You will also need a beading needle, glue, silk thread or fishing line. I would like to make an accent; I do not recommend using blanks made from ordinary chicken eggs, as they are fragile. Very easy to use, wooden ones.
I have made various jewelry from beads, but I have a master class on making eggs from beads for beginners. Following the rule, everything ingenious is simple. I made this Easter decoration in a couple of hours.
This is my work, look what a bright, burning, beautiful craft it turns out to be. Moreover, I didn’t select beads, I made them from what I had. A few years ago, I was embroidering icons with beads, I had leftovers, and I made some brooches and Easter decorations.
Color symbolism
It has been known for a long time and they try to stick to it.
- white - purity, sinlessness;
- blue - divine wisdom, element of air;
- red - love, health;
- yellow - sun, prosperity, protection;
- green - rebirth, life;
- brown - fertility;
- golden - light, strength;
- silver - cleansing;
The patterns are also significant: rhombuses - harmony, triangles - trinity, sigma - fertility, cross - the universe.
Before you get started, think about what your work of art will be about. Think over the motive, artistic solution, style.
Measure seven times
You can’t do without measurements and calculations. Braiding an egg with beads is a delicate and painstaking job, be patient. Using a measuring tape, measure the diameter of the egg “at the waist”, then its height. Match the parameters with the sample.
If they are different (for example, your workpiece is wider or lower), make an adjustment. To do this, calculate the number of beads per centimeter. For example, 4 beads No. 10 fit in 1 cm. Let's assume the girth of your workpiece is 15cm. Accordingly, we multiply 4 by 15, for a total of 60 pieces. will lie in a circle.
And in your pattern of an Easter egg made of beads there are 54 of them. Therefore, we will add 6. We will similarly adjust the height. It is important that the drawing is not damaged. Add beads in the background of the design or along the edges.
Braiding eggs with beads
A classic way to decorate eggs. First, they are covered with a layer using the papier-mâché technique, after which a pre-woven mesh is laid. The result is real jewelry.
To work you will need:
- raw eggs;
- beads and beads;
- PVA glue;
- needles for fitting and collecting beads into a pattern;
- thin fishing line or nylon threads;
- newspaper or napkins.
The instructions are as follows:
- Take the eggs and make small holes in the ends.
- Remove the contents of the egg from the shell.
- Strengthen the shell with pieces of newspaper or napkins using the papier-mâché technique.
- Choose a weaving technique and get to work.
How to braid an egg with beads for a beginner
For those who are weaving for the first time, it is better to start with spirals. Take a metallized thread 1.5-2m long. String beads onto it. Apply PVA glue to the workpiece. Secure the end to the top of the egg, carefully wind the thread in a spiral. Make sure that the beads fit tightly to each other and that there are no gaps between the tiers. Ideally, the result should be a canvas. Carefully remove excess glue with a toothpick and attach the thread at the bottom end.
Note!
- DIY wall clocks - the best clock designs for children
Crafts on a military theme: how to make a tank, a soldier, various patriotic models of military equipment
What is a Candy bar - decorating a sweet table for a girl or boy for a birthday and New Year
A more complex option is a snake with sequins or sparkles. They frame the core and are also fixed with PVA.
You can use the bracelet technique. True, the blank should first be painted and varnished. Make two flower bracelets across the width of the fishing line. (Four petals close into one). Connect them with rhinestones in the middle. Run 7-8 single bead chains from the center, and then fasten them on both sides. The method is simple, but very effective.
Pasting eggs with beads
Pasting eggs with beads is the simplest and most straightforward method compared to braiding. Working with beads is very painstaking and requires a lot of time.
You will need:
- hard boiled eggs;
- beads;
- PVA glue;
- toothpicks;
- food coloring;
- dry wipes;
- a simple pencil;
- thin fishing line or nylon threads.
You can paste eggs with beads in different ways, for example, like this:
- Dip hot boiled eggs in food coloring.
- Swirl the eggs in the dyes until they are evenly colored on all sides.
- Place the eggs on a dry cloth and wait until they dry.
- Draw a drawing or pattern (optional) on the surface of the shell with a simple pencil.
- Apply a strip of PVA glue and use a toothpick to glue the beads.
The second method is similar to the first. You need to do this:
- Follow (1-3) steps indicated in method No. 1, or take a plastic egg.
- String beads in one row on a thin fishing line.
- Coat the egg with PVA glue.
- Attach the end of the beaded thread well. (You can start work from the end or from the middle of the egg).
- Start winding the bead thread around the egg.
- Glue single beads to the tapered ends of the egg using a toothpick.
The instructions are clearly shown in the pictures.
Mesh and checkered
The base is braided with a diamond-shaped mesh. The bead mesh pattern is simple. Take the thread and put on it the required number of beads (necessarily a multiple of six) so that it encircles the diameter of the egg at its widest part. Complete the chain by passing the needle through the end of the first bead. You should now have a “hoop”.
Then string 5 beads and thread the needle through the sixth bead of the first row (hoop). The result is your first diamond. Pass the next 5 beads into the twelfth, and so on until bead No. 1 of the initial row. If you follow the instructions correctly, then the cells of a beaded egg have come out.
We do the next (third) in the same way: we string five beads and close them with the third bead of the second row. This way you form a middle, or belt.
Note!
DIY New Year's gifts - interesting New Year's ideas for crafts. Master class on creating New Year's souvenirs
- What to give to a classmate: how to make an unforgettable surprise with your own hands (Video + photo master class)
How to make a snowman with your own hands from cotton wool for a window, for a kindergarten, from scrap materials
In order to tighten the crowns, it is necessary to narrow the cells. Therefore, collect three, then two, and finally, under one bead. Secure the thread discreetly inside the last bead.
Note: if desired and with some experience, beads can be alternated with bugles (glass tubes) and artificial pearls. These beaded eggs can be placed on a twisted stand.
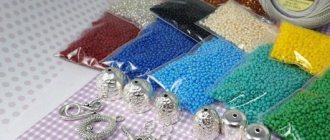
Preparation and selection of material
Before starting work, you should find all the necessary material to create beaded Easter eggs. These materials are the same, and their choice does not depend on the preferred technique of working with beads. For this lesson you will need:
- Blanks (egg-shaped or similar).
- Beads of various colors and preferred sizes.
- Glue.
- Needles for working with beads.
- Bead thread or fishing line.
The blank can be easily found in specialty stores for handicrafts and beadwork. Regular blanks made of wood or plastic will do.
You can also use the shell of an ordinary egg to make the product. This requires:
- Make small holes (at the ends) and remove all contents.
- Strengthen the remaining shell by covering it with pieces of newspaper or other soft paper.
Popular articles Postcards for the New Year 2022: templates for exquisite gifts for guests and loved ones (67 photos)
Knowing this technique well, you can do without the shell. You just need to make a blank from pieces of soft paper in the required shape. For its stability, the base is made flat. To give the workpiece a beautiful look, the top layers of paper are smoothed with sandpaper and coated with paint.
Any beads are suitable for this work. Czech glass beads are of particular quality. If they are not available, Chinese will do.
The choice of colors and size of beads depends on the chosen pattern and pattern.
Background colors are usually pastel tones. White, blue, light pink and other neutral colors are suitable. For the significance of the look, the pattern is made from a bright and catchy color palette in all variations.
Beads are sold by weight, not quantity. It is necessary to know exactly the required mass for the product. Its determination is possible thanks to the presence of a diagram and a special table.
Threads (fishing lines) and needles for work are found in the same stores where blanks are sold. When choosing a thread, you should give preference to the thinnest and strongest ones so that they fit the existing hole in the bead. The needle should also be thin, with a small eye.
Two-way intricacy
There is no openwork here.
The beads are laid in even rows. Weaving goes in both directions: from left to right and vice versa. So, a master class for beginners step by step. String two beads and bring the needle through the first. Then two again, and return the needle to the third, and so on until the completion of the first and second rows.
Connect the outer beads in pairs: the first with the penultimate and the second with the last. And then we braid it cunningly: we pass a needle through four beads of the first row and one bead of the second, into the third - the fourth bead of the third. Our hoop is ready.
Note!
- How to make a snowman from plastic cups: step-by-step photo/video instructions + master class
DIY wedding decorations, crafts and accessories: photos of original wedding decor
Wedding invitations - original and unusual handmade samples with photos, video invitation example
After the thread is in the third row, take one piece and thread it through the same bead where the tip comes from. Then turn in a circle. Thus, all subsequent rows will be attached not horizontally, but vertically in relation to the previous ones. Remember to decrease the number of beads as you get closer to the edges of the workpiece.
Tip: having mastered this variety, try braiding balls with beads. Christmas tree decorations will be no less delightful and original.
Ways to decorate eggs
Before starting our main master class, I would like to dwell on the simplest ways to decorate a beaded egg with your own hands. Pasting with beads and rhinestones This method is very simple, since it does not require the use of a pattern and even children can do it. All you need is your imagination and a tool. We take a blank and draw a sketch of our future drawing on it with a pencil. Next, we apply glue to those places that will be decorated accordingly and begin gluing the beads, following our pattern. The advantage of this option is its simplicity, accessibility and the ability to reproduce any ornament or composition. In this case, beads can fill both the entire form, covering the surface with a monolithic layer, and its individual parts, placing emphasis on individual elements. Carrying out such registration is a very labor-intensive and painstaking process that requires perseverance, patience and attentiveness. Decorating with sequins Sequins can also be an excellent material for decorating Easter eggs. Using sequins of pastel colors, you can paste them over the shell, creating a very delicate and airy sample. And the use of sequins in the shape of flowers will allow you to create a lush decoration for our souvenir, marking the spring awakening of nature. Let's take a closer look at what we should do. We take a foam rubber blank. We pierce the sequin with a pin with a colored bead at the end and stick it into the base. Alternating the color of the pins, we place our flowers on the base, trying not to leave empty spaces, until the surface is filled to the maximum. While working, coat the iron core of each pin with glue for better fixation in the foam rubber.
To give the work completeness, we suggest you make a stand for the egg. For this purpose, we will use a pin mold (true craftsmen will find a use for everything). We paste the edge of the stand with green sequins in a circle, and when everything is ready, we glue the finished creation into the center. Our wonderful souvenir is ready! Easily, simply and quickly, you get a spring mood and joy from the work done.
Braiding an egg with a mesh of beads This method involves using a pattern in your work. Weaving technology is based on the fact that the braiding takes place in three stages, due to its specific oval shape. So, a mini master class and accompanying photos. We divide the base into three parts: upper, lower and wide central belt. We start the work from the central fragment, for which we weave a mesh of beads using a given pattern. The size of the mesh should be sufficient to encircle the width of the egg. Next, we put the mesh on the workpiece and connect its edges. Very important: the belt should fit tightly. Now we have to braid the poles. The visual diagram shown in the photo below will be an excellent assistant for us in this: Braiding the crown requires special attention; you must ensure that the number of beads in each subsequent row is evenly reduced. The mesh should fit as tightly as possible; weak, dangling rows are not for us. We expect an excellent result, don't we? To fix the final bead, we thread a thread through it, additionally passing it through nearby ones, and tighten it with knots. We secure the thread well, otherwise the weaving may “unravel.” We mask the cut end. The result is a very original festive decorative element. And using beads of different colors to create all kinds of motifs, you can achieve absolutely amazing results. In the photo below you can see an example of such weaving.
After some weaving practice, using any pattern will become a very easy and familiar task for you, but what masterpieces in the form of eggs you will be able to create with your own hands.
Crochet beaded Easter eggs
You will need minimal knitting skills, hook No. 0.8, 50 g of cotton yarn. Lowering starts from the last row. Then we cast on the required number of air loops. The first row is single crochet, in the Russian way. All the following are incremented in a spiral. The knitting should not be loose or too tight. Nodules are not allowed.
A secret: numerous computer programs allow you to create your own custom themes, select shades, and determine sizes.
Mosaic technique
For it you can use both fishing line No. 2 -2.5 and threads. It is better to take chopped beads. Move from the tops to the center. To do this, make a flower of 6 petals with a center of one bead. Then, between the beads of the original row, weave the beads of the second row in a checkerboard pattern.
Pull the thread through the bottom row. With each subsequent one, increase the number of beads in proportion to the circumference. On reaching the equator, on the contrary, narrow down. Carefully secure the end of the thread inside the end bead.
This is important: do not loosen, but do not overtighten the canvas. The quality of execution depends on this. It is easy to determine the skill of a needlewoman from a mosaic.
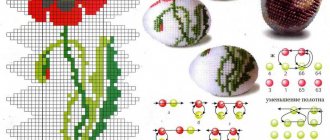
Beading for beginners egg, detail from scratch
Material:
- Beads size No. 8 (green and yellow)
- Wooden egg 50 mm high and 39 mm in diameter
- Fishing line 0.2 mm in diameter and two needles for weaving
Progress:
Weave the fabric for the belt using the monastic technique to cover the middle of the egg. Canvas size 7*29 crosses. In order to weave a belt using the monastic technique (or in a “cross”), you will need a fishing line with two needles. Place four beads on the fishing line.
Pass one needle through the outermost bead from the opposite end of the fishing line.
Tighten the fishing line, you should get a cross made of beads.
Place one bead on one end of the fishing line and two on the other.
Pass the needle, closest to which one bead is, through the outermost bead from the opposite end of the fishing line.
Pull the line to get the second cross.
Repeat the last step as many times as necessary until you reach a certain chain size.
To weave the fabric, you need to make a second row of crosses. Pass each of the needles in a circle through the beads of the last cross.
Throw one bead onto the end of the fishing line facing the product.
Beaded egg: interesting patterns
Combined techniques allow you to create a wide variety of ornaments and subjects. Let's take "Royal Lily of the Valley" as an example. We lay the base in a soft pink color on monofilament threads (using the double-sided weaving method).
We collect lily of the valley leaves on wire (by hand weaving). For the flowers we choose pearl beads and a circular weave, also on a wire frame. We place small pearls on top, large ones on the bottom. We form a bouquet by intertwining the wire bases of lily of the valley leaves and twigs.
Using nylon and superglue, we fix them on the braided egg. And finally, the crown. For strength, again, wire. In the center is the largest pearl. We sew all this splendor between the beads of the top rows.
The meaning of the Easter symbol
Easter is one of the greatest Christian holidays, revered throughout the world. His arrival is eagerly awaited, preparing in advance with special trepidation and respect. The celebration of Easter sacredly preserves the traditions and customs of our ancestors: baking Easter cakes, decorating the Easter basket and, of course, painting eggs. The egg is a talisman and a symbol of prosperity. The long-known tradition in Rus' of giving each other Easter eggs is not accidental, because the donor symbolically bestows goodness, prosperity and prosperity on someone, protecting the home of people close to him from damage and filth. Beading with its numerous bright and colorful weaving techniques allows you to create beautiful, and sometimes exclusive, egg decor with your own hands. Today we will look at several interesting and accessible weaving methods even for beginners: from simple to more complex.
You can combine not only different weaves, but also embroidery
To do this, you need to cover the model with thick fabric (gabardine, satin or velor). Sew the fabric along the bottom edge (or paste it over) and decorate. It is customary to embroider using a classic monastery stitch or beaded satin stitch.
In addition, you can simplify the task by purchasing a plywood blank adapted for beads. Their choice is quite wide and it is convenient to sew, as if using a hoop. Jewelry, very small beads will be especially good in this form.Cross-stitch patterns, divided into squares, are also suitable. All you need is the right scale. Add accessories, mother-of-pearl, openwork tutus, ribbons and braid, and bugle bead pendants. Apply wood painting, wax laying, diamond painting. Feel free to decorate with fringe, embossing and cords.
Images can be different: Christian themes, floral arrangements, abstractions. The design for Gzhel, Khokhloma and Palekh looks gorgeous. Themes of angels, butterflies and nesting dolls are incredibly popular.
It is worth taking care of the packaging. Classics of the genre are velvet bags, birch bark boxes and baskets.
These beaded Easter eggs and weaving patterns will definitely be exclusive. It's up to you to give or keep them. Don’t be shy, be creative, post photos you made with your own hands.
Step-by-step master - class No. 1
There are a great many options for weaving Easter eggs from beads. For example, our version looks a little unusual, but undoubtedly beautiful. It turns out that an Easter egg made of beads with lilies of the valley is in a beautiful stand and framed with spring flowers.
Where to start
Weaving an Easter egg with beads begins with preparing lily of the valley flowers and collecting them into a single inflorescence. The next step is to weave the leaves and assemble the elements of the four flowers together. Then we move on to making the base - the stand. After this, we braid the Easter eggs themselves from beads. Photos of all stages of production will certainly make your work easier. Follow them and you will succeed.
Step 1: weaving lily of the valley flowers
First we will make our lilies of the valley. To do this, take beads and a vice. We cover the edges of the instrument with adhesive tape in two layers so as not to damage the beads.
Now we cut off the top of the beads. At the exit we get a smooth flat surface on one side of the inlet. This action will allow us in the future to place the top of the flower on this plane and glue it to the bead without any difficulty
Then we take our gold metallized thread, fold it in two layers and string 6 pearl-colored beads.
Pass the thread through the holes in the beads. We perform this action several times to secure the beads more firmly and reliably. Then we send both ends of the thread into another bead towards each other. We also send thin wire there.
Next, we insert our stamens into the sawn bead, and drip a little glue onto the sawn top. Any remaining adhesive must be wiped off immediately with a soft cloth. Any napkin you have will do. If this is not done right away, the glue will remain on the surface of our stamen and will stick out unattractively from the beautiful flower. This is simply not acceptable)
We decorate the flower stem by wrapping the wire with tight turns of thread.
We will need a lot of such flower preparations. Remember that the inflorescence must consist of flowers of three sizes. The first ones are the smallest, made of small diameter beads. The second ones are medium-sized beads, and the third ones are the largest. The number of flowers depends on the inflorescence, i.e. how many elements will be on one lily of the valley stem.
Step 2: form branches with flowers
After this we form lily of the valley branches. The smallest bead will be the top flower, and the largest will be the bottom flower. So, our beaded Easter egg will look like a real plant.
Step 3: weaving leaves
We recall the techniques of hand weaving and in this way we form several bright green leaves for the lily of the valley. We make them in two sizes. The leaf that will be in the middle should be longer than the leaves on the sides. They should not differ in width.
Step 4: collect a flower sprig
Then we form a ready-made branch of lily of the valley flowers. We connect three flower branches and three leaves. So our beaded Easter egg decoration is ready. The master class moves on to the main step of making the product.
Step 5: weave an Easter egg from beads with laces
We braid the Easter egg with beads in a way convenient for you, and then make 4 embroidered stripes. They will help us divide the product into 4 parts in this way.
For a beautiful top we make a “crown”. When weaving, we place a bead of the largest diameter in the middle of the crown. Then we sew the crown and stripes to the egg shirt. It is better to perform this action with monofilament or gold thread. The stitches should be small and placed exactly in the middle, where the sides of two adjacent beads touch.
Since preparing the egg itself is very heavy, we strengthen the woven stand. In our case, the ring left over from the tape helped us.
Step 5: weave the stand
The final stage in our making of the most magnificent egg is the formation and weaving of the stand. It should only be performed after the previous stages have been completely completed. After all, only in this case can you not make a mistake with the dimensions of our stand. We weave the stand “Ndebele”, but its appearance is left to your imagination. You can give it the shape of a tube or vase. But under no circumstances should you do it completely straight down, because in this case, your beaded Easter egg will constantly fall and there’s nothing you can do to fix it later.
Another trick that is constantly used when weaving eggs from beads is additional strengthening of the stand. This could be a ring from adhesive tape, a plastic cutout from a bottle, or a ring glued together from thick cardboard. Any strong material that every needlewoman has at home will do. After completing the work with the stand, we move on to sewing our bouquets into place. We form a beautiful frame and straighten all the flowers. And at the very end, we sew the egg to the stand so that it can be picked up and put on display for “brag-offs” without fear. That's it, our magnificent creation is ready! All that remains is to straighten the beads with tweezers and enjoy the result of the work. These Easter eggs will be a wonderful gift for your loved ones.
Read on to find out what other Easter eggs you can create from beads. Step-by-step photos of weaving the product are also included.
Beautiful Easter eggs made of beads: photo examples of crafts
Please repost
1+