From our article you will learn how to make an Easter egg with your own hands.
In our country, Easter is loved just like New Year and Christmas. That is why most people begin to prepare for this bright day prematurely. And the first thing they do is start preparing pleasant surprises for their nearest and dearest.
Most people simply go to the nearest shopping center and buy the right amount of Easter souvenirs there. Of course, you can do the same. But if you want your family to really like your present, then try making it yourself.
DIY Easter egg made of beads: diagrams
Easter egg made of beads Scheme No. 1
Scheme No. 2 Scheme No. 3
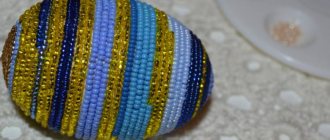
Some novice needlewomen think that decorating an egg with beads is impossible without special skills. In fact, beads are exactly the kind of decorative material that even a small child can handle. If you have no idea what beadwork is, then use the simplest method of decorating an Easter egg with beads.
To begin, mix beads of different colors in a small bowl, and then take a plaster egg pre-lubricated with glue and roll it as thoroughly as possible in bright beads. After they completely cover the entire surface, carefully set it to dry. After 6 hours, the Easter egg can be beautifully packaged and presented to your sister or close friend.
Master class on gluing eggs with bead thread:
- To begin, take a natural or artificial egg (it can be made of wood or plaster), degrease it as thoroughly as possible and let it dry.
- While this is happening, start making a thread of beads. Take an ordinary fishing line or thin wire and start stringing bright beads on it. Since you will subsequently wrap the egg with this workpiece, you can immediately gain greater length.
- Next, take the egg in your hands, grease its widest part with glue and carefully form the first circle of beads. We wait until it sets a little, again grease the surface of the Easter egg with glue and screw another row onto it.
- We continue these actions until the entire surface of our gift is covered with a thread of beads. After this, we leave it alone for at least 10 hours and only after this time we attach a thread to it, by which it can be hung.
If desired, you can replace a simple thread of beads with some beautiful pattern. Above we have offered you several interesting patterns that will make your gift truly original.
DIY Easter egg made from paper from origami modules: instructions
Figure No. 1
Figure No. 2
Figure No. 3
To make an Easter egg using the modular origami technique, you only need colored paper, scissors and a little patience. If you wish, you can also additionally coat the fastening parts with PVA glue, in which case the finished product will be stronger.
Instructions:
- First of all, take colored paper and fold it as shown in Figure No. 1. Don’t be lazy and make the right amount of blanks at once. If you want to create an interesting pattern, then make blanks in 2 or 3 different colors.
- At the next stage, you can start connecting the finished modules to each other. How to do this correctly is shown in Figure No. 2. Try to do everything as correctly as possible, because if at least one model does not fit correctly, the holiday craft may not work out.
- After the models form several full-fledged circles, proceed directly to creating an Easter egg. Recommendations for assembling origami models can be found in Figure 3. In order for your craft to acquire the desired shape, gradually reduce the number of models that you use to create the next row.
How to make a craft from threads?
Below are three ideas for Easter eggs made from strings.
Let's start with the simplest, in my opinion, option. Let's make pom-poms.
Take double cardboard, scissors and thin yarn of three colors.
We wrap all the shades on cardboard. leaving the first and last threads. Pass one between the cardboards.
We take out these threads and tie them.
Next, I cut the thread between the cardboards.
We take out the base and use scissors to give the shape of an egg to this pompom.
The next idea is shown step by step in the photo.
Next, let's repeat the idea with the tourniquet and papier-mâché. We will just cover the ball with threads.
We use the same PVA glue.
By the way, it is recognized as the safest for health and children!
DIY Easter egg made from paper using applique technique
Easter egg applique Template No. 1 Template No. 2
Template No. 3
Since the appliqué technique does not require any special skills, you can make such an Easter egg even with a small child.
To create it you will need:
- Colored cardboard
- Colored paper
- Glue
- Satin ribbons
- Scissors
- The simplest template
So:
- Take a cardboard of a suitable color, attach a template to it and trace it with a simple pencil
- Next, take scissors and carefully cut out the design along the resulting outline
- Put it aside for a while and start making decor
- Cut out several flowers, green leaves, willow branches or a small chicken from colored paper
- Glue the resulting blanks onto a cardboard egg so that you end up with an interesting plot.
- If you wish, decorate the Easter applique with small satin bows
Egg basket
You can make a whole composition out of Easter eggs. To do this, you need to make a basket, which, just like the eggs themselves, turns out to be a work of art.
Required:
- a small flower pot (preferably plastic so that it weighs less);
- a skein of twine (or yarn);
- glue gun;
- a piece of white felt;
- a piece of white cloth;
- a little lace;
- a piece of satin ribbon;
- wire.
Egg basket in 9 steps:
- Measure the height and diameter of the pot, take a white cloth and draw a trapezoidal pattern on it according to the dimensions. Leave a 1.5 cm allowance on each side. Cut it out.
- Using a glue gun, cover the inside of the pot with fabric. Fold the top seam allowance to the outside and glue it too.
- From white felt, cut two circles to fit the bottom of the pot and glue one on the outside, the other on the inside.
- Turn the pot over - it's time to decorate the bottom. Spread the surface with glue, attach the end of the twine to the center and wind it in a circle so that each subsequent turn fits tightly to the previous one. Cover the entire bottom with twine.
- Apply glue to the walls and wrap them in the same way with twine almost to the top, leaving the white fabric peeking out about a centimeter.
- Take the wire, bend it into the shape of a hand, apply glue and wrap it with twine.
- Glue the handle to the basket.
- Stepping back a little from the top edge, glue the lace. It should cover the junction of the handle and the basket.
- Form a bow from the ribbon and glue it to the basket.
You have now created an elegant craft where you can put eggs prepared for Easter and give it to a loved one. In principle, this Easter basket will be convenient to use after the holiday. For example, you can put sweets on the table in it.
Crochet Easter egg: diagram, description
Scheme No. 1
Scheme No. 2
Scheme No. 3
Of course, you can’t eat a knitted Easter egg, but such a souvenir will definitely be a wonderful gift. And if you also try to make it exclusively from threads and cotton or padding polyester filler, then in the end you will get a pretty cute toy for a child.
Also, such knitted gifts can be used to decorate your home. Since they turn out to be practically weightless, you can decorate a window with them by simply hanging them chaotically on wooden branches.
Process description:
- So, cast on the required number of air loops and connect them into a circle. This will be the wider part of the egg.
- At the next stage, we begin to knit two loops from each
- Next, we knit a row with simple chain stitches
- Then we knit a row, making an increase through one loop
- After this, we knit a row again with ordinary knitting
- Next, we again make an increase on every second stitch.
- After this we knit 4-6 rows with a regular stitch
- If you did everything correctly, you will get half an egg
- Next, begin alternating simple rows with rows in which you will decrease in every second stitch
- Continue knitting in this manner until the hole in the piece is closed.
Easter egg made from pasta and balloon
Easter egg made from pasta and a balloon Easter egg made from pasta: recommendations for making
Easter eggs made from pasta always turn out very beautiful. Such decorative material can be painted with any coloring agents available to you, these can be either ordinary painting paints or aerosol paints. Also in this case, you will have the opportunity to choose the size of your future Easter present.
If you wish, you can make it as large as possible. Yes, and if you want to end up with a very beautiful thing, then use pasta in the form of butterflies, feathers, circles, shells and flowers to create it.
Manufacturing recommendations:
- First of all, think about how big you want the egg to be, and then inflate the ball to the desired size (preferably, it should be oval).
- To make it more stable, place it in a porcelain bowl. If you are making an Easter egg in which you can put candy or cookies, then use a felt-tip pen to mark the location of the intended slot.
- Next, wet the brush with glue and coat a small area of the balloon with it. Carefully fill this part with pasta and let it firm up a little.
- Continue these steps until the entire space of the ball is filled with pasta. At this stage, the workpiece is simply set aside until completely dry.
- As soon as you see that the glue has completely dried, you can pop the ball and carefully remove it from the resulting shell.
- Basically, if you like what you get, you can simply paint the egg the desired color and attach a loop to it.
- If you want something more original, you can try decorating the Easter egg with additional pasta patterns, ribbons and large beads.
Kinder egg variant
A large Kinder is a great gift for a child. Therefore, it’s worth figuring out how to make such an egg. After all, all children love such sweets, and especially gifts in them.
When making such a surprise, you have the opportunity to choose the desired surprise and the size of the future egg.
To make this option, you need to take a balloon, paper, glue, starch or flour, and a brush. Kinder will be based on a ball; it can be made of any size or you can use paper.
Before pasting, you need to place the desired gift inside it. Then you can start gluing and then decorating the gift.
Waiting and anticipating the gift inside will bring a lot of joy to children.
DIY Easter eggs made from thread
Manufacturing recommendations
Ideas for needlewomen
An Easter egg made from threads is made according to the same principle as the previous craft. In this case, you will also need to inflate the balloon to the desired size, and then wrap it as tightly as possible with threads of the selected color. If you want your egg to be more colorful, then you can try adding threads of a different color periodically.
When you see that the entire surface of the ball is covered with threads, take a brush and use it to generously coat the workpiece with glue. Do everything as carefully as possible, without missing the smallest area. When this process is finished, place the ball in a bowl and wait until the glue dries completely. As soon as this happens, you will need to burst the ball and carefully remove it through some hole.
But still remember that in this case there are some nuances of making an Easter egg. If you want it to be as light and delicate as possible, then wrap the ball in such a way that its color is clearly visible through the gaps between the threads. If in the end you want to get a product that looks as much like an egg as possible, then try to wrap the ball without the slightest gap.
Video on how to decorate a Faberge egg using embroidery
Faberge eggs can be made using absolutely any technique offered today.
The main thing to remember is that such a craft should differ from others in sophistication, style, and, if possible, a large number of decorations. And it should be a gorgeous job in every way.
Here is one of these chic crafts that I would like to bring to your attention.
When you see the end result, it may well seem that such work is simply impossible to do. But why not, a little perseverance, effort and desire to repeat it, and such beauty will show off on your holiday table!
And if you present such a thing as a gift, then I think that Carl Faberge himself would not refuse such a gift.
DIY Easter eggs made from papier-mâché
Bright Easter eggs Papier-mâché eggs
Using the papier-mâché technique, you can also create a custom Easter egg; if you wish, you can cut out a circle of the desired size in it and your product will turn out hollow. This will make it possible to further decorate the Easter craft from the inside. As for the form that will be covered with paper, then in this case you will have a choice.
Depending on what you want to get in the end, you can use the same balloon or a plaster blank. You can buy the latter at a craft store or make it yourself by simply pouring the gypsum solution into a Kinder mold.
So:
- Chop bright napkins and white paper into small pieces in advance.
- Lubricate the ball with a thick layer of glue and begin laying out the first layer of napkins.
- When finished, coat it with glue again and repeat the procedure.
- Next, we line the napkins with plain white paper, coat it with glue, and then again put 2-3 layers of napkins.
- If you are making a non-hollow egg, then it is not necessary to use white paper.
- In order for the Easter craft to withstand additional decor, you must have at least 8 layers of paper on the ball.
- Next, we wait until all the layers dry, take out a ball from the resulting egg and decorate it with ribbons, beads and sequins.
Large egg option
There are a lot of options on how to make a large egg yourself. Often these versions of eggs are made using balloons.
Using a balloon, you can make an egg of the size you need, since the balloon is adjustable in size. It is also covered with paper and glue on top.
After all the layers have dried, the ball is removed from the base, the edges are coated with glue and fastened together. Here is a simple option on how to make a large egg.
Easter eggs from newspaper tubes
Eggs from newspaper tubes
Weaving pattern No. 1 Weaving pattern No. 2 Weaving pattern No. 3 Weaving pattern No. 4
If you really want to surprise your household, then try making an Easter egg from newspaper tubes. This product is woven quite easily, so if you wish, you can quickly make a large number of holiday gifts of different sizes. If you do not plan to paint them in the future, then use newspapers with colored designs to make the tubes.
Yes, and remember, in order for the egg to weave well, the tubes must be the same size and in no case should they be very thick. For those who will be making such a craft for the first time, we present an interesting master class.
DIY Easter eggs made from salt dough
Easter egg made using the first method
Easter eggs made using the second method
You need to start making this Easter craft by preparing the dough. In order for it to turn out right, you will need to take equal parts of salt and flour, mix it all with a small amount of ordinary water and knead a stiff dough.
To make it more pliable, you can add 2-3 tablespoons of PVA glue to it. Once the dough is ready, you can start shaping the eggs. They can be done in two ways.
First way:
- Roll out the dough into a thin layer and use a cookie cutter to cut out the required number of eggs.
- Take a pencil or stick and punch holes in the resulting blanks
- Dry the blanks in the oven, let them cool, and then paint them as you please
Second way:
- Make an oval shape from food foil
- Place it in the pre-rolled dough and dry it a little at room temperature
- After that, put it in the oven for 3-4 hours, and then take it out and start decorating
Ideas for Easter eggs made from plasticine for kindergarten children
Here are some examples of how you can have fun with your children by telling them the story of Easter. To do this, you need to give them an oval blank and plasticine.
And then let them independently stretch the material over the cardboard, developing motor skills.
You can use the plasticineography technique to create a composition.
Or let them come up with it on their own. I think that even a first-grader will like such ideas.
From grains of rice you can depict a willow. But this is already under the guidance of the teacher.
Bright, simple and interesting!
Craft: Easter egg made from ribbons using the kanzashi technique: instructions, photos
Easter egg made from ribbons using the kanzashi technique Rainbow egg The
kanzashi technique involves the use of satin ribbons for decoration. And since you won’t be able to glue them together, you will use sewing pins to fasten them together. For this reason, it will be better if you buy or make the required foam mold. Since this material has a soft structure, you can stick the required number of pins into it without much effort.
To make Easter crafts using the kanzanshi technique you will need:
- High quality satin ribbon
- Sharp scissors
- Sewing pins
- Foam mold
- Lighter
So:
- First of all, cut the satin ribbon into pieces and singe their edges using a lighter (if you want, you can replace the lighter with a candle).
- Next, fold each square so that it forms a triangle, and then bend its edges towards the middle, burn them with a flame and press them well together.
- As a result, you should end up with blanks that visually resemble small flower petals.
- The petals prepared in this way must be taken one at a time, placed on a foam mold and secured with a pin.
- It is best to start forming an Easter egg from the narrowest part of the craft. The petals should be laid in rows, carefully securing them with pins.
Easter bunny
You will need a cardboard egg carton. We tear it finely and soak it in the sticky mixture, you can even boil it, but then add the glue after. Using a blender, make the mixture homogeneous. We added glue, kneaded it and wrapped it in film for a while, put it in the refrigerator:
The frame will be wire. Cover the frame with the previously prepared mixture:
Head and ears on a wire stuck into a ball. We form the body and coat it with Paper glue:
Felt clothes, without patterns, are glued directly onto the rabbit. We cover it with acrylic paint and apply blush and other touches on top with pastels, and arrange the hair in a hairstyle. We sew the skirt and vest directly on the bunny, finishing with beads:
Small parts and stand are made of polymer clay.
Craft: Easter egg made from ribbons using the artichoke technique: instructions, photos
Easter egg made from ribbons using the artichoke technique Easter egg made from ribbons Egg using the artichoke technique The
artichoke technique is somewhat similar to the kanzansha technique. In this case, you will also need to use satin ribbons, although they will be cut into longer pieces. They will need to be folded in a special way, directly on the foam blank and secured with sewing pins.
So:
Figure No. 1
- To begin, take a satin ribbon and cut it into pieces. Depending on the size of the finished product, their length can range from 8 to 15 centimeters. After this, take a piece of satin ribbon, place it on a foam mold, bend it as shown in Figure No. 1 and secure with a pin.
Figure No. 2
- Having formed the first petal and secured it, begin to make the next one. To do this, place the ribbon as close as possible near the first petal and secure it with pins. How this is done correctly is shown in Figure 2.
Figure No. 3
- Form such petals, lay them in rows until you completely cover the entire area of the workpiece. When you reach the top, make a buttonhole from pieces of satin ribbon and sew it to the upper petal with ordinary threads (Figure No. 3).
Painting eggs
Traditionally, eggs are often colored. This is the most popular way to decorate eggs for Easter. Only fresh eggs are suitable for work, because they are meant to be eaten - even the most beautiful ones.
Variety of options
Are used:
- household dyes, for example, onion peels, beets, cherry or oak bark, spinach, saffron. Choose depending on the color you want. You can see how they turn out in photos on the Internet;
- industrial dyes, a lot of them appear on sale shortly before the holiday. Make sure that the dyes are labeled “food grade”.
There are different ways to make eggs not exactly monochromatic, but more interesting:
- cooking with rice. The egg will turn out speckled. To do this, wet eggs need to be rolled in rice, preferably long-grain rice, tied with gauze and boiled in a dye solution;
- "mask". This can be a glued leaf of a houseplant (a young fern looks great), rubber bands, strips of adhesive tape or electrical tape. After the eggs have cooked and cooled, the elements of the “mask” must be removed;
- cooking with vegetable oil. It is added to water with dye. Eggs prepared according to this recipe are obtained with “marbled” stains.
Master class: “gradient” egg
Spectacular products are obtained by using different shades of the same color. This technique is called “ombre”. We'll tell you how to get a “gradient” egg, painted in three shades of the same color at once, smoothly transitioning from one to another.
- Dilute food coloring according to instructions.
- Place the eggs in the container with the dye. Place them tightly, with the sharp end up. They should be covered only one third with colored water.
- Paint according to the technology indicated on the packaging.
- Add water to the dye so that it now covers two-thirds of the eggs. The solution became less saturated. Paint over.
- Add water again until the eggs are completely covered. It turns out the third shade, the most delicate.
The gradient eggs are ready.
Craft: Easter egg made from ribbons using quilling technique
Idea for Easter quilling
Figure No. 2
There are several ways to make an Easter egg using the quilling technique. The first one is suitable even for those people who have never done needlework in their lives. In this case, you will need to make a circle of multi-colored ribbons of the required diameter, and then carefully form one half of an egg from the resulting blank. To do this, you will need to press your finger on the center of the circle and gently bend it outward.
After this, you will need to make the other half of the holiday product in the same way, and then use glue to fasten them together. The second method is more complicated, but the result will be more interesting. In this case, you will first need to make a plaster blank, prepare a three-dimensional decor from paper, and then fix it with glue.
Simple decoupage technique for decoration
This technique is quite simple and not at all difficult to perform.
We will need:
- boiled white eggs
- napkins with small patterns
- protein
- tassel
Manufacturing:
1. Boil the eggs in advance, then cool them.
2. First, break one of them and separate the white from the yolk. We will only need protein.
3. Napkins with a beautiful pattern usually come in three layers. At the very top there is a drawing. This is what we need to separate from all other unnecessary layers.
Then carefully tear off the desired fragments with your hands. You can, of course, cut them off with scissors, but when you tear them with your hands, the edges end up with fuzzy lines and are less visible on the egg itself.
4. Place the desired fragment on the surface of the shell and coat it with protein. You can do this with a brush, or just with your finger. Then glue the next fragment in the same way. And so on.
5. Place the decorated copy on a wire rack to allow the protein to dry. This is especially necessary if the drawing is applied from all sides.
6. By analogy with the first copy, draw up all the rest. For each of them you can use fragments from different napkins.
7. When the protein is completely dry, it will stick better than any glue.
For a better appearance, after drying, you can moisten a rag with vegetable oil and wipe our Easter decoration.
To make it more clear, please watch the video filmed specifically for the blog “Secrets of Housekeeping”.
As you can see, everything is quite simple. And even a child can handle this technique. At the same time, you will receive a lot of positive emotions as a bonus.
Decoupage and decorate Easter wooden eggs
Pink Easter egg Vintage style Easter egg Rustic ornament on an Easter egg
The decoupage technique is more suitable than others for decorating wooden Easter eggs. Thanks to the fact that the paper almost instantly sticks to the wood, you can quickly create a real masterpiece. But remember, before you start directly decorating, the wooden blank must be sanded with the finest sandpaper and then degreased.
Only in this case will you be able to place the drawing on the surface as evenly and correctly as possible. When it comes to decorating such holiday items, you definitely won’t be limited in choice. If you wish, you can decorate the finished egg with beads, rhinestones, sequins, multi-colored ribbons, bright feathers and even dried flowers
Brief summary
Easter eggs are an excellent decoration not only for the holiday table, but also for the entire room in general.
As a rule, the main materials for their creation are paper, cardboard, and balloons. They can come in different sizes from very small to very large.
A good gift for children would be a Kinder surprise egg. Children love this delicacy for the gifts inside. You can make such a craft yourself; it can be any size.
You can put any gift inside. You can involve children in such an exciting process as creating eggs; they will be happy to help you in this matter. Joint creative activity will certainly delight you.