Hello, dear readers! Since Valentine's Day is approaching and even though we don't celebrate it, simply making our closest people happy with hearts that we will make with our own hands is a great occasion. Today we will make a heart from napkins in different versions. I remember in my childhood and youth we ourselves drew “Valentines” for girlfriends and friends. You can also make them with your own hands in the same way as I will show you today.
In fact, there are so many options for hearts made from napkins that it’s probably impossible to fit them all into one article, so I’ll show you the options I like the most. If anyone missed the previous article about the history of Valentine's Day, be sure to read it. And we will start making handmade gifts. Why let’s get started, because we made all the hearts below together with our daughter, it took us several days, but it’s worth it, now we have something to please our nearest and dearest.
What will you need?
To make a heart from napkins, in addition to the material, you will need some other things. This:
- scissors;
- pencil;
- glue stick, PVA glue or hot glue gun;
- stapler;
- wire;
- colored insulating or special decorative tape;
- satin ribbon;
- colored napkins, paper, cardboard.
To make a heart, paper napkins of a beautiful shade are suitable.
All these accessories play an important role in the process of making a decorative heart. But for any one method all items are not needed. For example, to make a three-dimensional heart from napkins, you do not need to use a glue gun or a stapler.
Depending on how the heart is made, different tools may be needed.
Every girl will like such a gift as a decorative heart. There are many options. Choose multi-colored napkins, select the desired texture, density, pattern, design. Buy colored cardboard. Make a heart of any size. Such variability will satisfy the needs of the most capricious birthday boy.
The heart can be made of any size and design.
Let's consider the methods of making decorative hearts, generously provided to us by specialists in the field of design craftsmanship.
Master classes on manufacturing
The choice of method for making a gift heart determines what materials and tools are required, as well as the appearance of the product. In modern times, coming up with new methods of working with paper is easier than ever, since there is the Internet.
There are several ways to make a three-dimensional heart.
In this review, we will highlight the most popular, easy and quick ways to make a gift heart at home.
And here are the methods by which this is done.
- Heart frame of simple roses made from napkins.
- Volumetric decorative heart.
- A heart made by rolling balls from colorful napkins.
- Making a twisted rose from satin ribbon or table napkins.
- Heart using table napkins.
To understand each approach to making a decorative heart, it is necessary to analyze each separately and in detail. Let's do so.
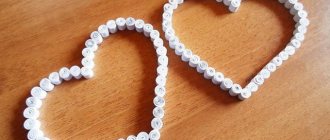
Heart frame made of ordinary roses
Before you make a heart out of napkins in the form of a frame with your own hands, you need to buy colored square napkins. Here's what tool you'll need:
- scissors (you can’t go anywhere without them);
- cardboard, thick paper;
- pencil;
- satin ribbon.
In addition to napkins and satin ribbon, you will need some simple tools.
Design experts advise using the most ordinary kitchen napkins, plain, without any patterns. Choose a suitable shade and get to work.
It is better to take plain napkins, without a pattern.
The order of the work is as follows. First of all, cut out the frame from a sheet of cardboard. The larger the sheet format, the more beautiful the heart will turn out. But also the dimensional parameters are selected based on the requirements for the final result. Whatever gift you are hoping for, choose this size.
Cutting to shape is not difficult. Fold the paper in half and draw one half with a pencil. Next, use scissors to cut out the layout. The base is ready. If there is no cardboard, you can glue together two or three sheets of plain paper.
A heart model is cut out of cardboard with scissors.
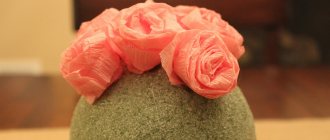
The production of roses is carried out in the following order. Take a two or three layer napkin and cut it along the edges where it is joined into a whole. Next, each part needs to be screwed onto a pencil separately. This is only half done. After this, the screwed part, screwed onto the pencil, must be collected towards the middle with an accordion and removed. Next, the resulting workpiece is folded into a rosette, pressing the straightened part of the napkin.
To get a full-fledged rose, you need to roll up to two or three such blanks, and then connect them together. If you need a large flower, you need to roll up to 6-8 such blanks.
After assembling the required number of roses, they can be glued to the frame. If you plan to hang this frame on a wall or ceiling in the future, additionally attach a color-matched satin ribbon to the back side.
Roses are glued around the perimeter of the frame.
For an interesting design, the colors of the roses are made different. When further sticking to the frame, they are alternated, obtaining a unique product.
Roses can be made in different colors, this will give the product originality.
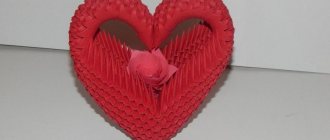
Volumetric product
In order to make a three-dimensional craft, instead of a frame, a solid heart is cut out of cardboard. After this, the roses are glued along the entire front perimeter. To add volume to the craft, roses can be made in a completely different way.
First you need to draw the outline of the heart.
For this you also need colored napkins. Take a whole one, cut off the edges in the places where the sheets are connected. Next, you need to cut the leaf into four parts and place them evenly on top of each other. After this, the rectangular or square shape must be turned into a round one by trimming the edges with scissors. The resulting circle is fixed in the middle with one staple using a stapler. Next, you need to wrap the edges, pressing on top. It turns out a voluminous rose. The quantity should completely cover the cut out cardboard layout.
The entire surface of the layout is covered with roses.
A voluminous rose can be made with flowers using the first method. The choice depends on personal preference.
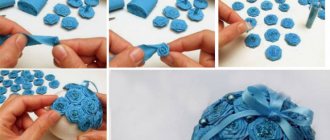
Rolling the balls
This method is not something complicated. The heart model is also cut out of cardboard as for a three-dimensional product. The balls will be attached with the same adhesive stick or PVA glue.
Balls are rolled out of paper and glued onto a cardboard model.
The process of rolling balls is a pleasant activity that you can do together with your children. Take the same multi-colored napkins, cut them into four parts to obtain equal squares, with a side length of 2.5-3 centimeters. Next, roll the squares into balls.
To get a beautiful result, choose multi-colored paper. It is better to glue such balls in different directions. This will make it more original.
twisted rose
In order to make a twisted rose, you will need a satin ribbon 1.5-2 centimeters thick. The manufacturing process is labor-intensive, since each turn will have to be glued with a glue gun. To understand how to make a twisted rose, watch the video. In short, this is done like this: take a satin ribbon and start rolling it, twisting it and gluing each turn.
After receiving the required number of roses, they are glued to a frame or to a solid layout.
Features of volumetric hearts
Do-it-yourself hearts made from napkins look especially solemn and are a symbol of love. They can be collected in the classic red color, or you can create creative options that can contain the most unexpected shades, or a combination of several colors at the same time. This gives a special effect, brightness and beauty to the craft.
It is important to maintain the correct geometry of the heart shape when creating a blank. To fill the base of a three-dimensional craft, paper flowers made from corrugated paper or napkins are used, which can be made in different ways (small or large). But you should remember that they need to be placed compactly on the base so that there are no gaps or emptiness - then the imitation of a blooming bouquet will look harmonious and rich.
Where can crafts on this topic come in handy?
A voluminous cardboard heart will be appropriate for decorating rooms where wedding-themed celebrations, marital anniversaries, anniversaries, or birthdays will take place. With the right shades (the heart can be not only red), this neat craft will harmoniously fit into the interior of the room or bedroom.
A voluminous small heart is often used for congratulations and surprises on Valentine’s Day - in the form of “Valentines”. Also, a symbol made from colored paper can be used to create a homemade postcard or poster. Heart-shaped items (in the form of garlands) collected in the same style on strings or ribbons can be hung on windows, stairs, and furniture for decoration.
Examples of ready-made crafts made from paper and napkins
Hearts made of corrugated paper or napkins attract attention, lift your spirits and create a festive atmosphere. The variety, shapes and options for their manufacture are simply amazing.
General Tips
When choosing decor, it is important to remember a few general rules regarding wedding cars:
- The bride and groom's car should preferably be white or black.
- Guest cars can be of any color, but in the column it is better to have white, black and silver models first, followed by brighter shades.
- It is better to use jewelry of no more than two or three colors; a more colorful range will look tacky and tasteless.
- All elements must not obscure the driver's view.
- If cars are rented, then you need to clarify whether they can be decorated and with what. It is advisable not to choose too adhesive decor so as not to leave marks.
- The style of the entire tuple must be the same.
Photo of a simple and beautiful DIY wedding car decoration
What can you use for decoration to simply and tastefully decorate a car for a wedding with your own hands:
- ribbons made of any material;
- fabrics: chiffon, tulle, organza;
- flowers: fresh or artificial;
- Balloons;
- figurines and figures, plush toys;
- paper decorations: pompoms, posters, appliques;
- comic numbers with inscriptions and drawings.
Decorating a car with your own hands for a wedding is a significant saving on the budget of young people, especially if you rent a car. Plus - this is an opportunity to show imagination and creativity, achieving exactly the result you want.
Paper heart using origami technique
https://youtu.be/BPA7H4cpj7w
You will find more interesting ideas for creativity in the website section:
— a three-dimensional postcard, an original flower vase, corrugated cardboard flowers, a floral panel made of two postcards.
Recently, it has become fashionable to make room decorations yourself from improvised materials. A very simple and original way to decorate your room is to make a heart out of napkins with your own hands. This pendant will decorate any room, will be an excellent addition to any interior, and will add a touch of romance and comfort. In addition, it is absolutely not difficult to design - even a child can handle it. By the way, it is a great idea to involve children in such creativity, because it is useful and interesting.
How to make a heart-shaped ring craft
The original ring will become a children's accessory and will provide an entertaining creative process.
To do this, prepare a couple of sheets of multi-colored paper, scissors, a pencil and a ruler. Next, get to work:
- Cut out a square from paper of any shade you like, and then fold it in half.
- Straighten the square and draw four stripes on the wrong side.
- Turn the square over with the white side up.
- Fold the top strip into the inner area.
- Fold the square with the bright side up.
- Fold the square vertically and straighten it to form a triangle.
- Fold the top of the resulting triangle down.
- Using lines, fold the remaining components of the craft.
- Place the end parts of the strips inside each other.
The accessory is ready! Give it to your child, or make such a ring from a banknote. Your boyfriend or girlfriend will love this gift.
Pompoms and balls
From disposable napkins you can make a voluminous ball or pompom for the holiday. During the manufacturing process, it is important to adhere to the following scheme:
- Cut the same number of squares from 8 sheets.
- Stack the sheets on top of each other and then twist them into an accordion shape.
- The accordion is firmly fixed with a thread in the middle. The edges on both sides are trimmed to form a neat triangle.
- The base expands, resulting in a flower.
- All that remains is to straighten each leaf and fluff it up slightly.
Such DIY crafts made from openwork paper napkins will look natural both at a children's party and at a wedding.
How to make a 3D heart
Not only adults (including “lovers”), but also children are happy to create voluminous paper hearts with their own hands. Every child will be happy to give his mother a craft in a “heartfelt” style. To understand how to make a volumetric heart out of paper, you must first familiarize yourself with the diagram, assembly procedure and video material.
Required materials and tools
For work you will need the following tools and materials:
- colored paper, napkins;
- cardboard;
- scissors, pencils;
- glue, stapler;
- threads, ropes or ribbons.
If you plan to install the craft on a cabinet or chest of drawers, then you will need a stand.
Step-by-step assembly of a three-dimensional craft
Let's look at how to assemble voluminous paper hearts step by step:
- Cut out a heart shape of the desired size from cardboard according to a template (or draw it yourself) - this is the basis. A hole is made in the upper part with an awl, and a matching ribbon is inserted. On the reverse side you can glue a large card with wishes.
- Two napkins are folded on top of each other and the edges of the folds are cut off. Fold like an accordion with a side of 1 cm.
- The middle of the workpiece is tied with thread, and the tops on both sides are cut off in a semicircle.
- The edges of the “accordion” are turned into a “butterfly”.
- Each layer of napkins is lifted upward, giving a rounded shape to the flower, which will be large, half the size of your palm.
- To decorate a voluminous large heart you will need 25 pieces. flowers.
- Starting from the edges of the base, glue the flowers (evenly and compactly) to the middle of the lower part and the lower “petals”. The last flowers are fixed in the center.
All flowers must be glued neatly, without “voids,” and symmetrically.
To create smaller “roses”, fold the napkin twice, then fasten it in the center with a stapler. The edges of the resulting square are trimmed, giving the workpiece a round shape. Each layer is lifted up, slightly squeezing - smaller flowers are obtained. The craft is then assembled in the same order as in step 7.
Video master class
The video greatly simplifies the work, since the visual procedure for making the craft helps you figure out how to fold a heart from a napkin.
Origami from a napkin with a simple diagram
Even the smallest “craftsmen” can make a version of “heart” origami from a napkin, for example, on Sunday morning for their mother - for serving breakfast.
The scheme is carried out in stages:
- unfold the napkin into a rectangle;
- fold in half - in the form of a thin rectangle (fold at the bottom);
- the right and left parts are folded upward - the edge runs in the middle of the workpiece;
- the form is turned over with the bottom side up;
- The sharp corners (2 on each side) in the upper part are bent, the craft is turned over with the front part up.
The “heart” napkin is ready.
And to understand how to make a three-dimensional origami paper heart, you need to follow the following diagram:
- a square of colored paper is folded in half and unfolded;
- on the upper side, perpendicular to the fold in the center, make a small bend - 3mm;
- fold the sheet in half in the other direction;
- the lower right corner is folded in the middle towards the upper fold;
- do the same on the left side;
- the upper parts (left and right) of the bent corners are folded down;
- the outer corners on each side are folded into the resulting fold points;
- the upper corners are folded over them;
- The tips are tucked into the resulting “pockets”.
The craft is ready, but in order for it to “come to life”, you need to “blow” lightly into a small hole (in the lower sharp part) so that the air gives the heart volume.
Simple origami folding schemes and more complex master classes for crafts made from modules are presented here.
Ideas for lush hearts made from paper napkins
Light and airy, but at the same time solemn hearts made of paper napkins can be constructed double-sided - when two classic assembly options are glued together with bases.
Napkins folded into a heart will perfectly decorate a holiday table; they can be made from napkins of different sizes - small and very large.
If there are no napkins of the desired color (red, pink, lilac) in the store to create flowers, then you can always use corrugated paper, which will go perfectly with white flowers from napkins.
Summary of GCD for the application “Heart for Mom” in the preparatory group
Olga Viktorovna Borisova
Summary of GCD for the application “Heart for Mom” in the preparatory group
Educational areas:. Artistic and aesthetic development. Cognitive development. Social and communicative development. Speech development. Physical development.
Goal: To develop in children a kind, respectful, attentive attitude towards their mother.
-To consolidate children’s knowledge about the public holiday “Mother’s Day”
-Teach a kind, attentive attitude towards the mother;
-Activate the use of sayings in the active dictionary, the name of the holiday “Mother’s Day”
,
«warmth of the heart»
;
-Create favorable conditions for the development of artistic manual labor skills, develop the ability and desire to complete the task.
-Develop interest in applications ;
— Develop the skills and abilities of working with paper, creative thinking and imagination of children based on familiarization with the technology of making applique from paper napkins.
-Develop fine motor skills in children.
-To instill in children respect for their mother, the desire to help her, to please her; .
— To cultivate the qualities of accuracy and composure when performing work techniques, hard work, listening skills, communication skills, neatness, activity, work culture
— Preliminary work: conversations about Mother’s Day, family, kindness, love, reading poems about mothers and grandmothers, the story “Mom’s Hands”
B. Emelyanov, memorizing E. A. Blaginina’s poem
“Let’s Sit in Silence,”
learning proverbs about mothers; physical exercises, drawing portraits of mothers.
Preparing heart .
Demonstration material: samples of crafts, instructions for making hearts .
Fluffy heart
It’s very easy to create a cute fluffy heart from napkins with your own hands. We present to you a simple and understandable master class:
- Cut out a heart-shaped base from cardboard.
- Cover it with a thin layer of plasticine. White is best for this purpose.
- Cut the napkins into small squares. Insert a cocktail straw into the center of each square and twist it in one direction.
- Without removing the paper from the tube, press it into the plasticine.
- Fill out the entire base in this way, choosing colors to suit your taste.
Important! You can design a single-color heart, or from 2-3-4 colors - it all depends on your taste and imagination. With this simple method you can create beautiful patterns.
Paper or cloth napkin; -flat surface; -iron; -ironing board.
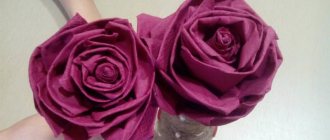
Roses
A beautiful rose craft made from a napkin, the instructions will help you make it. First, the color is selected - it depends on the room in which the product will be located. Most often, either bright or, on the contrary, pastel colors are used. You should take multi-colored napkins, newspaper, glue and a stapler, scissors, and you will also need a flowerpot. It can be purchased at any store that sells flowers. The flower pots can be painted or left in their natural form; shells, beads, and ribbons can be attached with glue.
The napkin needs to be folded in half, and then in half again. The middle is fastened with a stapler, a circle is drawn according to the template and cut out. Fold the layers of napkin one after another to form a flower. This must be done very carefully. You need to make not one such roses, but several - both plain and different colors (optional).
Next we will need a base where we will need to attach our creations. To do this, take a newspaper and crumple it into a tight ball. We tie this ball with threads. It is worth remembering that it must fit into the flowerpot. As soon as the ball is ready, cover it with napkins, on top of which the made roses are glued. The main thing here is your imagination. You can glue it however you like or in any order, making a pattern. Next, place the ball in a flowerpot and decorate with ribbons. The bow will look beautiful.
To avoid confusion, just watch a video on how to make roses from napkins.
An original craft that you can’t buy in a store. It's easy to do and takes little time. To make a doll with your own hands from napkins, the following items are required:
- White threads.
- Simple napkins.
- The serving napkin is bright, beautiful, preferably red.
Here is the process of making a doll step by step. To create a doll, you need to twist a napkin into a tube. For the body you need to roll up a few napkins. The body should be twisted very tightly.
Adding napkin hands
We outline the palms along the edges with white threads. We make a dress from a red napkin.
Using various patterns for crafts from napkins, it is quite possible to create something very beautiful for the table, for example, decorate a holiday dish using a napkin.
We need a napkin or a towel. You will also need threads and a ring for the curtain (on a clip). Now we are making a beautiful flower to decorate serving items.. For this you need single-layer paper napkins. A stack is made of them as follows: each napkin is folded along the edge by 1 cm. All napkins are folded until only one remains. The resulting blanks are connected. Carefully holding the strip, tighten the thread with the workpiece. Now cut strips of the sides along the edges in the form of sharp tips.
Pay attention to the master class that will help you master the creation of this decoration.
Release the ends of a separate napkin so that it turns into a bud. And you will receive a chrysanthemum. To secure the jewelry, take a ring. The clip is removed, the ends of the base thread are taken and the ring is tied. This decoration diversifies the table setting.
Unusual table decoration
Craft “Frozen” from plasticine
A figurine of Anna made of plasticine will delight every child. To do this, prepare a special board, plasticine and a plastic knife for cutting it.
Let's get started:
- Roll a small flesh-colored ball and outline facial features on it with the sharp side of a knife.
- Stick small pieces of plasticine to your face and work on your hair. Draw the relief of the hair with a knife and start braiding two brown braids.
- Attach the braids to the head and work on the torso. Make a body from dark blue plasticine, attach two blue sleeves.
- Make a cone out of cardboard and cover it with blue plasticine: this is how we made the heroine’s skirt.
- Connect the torso with the skirt, and press its lower edges so that the effect of an inflated skirt is created.
- Make a thin purple cape and attach it to the torso.
- Connects the head to the torso.
- Make Anna's hands.
Cover the craft with a special varnish and place it on your desktop so that you can admire the beautiful princess you made with your own hands.
Dove - origami
The most common way to create a dove out of paper is the origami technique. The parts do not need to be glued or cut. All you need is a sheet of paper, always square, and a little patience.
Making a dove using the origami technique:
- Fold the square sheet diagonally to create a triangle.
- Bend the triangle in the middle and return to its original shape.
- Raise the corners to the fold line and iron them with your fingers.
- Bend the corners of the resulting diamond to form a horizontal line.
- Smooth it out and return the workpiece to its previous shape - folds will form.
- Fold the corners from the sides to the center.
- Unfold the corners.
- Hide the corner of the diamond in the center of the figure.
- Turn over and repeat - if you do everything correctly, you should get a “candy” shaped figure.
- Bend the blank - you get a figure resembling a “boat”.
- Bend two fragments 90 degrees.
- From the intersection of the pigeon's head and wing to the beginning of the tail, draw a fold line.
- Do the same with the second wing, remembering to iron the paper well.
- Bend the tail. Open the figurine resembling a rocket, hide the corner inward and downward.
- Fold the wings down.
- To make a beak - make a fold in two directions. Hide the resulting corner inward and downward.
An easy way to fold a napkin
Take a napkin and place it on a flat surface. Fold it horizontally, connecting the bottom edge to the top. If the napkin is made of fabric, iron the fold. If it is paper, carefully smooth the bottom edge with your hand.
Fold the napkin in half again and horizontally. Iron or press the folded edge tightly. You will get a long narrow rectangle. Fold the napkin in half from right to left. Now lay out the napkin. There will be a vertical fold in the middle.
Using the vertical fold line as a guide, fold the left edge toward the middle so that it lies perpendicular to the right edge. There will be a corner at the base of the napkin. Now fold the right side in the same way. The napkin will resemble an inverted “house”.
Turn the napkin over to the reverse side. There will be a triangular pocket at the base of the napkin. Fold the top ends of the towers horizontally so that their edges line up with the top edge of the triangular pocket. Now straighten them out. You will mark a fold on each “tower”. Fold the left and right corner downwards at each end until it touches the fold line. Press the corners or iron them. Turn the napkin over. The heart is ready.
Before folding a fabric napkin, it should be thoroughly ironed.
The best color for a heart napkin is red or pink. Hearts in white, blue, yellow and green will also look interesting.
Place a heart-shaped napkin in the middle of the plate. On top of it you can put a wine glass, a small gift, a flower or a card with wishes for Valentine's Day.
The paper napkin is usually small and already folded in four. Before folding a paper napkin, it is better to straighten it.