Techniques for making pompoms from fabric, paper, rain, plastic bags. Photo and video instructions.
Decorating a space is a creative activity that inspires people of all ages. More often than not, decorators are women. They are closer to the theme of transforming the world around them, bringing beauty and harmony into it.
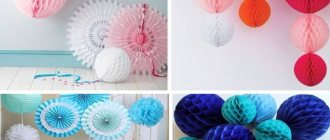
Pompons have taken their rightful place in the theme of decorating spaces for various events. Although initially they were used to decorate gaderob items.
It turns out that making them yourself is quite simple. Yarn, fabric, New Year's tinsel, and paper are used. It is important to follow the correct sequence of actions and arrange the pompoms harmoniously.
What can pompoms be made from?
various pom-poms assembled into products
Classic pom-poms are made from knitting yarn. Other materials for their creation are:
- fur pieces
- paper of different textures and colors
- bags from small to trash
- napkins
- foil
- New Year's rain and tinsel
- fabrics, for example, tulle, felt
In addition to the basic materials, you will need:
- scissors
- blanks for winding thread or fastening other types of materials
- thread, thin wire or decorative tape to secure the middle
Ideas for beautiful DIY Christmas balls: photos
There is a huge variety of all kinds of New Year's toys:
- Classic in the form of animals
- Plain
- Transparent
- With decorative painting
Making your own decorations will not only put you in a festive mood, but will also help improve the energy in your home.
With your own hands
Regardless of experience and skills in needlework, every housewife will be able to find the most exciting and interesting method of making toys. The most popular of these techniques are:
- Origami
- Making balls from wool threads and glue
- Decoupage
- Application of applications
- Salt dough modeling
- Gingerbread and gingerbread decorations
- 3D style toys made of paper, cardboard and felt
- Sewing decorative elements in the shape of hearts and animals
- Application of papier-mâché
- Knitting toys
- Plaster modeling
- Making wax figures
Scrapbooking and decoupage
Also, don’t forget about the old toys you have in your home because they can be used in the following ways:
- As crushed crumbs for decorating new products
- In transparent balls, inserting photographs, pictures or New Year's rain
- Painting toys with acrylic paints
- Changing their shape with wax
- Decorated with beads, rhinestones and sequins
The New Year's mood begins not only with a person's inner feelings, but also with a comfortably furnished home. Decorate it with toys, balls, as well as various crafts and happiness will not keep you waiting. After all, in order to celebrate the holiday with dignity, you do not need to spend huge sums of money. It is enough to put in a little effort and also put in some warmth when creating New Year's decorations.
How to make a pom-pom from yarn, threads on a fork: step-by-step instructions, design ideas, photos, videos
brief instructions in pictures for creating a pom-pom on a fork.
Needlewomen often decorate their work with pom-poms. They know how to make them in different ways. Let's consider a classic one using round cardboard blanks and a regular fork.
The peculiarity of the first method is that you wind the thread on 2 cardboards with a hole in the middle to the desired thickness. Then carefully cut the threads between them, and thread the thread to fasten the middle of the pompom. Pull it together and remove the blanks. The larger their outer diameter, the larger the pompom will be.
Below are instructions in pictures.
photo of step-by-step making of a pompom from threads using a cardboard template
In the second method, the finished product will be small in size. The reason is the small distance between the 2 teeth. Proceed like this:
- place a short thread in the middle between pairs of teeth so that its ends hang down towards the handle
- wrap the thread around the outer teeth of the fork to the desired thickness
- pull one free end of the cut thread up so as to connect it to the other
- tie them tightly and remove the thread from the fork
- cut all the windings on the opposite side from the knotted place
Below is a visual cue in the photo.
step-by-step photos of creating a pompom from yarn on a fork
Video
How to make donuts directly on your fingers is shown in detail in this video.
You can see how to make a small bell on a fork in the following video.
We make a balabon using cardboard rings using this video instruction.
Sources
- https://handskill.ru/431199a-kak-sdelat-malenkiy-pompon-iz-pryaji-poshagovaya-instruktsiya-sovetyi-foto
- https://svoimirukami.guru/pompon-iz-nitok-svoimi-rukami/
- https://tkaner.com/tkan/sherst/kak-sdelat-pompon-iz-sherstyanyh-nitok/
- https://handsmake.ru/kak-sdelat-pumponchik-iz-pryazhi.html
- https://trudogolikam.ru/master-klass/zabavnye-pushistiki-kak-sdelat-pompony-svoimi-rukami.html
- https://camodelkin.ru/dlya-doma/pompon-iz-pryazhi.html
- https://comfort-myhouse.ru/rukodelie/masteritsyi/kak-sdelat-pompon.html/
- https://vsesvoimirykami.ru/pompon-iz-nitok-svoimi-rukami/
- https://kaksdelat.guru/kak-sdelat-pompon-iz-pryazhi/
- https://sharm.click/rukodelie/pompon-iz-pryazhi.html
[collapse]
How to make a fluffy pompom for a hat?
girl in a hat with a fluffy pompom
The fluffiness of a pompom for a hat directly depends on the diameter of the object around which you wind the yarn. The second important factor is the volume of the ball of yarn. It will correspond to the diameter of the future pompom.
In addition to the classic cardboard round blanks, you will be suitable for:
- own palm
- cardboard rectangle
- mobile phone
- plastic bottle
- glass jar
The main thing is that you can pull the thread around the winding on both sides and tie all the threads tightly.
- Cut the circle to the right and left of the fixed center.
- Align the threads, cut off those that stand out in length.
How to make a pompom from napkins: step-by-step instructions, design ideas, photos, videos
several ready-made pompoms from blue napkins.
The more magnificent you want the pom-pom to be, the more napkins you take to make it. For example, for the middle option, 3 napkins are suitable.
- Trim the edges of each with scissors.
- Stack them and arrange them like an accordion.
- Secure the middle with thin wire.
- Carefully go through each layer, leveling it.
- To make the napkins as fluffy as possible, level the layers only in one direction, leaving the other flat.
- Then you can glue it with another similar napkin.
In addition to processing with curly scissors, you can trim the edges in a semicircle or house. Fold the straightened napkins on top of each other, 10-15 pieces at a time, if your goal is large and delicate pom-poms. Such products are a good solution for decorating children's parties, as well as events involving children.
Pompoms made from napkins are hung from the ceiling or other objects, or glued to thin twigs or clothing.
Manufacturing process
If you follow the following sequence, you will not have a question about how to make pom-poms from napkins with your own hands. Here's the recipe.
- Take 5-6 pieces of colored napkins (at least two layers).
- Stack them on top of each other evenly so that the edges match.
- Make an accordion along the entire valley, ensuring that all sides are equal along the bends.
- Next, wind a thread, thin wire or colored ribbon in the middle of the resulting accordion.
- After tying the fan with thread, you need to trim (round) the edges. This is done with scissors, keeping the lines smooth, or sharp edges are cut off. Ultimately, the resulting product differs in structure.
- After trimming, you need to “fluff” the workpiece, bend and straighten all the edges, shake well, and finally straighten the product.
This completes the process of making a pompom from colored napkins. The finished product can be hung on the wall, creating a kind of panel, hung from the ceiling, attached to the backs of chairs, or placed on a holiday table next to the service as a napkin decoration.
How to make a pompom from corrugated paper: step-by-step instructions, design ideas, photos, videos
multi-colored crepe paper pompoms suspended from the ceiling
- The technique for making a pompom from corrugated paper is similar to that discussed in the previous section.
- The difference is in the preparatory stage. Cut the corrugated sheets into identical rectangles, for example, 20x30 cm in size.
- Be careful when securing the center of the sheet with thread or wire. The paper is thin and may tear from excessive pressure.
- To make pom poms more interesting, fold 2 or more colors of paper into an accordion shape. Alternate them at your discretion.
step-by-step instructions in pictures for creating a pompom from corrugated paper
How to make a pompom from crepe paper: step-by-step instructions, design ideas, photos
Multi-colored crepe paper pompoms hang in the room.
Take a lot of crepe paper to create a pompom. Due to the thinness of its sheets, the required volume is achieved by their quantity.
- Lay out the sheets and cut them to standard A4 size.
- Fold with an accordion 1.5-2 cm wide.
- Secure in the middle with strong thread or thin wire. Leave a long tail if you plan to hang the pom pom from the ceiling.
- Cut the ends of the accordion on both sides with scissors, rounding them or giving them the shape of a triangle.
- Connect the ends of the accordion and begin to level the sheets layer by layer.
- Do this without haste, carefully so as not to tear the paper.
Instructions in pictures for creating a pompom from crepe paper
Tips for Newbies
It’s not difficult to create original soft spheres, but the goal will be accuracy and splendor. To create them exactly like this, you need to rely on several criteria:
- A porous, dense thread will help make the sphere more magnificent.
- The shade does not have to be matched to the main color of the hat. Contrasting will add zest to your everyday look.
- The scissors must be sharpened as much as possible to create a uniformly smooth sphere with quick and precise cuts.
- It is better to secure the element with thread, so it will keep its shape for as long as possible. Its original appearance will last a long time precisely because of such retention.
- If the product is planned with a pattern or completely multi-colored, it is better to print the layout in advance and rely on it while collecting the strands into a single whole.
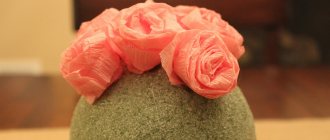
How to make a pom-pom from garbage bags and T-shirts: step-by-step instructions, design ideas, photos, videos
ready-made pom-pom from polyethylene T-shirts on the table
These rustling pom-poms are often used for dances, support groups for sports teams, and decorating festive costumes. Therefore, one side is always a handle, which is convenient to hold the pompom.
- Place the bags with equal sides facing each other. Cut off the handles and cut the sides.
- The remaining glued bottom will be the handle of the future pompom.
- Cut the fabrics of the bags into fringes up to a centimeter wide. Leave 2-5 cm to the edge intact.
- Roll the result into a tube and secure the handle with tape or thread.
- Straighten the fringe. If desired, add a layer of glitter tinsel along the outer edge.
- If the pom pom is made for cheerleading, attach a plastic handle inside it to prevent your hand from slipping while dancing.
step-by-step photos of collecting pompoms from garbage bags
Paper art
This technique produces very beautiful things. From their appearance it is not clear that they are made of simple paper napkins.
To decorate a box in this style, you need to take:
- packaging of any napkins (color does not matter);
- small towel;
- PVA glue;
- acrylic paint in gold-colored cans.
Process of creation:
- Unfolded napkins are cut into strips of 2-2.5 cm.
- The towel is soaked in water and wrung out well (until damp, but not damp).
- Place the paper strip on the fabric and press lightly.
- The wet piece of paper is twisted into a rope with your fingers (on a flat surface).
- Any pattern can be drawn on the box.
- Then the flagella are glued along the lines of the ornament onto PVA. Leave to dry.
- Paint with acrylic paint (gold, silver).
In this way, you can create three-dimensional images of anything.
How to make a pompom from tulle: step-by-step instructions, design ideas, photos
hanging pompoms made of tulle
There are several ways - winding and assembling on a thread.
The procedure in the first case is similar to using yarn, which we discussed in the sections above.
In the second case, you need a needle and a long thread. With their help, you either string the fabric in the middle of the tulle cut or along its edge.
Once you reach the edge, pull it together to form a pompom.
Fix the thread tightly and cut off the excess.
Often tulle pompoms decorate weddings or children's outfits for girls.
step-by-step photos of creating a pompom from tulle
simple fluffy flower
In addition to roses, napkins are used to create wonderful fluffy flowers that look like asters or dandelions. You can see how to make dandelion above. A simple flower is made in a similar way. First, fold the folded napkin (in the form in which it was in the package) four times to make a square. Then they staple it in the middle and cut it into a circle. Next, layer by layer, all the “petals” are lifted, creating a fluffy flower bud.
Large inflorescence
Large flowers are also made, but several napkins are used (the more, the more magnificent the inflorescence) in their packaging size (that is, factory folded 4 times).
Fold the napkins in a stack, or simply carefully take 1/3 out of the package and staple them together in the center. Using a plate or mug, draw a circle on the workpiece and cut it with scissors along the contour.
Flowers can be given different shapes by making different edges (round, zigzag, hearts, petals). Then the paper layers are lifted up and the products are fluffed.
Another method of creating a flower is to tie circles in the middle with thread and then fluff up the “petals.”
Beautiful large paper flowers are used to decorate a photo zone or decorate a hall to celebrate a particular event.
How to make a rain pompom on a stick: step-by-step instructions, design ideas, photos, videos
several ready-made rain pompoms on sticks
- In addition to rain, you need sushi sticks or pencils, tape, and a glue gun.
- Measure the required length of rain and cut off the excess.
- Cover the middle with a thin strip of tape.
- Repeat the steps as many times as necessary to obtain the desired volume.
- Distribute the resulting bunches evenly around the stick and secure with either tape or a glue gun. To be safe, use both methods at the same time.
- To add beauty to the product, cover the stick with the same rain that was used for the pompom. Wind it in a spiral in 2-3 layers and secure it with glue.
How to make a pompom from tinsel: step-by-step instructions, design ideas, photos
a girl holds pompoms made of tinsel in her hands.
The tinsel is quite voluminous, it is quite difficult to collect it like yarn to create a pompom. Available means will come to the rescue, for example, straws, foam balls, and the figure-eight folding technique.
- In the first two cases, you should attach the tinsel so that there is no free space.
- If you took a foam ball, stick it in rows, starting from the middle.
- To give the pompom extra volume, wrap another row of tinsel on top. It will look especially beautiful in a different color.
- If you plan to hang the pom pom, use a glue gun to attach the string between the strands of tinsel.
Recommendations
Connecting threads of two colors when winding will help achieve the melange effect.
Take leftovers that are unsuitable for knitting: this way you will not only recycle the material, but also diversify the color. With careful winding, you can combine several relatively short sections.
Use thick yarn: this will allow you to complete the work faster, and the decoration will look more voluminous and dense.
For extra fluffiness, comb the product with a special comb for animals: each thread will break up into separate thin fibers.
How to make a pompom from faux fur: step-by-step instructions, design ideas, photos
rows of ready-made faux fur pompoms
- Take a cardboard blank with a slightly larger diameter than the future pompom.
- Place it on the inside of the fur piece and circle it.
- Cut out the result and sweep the edges of the future pompom from the inside so that the fur does not fall apart.
- Pull back the thread you used to sew. You will get a fur ball.
- Fix the thread so that it holds the edges tightly. If you plan to hang the pompom from something, leave it long, otherwise cut it off.
step-by-step photos of making a fur pompom
How to make a fabric pompom: step-by-step instructions, design ideas, photos
three fabric pompoms on the table
For such a pompom, prepare pieces of fabric 1.5-3 cm wide and 2 cardboard crescents.
- Between the latter, place one piece so that its ends hang freely.
- Wind the fabric in the same way as discussed in the yarn section. Be careful not to over-tighten the winding.
- Secure the remaining end with glue or a stapler.
- Using scissors, cut the strips between the crescents and carefully remove them.
- Pull the thread and tie tightly.
- Trim the fabric in a circle to give the pompom a nice shape.
- Hang it either from the ceiling, or create original bouquets, or attach it to the “wishes” tree.
step-by-step photos of making a fabric pompom
How to make a two-color pompom?
a set of materials and tools for creating a two-color pompom.
Depending on the material from which you plan to make a pompom, the process of making it will also be different.
For example, for a yarn product, you do one of the following:
- wrap each color on half a piece of cardboard or a special device
- alternate colors in layers
- wrap both shades at the same time
How to make a pompom for cheerleading?
ready-made pom-poms for cheerleading made from rain
One of the easiest options to make is a pom-pom for cheerleading.
The technique for making it is quite simple:
- take a solid piece of the material from which you plan to make a pom-pom
- on both sides, cut the canvas into strips of equal width, which you set at your discretion
- leave a narrow space in the middle without cutting
- twist the cut fabric with a pipe and pull it in the middle
- If desired, glue a loop here to prevent your hand from slipping while dancing
So, we looked at the technique of making pompoms from different materials. We got inspired by looking at photographs of their placement in space and on the hats.
Use your imagination and pick up scissors, cardboard blanks and thread for attaching the centers. You'll definitely make some interesting pom-poms!