Desire and strength are all you need for summer cottage creativity
City life sometimes puts pressure on us with its canons, stereotypes, hackneyed templates... Fashionable - white walls, Italian furniture, high-tech kitchen... At the dacha everything is different. Here you are your own creator, designer and performer. I want to make my garden coniferous... or plant everything with tulips... or just lilacs... And furniture - only I will have this, and no one else. Because I will make it with my own hands. And I hang the walls in the house with my paintings... or maybe a hunting lodge... or maybe a library house... My dacha - whatever I want, I create on it!
Heather in the garden
But what about abilities, material capabilities? Here everyone will feel what is given and available to them. But, as a rule, one desire is quite enough, and without desire, why take on work?
In our garden - everything with our own hands and the way we love and want
Well, I almost convinced you. In our garden, in a country house - everything with our own hands and the way we love and want. In the meantime, to get acquainted, I invite you to take a walk through my garden, and I will clearly try to show how you can decorate the garden with what everyone has at hand. Nature, as you know, does not need decoration, but sometimes one’s “hands are itching” to decorate something in the garden, to attach a “bow on the side.”
Ads by
How to prepare a vine for weaving a ball
- We cut the branches longer;
- Place the branches in a large pan/basin;
- Boil over low heat for 40-50 minutes. This is the minimum, you can extend the boiling to 1-1.2 hours.
- Using a sharp knife, remove the bark from the branches. If you debark the shoots as soon as they have cooled down, things go quickly.
- Dry it. Not in direct sun, somewhere under a canopy. There is no need to dry for a long time so that the branches do not lose their flexibility.
- We paint. We take paint, naturally, for wood, acrylic can be used. We lay out the branches parallel to each other on some newspaper or film, paint on one side, turn them over, paint on the other. If the paint is aerosol, we can handle all the material in minutes. But, in any case, the paint should be intended for outdoor use. Sometimes the same balls woven from wicker are made to decorate a house, then you can use interior paint.
- Dry it. The vine is ready – flexible and bright.
If you like “natural” garden decorations, you don’t have to prepare the vine so carefully, you don’t even have to remove the bark. But be prepared that your decor will only look perfect for one season: the bark will gradually crack, the balls will look sloppy.
If you want it to look natural and last a long time, paint the debarked vine with wood paint or stain.
To create Christmas balls with your own hands we will need:
- foam balls of different diameters (5 pcs.)
- glue gun + 3-5 glue sticks
- spray paint (brown and beige)
- nylon
- coffee beans
- raffia
- jute twine (2 types)
- willow twigs
- sackcloth
- decorative elements (ribbons)
What do you need for work?
DIY New Year's ball
You will need:
- Floral (floral) foam in the form of balls
- Pine, spruce, fir branches
- Red holly berries
- Cord
- gold ribbon
- Small stars made of wood or metal
- Glue gun
DIY New Year's ball: Preparatory work
Everything you need for work.
Earlier in the article “Floristry for Beginners” we already talked about floral foam. Most often it is sold in blocks, but there are other forms. For example, in the form of balls of different sizes.
However, you can form such balls yourself. Naturally, from floral foam.
The cost of this material is not high. Often the foam is already packed in some kind of mesh.
However, if this is not the case, then make such a mesh yourself or buy a ready-made one. Nowadays this is not a problem.
In its unprocessed state, floral foam is very fragile, crumbly, and porous.
Beginning of work
This is why we need:
- make a ball out of floral foam;
- place it in the grid;
- then soak it in water;
- and let it soak very well with water.
Take your time, because water does not absorb quickly into the foam. It is important for us that the ball is saturated with water to the very core. Otherwise, there is a risk that due to the lack of water inside the ball, it may fall apart during decoration.
So, if the ball is already completely saturated with water, then tie the mesh tighter. Then hang it over the container to remove excess water.
When the excess water is gone:
- We tie the foam with gold ribbon so that there is a long rope left for hanging.
- Or we’ll put a plastic mesh on top, and then tie a decorative gold ribbon to it.
New items of labor
You can not braid the ball, but make it yourself from beads. We use beads with large holes. We close 4 or 5 beads into a ring and attach bead loops to it. We attach beaded loops to them. They will be small, but original.
Read also: How to properly graft a peach
Let's make a four-bead product. Its base is a ring of 4 beads. You need to close the ring with 4 beads, leave the fishing line from 7 to 15 cm long. It is better not to tie a knot, we will leave this for the last stage of work. We put 3 beads on the fishing line and thread it through the first and second beads of the ring. We connect the ring with the remaining two (into the 5th bead), and then the first one.
We tighten the ball with fishing line, it will be beautiful and voluminous. Then we pass the line through 6, 9, 11, 2. We tighten it again, cut off the ends, and melt them. Thread the 7th bead through the other end.
Idea . Embroidery on... wood!
Yes, you didn’t think so – now we will tell you how to cross-stitch on wood. First of all, you will need a wooden board. It can be of any shape and size - it all depends on your imagination and on what exactly you are going to place on the panel. Treat the board (clean it, cover it with acrylic varnish).
Now cut out an “embroidery” stencil from checkered paper, place it on the board and, with a sharp tool, mark points for the thread to enter so that they remain on the wood. Then use a drill with a thin bit to make holes at the points. Thread a coarse thread through them using the principle of cross stitch.
Making a New Year's ball from pine, spruce or fir branches
Ball decoration made of floral foam
Let's start decorating. What branches do you have? Pine, spruce or fir?
I like to make this Christmas ball from pine. Its branches make it more fluffy and dense.
Practical tips:
- Before work, prepare the branches by removing all the needles from below a few centimeters.
- We start decorating the New Year's Christmas ball from the bottom.
- The branches should be cut at a slight angle. Thanks to this, they will easily enter the floral foam.
- To make the New Year's tree ball fluffy, insert the first branches into the foam perpendicular to the ball. And when you start to rise higher, you can work with a slightly smaller angle.
The unevenness of our decorative winter ball can be smoothed out with scissors. To do this you just need to trim the needles.
When the New Year's Christmas ball itself is ready, we begin to decorate it.
Tags
decorative balls such balls weave balls vine balls make vine balls. A ball can florists have a ball base in the form of a ball. a hollow ball of several balls like this. Making a New Year's ball with your own hands with your own hands with your own hands with your own hands with your own hands with your own hands with your own hands with your own hands from branches. from branches or from branches with your own from branches. the number of tree branches from branches with your own from branches you can from branches .from branches or DIY insulation Facades with your own hands DIY houses DIY houses DIY houses DIY gardens DIY houses DIY animals DIY bottles DIY houses
articlesuseinteriorcraftscreatesimplegluewewillballsteppartssimilarwayasideascoffeeourbeansread
Charming round toys made from saw cuts
For those who like to draw, the option of making Christmas tree decorations from wood cuts is suitable. You can find them after collecting firewood for the dacha, or you can make them yourself by sawing unnecessary tree branches of various thicknesses.
It is enough for the thickness of the round to be up to 1.5 cm.
The surface of the saw cut is decorated to your taste:
In order for such a wooden Christmas tree toy to last for many years, it is better to cover its surface with two layers of varnish. This will not only extend the life of the jewelry, but will also make it more attractive.
Wicker balls - stylish garden design
Now all that remains is to weave balls from the prepared vine. This is the simplest, because precision in weaving is not required. The main thing is to create a base on which we will randomly (but, nevertheless, beautifully and neatly) wind the branches, intertwining them with each other.
The ball can be hollow, then you will need to try to make a sphere from branches or wire, and then weave a vine onto it. Anyone for whom this is at all difficult can buy a ball base for topiary in the form of a ball at a gardening or florist store.
But it is not necessary to make a hollow ball - it will not be too heavy. Therefore, initially we can wind the vine, but in the middle we can do it more “loosely”, and closer to the surface more tightly.
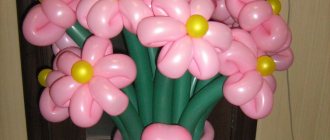
From several balls of this type, but different in size and color, you can create an amazing composition.
Factory-made New Year's decorations will never be able to replace the warmth and soulfulness of products made with one's own hands, and even if a homemade hand-made product is not entirely ideal, but all the soul will be put into it, and this is worth a lot! Today we will show you how to make Christmas balls with your own hands, so that you won’t be ashamed to decorate the interior of your beloved home with them. In addition, you can involve children in the creative process, firstly, such work is useful for the development of children's motor skills, secondly, any common cause greatly unites, and thirdly, together you will have time to make much more unusual Christmas tree balls.
One legend says that the first Christmas tree balls appeared in Germany in 1848. In those days, Christmas trees were decorated with real apples, but 1848 was a bad harvest, and local glassblowers urgently created glass “apples” that successfully replaced real ones. Local residents appreciated the idea of glass decorations, and so they gradually replaced fresh apple candies.
Christmas balls made from newspaper tubes.
We take a sheet of magazine, twist it into a bundle, if required, you can create several bundles by gluing them together. Then we take a foam ball, glue the end of a magazine strip on top, and begin winding around the perimeter of the ball, as in the photo below, gluing each layer with polymer glue.
Christmas balls made of felt.
On paper we draw patterns of flowers, one larger than the other smaller. We take tracing paper, lay it on pink felt fabric and outline a large flower, you will need a lot of such flowers, so we create the required number of them. Then we take white felt, lay tracing paper on it and outline a small flower; you will need exactly the same number of them as pink flowers. We cut out all the details with scissors, sew two flowers together, and glue a bead in the center. Using this pattern we sew the rest of the flowers. We glue the resulting flowers using a glue gun to a foam ball.
DIY Christmas balls made from paper flowers.
Using a hole punch with a flower tip, we create a variety of purple and white paper flowers. We put the white flower into the purple one, bend the edges to the center, then use pins with bead heads to pin them to the foam ball.
New Year's balls in rosettes made of corrugated paper.
We create miniature roses from corrugated paper (the process of creating roses is captured in the photo below). We tie the stem of the flower with thread so that the bud does not fall apart, cut off the long stems closer to the threads, and glue the flowers using a glue gun or instant glue to the surface of a foam ball. We fill the gaps with large beads.
New Year's balls made of sequins.
Each sequin needs to be secured to the surface of a foam ball using sewing pins (the kind seamstresses use). Sequins need to be pinned overlapping.
Christmas balls decorated with beads.
On a pin with a beaded head, we string beautiful beads of different sizes, and stick each nail into the surface of a foam ball. Don't forget to glue or pin the ribbon on the pendant.
How to make Christmas balls from paper.
First way.
According to the template presented below, we cut out many parts, which we connect together as in the photo below, forming a ball.
Second way.
We cut the paper into strips (4 pieces), lay them crosswise, connect them in the center with a nail, connect the ends together from the bottom, forming a ball, and fasten them with a stapler. We create a pendant from a rope, which we attach to a nail.
Third way.
We cut the paper into circles, bend the sides of the circles towards the center, it looks like a triangle. Glue the parts together to form a ball.
Christmas tree balls made from cinnamon sticks.
We cut the cinnamon sticks into pieces of equal length, each of which is glued with polymer glue to the surface of the foam ball.
Christmas tree balls decorated with paper scales.
Using a large round hole punch, we create many circles, which we glue with an overlap to the surface of the foam ball using a glue gun.
DIY Christmas balls made from branches.
Let's make a ball (it's even better to take a thin rubber ball of a round shape that can be deflated and inflated), cut the dry branches into small pieces with pruners, apply the branches to the surface of the ball and glue them together with a glue gun. When the glue dries, deflate the ball and pull it out through one of the wide holes.
How to make a New Year's ball from threads.
We inflate the ball, wrap it with threads, then thoroughly soak it with PVA glue, hang it in a dry place to dry the glue. As soon as the glue dries, pierce the ball with a needle and pull it out through one of the holes. To make a ball of thread look more impressive, immediately after applying the glue, you can generously sprinkle it with coarse glitter.
How to make a “chocolate” ball.
We take any unnecessary ball, cover it with glue from a gun, creating spectacular drips, when the glue dries, paint the ball chocolate-colored with spray paint. After the paint has dried, cover the spectacular chocolate drip with a layer of PVA glue and sprinkle with large white glitter. We glue red decorative berries and twigs on top.
How to make a ball out of rope.
We inflate the medical fingertip, tie it with thread, soak the rope in PVA glue, and wind the rope around the fingertip ball. We leave the product to dry, after which we glue a hat on top for hanging. Details on creating such a ball are in the article.
How to decorate a ball with acorn caps.
We paint the foam ball brown with acrylic paint, take polymer glue, generously lubricate the acorn cap with it and glue it to the surface of the ball; according to this scheme, we completely cover the ball with acorn caps. Finally, gaps can be masked with beads and silver glitter particles.
How to make a ball of pine cones.
We take a thick garbage bag, put cotton wool tightly inside, and tie the bag. We separate the tops from the cones and glue them to the surface of the ball using polymer glue or a glue gun.
How to decorate a ball with pine cone scales.
Use pliers to separate the scales from the cone. Then we take a foam ball and, using a glue gun, glue all the flakes overlapping to its entire surface.
How to decorate a ball with decorative balls.
Such synthetic padding balls are sold in departments for creativity; we glue them to the surface of the foam ball using a glue gun, alternating simple white balls and shiny balls.
How to decorate a ball with lace.
We cut out details from lace, for example, flowers, and glue the flowers to the surface of the foam ball using PVA glue. We paint the ball with white acrylic paint, then bronze, after which we take a sponge and go over the surface of the ball with blotting movements. The surface acquires an aged effect; all that remains is to glue the hat and pendant and tie a beautiful ribbon.
10 ideas - DIY Christmas tree decorations (video)
How to hang wooden toys on a Christmas tree?
The blanks are made, the paint has dried, the toys are ready, and then the question arises - how to attach them to the New Year's beauty? There may be several options for holders for Christmas tree toys. We suggest using the most common ones:
If there are no holes on a wooden Christmas tree toy, they are drilled or an additional small ring is first screwed into the figurine to attach the holder.
As you can see, making Christmas tree decorations from wood with your own hands is not at all difficult, and even children can make some models without the help of their parents. Such decorations are not only environmentally friendly, but also contain a bit of the soul invested by their creators, because when working with wood, the master gives it a part of himself, as if breathing life into the tree. Our ancestors believed in this, and we will believe in it too. Let your Christmas tree come to life with fairy-tale characters, wooden in appearance, but with a living soul, and attract only happiness into your home. Happy New Year holidays!
Creating masterpieces - video
Turn on your imagination and create - video
Home decor: ball of branches + MK
DIY ball of branches. Photo
In this article we will show a simple master class on creating a ball from branches. A very unusual decor idea, isn't it? Making such a ball is quite simple; here we use it, dipped in glue, on a balloon. Only the threads need to be replaced with tree branches peeled from bark and cut (you can use smooth sea branches).
To create a ball from branches you will need:
Enough tree branches (you can use sea branches)
Inflatable beach ball
Secateurs
Hot glue
Technology for creating a ball from branches with your own hands:
Collect twigs and sticks. If necessary, peel off the bark and use pruning shears to cut the branches into small pieces, about 3 inches in size.
Use an inflatable beach ball as a base. You can, of course, use a simple balloon, but then you need to be extremely careful not to accidentally puncture it with a branch.
You need to glue the branches close to each other and try not to get glue on the inflatable ball, then at the end of the work it will be easier to remove it (in a fluffy form) from the finished ball (Fig. 1-3).
When the beach ball is completely covered with tree branches, lower and remove the inflatable ball from it (Figure 4).
At the end of the work, the ball of branches can be varnished or painted in a suitable color.
Such a ball of branches can become an excellent decorative element, and can also be used in holiday decorations. For example, you can put a candle in the middle, and you will get a rather beautiful and romantic glow. Also, a similar ball of branches can be used as a lampshade or candy dish (if the hole is made a little larger).
Photo used: designmegillah.com
Hi all! Many probably already know that I really love technologically advanced, versatile decor that can be assembled quickly. It comes in very handy when I’m preparing for fairs or when I receive a lot of orders. Today I want to talk about wicker balls that I use in candy bouquets.
I wanted to make balls as a quicker alternative to pine cones and berries. Decorating with wicker balls has several useful features that help not only to arrange a bouquet, but also to balance the colors.
- Choose the desired color and the ball in the bouquet can become an imitation of a pine cone, a New Year's ball for a Christmas tree or a berry.
- You can make a braided ball from the same color as the main flowers in the bouquet. And the main color of the composition will also receive support in the decor.
- The spherical shape fits perfectly into any bouquet. And due to the quick production of such balls, you can improve the layout and fill empty spaces.
- The decor can be made of any color and size, as well as from different materials.
- Well, an important point - the decor is super inexpensive!
Production time: 7 minutes
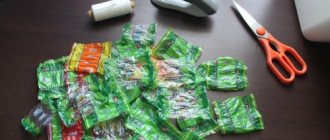
Making a ball For work we will need napkins, glue and corrugated paper “Cartotecnica Rossi”. I took No. 562, but you can choose absolutely any color. For example, balls made of orange paper will resemble tangerines, balls of red paper will resemble small apples or Christmas balls, balls of brown paper will resemble pine cones, and balls of pale blue paper will resemble snowflakes.
From paper we need to cut out one rectangle for the core 3x10 cm and three strips 50 cm long and 8-10 mm wide.
We roll all three strips into a bundle.
The tourniquet must be rolled tightly enough so that it is tight and does not unravel.
Now let's take a rectangular piece of paper. Exactly in the middle, fold it half a turn. It turns out to be a bow.
Use your fingers to stretch each half of the bow.
Feel free to stretch the paper further. The halves should take on a round shape.
So that the middle of the ball is not empty and holds its shape, we fill it with a ball from a napkin. To make it, just take one napkin, crumple it and roll it into a ball. I got a ball with a diameter of about 2 cm.
Now we put the ball into the rounded halves of the bow.
We glue the edges so that the napkin does not peek out.
We will also glue the bottom to close the ends of the corrugated paper.
Now we twist the ends at the base so that the napkin ball inside shrinks a little and takes on a more rounded shape.
Let's cut off the excess paper.
We start decorating with strands with a drop of glue at the base of the ball, where we just cut off the excess ends.
Glue one end of the rope and begin to wrap the ball.
We place the tourniquet on the ball in the same way as one usually winds threads into a ball.
When the length of the tourniquet ends, glue its tip.
Then we take a new tourniquet and continue working.
The ugly protruding tip needs to be trimmed.
Glue the tip with a small drop of glue.
And with the tip of the scissors we carefully hide it under the adjacent tourniquet.
I wound the tourniquets quite tightly and all three of them came off. If you did it more freely, two may be enough. We fasten the third tourniquet in the same way and hide the tip. Our ball is ready! Let's now figure out how to secure it in a bouquet.
Methods of attaching to a bouquet The ball can be added to completely different bouquets, both with a static and dynamic arrangement, and in spherical bouquets, and in elongated ones.
In tabletop compositions, the decor is attached to a skewer and toothpick, and in hand-made ones - to a wire.
Apply a drop of glue to the base of the braided ball.
We firmly insert the toothpick into the glue so that it gets between the strands.
The wire attachment is very similar. Make a small loop at the end of the wire.
Place a drop of glue between the strands at the base of the ball.
We insert a loop of wire into this place so that the fastening is not visible.
The mounts are ready and the decor can be safely added to bouquets and compositions!
Furniture and lamps
Branches in the interior can find their place as components of original furniture, legs, stands, holders or mirror frames. It’s better not to talk about furniture options, but to show interesting solutions invented by designers in different countries. Believe me, such home furnishings will never look inappropriate, as they are real designer furniture.
Let us note that many of our readers are interested in how to paint branches - for these purposes, water-based paints are used, which form a breathable surface, as well as wax and varnishes. The decor made from dry branches painted white looks especially festive.
Decorative tree branches of different sizes in the interior can be used to create designer lamps that will look great in almost any room. We can talk about temporary design of an existing one or creation from scratch of a unique sample from branches. For these purposes, you can use both LED garlands and strips for making decorative lighting, as well as traditional electrical accessories.
Garden decor
Decorating the garden yourself is an original solution from a “home-grown” designer. Natural materials and decorations made from them are very popular among home garden designers. Specialized stores can provide the opportunity to buy such garden decor, but it will not be cheap at all. It is much easier and cheaper to make such items yourself.
After the necessary “model trimming” of the garden has been made, you can always find material for making decorative garden decorations. Cut tree branches and unnecessary, removed young shoots are perfect for this. They can be an ideal material for creative work on weaving simple accessories.
Free time and imagination are all that is needed for such work. Things made with your own hands will look unusual, original, and will not be repeated by neighbors in a cottage or country house.
How to make a beautiful ball
To make an original wicker ball you will need: 3 strong but flexible branches. It is necessary to make three separate rims from them, which are inserted into each other. Form a sphere with a uniform frame. Finally, fasten the intersections. To braid the frame, you should look for rods of great length. They braid the sphere over its entire surface, stretching them one after another. Neighboring arches are snaked around from different sides in turn, the tails are tucked inward. The braided pattern can be changed as desired.
A ball in which the rods are intertwined very often looks original. The similarity of the ball with a ball of thread will be given by weaving, in which the rods were launched in different directions.
The ball looks very beautiful and unusual when a light breeze blows in the garden. To create a special natural “windy charm” and unusualness, you can put a small rattle inside.
At the top of a thin and low tree, the ball looks very interesting and has an exotic resemblance to a standard tree.
Trellis for climbing plants
To create such a trellis, it is necessary to plant seedlings, or seeds, on the ground inside an outlined circle. With a small interval of centimeters (maybe 10 or 15), deepen thick supporting branches into the ground (10 centimeters), tilt them towards the center of the intended circle, and tie them together. Choose a support of 1 or 1.5 meters. This design will be reliable in bad weather.
After this, ring the conical vertical support with thin rods. At a certain distance from each other (10 centimeters is possible), make adjacent rows vertically located to each support.
Thus, you should get a lattice with large cells. Climbing or climbing plants clinging to the support can easily and unhindered penetrate through them.
With the help of such a decorative trellis you can transform and decorate any place in the garden. Sweet peas, pumpkin, morning glory, or decorative beans are ideal for the “flight” of design ideas.
Vegetables such as cucumbers and zucchini will also look great in this design. All the beauty of their wide leaves and peculiar flowers, which always remains inconspicuous in the garden, will be revealed.
Bird feeder in the form of a hanging ring
Three sets of thin and long rods are needed, which need to be folded together and tied with twine at the base. Do not cut off the ends, leave it for now. Weave a not too tight braid from the twigs, roll it into a ring, fasten it, and wrap the ends of the twine around the joint. In the same place, tie a loop from which the ring thus obtained will be suspended.
Small bunches of berries or slices of fruit (not citrus fruits) can be inserted into a loose ring braid. And thus feed the birds.
Birds are very careful, and they always visit places where they may be in danger with great reluctance. Therefore, you should not hang such a feeder very low, or on one of the branches of a garden tree, where a tree-climbing cat can easily reach it. It is necessary to position the ring in such a way that it hangs very high above the ground and is in a place inaccessible to domestic predators.
How to make a New Year's ball from raffia
Raffia is a palm tree, a palm tree is raffia. Literally, this is how you can summarize all the available information about the origin of this material.
Tools and materials:
- glue gun
- foam ball
- raffia
- jute twine
- beige paint
We start with a method that is already well known to us. Foam - jute - loop.
Next we wrap the ball with raffia according to the previous principle.
We fix it with a heat gun.
We do it in several layers.
If desired, you can leave it in its original form...
...but we will paint the ball beige, since it is a little out of our general trend.
Idea . Autumn candle
If there is an oak tree near your site, collect some acorns - this is an excellent material for decoration! The acorns can be left as is or painted with the same acrylic paints. Use your imagination: if desired, paint the hats in contrasting colors, cover the acorns with sparkles or gild them.
Pour elegant acorns into a small glass vase and place a candle. However, you can do without a candle by completely filling a transparent container with unusual acorns.
Candy bag handles made of cord and rattan balls master class
Well, my dear residents of SM, I want to try to make my first MK on creating handles for a candy bag from cord and wire. And creating decorative rattan balls. Advanced masters of floristry and suites can do all this, and this is how I do MK for beginners.
Let's start with the handles. We will need scissors, 1.2 mm gerbera wire, tape and the cord itself. I have a medium thickness cord here, but it’s better to take a thicker one so it will look more harmonious. The length of the cord for one handle is 45-50 cm.
The cord tends to fray, so I secure it with tape.
I cut off the excess now it won’t go anywhere.
Now we take the wire and cord and insert the wire between the grooves of the cord.
And we begin to wind the cord onto the wire (twist clockwise). The wire easily fits between the grooves and is hidden in the cord.
When we reach the end, we secure the tip again with tape. Then there are two options. Either completely hide the wire in the cord or leave the tip of the wire and then stick it into the base when fixing the handle. It all depends on how long the wire is. I have come across wires of different lengths and sometimes there is not enough length to stick the wire into the base. Then I just hide all the wire in the cord and attach the handle to the edges of the bag itself.
This is how I bend the arms so that they have the same shape.
Here it is ready. One end of the wire is hidden, the other is not (for clarity).
These are the handles for such a handbag
Now I’ll tell you about working with rattan. For reference, what is rattan? Rattan, rotan, vines from the palm family, mainly species of the genus Calamus and related genera (Daemonorops, etc.). R. stems are thin, usually up to 3-5 cm in diameter, very long (up to 150-180 m, according to other sources - up to 300 m), climbing with the help of modified leaves or sometimes inflorescences and reaching the crowns of the upper tier of trees in tropical rainforests . It is sold in skeins like these. Rattan comes in different thicknesses: 1.5 and 1.75 mm.
Now let's start creating rattan balls. We will need: the rattan itself, a bowl of water, a balloon and scissors.
That's how hyped he is. It's not very flexible and if you try to bend it, it breaks.
The whole secret is that you need to soak it for 20 minutes in cold water. For a small ball, take 1-2 threads of rattan.
Voila, he became as soft as a thread.
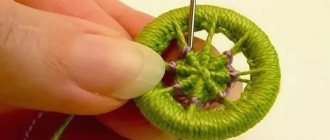
Spin it on a balloon. The size of the finished product depends on the size of the ball.
To prevent the ball from unwinding and coming off, you need to stretch the rattan between the layers of already wound rattan, twisting it so that it is fixed and does not come off.
This is how it turns out, hide the tip and fix it. Now the rattan must be allowed to dry and it will become hard again and keep its shape.
Then I think everything is clear.
Now let's make a small little ball. Take a piece of rattan and a small piece of sisal (I wound a ball from sisal)
I'm reeling it in. I leave it to dry in the sun for 15 minutes. If it gets too dry it can break.
Using tweezers I can easily pull out a ball from sisal (sisal resembles grass or thread)
They are handsome. It's simple.
Making balls is cheaper than buying ready-made ones. And most importantly, you can have different diameters.
stranamasterov.ru
Idea No. 9. "Birch" flower pots
These flowerpots are not made from birch logs, as it might seem at first. These pots are based on ordinary tin cans of coffee or canned food. You will need birch bark. Using a thread, measure the circumference and height of the can. Cut out a corresponding piece from the bark sheet, adding 2 cm in width and 0.5-1 cm in height. Apply glue to the bark and wrap the jar.
How to make a New Year's ball from willow twigs
After a walk in the park, you may collect beautiful branches, but decide to throw them away. There is no need to rush, because they may come in handy in the process of creating New Year's decor.
Tools and materials:
- glue gun
- willow branches
- jute twine
- brown paint
The branches should not be dry, otherwise they will not take the desired shape and will break.
First we make two circles of branches. We connect them together with a rope and make a loop for the future ball.
Then we straighten the branches...
... and thread new ones.
We make it as close to the ball as possible.
You will get a ball approximately like this.
Brown suits us better. Therefore, we will also paint this ball using a spray can.
The attractiveness of original works
Any handmade craft is a flight of imagination, creative ideas, and craftsmanship. The theme of bird's nests is often played out in artistic interiors, landscape design, and designer gift works.
Entourage can be used for different purposes:
- Decorate the living room - a nest on the mantel, coffee table, nightstand.
- Decorate the dining room - crafts suspended from the ceiling above the dining table look interesting.
- Use in landscape design - build large nests in branches, on stumps. They look great with decorative birds.
- Decorate the festive table for Easter - you can place a nest with Easter cake and eggs in the center of the table.
- Use as a natural setting - for a photo zone, decorating a children's room.
- Use a real nest to attract birds to the site - you need to choose natural materials for the craft.
Beautiful author's works will not go unnoticed by others. It’s attractive that there are no identical handmade crafts. Each work is unique, because the author shows personal artistic vision and imagination.