How to make a hand router from a drill with your own hands + instructions, videos, drawings
During repair work and when arranging a house or apartment, sometimes you need to cut a groove or beautifully sharpen the end of a board. There is no need to buy an expensive electric tool for this. You can make a manual router out of a drill with your own hands.
The principle of operation and transmission of torque to the spindle of the device will be identical. It will be enough to make a milling table for the drill, and you can use the device as a manual router. Options for fixing the tool body can be very different, but the main thing is that there are no backlashes or distortions.
Please note that under no circumstances should you use an impact drill as a hand router.
Design features and device of the milling cutter
A milling cutter is a unit for processing wood or metal, designed primarily for cutting technological recesses. The device consists of a housing in which key components are located, a motor and a holder for installing collet adapters for cutters. At the bottom of the unit there is a platform made of cast or stamped metal.
When turned on, the electric motor of the milling cutter imparts rotation to the shaft and sets the milling attachment in motion. The tool allows you to make grooves and cavities in wood, process the edges of parts or create threads without wasting time and extra effort.
Classification
In accordance with the generally accepted classification, cutters of the shapes shown in the table are used for processing wood.
| Types of wood cutters | Main types of work |
| End | End surface processing |
| Cone-shaped | Processing any type of wood at different angles |
| V-shaped | Engraving, 45° chamfering and V-grooving |
| Disk | Making horizontal grooves of various sizes for cutting work |
| Profile | Decoration of products |
| Folded | Quarter milling |
| Mouldings | Rounding edges |
| bird home | Making tenon joints of various types |
| Curvy | Processing the edges of panel parts |
| Fillet | Creating fillets (grooves) on the edges of products |
There are various subspecies that differ in design, blade shape, and application.
Thus, using a ball (spherical or spherical with a round head) tool, you can perform artistic wood carving. There are special-purpose products used for cutting laminate flooring, furniture parts, handles, and handrails.
The combined type is a combination of a groove cutter and a tenon cutter, used for merging boards.
Plunge tools are used for milling grooves. To obtain neat grooves, models with an extended shank are produced.
Drawings of a router from a drill
If you plan to use the router frequently, you should purchase a ready-made device at a hardware store. But if a device is required to solve a specific problem, you can make it yourself from a conventional drilling unit.
If you have to process small workpieces with a milling machine, it is better to build a vertical machine
Drawings and photos of a do-it-yourself drill router show that the tools are very similar in design and operating principle. The difference is that the drilling device is designed to make pinholes and is not designed for radial loads.
When improving a drilling tool, it is important to install a collet chuck on it instead of a jaw chuck
The drill has a lower number of revolutions compared to the router. Even a converted tool should be used for working with soft workpieces.
What tools and materials will be needed
To make a router from a drill with your own hands, you need to prepare consumables. Their exact list depends on the chosen scheme, but usually you need to take:
- plywood or thin sheet of chipboard;
- metal clamp;
- nuts and bolts;
- self-tapping screws;
- jigsaw;
- feather or core drill;
- wrench;
- drills 0.4 and 0.8 cm;
- screwdriver
If you don't have a jigsaw, you can use a hacksaw as an alternative. If necessary, the screwdriver is replaced with a Phillips screwdriver.
How to make a manual wood router from a drill with your own hands
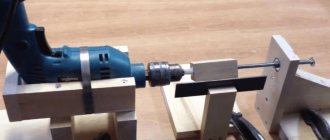
To make a simple hand router, you will need to take an electric drill, several wooden blocks and planks, and also screws and bolts. The tool creation algorithm looks like this:
- For the router, prepare a base from a thick board, two legs in the form of wooden blocks and two clamping device strips. The centers of future holes are marked on the structural elements. Holes for screws are made with a 4 mm drill. For holes in the corners of the clamping plates, use a 16 mm pen nozzle. For grooves for furniture bolts, you need a regular 6 mm drill.
The hole for the electric drill chuck is cut with a hole saw for wood with a diameter of 51 mm - Using a jigsaw, you cut out rectangular grooves in the clamping plates with your own hands, cut out the legs, and also make small recesses in the base for convenient holding of the structure.
All workpieces must be sanded with sandpaper, paying attention to sharp edges and corners - All parts are assembled together. First of all, using eight screws, screw one of the parts of the clamping device to the top of the base. After this, the legs are secured with four long screws. The second part of the clamp is secured with furniture bolts. Wing nuts with washers are screwed onto the ends of the fasteners.
A large number of fastenings ensures the clamping plates are securely fixed to the base - At the last stage, all that remains is to clamp a cylindrical cutter with the required offset in the electric drill chuck, insert the tool into the homemade device and secure the neck with wing nuts.
A simple manual milling cutter made from a drill is designed for drilling grooves with an average depth of 2-5 mm
When working with a router, you need to take into account that the grooves will be less neat than when using a purchased unit. But from the point of view of geometry, the recesses will be smooth.
Attention! It is not recommended to use a do-it-yourself router using a drill for processing especially hard wood, and especially metal.
Application at work
This attachment will turn your power tool into an efficient woodworking machine:
- cutting grooves of complex shape;
- grinding corners and edges;
- processing complex elements.
And this is not a complete list of possibilities that open up with a working attachment for a drill. A correctly selected part for a specific task will help you complete not only the rough work, but also the finishing touches.
How to make a milling table from a drill
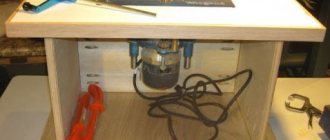
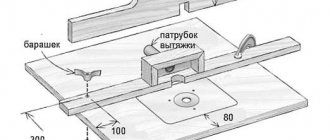
The milling table is the most convenient to use. When using it to make holes, you do not need to move the tool itself - it is in a fixed state. The diagram for making a simple table looks like this:
- The workbench lid is turned over and a large hole is cut using a jigsaw. In diameter it should be 5 mm larger than the dimensions of the cutter. A bar is installed perpendicular to the table - it must be positioned parallel to the long side. The part is secured with corners and screws.
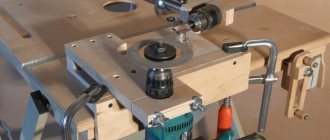
The strip should be located exactly in the center of the prepared hole - At the bottom of the workbench cover, long screws are used to attach clamps for a drill, hand-cut from wooden blocks, to the surface. The design should allow you to freely adjust the position of the homemade router. It is also necessary to provide a movable clamp designed directly for fixing the power tool.
To adjust the position of the drill, screws with wing nuts are mounted in the clamps - To prevent sawdust from interfering with the grinding of workpieces and lifting the cutter itself, you can immediately attach a vacuum cleaner to the table. There is no need to build a complex structure - just position the unit hose closer to the rip fence and the moving element, and then fix it.
To fix the vacuum cleaner on the layout, you can use either metal clamps or regular tape.
A DIY milling table made according to the above diagram allows you to grind both small and very long parts. Its main disadvantage is its low speed. The speed of a standard drill does not allow processing wood quickly and in large volumes.
Advice! If you need to build a compact table for a router with your own hands, you can use folding legs from an ironing board as a support for the workbench.
Features of cutters with shanks for metal processing
Metal is a solid material with a uniform crystal lattice. It is processed rigidly, the main indicator is the speed of work.
Depending on the desired result, metal cutters of various configurations are used for drilling:
- end;
- corner;
- cylindrical;
- disk;
- terminal
Face cutters are used for vertical metal processing. More often they process a plane.
If the teeth are placed on the end and side edge of a flat disk, you can drill a recessed profile on the plane. This is how grooves and grooves are made. If you use not a disk, but a cylinder with smoothly curved grooves, you can process a horizontal surface, remove a layer, and smooth out irregularities. For each operation, a special metal cutter for the drill is selected. In this case, you should remember the load on the motor and bearings, avoiding overheating of the tool.
The requirements for the manufacture of cutters are strict. The tool must work efficiently, maintaining the sharpness of the cutting surface for a long time. Often, in order to save expensive carbide steel, cutters are made prefabricated, the body is made of ordinary steel, and the teeth are made of alloys.
Milling cutters should only be purchased from well-known manufacturers. At the same time, check the quality of sharpening, the uniformity of the structure, and pay attention to the material of the cutting edge. Particularly check the tight fit of the prefabricated cutters.
A cutter, like any cutting tool, requires careful handling. The cutting edge does not tolerate heat, vibration, or improper use.
How to make a simple milling machine
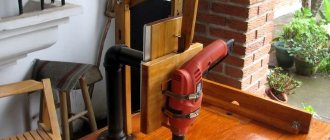
The simplest do-it-yourself machine, based on a drill, can be made from three simple parts - soles, scarves and stands. The tool creation scheme is as follows:
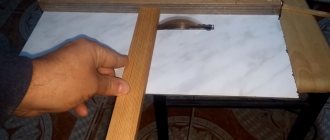
- On plywood, with a pencil or marker, draw a square with sides equal to the width of the drill, and then add strips on two adjacent sides, similar in diameter to the thickness of the sheet material. In the main part, mark the location of the cutter and cut a hole.
The hole for the cutter in the sole can be made with a core or feather drill - The sole and racks, as well as the scarf, are cut along the drawn line. A small triangle should give the structure rigidity. The stand is attached to the sole with self-tapping screws, the caps are properly recessed so that they do not protrude and scratch the table. The scarf is mounted so that its short sides are adjacent to the two main parts.
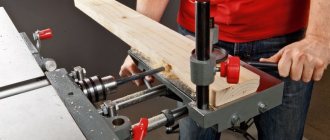
The stand for the router should be approximately 20-50 mm longer than the drill - Using a clamp, the drill is secured to the stand, pulling it just above the chuck. For reliability, you can install a second lock above the handle, then even at high speeds the tool will not vibrate or tremble. If it is inconvenient to put on another clamp, you can limit yourself to installing a rigid wooden stop above the handle.
The drill power button should be located so that the elements of the machine do not interfere with its pressing
At this stage, a do-it-yourself milling machine made from a drill can be considered ready for work. If desired, you can glue a piece of linoleum to its sole to ensure smoother sliding.
What is needed for making
In order to get started, you need to prepare the following:
- A sheet of thick plywood. Its thickness must be at least 12 mm. Instead, it is permissible to take a chipboard slab.
- Scraps left over from boards.
- Pencil to make a drawing.
- Wooden bars.
- Drill.
- Drill.
- Self-tapping screws for attaching parts. You need to choose ones whose size is 6-8 mm.
Here it is proposed to use wood for the base. However, the base can also be made in another way: from acrylic or metal.
To connect parts, you can use furniture fittings: fasteners, guide mechanisms and similar parts.
How to make a vertical milling machine from a drill
Another simple algorithm suggests making a manual milling machine that is as similar as possible to a purchased unit. The diagram looks like this:
- Two identical polygons with small protrusions on three sides are cut out of plywood or a thin sheet of chipboard using a jigsaw. The parts are fastened together using glue and self-tapping screws.
The screw heads must be recessed so that they do not protrude above the surface of the wood. - A hole is drilled in the center of the workpiece, the diameter of which should slightly exceed the width of the cutter. On one side, the part is sawn from the edge to the center of the hole. A circle is cut out of a large piece of plywood and a wide hole is also made in its central part.
The holes in the round and polygonal workpiece must be the same in size - Two identical vertical stands with guides along which the drill will move are made from wooden dies and boards. The supports are fixed on the sides of the large circle, and then stops-limiters are additionally installed in their lower part.
Stops will prevent the drill from going too low - In the notched part of the polygonal workpiece, a through hole is drilled for a long screw with an adjusting nut. The milling cutter from the drill is inserted into the platform and tightened so as to eliminate vibrations and backlash. Grooves are cut on the sides of the racks in the lower part and screws are passed through them. You need to screw the fasteners into pre-prepared side holes on the platform.
At the top of the router, install an additional stop with your own hands to eliminate vibration of the drill
Videos about a DIY drill milling machine show that it should be used for processing small parts.
The platform is slowly moved along the workpiece, holding it by the racks, and smooth and neat recesses and grooves are made.