This digital LED heart will be a great gift for a girl for Valentine's Day, March 8, or for her birthday. 21 LEDs are located around the perimeter of the printed circuit board in the shape of a heart. All of them are controlled by the ATmega328 microcontroller. The demo sketch contains several effects that revive the heart. The sketch can be loaded using any Arduino controller. But the main highlight is the vibration motor from the smartphone located on the back side. It creates the effect of a heart beating in time with the light effects. The sketch is easy to change if you come up with new lighting effects and heart beat frequencies. On the back of the heart there is a Li-ion battery charger that will charge your heart via the Mini USB port. The charger circuit is assembled on the MCP73831T chip. The connection diagram is standard from the description of the microcircuit. All details of the project are open for free use. The project created in KiCAD can be downloaded in the application.
From a paper clip
The next two methods will be as simple as possible to implement. Such hearts can be made in conditions where there is practically nothing at hand, but you want to surprise the person sitting next to you.
For this particular method, you only need a paper clip.
Its side part is folded to the top and in this position is attached to the paper.
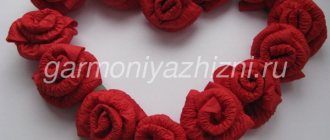
Beautiful felt hearts
One of the favorite materials for most needlewomen is felt. You can make many original and interesting crafts from it, including a heart.
You only need four components:
- Two pieces of felt of different colors;
- Padding;
- Scissors.
The fabric is folded together, a heart is drawn on it and cut out. Inside this heart, another one is drawn at a distance of 2-5 cm from the edge. A fringe is formed around the “central” heart with scissors. The width of each piece is from 0.5 to 1.5 centimeters.
Then two flaps lying opposite each other are tied into a half-knot, gradually filling the space between the pieces of fabric with cotton wool or padding polyester.
Pillow
A heart pillow is a great way to create a romantic atmosphere in your home.
Required:
- Sintepon or cotton wool;
- Scissors;
- Heart patterns;
- Needles;
- Thread;
- Any bright red fabric.
On fabric folded in half, trace a heart pattern with tailor's chalk or a bar of soap, then cut it out.
The resulting pieces are placed facing each other and not completely sewn together. Through a small hole that remains unstitched, the heart is turned inside out, filled with cotton wool or padding polyester and sutured to the end.
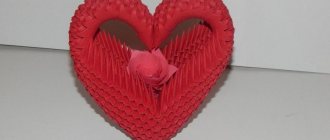
Let's start simple
Let's talk about how to make the simplest volumetric heart out of paper. For this craft you need to prepare:
- colored paper, and not necessarily only red. Crafts made from paper of other colors will also look great;
- pencil;
- scissors;
- glue.
The craft is made as follows.
- Draw the outline of a heart on a piece of paper. Size is at your discretion. The drawing is very simple, but if it turns out crooked and uneven, it is better to use a template. It is easy to download from the Internet.
- Cut out the heart with scissors.
- We make a small cut on the cut out heart in its upper part.
- Lightly bend the edges inward.
- Lubricate the curved edges with glue.
- We grab the glue-coated edges with our fingers and press them against each other on the back side of the craft so that they stick together well.
- After making sure that the edges of the heart are glued to each other, we unclench our fingers. That's it, the voluminous heart is ready.
Envelope
Love letters require a matching envelope.
Required materials:
- Simple pencil;
- Beautiful paper;
- Scissors.
A heart is drawn on the selected paper and cut out. To form the envelope, the side parts are folded inward. Do the same with the bottom and, finally, the top.
From a napkin
An unfolded napkin is folded into three. The middle of the resulting rectangle is visually measured. The left side is folded up. You need to do the same with the right side.
After these steps are completed, the napkin is turned over. Two outer and two inner corners of the upper part of the workpiece are bent.
Then the napkin is turned over again.