A technique called quilling is very popular in the modern world. The main reason for this is the opportunity to create incredibly beautiful paper crafts, used both as interior decor and as souvenirs, gifts for loved ones, relatives, friends, and colleagues.
A homemade holiday gift is always valued much higher than a typical item purchased from a store display. “Valentines” with declarations of love are no exception, the excitement around which increases on the eve of Valentine’s Day.
The master classes below will help you make a heart-shaped gift using the quilling technique for your other half.
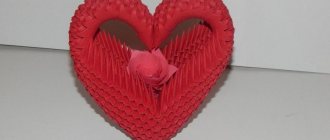
Volumetric heart using quilling technique
To create a three-dimensional heart using the quilling technique, you will need the following materials and tools:
- Plain paper quilling strips of the same size.
- Brush.
- PVA glue.
- Awl.
Using an awl, make a large number of rolls of paper, wrapped in a spiral.
Unravel them, and then, by squeezing them with your fingers, create elements of completely different shapes, as demonstrated in the photo below.
On the work surface, lay out the outline of a heart from the resulting three-dimensional shapes in quilling style. Then carefully fill its interior with the remaining elements.
At the final stage, take a brush and carefully apply glue to the side surfaces of the volumetric spiral shapes in the places where they join each other, leave for a while until completely dry.
Openwork heart in quilling style (with diagram)
For those starting to work on an openwork heart in the quilling style - a real work of creative thought - you will need:
- Colored paper for quilling.
- Cardboard.
- PVA glue.
- Brush.
- Scissors.
- Stationery knife.
- Simple pencil.
- Awl.
On a sheet of cardboard, draw a base diagram for the heart in quilling style, ideally with an openwork edge. Using scissors, cut it carefully along the outline. Inside it, draw another heart and cut along the contour with a stationery knife.
Using an awl, form strips of quilling paper into spiral rolls. To make the craft more colorful, use paper of different shades of pink.
- Place the resulting rolls tightly into the empty space of the heart placed on the work surface.
Apply glue to the sides of the rolls where they meet each other. Glue those elements located along the edges to the outline of the heart, made in the quilling style.
As a finishing touch, decorate the product with a bow made of ribbon or braid.
Card with hearts and leaves in quilling style
- The quilling technique not only allows you to form hearts from various three-dimensional paper shapes.
- There is an independent element in it - a heart.
- By making several of these components, you can creatively decorate your Valentine's card.
- To work you need:
- Awl.
- Brush.
- PVA glue.
- Green and red quilling paper.
- Scissors.
- Thick paper for cardmaking.
Make a base for a card with hearts and leaves in quilling style, onto the front of which you will glue elements made using the paper rolling technique.
Next, using an awl, form a roll from the red ribbon and glue the free edge to the base. Then pinch the roll with your thumb and forefinger, and with an awl, press it from above into the center, while modeling the contours of the heart. Complete 9 of these elements.
Then form green leaves. Wrap the green paper tape all the way around the awl. Remove the roll from the awl, unravel it, and secure the free edge of the roll with glue. Pinch the element on both sides with your fingers to give it the appearance of an eye. Make 11 leaves.
Now start finishing the card. Cut out 4 narrow strips from green paper strips, glue them onto the card, crossing them at the bottom like a bouquet.
- Then, in random order, as your imagination dictates, stick on hearts and leaves.
- Decorate the place where the green stems cross with a red paper bow.
- Let the glue dry, sign the card and hand it to the recipient.
How to make a complex heart using the quilling technique
To make a complex heart out of paper using the quilling technique, you should pay attention to preparing the necessary equipment:
- Red quilling strips.
- Scissors.
- PVA glue.
- Tassels.
- A small piece of magnet.
- Quilling tool or regular awl.
- The next master class with step-by-step photos will show you how to properly create such a quilling heart.
Take a strip of paper 10 cm long and glue its ends together. Give the resulting circle the outline of a heart.
Using a quilling tool or an awl, twist the red stripe in this way: make 3 curls, remove the device, step back 2 cm and make 3 curls again. Repeat these steps until you run out of paper.
- Apply glue to this strip on the side, glue it inside the quilling heart blank, as shown in the photo below.
- Make many of these swirl ribbons and glue them one by one into the cavity of the heart.
- Glue a piece of magnet on the back side and decorate your loved one’s refrigerator with original decor.
Creating a heart in quilling style: master class with video
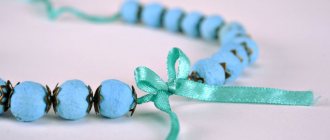
As a gift to a friend or employee for Valentine's Day, you can create a miniature pendant that is attached to a chain. In addition, you can complement your own holiday outfit with a similar product when going to a party or a romantic dinner with your other half.
First of all, you should make sure that you have on hand:
- Strips of red paper.
- Brush.
- PVA glue.
- Awl or quilling tool.
- Two connecting metal rings.
- Pin or needle.
- Tweezers.
- A master class on creating a heart in the quilling style with step-by-step photos is presented to your attention below.
Screw one red ribbon onto the awl until it ends. Take out the tool and loosen the resulting roll slightly.
Wet your fingers lightly in water, take a pin and use it, pressing your fingers on the roll, to form the pattern shown in the photo. Once it is ready, secure the free edge of the tape with glue. You should get a drop-shaped figure. Make another such element.
Connect both components into a heart by gluing them to each other.
Using an awl, wind a thin piece of red paper tape into a roll. Apply glue to its lower part, take it with tweezers, flatten it slightly and insert it on top between the two halves of the heart. Thread two connecting metal rings into it, inserted one into the other, and put a chain on them - and the neck decoration is ready.
Check out several options for making a heart using the quilling technique in the video below:
Get ideas and inspiration from these workshops to put them into practice.
Source: https://www.lady-i.ru/kvilling-valentinka-serdc
Volumetric “Valentine”
To create a three-dimensional heart using the quilling technique, you will need the following materials and tools:
Using an awl, make a large number of rolls of paper, wrapped in a spiral.
Unravel them, and then, by squeezing them with your fingers, create elements of completely different shapes, as demonstrated in the photo below.
On the work surface, lay out the outline of the heart from the resulting volumetric shapes. Then carefully fill its interior with the remaining elements.
Heart made using quilling technique
Craftswomen love to work with material such as paper due to its availability and ease of use. Therefore, such a technique as quilling, or, more simply, paper rolling, has become especially popular.
Its essence is to create three-dimensional figures from strips of paper twisted into a spiral. Using the quilling technique you can make different shapes, including hearts.
Making a heart in the quilling style is quite easy and simple, and requires a minimum of equipment.
Valentine heart using quilling technique: master class
Before you make a valentine heart from quilling, you need to prepare the following materials:
- colored paper;
- thick cardboard;
- scissors;
- PVA glue;
- a device for twisting paper (a toothpick will work as an alternative);
- stationery knife;
- a simple pencil;
- eraser.
To create a quilling heart craft, a curl pattern is used:
Now let's proceed directly to creating the heart.
- Draw a heart on cardboard and cut it out in a zigzag pattern.
- Draw in the middle of the heart with a simple pencil along the entire length of the edge. Cut out the center with a stationery knife.
- Take colored paper and cut thin strips.
- Using a special twisting device, we begin to twist the strips of paper in a spiral.
- Apply PVA glue on top of the colored paper and at the joints with the white base.
- There are empty spaces inside the heart. They need to be filled with small curls and secured with glue. While the glue is drying, you need to periodically move the heart around the table so that it does not stick.
- If desired, you can add a small thin rope for decoration.
Peculiarities
Quilling is a spectacular and very simple type of needlework. It does not require rare materials or specific tools. A product made using this technique consists of spirally twisted narrow strips of paper. Otherwise, this type of needlework is called “paper rolling”. Quilling can be used to create both flat and three-dimensional compositions. It’s easiest to make a flat one; you just need to glue the elements to a sheet of cardboard in the form of a picture. Depending on the nature of the design, such a product can easily serve as a postcard for any holiday.
DIY Valentines: lace hearts made of paper using the Quilling technique
This time “Cross” will tell you in detail and show you how to make valentines with your own hands using the Quilling technique. These paper valentines are quite simple to make and will help you beautifully express your feelings!
Openwork heart made from the “roll” element
To create a paper heart with your own hands, prepare:
- quilling paper cut into strips (you can cut it yourself from colored double-sided paper, but this is a very time-consuming process)
- thick cardboard
- curly scissors
- stationery knife
- PVA glue
- special quilling tool
Buy a quilling tool
A quilling tool is a tool for curling strips of paper with a forked tip. You can buy it at the store, or you can make it yourself using a ballpoint pen case and a thick sewing needle. You need to cut off the tip of the needle a little, on which the eye is located, and then insert the needle with the tip inside the body of the pen.
So, let's start creating a valentine with your own hands. Draw a heart shape on cardboard and cut it along the contour with curly scissors.
Inside the resulting heart, draw another, smaller one, and cut it along the contour with a stationery knife.
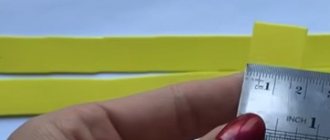
Base width 6-7 mm
Then the cut paper strips must be twisted into spirals (in Quilling this element is called a “roll”).
To make the heart more interesting, take paper of different shades of pink and make spirals of different diameters.
Carefully place the rolled paper rolls inside the heart:
Now the most important stage: each roll needs to be glued to the one nearby, and the outermost ones also to the heart itself.
If you see large gaps between large rolls, fill them with tightly rolled rolls in a contrasting color. This will make the heart look even more voluminous.
Move the heart carefully while drying to prevent the paper from sticking to the work surface!
As a decoration, you can tie a small ribbon or braid to this openwork heart.
- Write a declaration of love in a circle on a white outline :)
- Original master class
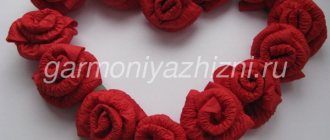
- These paper hearts are made in a similar way, the only difference is the use of corrugated paper instead of regular paper.
Valentika in a discreet “masculine” style
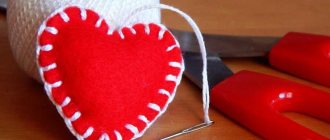
Heart made from the “droplet” element
And now we will learn how to make small elements, which in Quilling are called “tear drops” or “droplets”, and from them we will make hearts.
So, again we take a strip of white paper in our hands and, using a special tool for twisting paper, roll up a round spiral. Glue the tip of the paper with a small drop of PVA glue.
- The longer the strip of paper, the larger the diameter of the spiral.
- Then we compress the spiral from one edge so that the element itself eventually takes on the shape of a drop:
- By making 2 such droplets and carefully gluing them together, we will get a beautiful heart with curls!
- You can decorate a postcard for your loved one with these cute and very easy to make hearts. Here are some ideas for you:
- Paper hearts can be coated with glitter gel.
Valentines from the “heart” element
There is also an independent element “heart” in Quilling. Of course, it can and even should be used when creating a valentine card with your own hands!
- First, we roll the already familiar “roll” element from a strip of paper:
- Then we carefully try to make a depression in the middle so that the element takes on the shape of a heart.
- It is not so important that the curls in the center of the heart are located symmetrically; it is much more important that the element itself looks like a heart.
- Now let’s get inspired by ideas for decorating a postcard with “heart” elements:
In addition to the “heart”, this card contains the “eye” element. It is done as follows: place the “roll” between the index and thumb, and then squeeze it first on one side and then on the other, giving the finished element a slight asymmetrical effect. These are the elements that leaves are made from!
Valentines made from strips of paper
- As you already understand, cut strips of paper are the basis of Quilling; absolutely all elements are made from them.
But stripes can also act as independent elements to create original and stylish cards, such as these: - Multi-colored strips of paper fold into a beautiful heart thanks to different lengths and slight curling at the ends.
- A labyrinth made from strips of paper is a great idea for lovers of secrets and riddles)
- As you have already noticed, you can write words from strips of paper:
Volumetric heart-magnet made from a “chain” element
The “chain” element is a little more difficult to make, but it looks very impressive, so it’s worth learning how to make it!
First, the end of the strip is twisted into a “roll” using a quilling tool (only 2-3 turns are made), then the tool is taken out and inserted at a distance of about 2 cm from the previous turn, and the next turn is twisted towards the previous one. The process is repeated until you have twisted the “chain” of the desired length.
Approximately, from a strip of 29 cm, a “chain” 5 cm long is obtained, but the length may vary slightly depending on the number of turns.
- To make a voluminous heart from the curls of the “chain”, first glue a circle from a strip 10-12 cm long:
- Then give the circle a heart shape by making creases in the right places.
- Next, we make a “chain” according to the instructions described above and lubricate it with glue on the back side of the curls.
- Glue the “chain” along the outline of the heart from the inside:
- In the same way, we make several more “chain” elements and glue them inside the heart until we completely fill the entire space.
- When the glue dries, you can take the heart in your hands and make sure that it turns out very light and airy!
- If you glue a small piece of magnetic tape to one side, you will get a wonderful heart-shaped magnet.
- Original master class
- Using the “chain” element you can fill the space of flower petals, it also turns out very beautiful and elegant:
- Quilling is a very interesting needlework technique, thanks to which you can make the most beautiful valentines with your own hands without much expense!
SHARE! "Cross" will not give bad advice!