There is an opinion that fish traps appeared much earlier than gear. Most likely, they were used already in the Stone Age. With the use of these devices, the meaning of fishing as one of the sports and recreation is somewhat lost, but be that as it may, fish traps are in demand.
In an effort to save time and effort, but at the same time ensure a decent catch, many people use various fishing tricks and homemade products on reservoirs. "Muzzle" is one such trap. Of course, this product cannot be called a new product, since it is widely used by professional fishermen and amateurs. Beginners who decide to learn how to make this fish trap with their own hands can glean a lot of useful information from this article.
Fishing muzzle
Design and application When fish hooks had not yet been invented, and threads for fishing lines and nets had not yet been learned, fish were still caught with all kinds of traps. One of the most ancient traps is “Muzzle”, also known as venter, wick, winged, etc. The muzzle can be made of various materials: woven from flexible branches and reeds, knitted from mesh fabric or sewn from sackcloth (burlap, tulle, gauze.). Muzzles can be of different sizes, from tiny to house-sized, depending on the size of the fish they want to catch and the size of the expected fish catch. The muzzle looks like a pipe, with one or two catching cones at the ends. Sometimes guide wings are attached (sewn) to the muzzle. This is to make it easier for the fish to get into the trap. It is clear how the winged bird differs from just a muzzle. Sometimes the names may somehow indicate certain types of muzzles, but in essence they are all the same thing, only in different modifications. Muzzles made of mesh or fabric materials can be folded and take up less space when stored. Muzzles woven from wood twigs are good only for fishing, while catching fish. However, they are very inconvenient to carry. Let's look specifically at a muzzle for catching fish, tightly woven from wood twigs. Muzzles and traps are universal. They are placed on quiet lakes and on the flow of mountain rivers. With and without bait. The net, for example, catches fish only on the first day, then the fish bypasses the net. The muzzle, on the contrary, catches where nets are useless: in snags, thick grass and algae. The muzzle itself attracts fish, just like a snag that provides shade and shelter. In a fast current, the muzzle creates a special turbulence in the water and the fish, struggling with the current, trying to get into the calm behind the muzzle, finds the quietest place already in the muzzle itself. Therefore, in the old days, muzzles were hung on a common cable, sort of like hooks on a fence, and with such a bunch they blocked off a section of a fast river. In the spring, when fish from large rivers enter small rivers, their muzzles are placed in small (river) branches and behind stones with a strong stream of water. The fish, jumping up the stream because of the stones, hits it straight in the face. Personally, I myself saw how taimen, jumping over stones along the stream, only after the fourth or fifth attempt managed to squeeze into the neck of the muzzle. The muzzle was not tall enough for the taimen, the tail remained sticking out of the neck. After that, I had to break the muzzle to get the poor thing out. In the fall, muzzles are placed with an entrance against the current, with wings or with special fences, so that the descending fish fall into the trap. But for catching red fish, whitefish, muksun, burbot, etc., moving and ascending the river to spawn. The muzzle can also stand with the neck down. Special windows are made in the muzzles with doors on the side walls for pulling out the catch. The fish is also taken out of the muzzle through the hole of the fishing cone, if the size of the muzzle allows. Or the muzzle is made with one trapping cone, and the second end of the trap, during weaving, is brought together, also with a cone, almost leaving a small cylindrical hole, which is plugged with a plug (a bunch of grass). These are usually muzzles for catching fry or small baitfish. So, when a very large FISH plugs its muzzle, then the doors and other openings for pulling out such a fish are no longer suitable. (If you get a bad fish, you have to weave its muzzle again.) Sometimes large fish fly into small muzzles while chasing small fish. As they say: “Catch and you will be rewarded according to your labors and merits.” It's time to talk about a specific weaving of muzzles from willow branches. By the way, you shouldn’t be bringing your first fishing trap “snout” to the exhibition? This means the muzzle can be woven from any other suitable material. The base, naturally, should be stronger, and you can braid the base with anything. Willow branches can replace lashes of wild hops, roots of coniferous trees, grape vines, stems of old nettles, fireweed and raspberries. As well as wire, old rope, plastic strips cut from beer bottles and other drinks). The main thing is not to get hung up. Should I do it? So we'll do it! And from what? Let's find something! I cannot describe all possible options for weaving a fishing muzzle in this article, so let’s return to the option of weaving from willow branches. See my series of articles on weaving a fishing muzzle https://www.proza.ru/2012/06/04/1083 and, focusing on these principles, weave a product called a muzzle. If you don’t want everything to fall apart in five minutes, remember the general rule of weaving: “Any part must be attached in at least two places.” Otherwise everything will fall apart. Next, material will be given for those who have successfully studied up to 5-6 grades, remember what pi is and the multiplication table to ten. So, in order to prevent the fish from escaping from your snout trap, you can seal it by weaving along the frames or stringers. To put it simply, weaving along the crossbars or along the longitudinal base. Let's assume that you are going to seal the muzzle with cross weaving. Then the distance between the stringers (base sticks) is from 2 to 5-7 (cm). Let's also assume that you are making a muzzle with a diameter of N(cm). N(cm) multiplied by pi and divided by the distance between the base sticks (stringers), we get the required number of stringers. We make hoops for the muzzle. Hoops are needed to create the initial shape or bones of the muzzle. Here you need to immediately decide what length and diameter the muzzle will be and how many hoops you need, focusing on the average length of the stringer branches. In essence, only one hoop is needed to hold the neck of the inlet cone and the body itself, the rest of the hoops are temporary. In the future, the braid of twigs will itself hold the shape of the trap. It’s another matter if the braid is made of grass or other not very durable material, then additional hoops are really necessary. Let's assume that your trap is a muzzle with one trapping cone, a cylinder body with three rings of the same diameter on the body, and with the body gradually turning into a cone. The cylindrical body has a window (with a door) for removing fish. Rings for the muzzle (and all sorts of baskets) are made like this. Take a long branch and bend it into a ring. The branch is tied in the right place, or if the branch is long enough, it is simply twisted and intertwined, then dries until it remains a ring forever. We collect a double number of stringer branches, with the butts in one direction. Half of the stringers will go to the trap cone, and the second part of the stringers (every other time) will go to the body of the trap. We trim all the stringers from the tops and tie all the butts of the branches into a bundle. It doesn’t matter that the butts are different lengths, we will trim them if necessary. We tie the butt at the level of the shortest stringer branch. One end of the stringer branches is tied, the other end has nowhere to go. We separate one top from a bunch of stringers and tie it (with a beak, a leaf, a tongue) to the hoop, no matter what method, but we tie all the tops in a circle. Did you remember to put a stick under the first string of the top? If you haven't forgotten, it will be easier to secure the last tip. All stringer branches are fixed in two places. The butts are on the original string, the tops are tied to the hoop. Has the weave fallen apart? Great. Now you need to separate (every other time) the stringers of the catching cone from the stringers of the body and tie their butts on different sides of the hoop. Next, we will braid the stringer branches of the future trapping cone with crossbars. The method is your choice. Either with a rope, or with a double or single rod, it doesn’t matter. In fact, it is necessary to supplement the ending top, transverse weaving, with a butt, and the butt, accordingly, with a top. But in your case, there are no restrictions. Do as you wish. What is the diameter of the narrow hole in the trap cone? If you have already braided it to the required diameter, then step back a couple of centimeters from the transverse braid and cut off the extra branches - the stringers of the base. The catching cone has turned out. Next, we fix the butts of the body stinger rods on the second ring, above the catching cone, and braid them with a transverse braid. We increase (if necessary) the stringer branches with new branches and braid them again up to the third hoop, and then lower the braid to nothing. The door for removing fish on the cylindrical part of the muzzle is made like this. During weaving, a window is cut out in the stringers between two hoops. Naturally, they weave the braid only up to the window and return with a braid rod back around the body to the window on the other side. I think there will be no problems weaving a door (on a rectangular frame). You can figure out how the door is attached and secured to the trap-face. That's it, the snout trap is ready. You will weave the second trap and the following ones from memory and in accordance (with external conditions). A little explanation! A fishing snout trap is considered poaching gear and its use in many bodies of water is prohibited!
What is a fishing top?
The muzzle, venter, or top is a trap with a funnel-shaped entrance. A fish interested in the bait swims through a gradually narrowing tunnel and gets inside the body, where the bait lies. When trying to leave the container, the fish is no longer able to find the hole through which it entered.
When removing the tackle from the water, the fisherman can get the catch through another hole, which remains closed while the tackle is working. If the homemade top is made from a ready-made container (can, plastic bottle), then it is advisable to provide a funnel attachment that will make it easy to remove it when taking out the catch.
Bait
Attracting fish to your face is not particularly difficult. The most popular baits are dough, bread, potatoes, minced fish, cottage cheese, etc. This bait can be used to catch both large and small predators.
Any angler should remember that not all bodies of water allow the use of jigs. You can fish with traps in places remote from civilization, and only if your conscience allows you.
How to catch fish with a muzzle video. Fishing with a homemade muzzle.
How to catch fish with a muzzle video.
How to catch fish with a muzzle video
An excellent catch without the use of traps is guaranteed to you by the Zavidovo fishing base, where you can catch a huge catfish on a donk, or pull out an always hungry snakehead.
Source: zavidovo.kz
How to do it yourself?
Traditionally, willow or other thin and flexible branches were used to make the top. To weave a funnel, a ring with a diameter of 5-7 cm was made, on which a vine for the base was secured. The base was braided with thinner strands, and it was given the shape of a funnel, expanding from the ring. Having made an entrance about 20-25 cm long, they began to weave the expanded upper part of the muzzle, spreading the warp rods to the sides and gradually bending them down.
The entrance funnel then ends up inside the wicker vessel, which again begins to narrow towards the top. In a simple method, the ends of the unbraided rods can be tied with a strip of strong bark or rope, closing the hole. In a more complex version, a ring of larger diameter was placed on this hole, and a lid made from a circle of thick bark or woven from a vine was attached to it. Similar designs are still woven in villages using wire.
From a plastic bottle
At a picnic by a pond, the muzzle can be easily made from scrap material using a water or beer container. The amount of fish that can be caught in 1 cast and the size of the crucian carp depend on its volume.
Cut off the neck of the bottle and part of the body at about 1/3 of its height. If necessary, you can also remove the screw part under the cover to slightly enlarge the hole. In 5-liter cylinders this can no longer be done.
Turn the cut part of the container over and place the neck inside the container. Connect the edges of the parts with wire. The fastening must be detachable so that the neck can be removed and the fish can be taken out of the trap.
From the air filter
You will need a large filter from a truck (most often they take an air filter from KAMAZ). Remove all filling from the mesh body. A cylindrical metal grid is well suited for quickly making a top with your own hands:
- cut out and fasten at one end a dense, blind cover made of tin or plastic, plywood, etc.;
- make a funnel for entering the trap from flexible sheet material;
- strengthen the funnel with the narrow end inside the mesh body;
- tie a rope.
With metal frame
Frame products will require the use of thick steel wire and material to cover the frame. Most often, nylon or plastic mesh with a fine mesh is used as covering. You can make a top on a frame with 1 or 2 funnel-shaped entrances:
- Roll several rings of equal size from steel wire. Their diameter is chosen arbitrarily, but to catch large fish it is better to make the muzzle at least 30 cm wide. The length of the product depends on the number of rings; you can make 3-5 frame rings.
- Make 1-2 small rings for the entrances from the same wire. Their diameter can vary between 5-10 cm, depending on the size of the desired prey.
- Wrap the net around a large ring, leaving a free edge of about 20 cm in length. Tie the net to the ring with a slight overlap at the junction of the side edges. After 20-30 cm, also tie another 1-3 rings, and secure the last one at a distance of 20 cm from the edge of the mesh. You should get a soft cylinder with a loose mesh on the end sides.
- Shape the edges of the net into a cone shape, laying several folds, and attach small rings to the edges.
- Bend the tapered ends inside the body. To prevent the fish from swimming through the trap in a straight line, the entrances are shifted to the opposite sides of the venter, secured with leashes made of wire or fishing line.
Zakidushka with feeder
When fishing from the shore, without a spinning rod, you can get by with simple gear, which has been used for a long time and is called a bait with a feeder. With certain skill, it can be thrown quite far - up to 90 meters.
If the feeder or sinker placed at the end of the fishing line is additionally equipped with an elastic band approximately 3 meters long, then the bait on the hooks can be changed without repeated casts.
Several hooks with bait are attached to the fishing line, and the current and wind do not carry it away.
Designs of snack bars
This tackle is used for large fish, which do not come close to the shore and feed at depth in the bottom space.
There are several types of these devices, here are some:
- reel based. The components are fishing line, leashes with hooks and a weight or feeder, everything is very simple, no additional costs are required. The size of the winder depends on its capacity - the entire length of the fishing line must fit on the device. Having wound a cord of the required size onto it, the main part of the fishing rod is attached to the end - leashes equipped with hooks and a feeding weight;
- spinning Everything is basically the same as in the previous case, but fishing will be comfortable if such a rod is used, and it must be powerful and short in length in order to withstand a decent load;
- feeder This is the same spinning rod, but its flexible part (the tip) can be replaceable and installed depending on the size of fish to be caught.
In the latter design, the feeder itself serves as a bite indicator - its flexible component, and in the first two, a bell is tied to the fishing line near the base of the reel, stick or spinning rod.
A zakidushka is a tackle that does not require close attention (large fish rarely take it), so, as a rule, several of them are installed at once.
DIY tackle
Judging by the description of the designs of the zakidushki, making them yourself will not be difficult.
This process is presented step by step using the example of a spinning device:
- Select a spinning rod based on the load from the weighting material and feeder, and the weight of the expected prey. You can take a hard one, sensitivity is not required here, the main thing is that there is a strong frame. The usual length of such a rod is 2 m.
- Equip the base with a spinning reel with a capacity of 160 meters of fishing line. If you plan to catch a catfish, then to fish it out, the length of the line is increased to 200 meters, and its diameter is set to 1 mm.
- Prepare a feeder - it will serve as a load and serve as a container for bait. If you plan to fish with a zakidushka on a river with a fast current, then the body should be of an acute-angled shape.
- Tie leashes with hooks according to the size of the desired prey to the main fishing line; it should be thicker so that if one element breaks, you do not lose the entire tackle.
- Finally, a bite indicator is made - you can pick up a bell or install an electronic alarm.
When making gear, it is important to be careful: you can get hooked yourself if you are distracted by other activities. It is important to make a thing not only beautifully and efficiently, but also without causing damage to your health.
The tackle is ready - we need to try it
Now you can get ready to go fishing.
The main thing is the bait, it is important to choose a product for a specific fish, and this will require knowledge of the diet of the same catfish:
- live or foam fish;
- waste from chicken cutting;
- fish pieces;
- mouse;
- all kinds of beetles, grasshoppers and caterpillars.
It is clear that the entire assortment is not needed, but there should be a choice. In addition to bait, you need to take some complementary food with you. Often, for these purposes, semolina is used mixed with fishmeal or a ready-made concentrate is purchased.
https://youtube.com/watch?v=lSRtQIiHJag
In order not to fall into your own fishing rod, you need to know how to cast the tackle correctly.
If the throw is simple - based on a reel, then it is first unwound in a place free of debris and the original end is tied to a tree or a stick well stuck into the ground. After this, the bait is prepared and the feeder is loaded, followed by compaction of the mixture. Then the bait is attached to the hooks and the tackle is ready to cast.
When casting on a river, the current should be taken into account, and the aiming point should be higher; it will be carried away by the force of the current. Now the equipment is compactly concentrated and thrown by hand to the intended place. The free fishing line is selected by winding it onto the reel and a bite alarm is installed.
If there is no movement for an hour, you can experiment with bait and change the fishing location.
To make the process of fishing for a homemade bait with a feeder more convenient, you need to use a spinning rod or feeder.
Top fishing methods
Fishing for top fish can be done with or without bait. Fish can be attracted by the smell of food or the structure itself (during the spawning period). But for successful fishing you need to know how and when it is better to catch crayfish or crucian carp.
With bait
The feeding instinct forces the fish to dig into the most inconvenient places if it expects to get to the food. Lures that many breeds find attractive are placed in the muzzle: bread or dough flavored with vegetable oil, and sometimes with odorous substances (anise drops, perfume, valerian tincture, etc.). Potato peels, egg shells, and dough are suitable for catching crucian carp. In addition to crucian carp, minnows and minnows are used for such bait.
They are caught with bait in the summer, throwing their muzzles into the shady corners of the reservoir. It is advisable to drown the top where the strip of coastal underwater vegetation begins. If it is possible to observe the reservoir during the morning and evening feeding of the fish, then the fisherman will be able to determine a more accurate location for casting the tackle: the tip is placed where the fish were playing.
Without using bait
Sometimes catching tops is possible even without using bait. The method without bait is used in the spring, when the fish goes to spawn and may find that such a convenient place is suitable for spawning. Different breeds of fish that prefer to spawn in thickets of plants can get into the snout at this time. The trap is placed where a concentration of crucian carp, bream, and ide is found. The spawning site is easy to determine by splashes of water.
On rapids, in small streams, venters are placed in a narrowing channel. Passing along the river, the fish is forced inside and cannot get out of the trap. With a little practice, you can determine the best way to place the top on the river: on the current or closer to the spawning grounds.
Preparation of bait
Any bait, including home-made bait, must have the desired structure, and not just contain several components. Fish food should be as follows:
- The bait consists of the main mass, which is used to create volume and attract fish. Most often, the bait is based on cheap components. However, they must be edible for fish. The most common are compound feed, halva and pearl barley.
- Feed elements that can hold the fish in the fishing area must be added to the mass. If the fish does not find attractive food, it will quickly leave the area in search of food. Ingredients of animal and plant origin are used as feed elements, such as worms, bloodworms, maggots, millet and rolled oats.
- Additives should be used in bait, such as flavorings and taste enhancers. A special role is played by aromatic additives, which can attract fish from a long distance. Sunflower, anise or hemp oil, as well as fried seeds and garlic juice can be used as flavorings.
If fishing takes place in a small reservoir where the density of fish is high, these requirements can be neglected. In such conditions, you can use simple porridge. But if the reservoir is large and the density of fish is small, then the use of porridge is ineffective. In such a situation, you cannot do without special additives.
Fishing muzzle: how to make a trap
There is an opinion that fish traps appeared much earlier than gear. Most likely, they were used already in the Stone Age. With the use of these devices, the meaning of fishing as one of the sports and recreation is somewhat lost, but be that as it may, fish traps are in demand.
In an effort to save time and effort, but at the same time ensure a decent catch, many people use various fishing tricks and homemade products on reservoirs. "Muzzle" is one such trap. Of course, this product cannot be called a new product, since it is widely used by professional fishermen and amateurs. Beginners who decide to learn how to make this fish trap with their own hands can glean a lot of useful information from this article.
Description
The fishing muzzle can be classic or specialized. The first is used for any fish, the second - for a specific species. “Muzzles” differ in size, neck design and body shape. A variety of materials can be used for their manufacture. Externally, the muzzle resembles a cylindrical pipe equipped with a neck through which the fish penetrates the body. The entrance part is provided with a round shape, the end of the neck is conical.
To make the trap more convenient to use, fishermen equip it with guide wings. The body of the muzzle can be square, triangular or semicircular. The sizes are also different. Dimensions depend on parameters such as the volume of catch and the depth of the reservoir. How to make a fish trap with your own hands is written in detail below.
How to make a face? Progress
Making a device at home is not difficult if you follow the following sequence of actions:
- The first step is to make a hoop. It’s good if you managed to find a ready-made wood product. Otherwise, the home craftsman will have to make it himself. For this purpose, hard wire, previously sanded with sandpaper, is suitable. To prevent the product from rusting, a special antiseptic is applied to its surface. After the substance has dried, the hoop is given the required shape and size. Tree roots and branches are also suitable as material. The consumable material will be more elastic if it is first dipped in boiling water. Otherwise, working with wood will be difficult. Next, both ends of the hoop are pulled together and secured with a strong thread.
- Make the body of the muzzle. The rods are collected into a bundle and aligned in length. One tip is separated from the bunch, it needs to be tied to a hoop, and a stick placed under the string. Do the same with the rest of the rods. In order not to confuse the rods intended for making the body with the material for the cone, every second rod should be separated. The hoop is tied around the circle with it. The rods that will be used in the body are attached and fixed with a transverse braid to another hoop.
- To increase the length of the body, new branches are added to its rods and braided to a new hoop.
- After weaving, they begin to make holes in the trap cone. For this purpose, the craftsmen, stepping back a little from the braid, cut off all excess from the rods.
- So that the caught fish can be removed from the trap, a special hole is made in the structure. It is done in those rods that are located between different hoops. The dimensions of the windows may vary. It all depends on the size of the fish caught. They are closed using special doors that are woven separately. They are attached to the structure itself using a rope.
Types of tackle
There are several main types of such gear. They differ in some design features. The choice of gear type depends on the fishing conditions.
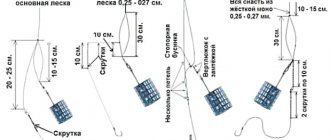
An ordinary snack
This is the simplest and cheapest option for a snack. It is a strong fishing line or nylon cord with a thickness of 0.35-0.5 mm. A weight is attached to one end of the fishing line. Lead casting can be used. For fishing in rivers, its weight is usually 10-200 grams. When fishing in still water, use a weight of up to 50 g.
Some fishermen use stones found on the shore instead of lead weights. The length of the main line usually does not exceed 50 m, because it is difficult to cast the tackle further in the usual way.
A leash is tied at a distance of 0.5 m from the sinker. It uses a thinner fishing line, its thickness is 0.2-0.3 mm. The leash is taken 0.3−0.6 m long. To ensure that the tackle takes up as little space as possible, the fishing line is wound on a plastic or wooden reel. Bells are used as signaling devices.
Zakidushka with sliding weight
Some types of fish are cautious and shy. Catching bream with a regular bait does not always bring good results. In this case, it is good to use a tackle with a sliding weight.
There are two main practical options for implementing this idea:
- a sinker in the shape of an oblong olive is attached to the main fishing line. The distance from the hook to the main line is regulated by a special rubber stopper. Instead, you can use a small piece of sheet lead. A leash with a hook is tied to the very end of the main cord. The fish takes the bait, but does not feel any resistance, since the line slides and the sinker remains on the bottom;
- A weight is attached to the main line on a leash with a swivel. The limiter is a rubber damper. Leashes with hooks are located at the end of the fishing line. In a similar way, the nozzle can be raised above the bottom. After casting, the line is pulled slightly and then fixed in this position. When biting, the fish does not feel resistance and boldly swallows the bait.
About the specifics of devices
According to experts, good traps are made from nets and burlap. Since various materials have both advantages and disadvantages, the home craftsman will have to take this into account. For example, fabric and network muzzles are more convenient to use. If necessary, they are easy to fold and transport. Also, these traps take up virtually no space. At the same time, these “muzzles” have a low service life. The rod construction is reliable and durable. Once caught in such a trap, the fish will not escape.
What is a top in fishing
The top (in everyday life you can find such names as muzzle or venter) is a trap equipped with a funnel-shaped entrance. Attracted by the bait, the crucian carp swims through the tunnel with a gradual narrowing and eventually ends up in the body with the bait. Attempts to get out of the container do not yield results - the fish is simply not able to determine through which hole it got inside.
Also, in the described gear, a second hole may be provided, which remains closed during fishing - it is through it that it is most convenient to get the catch. Despite the simplicity of the design, crucian carp very often fall into such a trap, but there is one significant drawback - the weight of the caught individuals is often in the range of 30–50 g.
To attract larger specimens, it is recommended to follow some rules:
- Select a body of water - the optimal place for top fishing with bait are fairly large rivers inhabited by golden crucian carp. Semi-flowing ponds with a large number of predators such as pike will be unsuitable (in such conditions, other gear should be used). Also, reservoirs with a large population of silver crucian carp are not suitable - in this case, small fish will be the catch.
- To filter the catch from small fish, the tackle must be covered with a large mesh (with cells from 40 to 50 mm). This method will save a lot of time. However, he will require placing the bait in the top in a separate bag (tulle or fine mesh can be used as the material), which will protect the bread or cake from getting wet and floating to the surface through a large mesh.
- You can choose the optimal place - you can identify the feeding area of the largest individuals using a fishing rod, at dawn, or at nightfall, by ear (usually in silence the splashing and fussing of fish during feeding can be clearly heard).
Design and manufacturing
Initially, oval and round hoops made of wood were used to make the frame of the hemstone. Currently, hoops made of metal or plastic have begun to be used. They are also called frame rings or catels. To increase the service life of the hemstone, if you make it yourself, use metal hoops made of stainless steel. But there is a cheaper option: you can apply waterproof paint in several layers to an ordinary metal hoop, having previously treated it with fine-grained sandpaper and degreased it. This must be done because the mesh that covers the frame instantly rots at the points of contact with metal covered with rust.
The design of a modern hemline (only one wing is shown for a better understanding of the design): 1 – floating cord; 2 – load cord; 3 – wing; 4 – arc (plastic tube with a diameter of about 20 mm); 5 – coils (plastic tube with a diameter of about 16 mm); 6 – “throat”; 7 – “barrel”; 8 – kutets (kutek)
To tighten the frame of the hemstitch, it is necessary to use threads of sufficient strength and thickness. Monofilament or mesh will no longer work. Gradually moving away from the entrance, the diameter of the frame hoops decreases and reaches the narrowest part, called the coddle or coddle. Sometimes this area is called motney.
The design of the fence is designed in such a way that the fish, encountering an obstacle in the form of stretched “wings” on its way, will immediately fall into a special chamber. The “wings” are attached to the inlet and form a rectangular mesh. The design of the trap chamber is based on the ease of getting into it, but it is almost impossible to get back out.
If the front hoop is made in the form of a rectangle or square, the fit to the bottom will be much stronger and the catch will be much greater. Most often this is used for hems with removable wings or wingless ones (we will consider their design later). The most popular and common among fishermen is the oval-shaped boat. The technique of greenhouse arcs is used: the ends of the pointed shape, extending beyond the dimensions of the tackle, are stuck deep into the bottom of the reservoir, allowing you to save on stakes for stretching the fence and time for searching for them.
In order for a good catch, the fish must freely enter the trap chamber (cuts). This can be achieved if all gradually mounted hemstone elements, such as the “neck” and “barrel”, are on the same axis. In addition, the shape of the “throat” also affects the quality of the catch. In practice, it has been proven that the entry of fish is maximum when the entrance hole is round.
The catel can be attached to the network in different ways. The first method is to thread the hoop through the mesh of the “barrel” of the hem around the entire perimeter. This is a very labor-intensive method, and besides, this work can only be done until the ends of the hoop are tied together. This makes it difficult to connect ends, install metal hoops, and repair them. In addition, the del, in contact with the hoops, quickly frays. The second method involves inserting hoops inside the hem, and attaching it directly to the hem using twine. A significant drawback of this design is that the part may become skewed and the hoop may not be installed correctly. In addition, this method does not solve the main problem - chafing.
The most common method is in which the hoop is attached to the outside of the tackle. To do this, you need to pass a thread at the place where the hoop is attached to the “barrel” around the entire perimeter. In addition, the transverse seam is strengthened. According to the diameter of the hoop, the thread is tied with one thread. As a result, an interesting design is formed: the hem is stretched inside the hoop.
There is also a frame type of hemstitch, in which case all the hoops are of rectangular cross-section, and not just the first one. A significant advantage of the frame design is the ability to make it collapsible, which is very convenient for transportation. One of the options for a collapsible frame design: metal rods that are inserted into corners made of aluminum tube. Naturally, such gear requires a lot of time to manufacture and considerable funds. But the resulting tackle is very compact and can easily fit into a fisherman’s backpack. Over time, the design of the mesh developed and changed. For larger catches on an industrial scale, they began to use very large meshes with several “throats” at once. If the dimensions of the reservoir are sufficient, the length of the wings of the fence can reach several kilometers. With the help of such lines, you can catch even very cautious and timid fish, since, swimming through kilometer-long labyrinths of gear, they do not even suspect that they are already in a trap.
What can you make a trap for crucian carp from?
There are many ways to independently construct crucian carp traps. Traditionally, willow twigs or any thin flexible branches are used for these purposes, which are now often replaced with wire.
The technology is similar to the process of weaving a basket:
- A funnel is made from a ring, the diameter of which is no more than 6–7 cm, and rods for the base are attached to it.
- Further weaving is carried out using thinner branches, and the shape of the structure is characterized by expansion from the base.
- After making the entrance (length is approximately 20–25 cm), they begin to weave the expanded part, gradually bending the vine downwards.
- The entrance (funnel) is placed inside the vessel, which tapers at the top.
- The remaining ends of the rods are tied with rope, which, if not available, can be replaced with bark.
However, the manufacture of the top can be carried out using other materials.
From a plastic bottle
In the absence of gear, catching crucian carp can be organized using a top made from any plastic container for a drink or beer. Moreover, its volume will directly affect the amount of future catch and the size of the caught individuals per cast.
Installation of such equipment is not particularly difficult:
- The bottle is cut into several parts: the neck is cut off along with 1/3 of the part, according to the height of the container itself. Additionally, to enlarge the hole, the part under the screw cap is also removed (in 5-liter containers such manipulations are not required).
- The separated part is placed in a container so that the neck is inside the bottle.
- The edges of all parts are attached to each other using wire. At the same time, the fastener itself must be detachable - this will make it easy to remove the neck and get the catch.
- A strong rope is tied to the container, with the help of which the top will be easily removed from the water.
Video: how to make a trap from plastic bottles
From the air filter
The main material can also be an air filter from a large (for example, truck) car. In this case, you will need the metal grill itself, for which all the filling is first removed from the purifier body.
Next, the manufacturing technology includes several steps:
- A tight lid is cut out and secured at one of the ends. The optimal materials are tin, plastic, plywood and others.
- A funnel is made from any flexible sheet material, which will be the entrance to the trap. After this, it is secured with the narrow end inside the mesh body.
- A tight rope is tied to the structure.
Made from metal mesh
A good option is to use galvanized mesh to construct the top yourself.
For this:
- A rectangular piece with the required dimensions is cut out of the mesh - its width will be the length of the trap, and the length of the workpiece must be selected so that it can be rolled into a cylinder with a diameter of at least 30 cm.
- The mesh is rolled up, and the sides are fastened along the side seam with wire.
- A blank for the funnel is cut out of the same material, after which it is rolled up and secured to the end of the trap.
- The other end of the body is equipped with a lid, which is subsequently used to extract crucian carp.
- A rope is attached to the structure.
Type overview
There are different types of such fishing gear. Each is characterized by sufficient strength, catchability, does not create installation problems, and when folded does not take up much space. However, there are differences in appearance, size, structure and design. Let's look at them in more detail.
The spring top does not have a rigid frame. In its place is a spring mechanism, the diameter of which can be from 40 to 60 centimeters. The length of the device can reach a meter. The average cell size is from 12 to 15 millimeters. The structure is equipped with two entrances. Since the trap is small, it is perfectly located in fishing areas and is convenient for transportation and storage. When in use, after unfastening the latches, it straightens in length, thereby straightening the mesh.