For a variety of reasons, holes or cracks can appear in wood. This often happens due to excessive internal stress, seasonal shrinkage, mechanical damage, and other factors.
To eliminate them, a large arsenal of means is now used - sealants, putties, adhesives and other solutions that are focused on one or another type of defect.
In this article, we propose to consider the most effective ways to repair a hole in wood, as well as how to remove cracks - from small chips to complex longitudinal cracking.
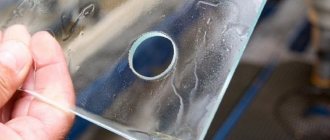
I drilled holes in the board in the wrong place. What to do?
- If the hole is not through
- If the hole is through
- Finally
It’s not for nothing that the saying goes: “Measure twice, drill once.” It happens that I measured everything several times, but still drilled holes in the wrong place. In most cases, you have to throw away the board and use a new one. What to do if the wood is butted against each other? In this material, Infosborka.ru gives practical advice on how to seal the wrong holes in wood - and so that they will hardly be noticeable.
Wood defects and ways to eliminate them
Timely processing of wood and the elimination of any deviations from the norm can provide the material not only with a perfect appearance, but also extend its service life significantly. Each group of damage requires its own preventive and restoration measures, depending on the nature of its origin. Thus, correcting wood defects consists of the following steps:
- to eliminate parasitic damage, the wood must be impregnated with antiseptics, and then the damaged layer must be removed;
- knots are removed mechanically, and wooden patches are placed in their place;
- wormholes and cracks are eliminated using putty with adhesive impurities, and special resins are used for through cracks;
- roughness and irregularities are removed by grinding the surface;
- To eliminate deeper damage, a special putty is most often used, or the required layer is removed and then sanded.
Each of the above procedures has its own importance. Restoring defective wood is not only for commercial purposes, but also expresses concern for the environment
If the hole is not through...
Option #1
Now let the other side, which has no hole, become the front side. Thanks to this, the face of the part will again be flawless.
Option No. 2
Seal the hole with scraps of the same board. To do this, you need to make a plug from the trimmings. A plug drill, which is used to cut out conical plugs, will help with this. The resulting plug after sealing will be the least noticeable.
If you don't have a cork drill, use a round dowel that fits snugly into the hole. However, this option is a last resort, since such a plug will stand out strongly against the background of the entire part - especially after varnishing.
Option #3
- Using a router or circular saw, cut a wide groove (not necessarily deep). The main thing is that it covers the hole.
- Cut the strip to the size of the groove, but slightly thicker than the depth of the groove.
It is advisable that the plank be made from the same board, or match the color and texture of the wood that you are repairing.
- Glue the strip into the groove as shown in the picture below.
- After the glue has dried, use a plane to make the surface smooth and then sand it.
And if the hole was near the edge of the board, then cut out the fold. The remaining steps are the same as described above.
Preventive measures
Method #1. Long natural drying
The best prevention is long-term natural drying of the logs before placing them in the log house. The more uniformly the logs dry across the entire thickness of the fibers, the less likely it is for cracks to appear. The drying rate in the inner and outer layers should be approximately the same. Then moisture from the inner layers will move to the outer ones, and they, in turn, will evaporate it into the environment.
This balance can be maintained if the drying period is at least two years. Dry the logs in a shady, dry and cool place. As a result, wood moisture content should decrease to 18-20%.
For comparison: when drying logs for one year, the width of the resulting cracks is no more than 6-10 mm, over two years - no more than 1-2 mm. If the logs have been dried for less than a year, the width of the cracks may exceed 10-20 mm.
Method #2. Compensation cut
A cut in the upper or lower part of the log (timber) helps reduce stress in the wood fibers. This type of cut is called compensation or unloading. It is performed along the axis of the log, often on the upper surface. Some craftsmen make cuts along the entire surface, while others do not cut the groove to the ends.
In a log house, the cut is covered with a lying log on top, so moisture does not get into it. When dried, the cut expands. But, at the same time, the number of natural cracks formed is reduced, their depth and width are reduced.
The cut is an even groove 7-10 mm thick, 1/3-1/4 deep from the diameter of the log. The cut can be made using a chainsaw, a router, or a rounding machine.
Method #3. Sealing the ends of logs
The ends of the logs (cutting areas) dry several times faster than the rest of the outer surface. Therefore, during intensive drying, the ends become cracked first. To prevent this process, you need to close the moisture exit through the ends. That is, cover them with sealant. Then the ends will stop quickly evaporating moisture. It will go into the outer layers of the log and from there it will evaporate, but evenly.
To cover the ends, you can use drying oil, oil paint, oil varnish, and wax solutions. Previously, the ends were coated with lime to seal.
The need to protect the ends of logs is discussed in the following video:
If the hole is through...
Option #1
- Using a cone plug drill, cut out two plugs. The height of each should be slightly less than half the depth of the hole. Otherwise, the plugs will rest against each other and stick out from the board.
- Install them so that the direction of the grain of the plugs and the board coincides. Then glue them.
Option No. 2
Cut out a rectangular piece that will have the irregular hole in it, and glue on a piece of the same shape cut from a scrap board or similar wood.
Option #3
If the wood has a pronounced texture (for example, oak or ash), then option No. 2 is unacceptable. In this case you need:
- divide the board into two parts by sawing it lengthwise
- then throw out the part where the hole was made incorrectly
- glue a board more or less suitable in texture.
In this case, the part will look like a glued shield. Which is also beautiful.
Instructions on how to repair MDF doors: causes of breakdowns
It is very easy to cover an entrance or interior door, for example, veneered or completely wooden, but first you should understand how the defects arose and for what reason. Mechanical damage includes those defects that were formed from direct impact on the door leaf. This may cause a scratch, dent, hole or hole.
If installed incorrectly, problems such as:
- Skewed canvas;
- Incomplete connection of the door to the door frame;
- Too much friction.
Wood and panels made from it have increased hygroscopicity, due to which they have the ability to absorb moisture. If production has been disrupted during manufacturing, this can cause serious consequences. If there is high humidity in the room or if the building is not heated, the structure begins to swell and deform.
It is possible to completely unstick the canvas if it was assembled poorly in a factory or even manually at home
To restore a door made of veneer or MDF from defects caused by improper installation, you should pay attention to a number of recommendations presented below
If the door opens poorly, friction increases, and therefore you need to remove the excess part of the canvas from the edge using a plane, after which sanding, painting and varnishing is required. Ideally, the gap between the frame and the door leaf should be 2 mm. If the door begins to spring back when closing, it may be hitting a quarter of the frame. In this case, you need to trim either the door leaf or the frame itself. In addition, the problem may lie in improper installation of the hinges. The door may sag, and to restore it to its normal appearance, you need to put new washers on the rod of each hinge.
Finally
If you made a mistake with the holes for the handles - that is, they are small - then you can buy restoration wax at furniture stores and rub it into the wrong holes. Next, remove the excess and wipe with a cloth until smooth.
When building your own home, it is not enough to pay attention to what materials are used for this - you also need to be very careful about the method of attaching these materials. As you know, any building material “requires” its own fasteners and method of its application. The floorboard is no exception in this regard. Considering the loads that fall to its share, the choice of method of fastening the floorboard simply cannot be an insignificant issue. Indeed, if the boards are not fastened well enough, after a short time they will begin to “demonstrate their dissatisfaction”, loosening and changing their position, and the initially smooth and even plank floor will not only begin to creak underfoot - it will literally fall apart into individual components.
Wooden plugs
Wooden plugs are cylindrical blocks that can be purchased at any hardware store. They are usually used as guide elements when joining boards at the ends. To seal a hole using this method, you need to drill it out to the diameter of the plug, which is usually 8 mm. Then we moisten the plug with wood glue and hammer it into the hole, after which we cut off the remains with a hacksaw.
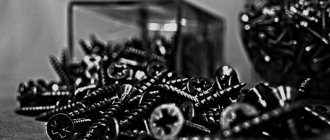
What fasteners are used to secure the floorboard?
Today, manufacturers produce special screws for floorboards, which ensure reliable fastening of the board to the base and guarantee a long service life of the flooring without any additional investments in its repair.
However, it is worth noting that such self-tapping screws are somewhat more expensive than conventional fasteners used in construction.
But at the same time, they perform their work very efficiently and as efficiently as possible. As a result, the entire floor covering will last much longer than if conventional screws were used to attach the boards. Saving on self-tapping screws in this case is an almost guaranteed need to repair the floor in the very near future. And on the boards themselves, fasteners that are not specifically designed for them can have a very negative impact - for example, screwing such fasteners into the board can cause a crack.
Thread restoration method
Each thread restoration method is suitable for a specific case. An example is the use of epoxy glue, which can repair minor damage to the coils.
The tool in question is designed to produce turns on metal.
In some cases, it is impossible to increase the diameter, then a screwdriver is used. Such a cylindrical device has coils on the outside and inside with the required pitch.
In some cases, the damage is represented by a hole that can be repaired by welding. After this, thread restoration is also carried out using the most suitable tool.
Seal holes in wood
All self-tapping screws have a special protective coating that prevents the possibility of corrosion on their surface.
And you can find out the special screws for attaching the floorboard very easily - there is a milling cutter at their tip, which allows you to screw these screws into the board without first drilling the holes. This allows for a more “tight” fit of the self-tapping screw itself, and therefore a more secure fixation of the board to the base.
In the same case, if you pre-drill a hole for a self-tapping screw on the base of the floor, spontaneous unscrewing of the self-tapping screw may occur, and it is not always possible to select the correct diameter of the drill for the subsequent “fitting” of the board onto the self-tapping screw.
Application of epoxy glue
Using epoxy glue can significantly speed up the process of thread restoration. Among the features of the restoration work, we note the following points:
- The hole is filled with a special substance, after which you need to wait a little until it hardens.
- The bolt is screwed in to form the required surface, after which the substance hardens.
Read also: How to tighten a belt with two rings
This method is not suitable when fasteners are used under conditions of high loads or vibration. This is due to the fact that the polymer does not form a durable and hard surface after hardening.
Some tips for installing floorboards.
- The distance between individual screws when attaching a wooden board to the base should be from 25 to 30 cm.
- Some craftsmen recommend using a special glue when laying floor boards on a horizontal base, which is used when laying parquet. This is a completely possible option if there is no additional waterproofing layer between the boards and the base - for example, a moisture-proof film. But at the same time, it is important to know that special glue can only be an additional way to fasten the board - the main method is still self-tapping screws. Without them, it is simply impossible to achieve a sufficiently reliable fastening.
- When ideally connecting flooring boards to each other, we must not forget that the flooring should not fit closely to the walls of the house along its entire perimeter - about 7-10 cm of free space should be left between the edge of the covering and the wall.
- It is possible to completely “hide” the screws used when installing a wooden floor. To do this, you need to “recess” the head of the screw into the board a few millimeters, and “mask” the resulting hole using a piece of wood of a suitable size and shape, the species of which must match the species from which the boards are made. Some manufacturers of luxury building materials produce similar “stoppers” that are included with the boards themselves.
Often, when choosing wooden panels, such as eurolining or false beams, purchasing them significantly hits your pocket.
Or if we are going to update the interior of our summer garden house, we don’t want to waste too much.
It is no secret that molded products are sold under different grades, differing in wood defects and price. For some, it is fundamentally important that the wooden panel be knot-free, while others like the natural pattern of wood with knots.
But there is another option ideal for finishing summer houses and workshops, the so-called 3rd grade.
Grade 3 usually includes small cracks and holes from fallen knots. Of course, such panels do not look “presentable” on the wall, to put it mildly, but often their cost is very tempting.
Third-grade panels are very easy to adjust with your own hands, and no expensive material or equipment is required.
Let's consider this option step by step:
We install the third-grade panel you purchased on the wall, just like any other expensive one. For installation, you can use special fasteners (clamps), or you can save money and mount the panel on regular mounting nails, driving them in every third panel. However, the quality of installation will not change in any way.
Small cracks and chips in the panel are covered with a special mastic to match the color of the wood, using a plastic spatula.
Traditional methods
How to seal the seams between the logs of a log house from the point of view of the grandfathers - the best solution is moss. Previously, gaps and splits were caulked. More often, a common plant was used as a material. If it was dry, then the moss was pre-soaked in water for 30 minutes and squeezed out before use. The mass must be rolled into rolls and pushed into the crack. In order to compact the aggregate, it is tapped using a caulking spatula and a hammer or mallet. It is important to achieve a spring-like result.
It takes about 72 hours for the moss to dry. During this time, the volume of material increases to 20-30%. As a result, the cracks are clogged, the filler breathes, and the excess is cut off using a petal circle.
How to fill blind holes in wood with your own hands
Such mastic
Available at any hardware store, on average a tube of such mastic costs 100-150 rubles. Or, you can save money again and mix regular PVA glue with sawdust. The quality of such “homemade” putty is often no worse than purchased mastic.
All that remains is to remove the large holes from the fallen knots. Again, nothing complicated here.
Using polyurethane foam, we foam the large holes in the panel and let the foam harden. After the foam has dried, cut off the excess with a knife or blade, and cover the foam with the same putty (mastic or homemade mixture).
After these steps, let the mastic dry for 1-2 hours and sand it with fine sandpaper.
Further, at your discretion, you can protect the panels from external factors by covering them with an antiseptic or varnish.
Thus, you can renovate your home using elite types of wood, paying a minimum of money for it and spending very little time.
On average, by purchasing wood panels of grade 3, you save up to 60%, while not being inferior in appearance to panels of grades 1 and 2!
You can see prices for different types of molded products in the price list of our website.
This video shows one of the ways to hide a self-tapping screw in wood. Video on how to make boats
GEORGE KAPIN:
Should I just drill 4 wooden wedges, grab them and sand them? The plug is attached to the glue and does not bear any load, why is this jerking off?
Vyacheslav Filimonov:
cool) but why such a hassle when it can be made so that it fits tightly and with glue. And then press it through the post with clamps, fix it purely symbolically, to give it strength.
Dinar Khaybrakhmanov:
I like the lining of the pillar with a figured lath, how do you do it?
Vladimir Davydov:
Volodya, the balusters look like a multi-story birdhouse. Tell me, can shields be processed with this grinding machine? I mean shields glued together from planks. Or is only a surface planer, or whatever else, suitable?
shturer:
Can you make a video about the tricky table?
There is no extra:
A good option! takes place in life.
Veaceslav Lefter:
Somehow, all this takes a long time.
Valentin Lisanov:
What for?
Alexander Shuvaev:
Aren't 2 screws enough?
Sergej W:
It would be possible to install round plugs this way. And the built-in will issue
alex sokolov:
Well done. Good luck to you in your creative work and good health.
Timur Yusupov:
I'm puzzled.
Which material is most optimal?
Currently, the building materials market provides a wide variety of materials for sealing cracks on log walls. The most modern and popular are putties and sealants.
When choosing the right sealant, you will need to carefully study its instructions so that the product is suitable for specific operating conditions.
According to user reviews, the following putties are the most popular:
- Finnish “Tikkurila” has good adaptation to the color of wood, is suitable for a wide variety of wooden products, and has high resistance to low air temperatures and moisture. Disadvantage: high price: 500 rubles. per package 0.5 l.
- Russian “Extra” is an excellent budget material with high protective characteristics for water and temperature.
Universal, can be used for interior and exterior work, characterized by low specific material consumption per 1 m.p. repair. Price: 60 rub. per package 0.45 kg. - Russian "Eurotex" in convenient packaging has a good plastic structure, and therefore is easily applied to the surface of the crack, sanded and sanded. Budget price: 80 rub. for 0.225 kg of putty. The disadvantages include the poor color range of the material and increased shrinkage.
- Russian-Swedish “Parade” is a putty with increased water-resistant characteristics. Dries quickly and sands quickly. Price: 300 rub. per package 0.4 kg. Disadvantages include difficult application to the surface due to the liquid composition of the paste.
- Russian "Rainbow" has restrictions on the temperature of application to the surface, not lower than 15 C. Otherwise, it has a number of advantages, including low specific consumption for wood repair, high adhesion speed and low shrinkage, price: 119 rubles. per package 0.9 kg.
Among sealants, Russian consumers prefer the following brands:
- Russian "Neomid" is a highly effective sealant that can eliminate cracks with high deformation from 15 to 30% of the cross-section. It features high protection against moisture and temperature changes. At the same time, it is very elastic and flexible, capable of working in both external and internal environments. Price: 1000 rub. per package 0.6 kg.
- Russian acrylic sealant "Eurotex" for external work, has protection against moisture, insects and biodamage. It showed itself well in repairing side and end cracks in wall structures of a house. Very durable and at the same time elastic material. Price: 1000 rub. per package 3 kg.
- German “Remmers” for interior and exterior work, resists moisture and temperature changes well. It has a wide range of colors from colorless to dark brown, and is also well compatible with both varnish and paint. Price: 400 rub. per cylinder 0.6 l.
- Polish "Ceresit" is produced on both acrylic and silicone bases and has a low shrinkage rate. Resistant to low temperatures, ultraviolet radiation and high humidity. It performed well when restoring the external walls of a log house. Price: 160 rub. per bottle 310 ml.
- American “Check Mate” acrylic sealant of an elite modification, very elastic, creates lasting protection of walls from moisture, temperature fluctuations and biodamage, and has minimal shrinkage. The price is high from 1300 rubles. per bottle 650 ml.
How to fill a hole in furniture so that you can screw a self-tapping screw in there?
It’s easier to make a patai so that the cap is not visible and then cover it with wax or wood putty
Sergey Naumov:
Greetings! Professional roofing mallets are available. 1000 rub. 89040580960 Sergey.
Mr Nab:
It’s good when there are tools and machines)
Onla T:
The main thing is fast, easy and without any hassles!
HOBBY WORLD:
Well done
Sergey:
I make it simpler, cheaper and less noticeable
Alex:
Fucking smart idea.
Leonid Lakizo:
And I forgot to drill 2 mm holes for screwing in self-tapping screws, and I haven’t heard anything about putty based on the same wood and PVA glue, and a special attachment for a drill that removes the chamfer by creasing the chips for subsequent plaster, which even preserves the grain of the wood, at StudioKmebel for such screwing self-tapping screws into furniture with a lifetime guarantee - they would have been fired. ...
Tool preparation
All of the described methods for sealing holes in wood will require the use of tools that every owner should have.
- Putty knife;
- Hacksaw with blade for metal;
- Hammer (preferably a wooden mallet);
- Wood drills or milling cutter;
- Sandpaper.
Safety precautions have also not been canceled, so we definitely arm ourselves with gloves and eye protection.
The popular bookmaker has launched a mobile application for Android, you can follow the link absolutely free and without registration.
Video on this topic
How to hide a self-tapping screw
This video shows one of the ways to hide a self-tapping screw in wood. Video on how to make boats
.
Let's say we need to fill a small chip in a wooden stock (my case).
To do this, we need two “ingredients”: baking soda and liquid cyanoacrylate glue. The first, I think, can be found in any kitchen, the second is sold in hardware stores, construction stores and large chain markets.
Manufacturers and type of packaging may be different, but one thing is important - the base. That is, it is cyanoacrylate. Nothing else will do.
(Immediately a warning for those who are not in the know: this glue is very poisonous, as can be seen from the name, and besides, it hardens instantly in the air and tightly grips together the surfaces that it comes into contact with. Including your fingers. It is best to store cyanoacrylate in the refrigerator, i.e., together with food, so be careful.)
Let's begin the process of repairing the chip in the wood.
First: add a drop of cyanoacrylate into the chip cavity. Here it is important not to overdo it and not to flood the neighboring areas - the glue flows like water, we will be tortured to scrape it off later. Personally, I dripped from the bottle onto the head of a match, holding it over a napkin, and then transferred this drop to the treated area. Now we take a little soda on the tip of a knife and pour it into the cavity. If you have poured too much, remove the excess and drop a drop of cyanoacrylate onto the soda crystals. The resulting composite instantly “stands up.” Shake off/blow away any excess crystals that did not fall under the drop, and see if the chip is completely filled.
You cannot pour in the entire required volume of soda at once: the glue will harden before it has time to saturate it - so, for example, a depression 2-3 mm deep. filled in layers, in 2-3 steps.
That's the whole algorithm of actions. Next, the composite “cork” is polished: with needle files, emery, a drill, abrasive sponges, or all of these in turn - it all depends on the area of the surface to be treated and the geometry of the object: in a word, everything is as usual with ordinary putty, for example, based on epoxy resin.
This putty, however, has a number of strong advantages over both epoxy composites and ready-made putties (for example, water-based). 1. The cyanoacrylate-based composite is ready for further processing immediately after puttying. 2. During this treatment, it does not chip or wear out, unlike soft ready-made putties, and also, unlike epoxy compounds, it does not “flow” from the heat imparted to it by the friction of the abrasive.
3. It has incomparably better adhesion compared to many other putties. 4. Possessing high strength, hardness and at the same time sufficient ductility, it allows you to model clear, rather than slicked, geometric differences using ordinary needle files, etc. 5.
Causes of cracks
When cracks form in the walls of a log house, most owners of such households think about the reasons for their occurrence. In fact, they depend on many factors that affect the tree from its birth to the harvesting of the log.
The key root cause is the uneven shrinkage of logs from the end and sides, under the influence of which internal stresses are created in the fibers, leading to rupture. Especially massive cracking occurs during sudden temperature changes.
On the sunny side of the wood, the density decreases due to a rapid decrease in the level of moisture, and on the cold side it will remain high.
Main reasons:
- The place where the tree grows determines how much the tree has defects - curliness of the wood. Usually, any natural defects are later overgrown with new fibers and hidden by layers of the most ancient growth rings, but during the drying process of the felled tree they are revealed, appearing on its surface in the form of cracks.
- Uneven drying of logs.
The layers closest to the surface dry faster than the inner layers. A situation is created when the outside of the log is almost dry, but the core remains saturated with moisture. As a result, stress occurs on the fibers. The surface layer is subject to a tensile force, and the internal layer is subject to a compressive force. They literally explode the wood from the inside. The process depends on the drying speed; the higher it is, the more cracks there are, and their sizes are wider and deeper. - Shrinkage processes. As a result of such influences, wooden parts twist, changing their shape and linear characteristics.
- Sudden changes in temperature and humidity levels in a finished house as a result of operation. Trying to properly “heat” a home in the first winter season will most likely result in the formation of through cracks due to the difference in temperature and humidity of the walls of the log house.
- Time of year for logging. If it was a warm period, cracking will be high; the best period for harvesting wood for felling is winter.
Seal a hole drilled in wood
Being not yet completely sanded, it can be painted well even with water-based compounds, such as potassium permanganate, not to mention nitro and other stains or enamels. 6. Excellent grinding and polishing. 7. Does not shrink. 8. Allows gradual build-up of the layer to absolutely any desired thickness.
Using the described method, I repaired a small (approx. 4x3 mm) chip in the PPSh wood, which formed when removing a skewed dowel nut. No matter what I tried, the trace of restoration remained noticeable. And not only because of the different color shade in this area, but also because the water putty partially “removed” during sanding and a noticeable depression was formed, and when using Epoxy composite glue under the finishing treatments, a too obvious border became visible along the edge of the putty chip, and this glue did not want to stick well. And here is the result with soda and cyanoacrylic glue. Before processing, this area looked something like this (reconstruction in Photoshop):
Of course, a slight difference between this area and the main surface is observed, but only if you know about it and look specifically at it, it can rather be mistaken for a fragment of a knot that was partially “removed” during countersinking or the like, a natural violation of the homogeneity of the wood structure. During the subsequent processing of the area, of course, tinting and “micro-painting” were used with tinting paste and a solution of potassium permanganate (that is, the compositions that were used when tinting the stock itself were used).
I don’t know why soda is recommended as a filler. Possibly due to the appropriate grain size. Any powder like wood powder with this purpose. too thin and its individual particles will stick together, not allowing in the glue, which in the case of soda crystals has the ability to envelop them and thus hold them together. Other fillers, such as salt, may also work. But not sand, which is too hard for abrasive processing, not flour, because it is hygroscopic and rarely dry, not sugar, the crystals of which are too large. In any case, the method works great.
Hi all. In today's article we will look at several methods of how to fill blind holes that are drilled in wooden blanks. For this experiment, 6 wooden blanks have been prepared, the holes of 3 of them will be filled with special compounds, and plugs will be installed in the remaining 3. Each of these methods has its pros and cons. I tried to describe them in detail.
Note: Each sample was sanded with 150 grit sandpaper prior to the final visual test.
Below is a list of what I used in my experiments.
- Ryoba saw (universal double-sided Japanese saw);
- Rasp;
- Sander;
- Device for connecting with self-tapping screws (Kreg Jig);
- Automotive putty;
- Magazine plugs;
- Wood putty;
- Dowels with a diameter of 10 mm;
- Wood glue.
The first method is to use traditional wood putty. It's very easy to use. I just filled the holes to the brim with putty and then set it aside to dry completely.
The holes are deep, so I let the putty dry overnight. I thought that it would crack or simply dry out, but the putty did its job perfectly. After sanding it became very smooth.
Will need
- PVA glue.
- Oil (any kind).
- Wood sawdust.
- Long wood screws (thin nails are fine).
- Thin wire.
- Short wood screws.
- Screwdriver for selected screws.
- Two smooth fiberboard sheets, larger than the hole.
- Coarse sandpaper for wood.
- Wood file.
- Self-adhesive wallpaper to match the color of the furniture.
The nuances of eliminating holes before wallpapering
It is quite difficult to glue wallpaper onto an uneven and holey surface. Therefore, it is better to remove all recesses and cracks in the wall in advance. This will allow you to subsequently create a perfectly even and beautiful coating.
When preparing walls for wallpapering, the same building materials are used: putty, repair compound. The restoration process itself differs only in that the completion of the elimination of the defect is considered to be cleanup. This is done using tools that are designed to level the base. If all stages of repair work are performed correctly, the surface will certainly turn out neat. The latter will prevent damage to the wallpaper after gluing.
The end of eliminating a defect is a final clean-up performed using tools for leveling the surface. Source sense-life.com
Recommendations from experienced gardeners
Treatment of hollows in fruit trees is often complicated by infestation of the wood with ants. Insects build anthills in loose, diseased wood, further destroying the tree. Insects are removed using scrapers and brushes. The hollow is washed with hot water and soap or a soda solution, and the root zone is irrigated with poisonous preparations.
Attention! When cleaning a hollow, all rot and debris should be cleaned out into a bag or bucket, then burned. You cannot throw away garbage in the garden or compost it, because it contains infection
Often a hollow is formed near the surface of the earth. You can remove the hole using stones and cement mortar. But treatment makes sense only if the hollow occupies no more than half of the internal volume of the trunk.
It is already useless to treat such a hollow
Kinds
There are two types of such screws:
- universal;
- confirmation;
- elements with blunt ends.
They can have different sizes. To assemble furniture from chipboard, screws with a diameter of 1.6 to 10 mm are usually used. The length of one unit can vary from 13 to 120 mm. For thin chipboards, hardware 16 mm long is most often used. Conventional screws have a cylinder-shaped shaft and a head of different shapes:
- secret;
- semi-secret;
- semicircular.
Models with a countersunk head are used when attaching handles, hinges, and guides for drawers. The screw is completely buried in the material. Hardware with a semi-countersunk head is used to create fastenings that are completely hidden in the material. Thanks to the smooth transition from the rod to the threaded surface, when twisted, such a head is completely immersed in the material.
Hardware with a semicircular head is used in cases where it is necessary to create a connection of increased strength and eliminate the possibility of deformation of the created chipboard structure. A universal screw can have simple or cross-shaped slots. The use of products with cross-shaped slots provides a number of operational advantages:
- during operation, the drill or screwdriver is firmly installed in the head the first time;
- when twisting, you can only use one screwdriver;
- Such screws are easily installed in hard-to-reach areas of chipboard products.
Euro-screws are called confirmats, which are most often used in furniture production today. These are reliable and inexpensive furniture hardware that allows you to create strong connections that are resistant to strong mechanical stress, including fracture. They can also be used instead of corners when assembling cabinet furniture. To hide the screw after tightening it, the head is closed with a special plastic plug.
Advantages of log houses
But first, I would like to go through the many advantages of such buildings, which made them so popular among our compatriots, and on a global scale in general. So, let's focus on the main ones:
- Environmentally friendly. Houses made from natural materials are completely safe for the health of the people living in them. Moreover, a person in wooden houses gets sick less, has higher body tone and vigor;
- Walls made of wood, with similar durability and strength, will be much thinner than their brick counterparts. So these houses have more space;
- Wood is a very mediocre conductor of temperature. Thanks to this, such a home is cool in summer, and heat loss to the outside is minimal in winter. Consequently, such a structure warms up faster, and less resources are spent on maintaining comfortable temperature conditions;
- Wooden houses are lighter than concrete or brick ones, so the construction of a massive foundation is not required;
- Wooden walls are very pleasing to the eye, so you can save a lot on finishing activities.
Repairing deep cracks
As a result of the shrinkage of the building, the seams between the panels often come apart and deep cracks form. The easiest way to get rid of such problems is to seal them with construction foam. It perfectly fills voids and penetrates into the most inaccessible crevices. In addition, such a material adheres well to different surfaces, instantly expands, and hardens immediately after contact with air. If you use polyurethane foam, you can confidently count on a high-quality result in eliminating defects in the wall.
Preparatory activities
Before starting wall restoration, it is important to carefully prepare the surface for future work. The gap must first be cleaned of concrete splinters and dust, then be sure to moisten it with water.
Application process
Before using construction foam, the container must be thoroughly shaken so that its contents acquire a uniform consistency. During use, the container should be kept in a vertical position (always upside down). Then the lighter gas inside will displace the foam mixture from the can.
All cracks must be filled only from the bottom up. In case of serious damage, polyurethane foam must be applied in layers. Moreover, each subsequent one is laid only after the previous one has completely dried. This method allows you to quickly and efficiently seal the gap and dry the material well.
At the finishing stage, using a sharp knife, it is necessary to remove excess polyurethane foam. Then you need to carefully apply putty to the surface. Once it has dried well, it is recommended to level the base with sandpaper.
Polyurethane foam allows you to reliably seal deep cracks and seams, attach some parts, and create a sealed cavitySource sense-life.com