how to make candy out of paper
Paper candies are very beautiful. Most importantly, making your own paper candies is much easier than they look. You can easily decorate them to match a party theme, holiday theme, or as a cute gift that's sure to make you smile.
On New Year's holidays, you can hang beautiful paper candies on the Christmas tree or make a garland. Use as gift wrapping or to store small trinkets. Paper candy is one of the easiest crafts you can make yourself. In this article you will learn not only how to make candies from paper , but also how to fold a beautiful origami box for candies.
How to make a New Year's candy out of paper: template, photo
You can decorate your Christmas tree or home for the holidays with the help of a “Christmas candy.” It is very simple to make, by folding two sheets of colored paper - red and white.
Depending on what size lollipop you require, you can prepare a large or small sheet of construction paper. Roll and fold the paper step by step, following the diagram:
- Take two sheets of colored paper
- Paper colors should be on the outside
- Fold two sheets into a triangle (2 pcs.)
- The triangle is superimposed on the triangle (not exactly, but with a slight shift down)
- Start twisting the stick from the wide side
- For ease of twisting, you can put a long wooden kebab skewer or knitting needle inside.
- Continue twisting until you get a nice tube
- Crochet the top of the resulting tube
IMPORTANT: For ease of twisting and bending the candy, you must work with paper napkins (red and white).
Work stage No. 1 Work stage No. 2
Work stage No. 3
How to make small candies - toys for the Christmas tree?
Bright and colorful paper candies on the Christmas tree look very bright, elegant and fun. You can have fun with your children, creating such candies from colored or craft paper, decorating them with sparkles, and confetti to taste.
What is required for work:
- Colored, corrugated or wrapping paper
- Scissors
- Glue
- Ribbons
- Serpentine
- Sequins, rhinestones, confetti and other improvised decorative materials.
How to make candies from corrugated paper:
- As a base, you can use a foam ball, real candy, or a wad of newspaper (twisted into a ball).
- Place the candy base on the edge of a cut out square piece of corrugated paper.
- Start rolling the candy
- Decorate the tails of each candy with serpentine or ribbon bows.
Other patterns for rolling decorative paper candies:
Rolling candies from colored paper and cardboard
Rolling candies using the origami technique
Third option
More complicated, but worth it because... very interesting. It turns out to be a kind of box for sweets, an original candy chest.
If you get creative, you can make a headband out of these candies for your child’s party. This is a great idea for a carnival costume for a kindergarten.
The base will be paper, and the top can also be decorated with organza.
Feel free to experiment! Your imagination can do more than you think!
I hope you found this article helpful.
Share in the comments below how to make paper candy in your own way. Very interesting.
Read my following articles on the topic of creativity with children and for children on my blog, recommend them to all your friends by clicking on the social network buttons.
Source
How to make surprise candy?
This candy can be used as a decoration for the New Year tree or instead of a gift for any holiday. You will need to use a sleeve as the base for the candy. A sleeve is a cardboard base in the form of a cylinder for kitchen towels, cling film or foil, and toilet paper.
IMPORTANT: It is the sleeve that is filled with various surprises and gifts (sweets, small toys, lollipops, jewelry, notes, even money).
How to do:
- Prepare all the materials for work: you will need a sleeve, decorative paper, a piece of tape, streamer and the “filler” itself (i.e. a gift).
- Spread a sheet of paper on your desktop
- The sleeve must be filled with a surprise
- To prevent your gifts from spilling out of the sleeve while working, cover the ends of the “tube” with something (for example, soft toys-keychains, handkerchiefs, gloves or mittens).
- Start rolling the candy and secure the paper with tape at the end.
- Tie the tails (tips) of the candy beautifully with a serpentine and fluff it up.
Sweets with a surprise
Why do it?
“Why is it needed?” — You ask, and I will answer you: “Lots of ideas where it can be used!” First of all, this is gift wrapping.
Every holiday we have to figure out how and what to decorate, or what box to put gifts in. There are a lot of examples, and read on about this.
This toy can be hung on a Christmas tree to make a New Year's gift, used as a decoration for a kindergarten, and much more.
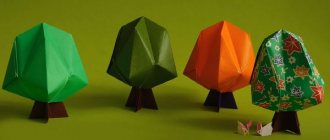
Making New Year's candy out of paper: top 20 creative ideas
Making New Year's candy that can be used to decorate a holiday home or Christmas tree is quite easy. To make the craft unusual, stock up on different types of paper: colored, bright gift paper, corrugated...
When all the necessary materials and tools are at hand, you can start creating candy that will look like the real thing.
We offer you more than 20 creative ideas on how to make a fake paper candy with your own hands. See the options in our photo selection.
You can also make a gift box in the shape of candy. For this you will need shiny wrapping paper, ribbons and bows.
Beautiful bright candies can not only decorate a Christmas tree, but also decorate a festive room.
To create decorative candies for the Christmas tree, use bright colors and colorful ribbons.
Imagine - you can “revive” such sweets with the help of eyes and mouth.
Candies made from corrugated paper are unusual:
You can decorate your home for the New Year 2022 with multi-colored paper candies or garlands of them.
DIY snowman 2022 – decorate the house with your favorite New Year’s character.
dream Catcher
A cute craft will not only help decorate the room, but will also attract the most pleasant dreams.
To make this you will need a small hoop. This could be a children's hoop, a piece of wire or a willow twig, rolled into a ring.
- Cardboard crafts - 135 photos of useful and beautiful crafts for children and adults
Unusual crafts: we make cool and original things from scrap materials (120 photos and videos)
Beautiful crafts: examples of very stylish and unusual options for homemade crafts (125 photos)
The resulting ring is tightly wrapped with decorative cord (you can use knitting threads) or fabric, leaving about a 15-centimeter tail. The second tail will become a loop for hanging the future creation.
Now you can begin to weave a web in which all unpleasant dreams will linger. To do this, tie the tip of the thread next to the knot from the cord, leave the thread to sag a little and tie it a little lower along the hoop. The first layer of the web is created in a similar way. For beauty, you can thread small beads into the threads.
The second and all subsequent layers are made in the same way, only knots are tied in the center of each piece of thread from the previous layer.
You can attach a larger bead to the middle.
Small decorative feathers can be attached to the remaining tails. Most often they are purchased at craft stores, but you can take them out of an antique feather pillow and paint them with regular paints.
Beads are hung on the end of the cord, a knot is tied, and the excess piece is cut off.
If desired, you can make several dangling ends. To do this, more strings are tied to the hoop and decorated as the creator’s imagination dictates.
New Year's candy for the Christmas tree: master class
A large candy for the Christmas tree can be made from cardboard or thick paper. It can also be used as a box for New Year's sweets.
You will need:
- square sheet of paper;
- scissors;
- glue;
- adhesive-based tapes.
How to do:
- Make a paper blank using a template.
- Cut out the candy shape.
- Glue the parts together as in the photo.
- Decorate the craft with ribbons.
- You can also paste any drawings and patterns you wish.
The template can be downloaded here:
Second option
For this beauty we will need:
The first thing we need is to draw out the paper according to the “scheme”.
If you want a larger paper sweet to put more gifts inside, then it is better to make a larger blank. Just increase the size.
After drawing the lines, use the blunt side of the scissors to make it easier to bend later.
Next, we bend along the horizontal contours in one direction and the other, you can help with a ruler.
Then we apply glue to the thinnest line that we left for gluing and connect it to one of the sides.
We tighten it with ribbon or twine, making a tail.
Fill the candy with the required amount and pull it off on the other side. And woo-a-la! The candy is ready!
And who doesn’t understand, watch the video as well.
With such beautiful “sweets” you can surprise everyone.
DIY paper “Box” candy
See how you can make a large box out of paper. It will look like a big candy. And you can put edible candies in this box. The ends are tied with bows. It makes a great gift.
Master class on making paper candy
1. Take thick yellow paper (or any other) in A4 format.
2. Fold a piece of paper in half. Cut the sheet in half along the fold line. We will need half a sheet.
3. Mark the narrow side of the half sheet using a ruler from the top edge to 35 mm + 35 mm + 35 mm + 35 mm + 7 mm.
4. On the other side of the sheet, make the same marks on top. Connect the marked points with horizontal lines.
5. Make a 25mm mark on each side of the edge.
6. Connect the marked points on both sides with a vertical line.
7. From the drawn vertical line, make a horizontal mark at a distance of 35 mm. Also on both sides.
8. Connect the marked points with one more vertical line on each side. You should end up with a diagram like the one below.
9. Now the sheet needs to be bent along the drawn lines. First, bend the length of the edge with a size of 7 mm wide. Then bend all other strips 35 mm wide.
10. On a folded sheet of paper, draw the following diagram. Place a ruler diagonally across the square. Mark the middle of the diagonal 2.5 mm from the corner. Then apply a ruler to the point and mark a vertical line 5 mm high. That is, 2.5 mm up and down from the middle of the diagonal.
11. Connect the extreme points of the 5 mm vertical line to the corners of the square. You will get a line diagram like the one in the picture above. Do the same in the square on the other side.
12. Using scissors, cut off the drawn triangles in each square.
13. Divide the rectangle in half at the edges to cut off its outer part.
Forming voluminous paper candy
14. Expand the sheet. You will see a diamond-shaped piece of paper cut out.
15. Using a glue stick, apply glue from one side of the sheet to the middle and along the edges.
16. Glue the edges of the sheet. You will get a three-dimensional figure.
17. To give the figure a candy shape, carefully tie the cut out diamonds on one side with a narrow ribbon.
18. And now you have a box in which you can put real edible candies. Place edible candy in a box.
19. Then, on the other side, to prevent the candies inside from falling out, tie a bow on the other side of the box.
20. Thus, you have a paper candy in the form of a box.
21. If you wish, you can use the cut out sheet as a template to create many of these candies in the form of boxes of different colors.
Sequencing
How to make a modular origami vase in Chinese style? It consists of 2 key parts connected with glue.
The “body” of the product is decorated with an ornament of lemon and scarlet triangular elements on a purple background. The base part and neck are usually made white.
Here are step-by-step instructions for beginners:
- Prepare the required elements (1116 pcs. 1/32).
- There is no need to try to collect the entire multi-colored belt of the vase at once. First, assemble 6 yellow-scarlet triangles attached to a purple inverted trapezoid. Next, connect these fragments together.
- From the 10th row, start bending the product inward. Collect rows either “clockwise” or “counterclockwise”. Join the elements using one force of pressure.
- After the 13th row, increase another 2 - 3 levels. Thin them out until a carved pattern is formed.
- Assemble the cylindrical neck.
- Make the top ring and attach it to the mouth of the neck, spreading it with glue.
- Connect the “body” of the vessel with the neck. Coat the areas where the modules are joined with a layer of glue.
DIY candy box
Origami candy boxes are great for weddings and parties. The best part is that they are very easy to make.
All you need is one sheet of square paper and since they only take a few minutes to make, they are worth the effort.
So, if you want a small box of origami chocolates, you can use a 7.5 by 7.5 cm sheet, and for a large box, take 15 cm by 15 cm paper. Just make sure that the paper is quite thick.
Making another model of a candy box in the form of a voluminous envelope
For this box, colored cardboard with an interesting pattern or thick paper is suitable. In addition, you will need PVA glue and “moment”, scissors, a hole punch, a pencil and ruler, rhinestones and a satin ribbon.
We draw the cardboard from the inside according to the diagram presented below. The numbers indicate the dimensions or aspect ratio of the box.
We cut out the blank from cardboard along the marked lines; the upper edge of the part that will lie on the “T-shirt” can be cut with curly scissors.
We fold the workpiece along the lines, punch holes for the ribbon with a hole punch. We glue the box together step by step using transparent instant glue. We carefully fold the side walls like an accordion, pull through the ribbon and tie a bow.
We apply small dots of glue to the front surface of the box (in our case, according to the picture, in the center of each star), and glue the rhinestones.
The original box for sweets is ready! You can fill the gift with candies.
Felt is one of the universal and affordable materials, which is also suitable for packaging candies if, for one reason or another, you do not want to make paper packaging. Their advantages are that the box can not be thrown away after the holiday, but can be used as an original box for storing small items.
To work you will need colored felt, a sewing needle and thread, glue, scissors and a ruler.
We draw a square sheet of felt into 9 small squares and cut out the corner ones. We fold and sew the box over the edge. Don't worry about the seams being visible. They look quite stylish, you can even choose contrasting threads. We decorate the finished box with appliqués to your liking.
Tips for making gift boxes from experienced craftswomen
In fact, there will only be one: you shouldn’t start your first creation from the expensive paper that you prepared for your box. First, start with a regular thick one - this way you will understand in which places to make the cuts, how best to bend it, and how to assemble the package. It will also become clear whether the container of exactly this size is suitable for you or whether it can be slightly reduced (increased) in one place or another.
Listen to this recommendation, and your work will be less expensive and less frustrating!
Materials and tools
So, what may be needed when making all kinds of boxes.
- Paper. It is best to take paper for scrapbooking - it is good because it can be double-sided, with a different design on each side. Thick designer paper, colored paper for pastels, cardboard (density 200-300 g/m2), a simple sheet of whatman paper or watercolor paper, which you can paint or tint yourself, are also suitable. You can also use “yellow” note paper (or an envelope made from it), wrapping paper... and any other that you can use for decoration.
- Corrugated cardboard
- Napkins (preferably thicker)
- Ribbons, ribbons, laces
- Beads, buttons
- Ready-made labels
- Scissors, stationery knife
- Double-sided tape, glue stick
- Superglue or “Moment” universal glue (transparent gel) for attaching beads and other things
- Ruler, pencil
- Compass
- Hole puncher
- Nail file (for creasing)
Useful advice.
Before you directly take on the paper that will make up your box, try assembling it from plain paper. You will understand where to cut, how to make folds more conveniently, how to assemble the box. Plus, you can estimate what size box you need. Often the first pancake is lumpy - so let this lumpy be made of simple cheap paper. Decor. As for the elements for decoration, you don’t have to limit yourself here: make flowers from fabric and paper, combine ribbons and raffia, lace, whatever you can think of. The main rule is not to overdo it. And now about the boxes themselves. There are a huge number of options, models and schemes for their manufacture. We offer you the most popular ones - from classic round and square boxes at the base to unusual bonbonnieres. But first things first.
Basics of modular origami technique
In this article, I suggest you master the main element of modular origami, from which you can subsequently create a variety of figures and models of varying complexity.
Sometimes the modular origami technique is mistakenly classified as a kusudama technique, but this is incorrect because the kusudama elements are stitched or glued, and in modular origami they are inserted into each other without the use of fastenings. Thus, you can create modular figures without any glue, having only paper on hand.
Let's try to learn how to fold the modules from which a spherical kusudama flower is formed.
DIY candies made from corrugated paper.
Hello again, DIY craft lovers! Today we will tell you how to make paper candies in different ways. Such sweets can decorate the interior, culinary products, or be used as a gift box. And we will show you several different interesting options for this DIY craft. Below is a video of candy making.
1 option
When you make these candies with your own hands using this option, they will look very much like the real thing; many may not even believe that they are made of paper. They can be used to decorate culinary products or fill a vase for treats as decor.
Prepare in advance corrugated paper (preferably different colors), several toothpicks, threads (to match the color of the corrugated sheet), paper glue, silicone glue, scissors and of course balls of the same size (1.5-2 cm).
1 step. Initially, you need to cut out a rectangle measuring 10 cm x 8 cm from corrugated paper. Then apply a little paper glue to the ball. And then place the ball on the edge of the sheet in the middle and wrap the ball in paper, as shown in the photo below.
Step 2. After this, tie the edges of the sheet with thread on one side and the other of the ball, do not forget to trim off the remaining threads so that nothing is visible. Next, if there are long edges of the paper left, carefully cut them with scissors, leaving 2 cm on each side.
Step 3. Fluff the remaining edges of the paper of the resulting caramel, you get a beautiful candy. Finally, dip a toothpick in some silicone glue and stick it to the middle of the candy ball. Here you have a real caramel made with your own hands.
I hope you enjoyed this master class!
Candy bowl
Good afternoon.
You can make anything from scrap materials. Especially plastic ones. From ordinary bottles you can make a beautiful and original candy bowl with your own hands, which will be useful around the house. For production we will need: - One bottle of 5 liters. — One bottle of 1.5 liters. - Knife. - Scissors. - Newspapers. — Paper napkins. - Clayster. - Brush. - Paints. - Varnish. First we will need to take a 5 liter bottle and cut off the neck of it to the desired height and remove the cap from it. We won't need it. You determine the height yourself. This will be the candy bowl. From a 1.5 liter bottle you will also need to cut off the neck of a small height. This will be the leg. The height is also at your discretion.
Now insert the neck of the leg into the neck of the bowl. One neck fits perfectly into the other and stays there well, but for better fixation you can coat the joint with glue.
Now let’s take a newspaper and tear it into small pieces. We will dip these pieces into paste and cover the candy bowl with them inside and out.
Let's take paper napkins and make flower petals. To do this, tear off a piece from the napkin, soak it in the paste and form a petal. Then press the petal firmly against the outside of the candy dish. The paste should be liquid, so the petals will stick better. In this way we make the required number of petals.
Now we roll a small ball out of a napkin. It also needs to be soaked in paste. In the middle of the flower, make a small depression with your finger and insert a ball into it. This will be the core of the flower.
You can make a stem for a flower. To do this, roll a sausage from a piece of napkin soaked with paste and press it to the vase.
Thus, we make as many colors as you wish. I made 11 pieces. Leave the candy bowl to dry.
After drying, we arm ourselves with paints of different colors and a brush. You can color it however you want. I painted the leg light brown. This will be an imitation of a flower vase. The bowl was painted green inside and out.
Then I painted the flowers. If you are good at drawing, then you can also draw flowers inside the vase. When the paint dries, coat the craft with varnish.
Source
Paper candy diagram
The following are instructions for making candy from paper or cardboard with your own hands.
Take a square sheet, fold it in half (Fig. 1), then into 3 more parts (Fig. 2). Find the middle of the workpiece and make two folds on both sides (Fig. 3). On the resulting edges of the paper, mark further fold lines (Fig. 4) and fold inward along the lines (Fig. 5). Turn the craft over, color it with beautiful pencils, and you have a candy (Fig. 6).
Thank you for your attention to our master class!
Tags
With your own hands With your own hands with your own hands. with your own hands you can With your own hands with your own hands from how to make a rug how to make organizers of course make a choice With your own hands candy dishes with your own hands With your own hands made with your own hands. Candy dish with your own hands Candy dish with your own hands this master class dear craftswomen.
masterclassesreplydecorsimplecommentshomeideasinteriordatanexthomeonesiteelementalreadydesignkitchenmoresearchkvaskrugsthanksvidatplateothergluenewvolumesection
Bouquets made of sweets and corrugated paper
To learn how to make sweets from corrugated paper, a master class may not be useful at all, because as soon as you see the materials, you will immediately understand what your actions should be, but on the pages of our website you can get ideas for the color scheme of your compositions. And be sure to make bouquets of candy together with your schoolchildren, because it will be a delicious gift for the teacher on March 8th.
More complex petals will be required if you make roses from paper, because your bouquet should be natural.
Large candies made from thin wrapping paper
Large, bright, shiny candies can become a real home decoration! They can be easily made from the wrapping paper you have on hand (glitter, corrugated, craft or any other). If you think that you don’t have the necessary material for manufacturing or you need to buy it specially, then just find a packaging bag at home from which you can remove bright paper (the paper peels off especially well if the packaging has been lying around for quite a long time). I took a photo specifically to show that this is really the case. By the way, you can also take thin cardboard from the same bag, which will be useful for making the base of the candy. I suggest making this candy together!
Necessary materials
To make large candies from thin wrapping paper we will need:
- thin packaging paper (ideally shiny packaging, but it can also be corrugated, craft or any other);
- scissors;
- scotch;
- thin cardboard;
- ribbons;
- pencil;
- ruler.
Manufacturing process
First, using a pencil and a ruler, we measure out the required amount of cardboard for the candy base. If you are wrapping a gift of suitable size and density in a candy form, then the base is not needed. But, if you are making a dummy candy, then without a base the thin wrapping paper simply will not hold its shape.
So we measure out a small piece of thin cardboard, cut it, fold it and stick it together with tape.
We cut a piece from the wrapping paper, which should be 5-7 centimeters larger than the cardboard base on the right and left. It should be a rectangle in shape, so it will be more convenient to roll the candy.
We wrap our cardboard base in wrapping paper and tie ribbons on both sides. We also “curl” the ribbons using scissors. And now the big elegant candy is ready for the holiday! I am sure that you can easily make the same beautiful bright candies that will help you quickly and without hassle create a holiday atmosphere in your home!
Progress:
For one candy, we connect two toilet paper rolls with transparent tape (you can take one paper towel roll)
.
Cut out a rectangle 30 cm by 25 cm from corrugated paper.
We wrap the sleeve with corrugated paper.
We attach the edge with double-sided tape.
the edges of the candy with rain .
Decorate with self-adhesive to your liking. I connected the edges with thin self-adhesive tape. It turned out durable and beautiful. I used a shaped hole punch in the shape of snowflakes.
We make the required number of candies . 25 New Year's candies were made for our . And, of course, we use the prepared attributes in the dance !
Thank you for your attention!
Master class on making an attribute for the dance “Bracelet of red poppies” Poppies, poppies, red poppies, Bitter memory of the Earth, Do you really dream of attacks, Do you really dream of attacks of Those who did not come from these hills?
Presentation “Making attributes for the New Year’s dance of stars” Master class for colleagues Making attributes for the New Year’s dance “Stars”. 1. Take multi-colored sheets of paper. Fold them in half.
Master class for parents “Making carnations” In order to instill patriotism and citizenship in the younger generation, foster a caring attitude towards historical memory in the group. Master class “Making a kokoshnik for the Alyonushka doll” Kokoshnik is a Russian folk headdress. Old Russian women and girls in kokoshnik spent holidays. Embroidered with precious stones. Master class “Making a mobile folder for parents” Often the teacher does not have enough space to place all the useful information for parents on the stands. And that’s why it’s so necessary. Master class on making a daisy hat for the “Flower Dance” Master class on making a daisy hat for the “Flower Dance”. The author is the musical director of the Child Development Center, kindergarten No. 1. Master class “The “Broom” attribute to complement the image of a snowman and the dance of snowmen at a matinee in kindergarten” In order to make such a wonderful broom, we will need: A backing for the laminate 5 mm thick. Broom handle. Leg-split. Master class on making flower circles for dancing for Mother's Day Good day everyone! Today I will tell you about how we prepare for Mother's Day. Our wonderful music worker staged. Master class “Attributes for the Eskimo dance” Hello, dear colleagues! I present to you another master class. On the eve of the celebration of March 8, our music worker staged.
Source