Reflection of one's own taste and individuality in the interior is embodied by the creation of non-standard designs. This concerns the strange steampunk style that was born from the industrial revolution and science fiction. And DIY steampunk crafts are an excellent decor that can complement the style direction.
When planning to create a steampunk craft for a new interior, it is worth getting acquainted with the correct combination of Gothic elements with the technologies of steam power machines of the 19th century.
What to make crafts from in the steampunk style
Many apartment owners have already chosen the extravagant steampunk style to decorate their rooms. Non-standard and new, it is suitable for people who are ready to create and create original objects using scrap materials.
The following materials are suitable:
- old wood that has changed color and has cracks;
- copper, brass, bronze, steel parts - steampunk metal;
- leather and glass;
- obsolete, written-off items and equipment;
- metal and glass pipes, valves;
- old mechanisms, which, after disassembly, are reassembled, creating a new masterpiece;
- Don’t forget about gears and gears – the main components of interior style.
Many crafts, made by craftsmen with inspiration and dedication, are used both for decoration and for use in the home.
Recognizable features
This design direction is more suitable for men than women. It is rough, dark and cold. At the same time, steampunk can be adapted to almost any design solution. Thus, progressive designers manage to fit such things into both pop art and modernity.
Kevin Jeter - writer who coined the term "steampunk"
You will find an overview of the pros and cons of diode lamps for the home in the article.
In the spirit of fantasy steampunk
However, it is worth deciding in advance on the main features of the style, so that in the end the interior design does not seem like just a jumble of details. So, what elements fully correspond to the concept of direction:
- Various gears, pipes, levers.
- To imitate steampunk, vintage lamps of unusual shapes are suitable.
- The main material of this style is metal. Specially aged wood can also be used.
- Primary colors are black, gray, brown.
- Chains, various levers, and unusual metal structures can be used as a decorative element.
The steampunk style is actively used in science fiction, which can be taken into account as a source of inspiration. This is a kind of idea of the people of the Victorian era about the future.
Many people believe that direction forces them to work within a certain time frame, but this is not true. Yes, such an interior design looks like a tribute to the 19th century, but the style itself can be modernized. The main thing is to act wisely and not forget about the listed features of the popular trend.
Steampunk is hidden in the details. That is why it is so important to complement the interior design with gas lamps, unusual figurines and paintings depicting a fantastic future.
Find out how to choose a functional and reliable LED rechargeable flashlight here.
Interior inspired by the works of Jules Verne
Modern spotlights for plasterboard ceilings will help illuminate a space for any purpose.
The product is based on a manual meat grinder
How to select and install recessed ceiling LED spotlights is described in detail in the article.
Elegant DIY steampunk furniture
For the steampunk style, you should choose old, restored furniture or something you made yourself.
Homemade furniture crafts:
1). Open shelving made of metal pipes.
2). For a stand under the desktop table top, take the bed of a machine tool or sewing machine.
More: Lifehacks for decorating a studio apartment
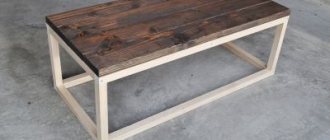
3). To make a coffee table, old suitcases or a suitable-sized gear are suitable. An original table is obtained by installing a clock mechanism into the tabletop. Make the leg from a pipe, shaft or also from a gear.
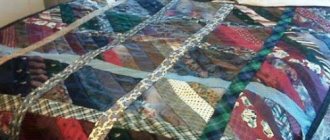
4). Restore a broken chair seat by weaving a lattice of multi-colored belts.
5). Equip the leather sofa with carved arms and lion paws instead of legs.
6). Replace the sink in the bathroom with a cast iron or copper boiler, in which a drain hole is made and insulated.
Steampunk - lamp. Continued... - DIY Community on DRIVE2
Hello everyone! I’m posting my next work in the hope that the public will not throw tomatoes at me, because recently the steampunk direction has somehow begun to irritate many)
the first version was released
my lamp. Friends and acquaintances, as well as our driving community, seemed to like the unit, so it was decided to make a sequel. During this time, new materials were mastered, so the new option is the implementation of all the developments that exist at the moment.
Last time, a carburetor from a truck was used as a donor. For the new work, a unit was taken that was half the size of a two-wheeled vehicle)
The carburetor was washed, cleaned from many years of storage in a barn. Elements that were unnecessary in the work were also removed.
Due to the impossibility of joining all the planned elements with the alloy from which the carburetor was cast using soldering, they were all supplemented with studs with a diameter of 3 to 1 mm. and nuts.
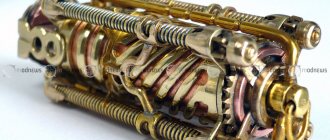
The entire frame is made of traditional steampunk materials: brass, copper, bronze. All components were cut, soldered, polished and then patinated.
According to our rules, it is necessary to post a photo of the work process, but in this case it would be a multi-part report, since the number of parts exceeds a hundred)) Therefore, it was decided to film the process of creating only one element.
The manufacturing principle for the rest is similar in technology. The rest depends on your imagination. And without it, there’s nowhere in steampunk)
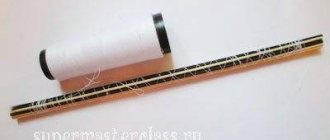
The element itself is often present in steampunk works, but unlike standard rivets, not everyone knows how to make it. So we'll cut it down. So we make the fan blades.
To begin with, we select the pipe of the required diameter and cut out a disk along its internal diameter. I used a turned plumbing fitting as a pipe, the disk itself was made of a sheet 1 mm thick.
We mark the disk into sectors according to the required number of blades. I have eight of them. More can be done. Then we drill a hole in the center and make slits according to the markings.
At the next stage, we bend the blades to the desired angle. It's better to do this in several passes.
Using a bur and an engraver, we smooth out all the edges of the workpiece.
We grind out the fan axis. In the absence of a machine, everything can be easily done using a drill or drill (diameter allows).
Next is soldering. We connect the blades to the axis.
Now we prepare the body for the blades. When mounted on a flat surface, everything is limited by the choice of the height of the tube itself. In my case, it was supposed to join two pipes at an angle of 90 degrees. Therefore, we make a sample in the housing according to the surface diameter.
After all the adjustments, it is necessary to tin the place where the body joins the surface and the axis of the blades with a soldering iron. Then we pass with a brush with acid at the junction with the base, put all the parts in place and heat the whole thing with a burner. Ready.
In my case, I had to repeat the entire chain twice) After cleaning and patination, I get this nice fan)
Not the most difficult element. All others are made using similar technology. After preparing all the parts, everything is soldered, twisted, cleaned and patinated. A very long story))) Finally, we cut out a stand from an oak blank.
Well, after docking the lamp itself with it, we get this view)
I installed a dimmer in the housing. And it’s useful for the lamp and you can adjust the brightness.
Video of work here
(I can’t insert a video here for some reason).
Well, in conclusion, about one question. It concerns the instrument. I often read comments like: “I wish I had such an instrument...”. I'm reporting.
This lamp was made during breaks between jobs over several months. The machine that flashed in the photo was assembled quite recently and only a few elements were made on it for the lamp. Everything else was turned using a drill and homemade cutters. I'll adapt
I already posted it here.
Instead of a torch, for such work, a one hundred watt soldering iron will do just fine. You can also easily do without a drill.
DIY steampunk lamp
It is recommended to illuminate a steampunk room with diffused, dim light to create a gloomy atmosphere. Metal is suitable for making lamps that create such a mood.
How to make a steampunk lamp:
1). Take black electrical wires, attach cartridges to them, and put wheels on top, which are found in mechanical watches. Hang on a rope.
2). If you attach 5-6 glass flasks to an old samovar, you will get a decorative table lamp.
3). Chandelier with pendants, placed in a golden cage - a combination of Victorian style with the new. Or a chandelier with a propeller instead of a lampshade.
4). A pulley with glass jars-shades or “Ilyich bulbs” suspended from it looks interesting.
We turn an old coal iron into a lantern
Before work, stock up on:
- With a charcoal iron and a candle,
- Board, copper wire,
- WD40 or similar
- Linseed oil and rust converter,
- Gold paint and black spray paint,
- Decorative nails and sandpaper,
- A piece of a shovel handle,
- Device for drilling small holes.
The tools you will need to prepare are: a metal brush and grinder, a screwdriver and a gas torch, a jigsaw, a lathe and drill, and a band saw.
Operating procedure:
1). Use a wire brush to remove rust.
2). Soak the axles with WD40 and open the covers. Clean the surface of the iron using a grinder and a brush.
More: Lifehacks for a small kitchen
3). Moisten with rust converter and let sit.
4). Make a handle from a piece of cutting, sand it, and cut off the excess with a saw.
5). Try it on, then drill through.
6). Insert a piece of copper wire into the handle and rivet it on one side.
Original candlesticks and steampunk lamps are made from gears attached vertically to a leg or connected to each other.
What is required for production
Due to the simplicity of the design used, the work can be completed within a few hours or one working evening. First of all, you need to provide yourself with everything you need, namely:
- sanitary barrels and tees;
- fumlenta or other insulating material;
- E27 sockets;
- cables and electrical wires;
- acetone for degreasing the surface;
- required paint colors.
All the necessary components to create a chandelier can be found at any hardware store. Their cost is low, and floor lamps can be made in the format you wish. The steampunk chandelier itself takes on only the shape you can imagine.
Steampunk clocks, paintings and other crafts
Door bell
Attach levers, tubes, nuts to the bell, and adjust the sound signal to the original sound.
Paintings and panels
Pictures and panels made from the same different-sized gears, valves, taps, pipes and other parts of different colors look interesting.
Steampunk wall clock
Items that fit into the steampunk style include impressively sized dials with Roman numerals. “Iron”, which is a pity to throw away, is perfect for decoration.
The body of the clock mechanism is covered with gears, wheels, old levers, and pipe scraps. They are fixed in the case of the first model of the TV or installed on an old telephone set.
Step-by-step guide to making steampunk photo frames
Prepare:
- finished frame;
- relief paste, acrylic paint in white, black, brown and metallic;
- acrylic varnish, sponges, Moment-Crystal glue;
- small knife, flat brush;
- a roll of masking tape and a stencil for a brick wall.
You also need to stock up on old nails, paper clips, bolts and nuts, screws, keys and similar waste material.
1). Cover the glass part of the frame with tape.
2). Take white acrylic paint and, using a sponge or piece of sponge, prime the surface of the frame.
3). A hairdryer will help dry the primer.
4). Apply the stencil diagonally to the frame and apply relief paste or acrylic putty with a knife, adding PVA glue to it. Smooth out the paste.
5). Remove the stencil, maintaining the convexities of the design.
6). Arrange it in an interesting composition, and then glue the waste material with “Moment”.
More: How to create a photo gallery in an apartment
7). Let it dry for at least a day, paint the frame with the parts white and dry again.
8). Paint it carelessly, leaving unpainted areas, black.
9). Protonate the convex areas with a “dry brush” in brown color, after drying, in the same way, cover the frame with metallic. For rusty steampunk, coat it with a copper or bronze shade.
10). The final touch is the finishing acrylic varnish.
Tools
- jigsaw
- drill
- wood drill bits (3, 6, 8, 10, 16 mm)
- fraser or chisel
- screwdriver
- countersink
- wire cutters
- pliers
- stationery knife
- wood screws (24 pcs.)
- ruler, compass, pencil
- sandpaper
- putty knife
- brush
- Super glue
Photo collection of ideas for other crafts
Chess table with chess, computer
Robots
Cup holders-figurines
Conclusion
When making crafts in the steampunk style with your own hands, you should pay attention to combining the elusive meaning of history and the diversity of culture. Taking this approach to steampunk interior design, he will teach guests about the industrial revolution, the history of steam engines and fantastic ideas for the future.
Simple first step
If you're not yet ready to decorate your entire apartment in a steampunk style, you can start by designing the room where the valves, pipes and mechanical parts look most organic - the bathroom. For example, you can install the simplest faucet with a round valve, and instead of a sink, use a cast iron trough or a copper boiler, in which you need to make a hole for drainage and be well insulated. You can place such a sink on a metal safe, which is usually kept in offices or medical institutions. Bathroom walls can be sheathed with sheet iron, untreated wood, or roofing metal. For this interior, you can use thematic tiles, for example, with images of airships or some kind of futuristic abstraction.
Steampunk table decoration
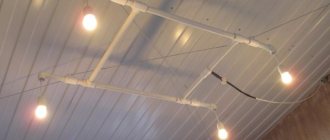
Another great first step is to transform your basement, if you have one. The ideal option is open communications on the ceiling of the basement; in such a place you can make your own steampunk cinema. Using paint, you should achieve a rusty effect on pipes and communications, as if the basement had turned into a submarine or ship. Bolts and screws can be repainted in brass color. Decorate the walls with sheet iron and wooden panels. For furniture, choose leather chairs, decorate the room with antique crafts, maps, and a globe. The walls can also be covered with photo wallpapers with fantastic motifs. To fully follow the style, you can attach illuminated portholes to the walls, so you will become a real Captain Nemo.
Steampunk office interior
You need to understand that before you start creating an interior in this style, you need to understand its essence. The design of individual items plays an important role here. A competent approach to design will fully embody the warmth, unusualness and thirst for the unknown that are characteristic of this style. Steampunk is a sure way to surprise your guests, they will spend a long time looking at all these amazing accessories and asking you what each of them means. This style is ideal for creative individuals who love to do things with their own hands, as it has no limits to imagination.
Kitchen with wood trim in steampunk style
Unusual table lamp in steampunk style
Bathroom in dark colors in steampunk style
Small living room in steampunk style
Steampunk dining room
Cafe interior in steampunk style
Steampunk Hi-Fi: An Alternate Past of Sound Equipment
Steampunk as an aesthetic concept in the design of hi-fi and other audio equipment is not a widespread phenomenon. Despite the fairly keen interest in such equipment, it rarely ends up in catalogs of online stores and on the shelves of audio equipment stores. I don’t know of any companies that mass-produce such equipment.
The creators of pseudo-steam and deliberately analogue audio miracles are, as a rule, loners who make for themselves or work to order for a specific client. Often, impressive concepts appear not only from professionals, but also from amateurs.
Despite the relative youth of the fashion for steampunk design in audio, enthusiasts have managed to assemble and/or modernize (customize) many impressive, unusual devices. It is also interesting that devices with a characteristic national flavor appear in Russia, some of them deserve special mention. Below the cut we will talk about several experiments in the design of audio devices that particularly impressed me.
Copper Steam
One of the pioneers of steampunk in audio was Copper Steam.
The appearance of this laboratory is directly related to the activities and aesthetic preferences of the designer and engineer Michael Cochran. The designer himself considers everything connected with his concepts to be a “crazy journey” that began in 2008 on the wave of the growing popularity of steampunk as a literary and animation genre. It all started in relatively squalid makeshift conditions. The lab was a couple of tables in an old shed in the backyard of the designer's Orlando home. Mike started out creating interior accessories. The first works were sculptural compositions and pieces of furniture, made in a style typical of steampunk universes.
Four years later, having moved from Orlando to Key West, Mike begins creating his first amplifiers. It should be noted that the designer chose the ideal time to create steampunk amplifiers, since the vintage aesthetic he proposed has become truly mainstream.
The latter circumstance largely determined the commercial success of the enterprise and made it possible to develop several directions and continue to create devices with a unique appearance. “Warm” lamp marketing probably also played a role. Almost all of the Copper Steam amplification is built on vacuum electrical devices coveted by audiophiles to make it even more archaic and brutal.
The Copper Steam experiments determined the canonical appearance of this kind of devices (amplifiers and speakers). Many of those who got into steampunk design and amp modding relied on the techniques and principles laid down by Michael Cochran.
The first acoustic development of Copper Steam was the small and budget Steam Amp. The model was a set of a complete tube amplifier and speaker system.
- Steam Amp Specifications:
- Construction: copper, brass, oak.
- Specifications:
- Dimensions (inches): 13w x 10d x 8h.
- Weight: 20 lbs.
- Output power: 8 W (continuous RMS into 8 ohms).
- Output impedance: 8 ohms.
- Input: 1/4 Line-Level.
- Speaker parameters:
- Dimensions (inches): 7 wx 10 dx 9 h
- Weight: 8 lbs
- Power: 20 W at 8 ohms
The following devices were designed for a more discerning audience, had more power, high fidelity and could impress experienced music lovers and audiophiles. The Deux line featured the DeuxPre stereo preamp and the DeuxAmp monoblock amplifier.
Deux Pre Specifications:
Construction: copper, brass, walnut. Dimensions (inches): 12.5 wx 12.5 dx 8.25 h. Weight: 20 lbs. Input/Output: 4 RCA Line-Level In, 1 Stereo 1/4 In, Ribbon Circuit, 1 Out.
Technical characteristics: Construction: copper, brass, walnut. Dimensions (inches): 12.5 wx 12, dx 8.25 h. Weight: 30 lbs. Output power: 60 W (continuous RMS into 8 ohms). Output impedance: 4, 6 or 8 ohms. Frequency range: 20 Hz to 20 kHz. Intermodulation distortion: less than 1% at 60 W; less than 0.5% of 50W below. Input: RCA Line-Level.
Somewhat later, the acoustic system The Æthereal One Tower Speaker appeared. The speakers were developed to complete the mono-brand concept. There is also an archaic approach here - the system is broadband, which is not very typical for modern acoustics.
Specifications of The Æthereal One Tower Speaker:
- Construction: MDF, Walnut, maple, copper, brass.
- Dimensions (inches): 13 wx 13 dx 42 h.
- Weight: 60 lbs.
- Driver: 8 inches Tang Band w8-1808.
- Power: 30 W (continuous RMS), 60 W peak (impedance: 8 ohms).
- Frequency response: 45 Hz to 20 kHz.
- Sensitivity: 93 dB.
Somewhat later, Steam Amp II appeared, which, like the first, was a set of an amplifier and a small wideband stereo speaker system. One of the main differences of this device was the modified acoustic design of the speakers with spherical housings. The amplifier still remained a tube amplifier.
Technical characteristics of Steam Amp II:
- Construction: copper, brass, walnut.
- Dimensions (inches): 13w x 13 dx 8 h.
- Weight: 40 lbs.
- Output power: 8 W (continuous RMS, 8 ohms).
- Output impedance: 8 ohms.
- Inputs: 4 RCA line inputs, 1/8 mini-jack.
- Speaker parameters:
- Dimensions (inches): 9 wx 9 dx 10 h.
- Weight: 10 lbs.
- Each Driver: 4" Tang Band W4-1879.
- Power: 25 W at 8 ohms.
I especially liked this device, since I am partial to spherical acoustics due to their anti-resonance qualities.
Some of these devices were also created in the city of St. Thomas, where Mike lived on the tiny island of Water Island. According to the designer, environment and place of residence have a huge impact on creative productivity.
Russian steampunk from Valery Afanasyev
The works of one of the administrators of the Russian resource Tehnari.ru Valery Afanasyev are also recognized as reference ones.
Unlike Mike Cochran, Valery does not use tube circuitry (at least for those amplifiers that I am familiar with). In order not to further philosophize and to concentrate primarily on the stylistic design of the devices, Valery uses standard class D amplifiers. The main design feature is an indication built on the electromechanical principle. Several amplifiers from Valery, which many consider real masterpieces, are considered canonical for Russian steampunk design in audio.
The first was the unnamed “Steampunk Audio Amplifier from Valery” with a mechanical spectrum indicator. The impressive design hinted at the steam principle of the device, as the body parts were made in the form of boilers connected by pipes.
A laser from a standard DVD was used as a light source to create the indicator. In fact, this part was a mechanical oscilloscope. (For details on how to create it, follow the link)
Later, a similar indicator appeared in an equally interesting device called “Audioskaf”, made in the shape of a steam boiler.
The video clearly shows the mechanical volume indicator, which rotates the arrow in accordance with the level. It’s not technically difficult, but it’s quite spectacular.
Another of Valery’s devices that has earned the attention of many fans of steampunk in Audio is the “Samovarofon”.
The device also featured an outstanding indicator, as well as other aesthetic features. For example, the amplifier nameplate was made in a style typical of the Russian Empire of the late 19th and early 20th centuries.
The indicator of the samovarphone is green, the principle of operation is close to the first device.
The author writes in detail about the device here: www.casemods.ru/section0/item1032
I think it is pointless to consider the technical characteristics of devices, since depending on the components used, they can be almost anything. I can only clarify that the power (RMS) of the samovar phone was about 100 W.
Among the multifunctional devices with impressive decorative effects, it is worth noting the music center with the pathetic name “Steam Sound” or otherwise “Music Box with a Steam Engine”.
It is perhaps difficult to come up with something more visually suitable for reproducing the compositions of the “Pre-Revolutionary Adviser” project. Smart lighting and other impressive visual effects left few people indifferent to this device.
It should also be noted that several music centers were made. The main difference was the automatic mechanism for opening the door of the CD player. The story about Afanasyev’s devices will not be complete without touching on the vinyl topic. So in 2014, the designer created a record player with an original vertical disk placement.
By analogy with other devices, the device received an interesting conceptual name “vertical gramophone “Vertikrut”
https://www.youtube.com/watch?v=lq2KMzJry_U
From the video we can conclude that the device has some problems with the stability of the rotation speed. This is likely due to the original drive layout. I also don't know if this problem has been resolved. At the same time, in the comments the author clarified that there is no such problem, and distortion is a recording problem.
One way or another, visually the device is very impressive. Everything has been worked out down to the last button.
It is known that the author sells his works, and also that they are quite expensive.
Bottom line
It is quite difficult to fit all the diversity of steampunk technology into one material.
If you would like to learn more about what is being created in this direction, I will be glad to write a few more posts. As in other materials of this kind, I invite users to take part in a survey and express their attitude towards such a phenomenon as steampunk in audio. The post uses photos from coppersteam.com, tehnari.ru, and casemods.ru
Our catalog contains a wide range of amplifiers, receivers and other sound-reproducing equipment. From us you can purchase both transistor and tube UMZCHs, as well as high-fidelity acoustic systems.