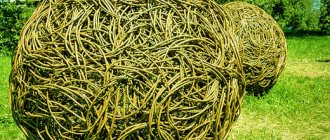
Recently, a material such as sisal has become popular among needlewomen. Few people know what it is and how to work with it, but sisal fiber is an indispensable material when creating many DIY crafts. ...
Sisal is a natural fiber that is obtained from the leaves of the agave bush. It is rough, tough and very durable, making it great for making ropes, ropes, washcloths, mattresses and animal toys. Undyed fiber has a yellowish color, and some craftswomen prefer to use it in its original form in their products.
Sisal is sold in sheet form or as twisted fibers in bundles and spools. Most often, fiber in bundles is used for crafts.
What is topiary
To create crafts in the form of a tree with a rounded crown, the craftswomen were inspired by the European fashion for cutting curly shrubs (topiary). And the word topiar itself, translated from Greek, means “tree of happiness.” In the Middle Ages, in the best houses of France, topiaries served as a symbol of eternal summer and prosperity.
Small artificial trees can be outdoor, indoor or based on a living plant. A fashionable interior detail includes: floral, foam, wood, and even a version made from patches.
Materials and tools
I will immediately list all the materials required for this: • A blank for a Christmas tree in the form of a cone (foam plastic) • Green sisal (straws) • Several cones of different sizes • Decorative elements (fruits, berries, mushrooms, bells) • Beads for the Christmas tree • Satin and ribbons made of burlap • Titan glue • Wire • Pot • Polystyrene foam • Artificial snow • Cardboard • Carnations for foam plastic • Sequins (flowers) • Wooden stick
What is made from sisal
Sisal is a fiber that is obtained from the agave cactus. Natural material from Mexico appeared in Russia recently, but immediately won the favor of “Hand maid” craftswomen. Thanks to its rigidity and elasticity at the same time, sisal is very durable. Therefore, sisal crafts hold their shape well and are durable. Sisal in natural tones is suitable for country style products. And dyed fiber is great for fancy products.
DIY sisal toys are easy to make, organic and environmentally friendly.Other natural fiber products
Probably the most famous use for this material is a sisal washcloth. This product has a natural wicker look, but it can also be made using a regular crochet hook. A sisal loofah is not suitable for everyday use, but it works well as a natural body scrub. Of course, you should not dye the fiber for such crafts. I also use washcloths made from this material for very effective anti-cellulite dry massage. For knitting, you should choose a hook of at least size 5. Thin tools are not suitable, otherwise the work will take a very long time to complete and will be too dense and rough. The smaller the distance between the loops, the worse the washcloth will lather. To get maximum foam when bathing, you should insert a regular bath sponge inside.
"Happy" tree
To create a tree in a pot for the interior with your own hands, you will need imagination, as well as: sisal fibers, newspaper, a small skein of yarn (can be replaced with a coarse thread), hot melt glue, a trunk (a branch without bark or sea driftwood will do), a flowerpot or pot, beads and ribbons for decoration.
- Form the newspaper into a tight ball. It will be very durable if you master the papier-mâché technique. A wad of newspaper can be wrapped with tape, but in this case the surface of the workpiece will turn out to be angular. To make things easier, buy a styrofoam ball from a craft store;
- wrap the workpiece with yarn according to the “ball” principle if you are using the “newspaper” version;
- roll sisal balls and glue them to the workpiece, leaving space for a hole along the diameter of the trunk;
- place the top of the trunk coated with glue into the deep hole of the ball;
- dilute the alabaster to the consistency of medium-thick sour cream and pour it into the pots, about ¾ full (alabaster can be replaced with gypsum plaster, polyurethane foam or cement);
- immerse the trunk in the flowerpot;
- when the solution has hardened, coat the surface of the pot with glue and decorate it with multi-colored sisal fibers, glass balls, artificial flowers or coffee beans;
- Glue beads and ribbons in the form of bows to the crown.
Topiary using kusudama technique
You will need: green sisal, decorative bills, flowerpots, green satin ribbon, building plaster (alabaster), glue gun, scissors, strong cable, wire, foam ball with a diameter of 7 cm or a newspaper ball, thick threads, food bag or bag, decoration elements - golden berries or candies, a bird...
Master Class
- Cut the bill in half to make a square.
- Fold the workpiece diagonally.
- Fold the edges of the triangle up to form a diamond shape.
- Straighten the small triangles in height, then fold the corners.
- Fold the triangles inward along the marked lines.
- Fold in half and glue the module inside.
- Make 5 modules in the same way, then glue them together to form a flower.
- Make 22 flowers.
- Line the inside of the pot with sisal.
- Cut a corner off the food bag, or use a bag and place it on top of the sisal.
- Dilute alabaster with water to the consistency of thick sour cream and pour it into a bag.
- Install a cable into the plaster as a trunk and 3 pieces of wire for branches.
- Leave the plaster for a day to completely harden.
- Remove the bag from the plaster.
- Insert the plaster into the planter and hide it under the sisal.
- Wrap the trunk and branches with green tape, secure the edges and ends of the tapes with hot glue.
- Twist the wire to create beautiful curls.
- Make a “pound” in this way: cut the bill in half, glue the edges together to form a cone, fill it with sisal and golden berries, then insert the banknote into the curl.
- Wrap the ball with thread.
- Wrap the ball in sisal, securing it with hot glue.
- Make a hole to the middle of the ball's depth.
- Carefully coat the table with glue and secure it in the ball.
- Cover the ball with kusudama banknote flowers.
- Glue the bird onto the tree crown.
- Decorate the base of the tree with golden berries.
Topiary using the kusudama technique is ready! I recommend watching this video!
BERRY TOPIARY made from sisal DIY gift Watch this video on YouTube
How to work with sisal
Craft stores sell sisal that is already dyed.
But sometimes there is no suitable color or shade. You can add the necessary colors yourself, at home. Choosing a dye is not difficult. Fibers can be painted with acrylic, gouache, fabric dye and even hair dye. The canvas is immersed in the solution for 5-10 minutes, and then washed with cold water and dried. Depending on the intensity of the desired color, the concentration of paint in water is calculated.
To get an unusual shade, you can experiment with paints by mixing several colors in one container. To paint the finished tree, you can use a paint spray can.
What to do with ready-made materials
After 24 hours, the sisal fabric will be ready for further use, and it’s time to make the first craft. Applications made from this fiber are considered very popular, as well as various topiaries, baskets, decorative shoes and even bouquets. For example, you can create a designer notebook and decorate the cover with elements cut out of sisal fabric: birds, flowers or hearts. Three-dimensional figures are created on the basis of simple wire frames, which can be purchased at a florist store or made independently.
How to make topiary balls from sisal
Important! It’s easy to roll sisal balls with your own hands for topiary.
You just need to follow some rules:
- Take a small amount of sisal threads and roll it between your palms easily without any effort. Don't be discouraged if the ball doesn't work out at first. As they say, “the first pancake, or in our case the ball, is lumpy.” With a little practice, you'll be making smooth, dense workpieces in a matter of minutes.
- Sisal is a natural fiber and requires additional processing. Therefore, the formed ball must be coated with PVA glue and allowed to dry thoroughly. Then repeat the procedure again. After this, the ball will be solid and will not fall apart. And excess fibers can be trimmed with scissors.
- Calculate the number of balls based on the size of the ball and the degree of coverage of the fabric.
DIY autumn topiary: master class
Trunk
If you are making a trunk from skewers or sushi sticks, take the required amount to obtain the desired thickness of the trunk, put them together and wrap them with thread along the entire length.
We fasten the thread and cut it. We take twine and wrap it around it. The turns should fit tightly to each other, without gaps between them.
We reach the end - fix it, cut the twine.
Planting autumn topiary in a pot
Crumple the foil into a ball and place it on the bottom of the pot. There is no need to compact it strongly.
Pour water into a separate container and add dry alabaster into it with a tablespoon, stirring constantly. The consistency you need is “thick sour cream.”
We pour the diluted alabaster into the pot and immediately install the trunk in it, being careful not to stain the winding with twine. Be sure to hold the barrel until the alabaster hardens thoroughly. We make sure that the trunk does not tilt.
How to replace sisal
If you are unable to purchase natural sisal, you can use other floral fibers for decoration. For example, natural bristles from a whitewash brush. Crafts made from sisal offer different color schemes.
Note!
- How to make wooden shelves with your own hands - original design options
- Kinusaiga technique for beginners: what is it, a description of creating paintings from threads
- How to weave a figurine from rubber bands: how to learn to weave animals, toys and what you can make from rubber bands on a slingshot
Therefore, the villi are dyed with different stable dyes. If there are doubts about the “durability” of the paint, then you can add a few drops of vinegar to the solution (per 1 liter of liquid – 5 – 7 drops).
- Separate the fibers.
- Immerse them in the dye for 1 - 1.5 hours so that the fibers are well saturated.
- Place the painted material on a dry sheet of paper and let it dry. Printed products should not be used. The print will stain the workpieces.
Another substitute for sisal is plumbing linen (it is sold in the form of braids). If you paint it in different colors, the craft will look no less original.
Balls of floral fibers can have different sizes and colors in one composition. The composition will look more refined if you felt the blanks from multi-colored fibers.
Which sisal is suitable for creativity?
Craftswomen discern elements of beauty in fibers and actively use sisal for creativity and handicrafts. The material lends itself well to coloring and shaping.
For creative work, three main types are used:
- Sisal fibers are the most popular material and are sold in bundles (tangled), spools and skeins. Before work, it needs to be divided into parts so as not to get confused. Suitable for various tasks - from filling voids to creating crafts for decoration, toys, and jewelry.
- Compressed into a thin sheet , sold in sheets or rolls, like crepe paper. They are actively used in floristry, scrapbooking, postcard making, and also for gift wrapping.
- Sisal rope is a durable and beautiful cord, suitable for decorating boxes, flowerpots, picture frames, mirrors and photos, and vertical compositions. It makes long-lasting scratching posts for pets. You can hang various decor and flower pots on a sisal rope.
If you need a little canvas to decorate a craft or bouquet, then you can press sisal with your own hands. Simply distribute thin threads on thick plastic film, creating the desired pattern. Apply a layer of wallpaper vinyl adhesive on top, cover with thick film, arrange a press on top and leave for three days.
artificial sisal on sale in the form of a mesh with fuzzy cells of different sizes. It comes in a variety of colors and is intended for arranging bouquets, floral arrangements, gift wrapping, and creating crafts. Typically sold in rolls.
Foam wood
You will need a bucket or flowerpot (for the base), alabaster or plaster (for pouring). A foam cone will serve as the base for a decorative Christmas tree (ready-made forms are sold in handicraft products). You can also carve it yourself from a foam block (if you still have packaging from household appliances in your house).
The trunk of the tree must correspond to the proportions of the product (diameter 5 - 7 mm.). Medium-thick branches, driftwood, pencils or Chinese sticks wrapped with twine or yarn are suitable for it.
We form the crown from green sisal (but you can use other colors for originality). Only now the fibers are twisted not into balls, but into “sausages”. Then, starting from the base of the cone, they are wound onto the adhesive base in a spiral. To the top of the cone. The stray fibers do not need to be trimmed; they will add fluffiness to the Christmas tree.
For New Year's decor, miniature Christmas tree decorations, beads, satin and “metal” ribbons are used. Pine cones, cinnamon sticks, nuts and dummies of candy will also come in handy.
Step-by-step photos with descriptions
The first thing we need to do is form the frame of the Christmas tree. To do this, insert the wire into the upper part of the cone and bend it with a hook.
Next, coat the wire with glue and start winding straws around it.
Gradually make the transition to the cone itself, leaving a small strip of foam free. We will paste the tape there later.
When you are finished with the straw, you should secure it with thread. Take a thread exactly the same color as the sisal (straw). Secure the thread to the end of the wire and begin to wind tightly over the sisal. You will see how your Christmas tree becomes slender and neatly combed.
Next, cover the loose strip of foam with burlap tape.
Wrap a thin white satin ribbon around the entire Christmas tree. Fix the tape with glue in several places. Then do the same manipulation with the red ribbon.
Now let's move on to the Christmas tree outfit. Let's make it from cones, fruits, green needles, berries. To do this, cut out a circle from cardboard and try on decorative elements on it.
To make an imitation of green spruce needles, you can use a green plastic mat. Separate one piece from the mat; it already has a hole. Insert a berry on a wire into this hole. Secure everything with glue, bringing the wire out from the back of the cardboard.
Golden nuts
A walnut topiary will fill your home with the atmosphere of a forest fairy tale. To work with the craft you will need (in addition to the ball, trunk and pot), halves of walnuts, moss or sisal, gold or silver paint (acrylic or spray can).
Note!
- How to properly make a birdhouse with your own hands from scrap materials: we create an original birdhouse according to sketches
- How to make candles with your own hands: instructions for making wax, gel, scented, homemade decorative candles with a wick
- What you can make from foamiran with your own hands: we create flowers, Christmas tree decorations, snowflakes, three-dimensional paintings (photo + video)
The principle of making the base of the tree is the same as for other topiaries. But there are some nuances in decoration.
- Prepare even halves of walnuts. To do this, the shell must be washed and dried;
- Apply paint to the parts in advance, before gluing it to the ball, since spray paint corrodes the foam;
- paint over the gaps between the nuts or decorate them with organza ribbons and beads;
- Glue moss or sisal onto the surface of the pot.
For the trunk, use a driftwood or branch. Open it with varnish or saturate it with stain. This will emphasize the naturalness of the craft.
Christmas tree made from coffee beans
This Christmas tree will be an excellent decoration for the New Year's table. To make this craft you will need about 200 grams of coffee beans. We will use them to cover our cardboard base.
This must be done in several stages, allowing the previous layer to dry first. The stand can be decorated with burlap or wrapped with twine. This coffee tree will look original if you “plant” it in an unusual glass.
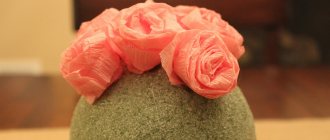
Summer all year round
A composition with flower decor will lift your spirits even in rain and severe frosts. Its implementation will not take much time. The main decorative element of the “tree” of happiness will be artificial or dried flowers.
Advice! It is advisable to use small inflorescences that match the overall design idea in shape and color. Flowers that are too large can look clumsy. And for a tight fit of the flowers to the workpiece, remove their stems.
To get ideas and create your own masterpiece, look at the photos of topiary made from artificial flowers.
DIY Easter topiary
The crown of such a product is decorated with artificial flowers, multi-colored eggs, greenery, butterflies, and balls of thread. The base for the top can be made in different ways: from newspapers, polyurethane foam, polystyrene foam; use a floral sponge. The first step is to prepare the base for the entire structure. It could be an empty tin can. A piece of foam plastic is placed in it so that the walls can withstand the pressure of the composite, which will be poured later. To create a trunk, wooden skewers or a more original blank - salex - will be useful.
If you go with the first option, you will need twine and a hot glue gun to fasten the sticks into one stand. Before filling the jar with plaster, the lower end of the finished barrel is lubricated with glue and pressed into a piece of foam plastic. After filling the vessel with composite material, proceed to installing the crown.
Incompleteness in the interior, the approach of the holidays, the desire to save money or show creativity - a small list of reasons for taking up handicrafts. Master classes with simple and understandable instructions will help beginners take their first steps in handmade crafts, in particular, in topiary art, which has become popular in recent years. To create a beautiful topiary with your own hands, you don’t need to buy bulky tools or spend a lot of time. In a few hours of work you will get a worthy example of decorative and applied art. A wide variety of themes, shapes, finishing materials and decorative elements will help you make a unique topiary. Visual examples in images and videos will help you decide on your option. All topiaries consist of an upper, lower part, as well as one or more trunks; there are no restrictions on other parameters.
Please note: How to make a T 25 bulldozer with your own hands
Delicious tree
Sisal toys decorated with real sweets will delight both children and adults. For decoration you will need shaped marmalades or jelly-based candies (the viscous structure will help the treats stay on the rod). Place treats on skewers or toothpicks and decorate the topiary ball with them.
DIY sisal crafts are distinguished by variety and conciseness of forms, the use of simple and affordable materials, ease of execution (even children can do it), and... limitless flights of imagination. “Tree from Europe” is an excellent souvenir for a gift, for home and office decor. A master class on making topiary from sisal will help beginning craftswomen make their own, unique “tree of happiness.”
Coffee Christmas tree
There can be an unlimited number of options for making topiary in the form of a herringbone, as far as human imagination can allow. The most versatile topiary is coffee, but what if you make it in the shape of a Christmas tree? This master class will present step-by-step photos of the manufacturing process.
First you need to make a cone out of cardboard or thick paper. You can use paper, newspaper, fabric or cotton wool as a base, the main thing is to push it all inside. How to make a cone: a sheet of paper needs to be rolled up in the form of a bag, or you can first use a compass to mark the diagram. The workpiece is glued together with an overlap using a hot-melt gun, regular glue, adhesive tape (you can use double-sided tape) or fastened with a stapler.
The cone can be placed on a paper coffee cup. The joints are glued with PVA or other suitable glue.
The cone is wrapped with twine, it is glued with double-sided tape or with Moment.
A bow made of golden ribbon is tied to the top of the tree. Instead of a bow, there can be any other decor.
Sisal topiary: photo ideas for crafts
Please repost
0
Beautiful examples and ideas for creating topiary on the theme of autumn
For many needlewomen, inspiration comes precisely during the creation of their next masterpiece. There are many original ideas for making autumn topiary. Everyone chooses a suitable craft design based on the availability of the material, the season, the complexity of the composition, and the need to process the elements.
A chestnut tree with only fruits looks boring. But if you add burlap leaves, twine bows, and walnut shells to it, you will get a beautiful and colorful topiary. A great idea is to create a tree from just pine cones. Some of the material can be bleached, painted with gold paint, and sprigs of pine needles added.
To make a craft from several components, you will need to stock up not only on pine cones and chestnuts, but also on acorns, nuts, autumn flowers made from corrugated paper, and thin leaves from napkins.
An extraordinary solution is a topiary made from one type of material. The berry tree looks beautiful, but it will require lengthy processing of the fruit before starting work. A complex craft on the theme of autumn - a tree made of maple leaves. You can simply insert them into the base in any shape or roll up stunning roses. The material for such crafts also requires special processing.
A tree of dried flowers will remind you of autumn. Dried spikelets, beautiful leaves, flowers and whole inflorescences, poppy boxes and other materials are suitable for creating topiary. If desired, the composition can be enlivened by simple coloring.
Website about the dacha
01/14/2019 admin Comments No comments
Save a piece of autumn - make an autumn topiary that will delight you with its colors and, of course, will definitely bring good luck to your home and productivity to your garden! Involve your child in the work (even if it’s just sorting chestnuts), and “together” you can create a wonderful piece of work for the fall craft competition in kindergarten or school.