/Accessories and decor/Decoration/
Coffee topiary can be a wonderful gift, decoration for a dining table or home interior. After all, it is so fragrant, beautiful, environmentally friendly and also very easy to make. In this material you will find a basic master class on making coffee topiary with your own hands for beginners and 50 photo ideas for inspiration.
Green sculpture
First you need to understand - what is it? A medium-sized figurine resembling a plant or shrub is called topiary. This art has come down to us since the times of the Roman Empire.
It was then that the fashion for decorating houses with objects created by nature began. The tops of the bushes were pruned in a certain way, embodying geometric and artistic images.
Nowadays, this art appears in the form of a small tree in a pot, designed to enliven modern homes. It is “grown” from the most accessible things, what is always at hand - change from a wallet, sweets, colored cardboard, satin ribbons - all this can be useful for a future creation.
The process of realizing such beauty is quite painstaking, but it will take no more than 2 hours. But the result will exceed all expectations. Such a homemade product contains a piece of the master’s soul, which he puts into working on it. This makes it attractive and unique and makes it possible as a gift for loved ones.
Having answered the question, what is the name of a craft in the form of a tree in a pot, and what are its functions, it is worth thinking about its use in everyday life.In what rooms is the presence of such an accent acceptable? Is it appropriate to use it in workplace decoration? What decor style does it go with? What can you make such an exclusive thing from so that it fits well into your living space?
Advantages
Now anyone can do fortune telling in their own kitchen. Why pay when you can look into tomorrow and remember the past? The simplicity of preparation for the sacrament is attractive: you need a Turk, coffee beans (if you have a mill) or instant coffee. Cooking recipes are available on the Internet. There is no need to study manuals like in Tarot cards. There are enough interpreters and reference books of patterns, where there is an explanation of the resulting images of animals, figures, numbers, letters
Practicing magicians advise thinking about an important issue, affairs, problems. The shallow trance into which a fortune teller falls on coffee grounds will reveal at the subconscious level the meaning and definition of the received symbols
In unity with nature, with the elements of the Earth, the energy of the drink and our planet merge. This is how esotericists explain the accuracy of answers to questions about the past, present, and future.
Not everyone has the ability to understand abstract images. And everyone sees the signs in their own way. Therefore, there is no need to consult with outsiders. It's very personal. Therefore, choose a quiet room, with dim lights, and privacy. The ritual can be performed at any time of the day, but not after midnight, when demonic forces are activated. Negative points:
- You cannot add anything to the drink prepared for fortune telling. These ingredients will change the consistency of the liquid and the results will be incorrect. If a person does not drink bitter coffee, he will have to be patient. The other side of the coin is that there will be no pleasure from ingestion, which may affect the result;
- any fortune telling, even coffee grounds, can be wrong. The result lies on the “conscience” of the beholder: if you don’t have a lot of practice, the result will not be entirely correct;
- opening the veil and looking into the future resolution is a sin according to church canons;
- lack of patterns for interpretation - an incorrectly formulated question or insufficient concentration on the process. The result will be a blurred pattern or a continuous canvas of sediment in which nothing can be seen. Taking this as a sign that the Universe does not want to communicate with you and it is better to postpone the divination is the best thing in this situation; Often you want to see only what you want. Consciousness does not accept negative signs and therefore can be ignored;
encyclopedias, reference books, interpreters are unable to accurately explain the symbols seen by a specific person. The formation of patterns consists of circumstances, life positions, and the psychological state of a person at a given moment. It is impossible to describe every situation in books. Therefore, the prediction may be incomplete and not entirely correct.
Topiary made of coffee beans as part of the interior
The divine aroma awakens the body, fills it with energy for a new day. A cup of this delicious drink in the morning puts you in a positive mood. It is quite possible to feel not only the taste, but also the smell throughout the day if you place it in your workplace or decorate your living room with such a detail. She has the ability to revive absolutely any home.
Classic, hi-tech or minimalism – it doesn’t matter at all what style the design is in. A coffee tree “grown” with your own hands is perfect for any direction.
Fashion designers are happy to use such an accessory in their decoration - it can emphasize and complement the color scheme of the space in mint tones. The versatility of this element allows it to be used both in residential premises and in offices or cafes.
Note!
- How to make wooden shelves with your own hands - original design options
- Kinusaiga technique for beginners: what is it, a description of creating paintings from threads
- How to weave a figurine from rubber bands: how to learn to weave animals, toys and what you can make from rubber bands on a slingshot
What is topiary
Decorative wood is made with your own hands from simple and environmentally friendly materials.
The art of decorating trees dates back to ancient Rome, only there they gave unusual shapes to living trees. Gardeners in Rome worked like real sculptors, creating green statues from leaves. Nuns in the Middle Ages worked painstakingly on decorative trees, and during the Renaissance, art acquired a monumental scope. In the works of Dutch and English artists of the 16th and 17th centuries, you can see unusual shapes of tree crowns.
In modern times, a coffee tree is a unique souvenir that not only brings visual pleasure, but also pleases with its unique coffee aroma. Even after undergoing additional processing, coffee beans retain a charming aroma.
What you need for work
To make topiary from coffee beans with your own hands, we will need:
Important. When choosing, focus on the quality of the material, and not on the degree of roasting. Only smooth and solid samples are suitable. The size is also not important: both large and small ones will be used.
- bean coffee approximately 250 grams, it all depends on your imagination;
- the base is a ball. Beginners prefer polystyrene foam (you can buy it in hobby hypermarkets). Another type of frame is a plastic hollow ball, or papier-mâché. Choose a ball of small diameters - 10-15 cm - small ones are difficult to work with, large ones are difficult to balance;
- twig, real, possibly curved, about 20 cm in length;
- glue gun;
- brown acrylic paint;
- plaster or alabaster to “plant” the coffee topiary;
- lace, rope, braid;
- small objects: beads, flowers, butterflies, etc.;
- small flower pot or clay mug;
- brush.
Coffee topiary with hearts "Valentine's Day". Master Class
In this master class we will look at the process of making a composition for Valentine's Day - a coffee topiary in the shape of hearts.
For work we will prepare corrugated cardboard, twine, coffee beans, a pot, wire, a heat gun, acrylic varnish, scissors, pliers and brown gouache.
Coffee topiary with hearts - master class
Let's start by preparing the heart templates. Templates are drawn on corrugated cardboard and cut out. First, draw and cut out a small heart.
The template should be much smaller than the heart you plan to get after you finish covering it with coffee beans.
Now we take a small heart and, following its example, draw and cut out a large one, with a notch in the middle.
It wouldn't hurt to add some volume to corrugated cardboard hearts. We cover the small heart on both sides with cotton pads and tie it with cotton thread.
Wrap the big heart with jute twine. In some places we glue the twine thread with hot glue.
Wrap the heart with another layer of twine.
We saturate the large heart with acrylic varnish or PVA glue so that the twine threads stick together.
Paint the small heart with brown gouache.
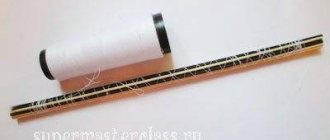
We will make the trunks for our hearts from simple wire. You can use aluminum or steel.
We wrap the wire around a tube with a diameter of about 2-3 cm and get curved stems for the hearts. Bend the edges with pliers.
Wrap the trunks with twine. In the meantime, our hearts have dried up - you can attach them to the wire!
We attached the hearts to the trunks and, if necessary, glued them with hot glue.
We begin to glue coffee beans onto the hearts. Glue the grains in two layers. The first layer – we place the grains with the convex part up.
When we glue the second layer of coffee beans, turn them over, placing the convex part down.
We got two hearts on wire trunks. You can coat them with acrylic varnish. While the varnish dries, let's work on the pot.
We will cover a flower pot of suitable size with twine.
When the pot is completely covered with twine, cover it with acrylic varnish or PVA glue. After the varnish has dried, plant the topiary in a pot. We dilute the alabaster with water, put the mixture inside the pot and place the hearts there. We hold it a little so that they do not move while the mixture sets.
At the base of the hearts we attach decor - bows made of satin ribbons.
Apply PVA glue thickly to the dried alabaster and pour in the remaining coffee beans.
We decorate the pot with a bow made of twine.
The coffee bean topiary can be considered complete!
A wonderful coffee aroma and wishes of love - all this will be presented to its owner by the “Valentine’s Day” coffee topiary!
How to make a decorative tree with your own hands
- Making the top. The grains are attached to the base with a glue gun. It’s better to start from the top - here they decorate with the most beautiful specimens. Gradually going down to the recess for the barrel, the entire surface of the foam is filled.
- Fastening. Pour a little glue into the hole and install a branch, which is pre-wrapped with twine or braid
- We plant a tree. Dilute the solution to harden according to the instructions and pour into a cup. Insert the free end of the barrel into the solution. With the help of such a building mixture, trees made from coffee beans are fixed in a pot.
- Final touches. Using miniature objects, we decorate the crown and pot. Mini-figurines of birds, animals, dry blades of grass, beads, butterflies - everything you need for the project.
Important. To give better texture and volume, apply a double layer of grains to the base. The first one is glued with the flat side to the ball, and the second one is glued outward.
The choice of decoration items is determined by the purpose of the homemade surprise. For lovely ladies - ribbons and flowers; for the interior of a children's room - sweets and dried fruits; for a work colleague or boss - a topiary made of coffee and coins. Everything is individual.
Master class for beginners
Tools and materials
To design a stylish topiary, first of all you will need coffee beans.
If possible, try to purchase the highest quality coffee; preference should be given to products in which the beans are evenly roasted and have the same size. It is very important that they are carefully dried. Before starting work, you need to sort the grains, of course, this activity is optional, but if you want to get a truly beautiful topiary, then it is advisable to do this
First, any damaged grains should be removed, and the rest should be divided into 4 groups. The first will include the most beautiful beans of the same size, they will be located at the top of your future coffee tree. The second group includes rounded grains - they are usually used to decorate flowerpots. The third includes whole grains, but they are not beautiful enough; they are used to decorate the lower part of the crown. The fourth group includes the smallest grains - they are used to finish the spaces between the remaining grains.
You will need the following.
- The base is usually a ball or a heart - you can buy it ready-made in the store or make it yourself from paper or foam. Threads will be required in almost all options for creating topiary.
- Varnishes and paints are needed for application to the base.
- Wire/tube/skewer or tree branch is necessary to ensure that your topiary has a trunk.
- Glue - it is better to give preference to a hot glue gun.
- Plaster/alabaster – prepare these along with a mixing bowl.
- Sharp scissors.
- Flowerpot. These options are very different, ranging from flowerpots and pots, ending with ordinary jars or unnecessary mugs.
- Scotch tape - to create a topiary you will need double-sided tape.
- Additional decor - the finished craft is decorated with bows, flowers and beads. Also used are cinnamon sticks, as well as cloves and dried fruit slices.
How to do it?
On the Internet you can find many master classes on how to create a coffee topiary with your own hands. We invite you to familiarize yourself with the step-by-step instructions, which include several popular techniques and are characterized by exceptional ease of implementation.
Step one - work with the workpiece. To create a round topiary, you need to take a base prepared in advance in the shape of a ball or heart. The workpiece is pasted over with paper and wrapped with knitting thread, preferably in dark shades.
It is necessary to cut out figures of equal shape from cardboard and place a tube between them, it will act as a trunk. Both blanks are glued together, then pieces of cotton wool or disks are attached to the base thus obtained, giving the desired volume. After you prepare the base and paint it, you can begin to paste it with coffee beans, it is advisable to do this not in one, but in two rows - in this case, the first layer is placed with the flat surface inward, and the second layer is the opposite.
Step two - we design the trunk. The wire or stick that you plan to use as the stem is carefully covered with strips of tissue paper. If it is not there, you can use satin ribbons or jute thread and then secure it to the crown. When working with wire, you can bend it a little.
Step three - plant it in a flower pot. First you need to mix a certain amount of gypsum-based solution and pour it into the prepared container. After it begins to set a little, a topiary is placed in the center and held until the mass hardens completely. When the plaster has dried, the so-called soil can be covered with a thin layer of ground coffee, wood shavings, sisal or dried moss.
Step four. Decorating the topiary. If we talk about coffee tree decor, then there are no limits to your imagination. You can stick on traditional ribbons, curls, beads and bows made of foamiran, or you can show your imagination and combine coffee with figures of insects, animals, star anise, coarse fabric and other decorative elements.
What to cover with?
Some needlewomen prefer to coat their coffee trees with a mixture of coffee and PVA - this is not necessary, but this treatment will make the craft more shiny. Usually the glue is mixed with water in equal proportions and instant coffee is poured in until the desired color is achieved. You can add a little cinnamon and cocoa to this mixture - in this case, the topiary will turn out even more fragrant and fill the house with an atmosphere of family warmth and comfort.
This treatment allows you to close the gaps well, as well as mask all traces of glue. If desired, you can apply a layer of varnish. Of course, this will remove the pleasant coffee aroma, but it will protect the product from dust accumulation.
Variations on different themes
Handicraft is a dream made into reality on your own. The craft can be made in any form. Using various techniques you can create pleasant little things for any occasion. When thinking through the idea of creating such a souvenir, it is worth taking into account the character and preferences of the person for whom it is intended. Then he will be appreciated.
Various variations on the theme “money tree” are an offering worthy of a real man. It symbolizes wealth and prosperity. Topiary as a souvenir for men is done in the traditional way.
Note!
- How to properly make a birdhouse with your own hands from scrap materials: we create an original birdhouse according to sketches
- How to make candles with your own hands: instructions for making wax, gel, scented, homemade decorative candles with a wick
- What you can make from foamiran with your own hands: we create flowers, Christmas tree decorations, snowflakes, three-dimensional paintings (photo + video)
The difference is the coins that are attached to the base first. Then the money is framed with a zipper, simulating an open wallet. Only after this, the basic component – grain – is used.
A fragrant composition, decorated with beads and ribbons, will be an excellent alternative to a bouquet for a girl on March 8th. Living plants will fade over time, but the invigorating aroma in the room will remind you of an unusual gift for a long time.
How to make a New Year's coffee tree for serving the holiday table? The frame is a cone, which is easy to make yourself from thick paper. The Christmas tree is decorated with balls, bows and tinsel.
If you make light strokes with white or silver paint, you create a snowy effect. A pine branch or pine cone will add liveliness and color to the decorative element, and fill the atmosphere with the smell of the forest. This Christmas tree will help create a festive mood at the table.
How to choose the right one
When choosing coffee for display, pay attention to the varietal difference.
- The oval shape is characteristic of the Arabica variety.
- Round - for Robusta.
To implement creative ideas, it is more advisable to choose Robusta, because its price tag is relatively lower.
Topiary heart made of coffee
A fragrant gift in a romantic style is an unforgettable surprise for lovers on their holiday on February 14th.
For this type of craft, the base or frame is chosen to be heart-shaped. The workpiece can be hollow inside or solid; it is covered with grains and decorated with appropriate paraphernalia.
You should insert your favorite photo into the hollow blank, and you can decorate the solid one with paper hearts and pink ribbons. Small figures of pigeons, comfortably making a nest at the foot of the bed, can add romance. A heart made from coffee beans in this way will be a wonderful sign of attention on Valentine's Day.
Panel
Widespread coffee products are panels. The cloth will fit harmoniously as a background, especially if you plan to not completely fill the space with grains. The sketch can be done without any accessories, or you can get creative with various ribbons, beads, and rhinestones.
It is worth taking care of the tools - it is convenient to use a glue gun. You will also need a simple pencil with a soft core, the canvas itself, plywood, replacement cartridges for the heat gun, PVA, and consumables.
- Smooth the fabric with an iron so that there are no wrinkled areas visible on it. This will make your work much easier and improve the decorativeness of the sketch.
- Then coat the wooden surface of the desired size (can be replaced with very thick cardboard) with PVA and evenly distribute the fabric on it, taking into account that the flap should slightly exceed the dimensions of the base. For neatness, fold the edges of the material to the wrong side.
- While the back plank is drying, think over a detailed sketch on paper, then transfer it to the canvas with a lead pencil.
- Lay out starting from the center of each element, attaching the grains with glue.
- When finished, coat the image with clear varnish and attach a baguette frame.
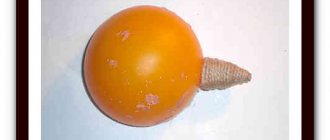
Fruit trees of happiness
Making such a decorative element is quite simple: you need to supplement the basic set with dried citrus slices. Cinnamon sticks and star anise inflorescences will enhance the effect. All this will fill the living room with an exquisite aroma and add zest to the festive table setting.
In the absence of natural ingredients, decoration with artificial berries and fruits is allowed.
Candles
In addition to its decorative function, such a candle will become a natural flavoring agent for the apartment. Unfortunately, such ethno-accessories in stores are offered to buy quite expensively, but if you know the step-by-step process, then you can actually make an original thing with your own hands much cheaper. In addition, it can be an excellent souvenir for friends on New Year's holidays.
For this you will need:
- Jute rope.
- Candle.
- Coffee.
- Glue.
Manufacturing mechanism:
- Place the seeds on the bottom of the candle on the glue. Choose the order according to your preferences - it can be a pattern with gradation of shades or a random arrangement.
- Wrap with jute and form a bow.
This is interesting: if you have jars of baby purees left over, you can use them for decoration by placing a wick in them and melting a regular white paraffin candle inside, and pasting them around the perimeter with grains.
Coffee bean flowers
As a continuation of the plant orientation of this form of needlework - bouquets of aromatic grains. The work uses the same technique as in the case of the most basic version. The only difference is the frame, consisting of rigid wire.
It is shaped into leaves and inflorescences, then wrapped with a bright ribbon; after which the coffee is fortified. In some places the plant is painted with gold or silver paint - this makes it more luxurious and elegant. This topiary will be a wonderful decoration for a living room or kitchen.
The second way to make an exotic bouquet is as follows: petals made of corrugated paper or bright fabrics are glued to a circle cut out of cardboard along the edge. Then the aromatic grains are placed in the center.
This composition imitates an open bud. The contrasting combination of dark grains, green leaves and bright petals attracts attention for a long time.
Types of coffee beans
If you have already shown interest in this kind of decor before this time, then you definitely saw in the photo on the Internet that some grains differ from each other in color palette. This is due to the degree of roasting, which plays a significant role in creating the composition:
- The normal vegetable color is characteristic of a product that is not roasted.
- At a light level of processing, the distinctive feature is a rich beige tone; at a medium level, it becomes darker and acquires an oily sheen.
- With strong heat treatment, the grains become dark chocolate in color and at the next stage they change color to almost black.
Homemade creativity
The master class described at the very beginning of the article describes in detail, step by step, the process of making such a craft. This is just a “foundation” on which unique furnishings are built.
Using available raw materials in the process and making a little creative effort, it becomes possible to realize a unique detail that can complement any design.
For experienced craftswomen, this is another way to express attention and congratulate a loved one. Beginners who are encountering the concept of topiary for the first time will be able to easily master such needlework by following step-by-step instructions.
Variety of options
fruit tree
Just add a slice of lemon or decorative mini-fruits, and you will see how your ordinary coffee tree sparkles with new fruity and summer notes. This craft is perfect for setting a summer picnic table.
Related article: Scrapbooking for beginners step by step: master class with photos and videos
Or the topiary may turn into some new fruit. Look how unusual it is.
Butterflies and birds
If you want to give the tree a spring-autumn mood, then we suggest decorating your coffee topiary with butterflies and birds cut out of pastel-colored paper.
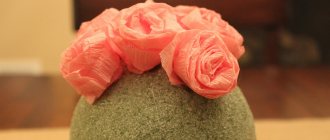
Topiary with flowers
But here comes the idea of a beautiful topiary with flowers blooming on it. This is a great idea to give such a tree to your mother or grandmother as a gift for Women's Day on March 8th.
Coffee tree with photo
This topiary can be given to any person with whom you have many good memories or photographs.
Topiary "Gentleman"
Well, the last, most unique idea for a coffee tree is the “Gentleman” topiary. Just look how beautiful he looks. The detailed process of making all topiaries can be viewed in our video collection.
Craft with a cup
And if you don’t want to make a coffee tree, then we suggest making a craft with a floating cup over a saucer.
Photo examples of coffee topiary
Please repost
0
Watch
Watches decorated with grains diversify the decoration of the kitchen space. Even the most simple pattern will be the “highlight” of the kitchen decoration.
To create chimes, you need to lay out a pattern of material on a cardboard of any shape, with the convex side up, and place it in the center of the arrow. The dial can be distinguished by using Arabica beans of a different color palette and adding Swarovski stones.
Magnetic figurines, Christmas tree decorations or photo frames are made in the same way. A series of mini-pictures with silhouettes of vegetables, randomly located on the wall in the dining room, will also look unusual.
Crafts from glue: 150 best ways to use glue to create crafts + simple diagrams and photos of finished works- DIY crafts from matches: step-by-step master classes and DIY craft ideas + simple and quick photo diagrams
- Crafts from tubes - unusual ideas, step-by-step master classes for beginners + photo reviews of ready-made DIY crafts
With a good imagination, you can make beautiful crafts from almost anything - true connoisseurs of the drink can use a similar technique to decorate a teapot and bowls for drinking it, which will exude a rich amber when the dishes are heated. Cups with a waterfall of grains are also in great demand.
Any little thing created on your own will not only decorate the space of your home, but also warm your soul, because you put a part of yourself into its creation.
Hedgehog
We will need:
- plastic or foam sphere of any size
- brown acrylic paint
- brush
- twine
- piece of foam plastic
- thick cardboard
- stationery knife
- pencil
- glue gun
- beads or seed beads for hedgehog eyes
Preparation method:
- Cut the sphere into two equal parts with a utility knife. One of the halves will be the basis for the body of our hedgehog.
- Using a craft knife, cut out a cone for the hedgehog's face from a piece of foam plastic. Please note that the base of the cone must be round.
- Attach the hedgehog's body blank to thick cardboard, trace with a pencil and cut out along the contour.
- Cover the hemisphere with acrylic paint in several layers and let it dry completely. This is necessary so that the original color of the workpiece does not show through the coffee beans.
- Glue the cut out cardboard circle to the hemispherical base.
- Cut the cone for the muzzle into two parts using a utility knife.
- Glue the cone half to the hedgehog where you are going to place his face.
- Wind the string around the tip of the hedgehog's nose to the base of its muzzle, securing the thread with a glue gun. Also, in the form of a spiral pattern, cover the cardboard glued to the bottom of the hedgehog with twine so that it is not visible either from the bottom or from the sides.
- Using a pencil, draw a straight line on the hedgehog’s body, passing exactly through the center of the hemisphere.
- Glue the coffee beans strictly along the line, placing them in a vertical position. These will be the spines of our hedgehog. Please note that the flat part of the row of grains should “look” in the same direction as the hedgehog’s face.
- Cover the back of the animal’s body with thorns in a similar way, gradually increasing the angle of the rows. Decorate the front part in the same way, only tilt the rows towards the hedgehog’s nose.
- If desired, decorate the hedgehog with decorative elements or glue aromatic decorations on top (for example, a cinnamon stick).
- Glue the nose and eyes to the hedgehog's face.