Master class on making squirrels from yarn
Necessary materials:
- cardboard for blanks;
- straight yarn orange or red;
- yarn with orange or red curls;
- beads or small black beads;
- black bead;
- black thread;
- red or orange threads;
- needles;
- scissors.
For pompoms, cut out two circles of cardboard measuring 6 and 4 cm. Inside, cut out circles with a diameter of 2 cm. Wrap threads around the cardboard. The internal space must be completely filled.
Cut the threads along the edge, thread the thread, remove the pom pom from the cardboard and tighten the thread. Spread the threads to create a fluffy ball. Make a second pom pom.
For curly yarn, make a circle of cardboard with a diameter of 10 cm, the inner circle is 2 cm. Make a pompom from curly yarn using the method described above.
To create squirrel ears, use a thread 10 cm long. Fold it in half and in half again. Tie it in a knot close to the edge. Sew the ear to the head. Repeat and sew on the second ear.
Make eyes from beads or small beads, sewing them to the “muzzle”. Under the eyes, secure the nose with a thread and a needle. Connect the head, body and tail using the threads left over from creating the pompoms.
Using the technology for creating ears (step 7), make paws. Take threads 20 cm long for them. Attach the paws to the squirrel. Use scissors to trim the threads on the pompoms. Now you can play with this craft!
Recommendations from experienced professionals
When planning to create something special from natural materials, you should always prepare the raw materials first. If the craft needs to be completed for a competition in a kindergarten or school, then it is advisable to wash the pine cones in a vinegar solution and dry them. This procedure is also required in any case if a child is going to make crafts.
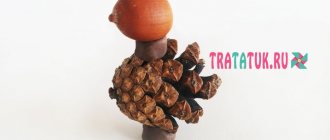
The amount of natural material will directly depend on the chosen craft idea. For example, if you want to make a large squirrel from cones, then you need to prepare at least 2 of them. But to create a small figurine, it is enough to use one.
For the base of the squirrel (body), pine cones are most suitable, but for the tail it is best to give preference to elongated specimens - spruce ones.
To ensure that the elements are securely fastened (not counting those works where plasticine is used), it is better to fix them with hot-melt adhesive.
Cardboard squirrel
Cute red animals can be made from other materials, such as toilet paper rolls, cardboard or thick paper. You will also need colored paper, paints or markers, scissors and glue.
If there are no ready-made cylinders, glue them together from scrap materials: paper or cardboard. From one edge, bend the top of the cylinder inward and make sharp squirrel ears. The photo of the squirrel shows how to do this.
Cut a strip of orange paper 1.5-2 cm wide. Roll it up and glue it to the finished body - this is the tail. Cut out 4 paws and an oval for the muzzle from an orange sheet. Glue all the parts in the appropriate places.
Draw the squirrel's eyes, nose and mouth. These parts can also be cut out of colored paper. The squirrel is ready!
Those who are lucky enough to have housing in close proximity to a forest or city park will be interested to know that often harmless forest inhabitants, such as squirrels, can come out to meet people in search of food.
If you have free time and a desire to help our little brothers, make a feeder or a house for a squirrel. The animals will be grateful, and the children will be glad to have the opportunity to get to know each other closely.
How to prepare pine cones for crafts
Selecting cones for making a squirrel with your own hands is not a difficult job, but it requires a special approach. As a rule, not all found materials are suitable for making figurines; for example, something beautiful can hardly be made from damaged, rotten or green ones. But at the same time, you should not throw away specimens that are irregular in shape (too long, curved or flattened).
Having collected suitable material, you should also properly prepare it for work. If you plan to make a squirrel for a competition in a kindergarten or school, then everything is quite simple to clean. But in order for the craft to stand for a long time, you can perform the following procedures:
- To begin, clean the cones from dirt using a paint brush and tweezers.
- Then prepare a solution with vinegar (1-2 tablespoons of acid are enough for 1 liter of water). Immerse the collected natural material in it so that everything is completely covered and leave for 20 minutes.
- Then remove and place on paper to drain excess liquid.
- Next, the cones are distributed on a baking sheet at a distance from each other and sent to the oven at a temperature of 100 degrees for 30-40 minutes.
- After calcination in the oven, they are allowed to cool and dipped in construction or wood glue. Dry completely. You can skip this step if you cover everything with varnish.
Attention! When wet, the cones become buried, and after drying in the oven, the scales open again.
Squirrel house
You will have to tinker a little with this product. It is unlikely that small children will be able to do it, but with the help of a parent or other caring adult, one or more squirrels will acquire comfortable housing.
Required materials and tools:
- log with a diameter of at least 40 cm;
- pencil;
- roulette;
- wood hacksaw;
- screws or nails;
- screwdriver or hammer;
- sandpaper;
- saw.
Manufacturing process:
Saw off a part of the log 5 cm thick and the main shape 40 cm long. Hollow out the inner part of the workpiece, leaving the walls and floor at least 3 cm thick.
Legal and accounting assistance for your business- The magic of photographs.
- Unusual and successful table setting using a table setting
Using sandpaper, sand the inside of the house. Make an "entrance" for the squirrels. Nail or drill into the roof with screws.
The squirrel house is ready. Take it to the forest and attach it to a tree you like. Squirrels will appreciate your efforts. If you visit your friends regularly, they will soon get used to visitors and will approach you without fear.
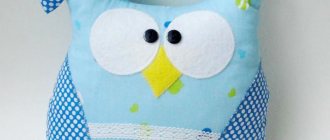
Soft toy “Squirrel” in tilde style
Now in stores you can see a lot of toys in the form of exotic overseas animals, but you don’t always find toys in the form of animals common to our area. But I want the child to become acquainted not only with the overseas fauna, but also to know well what the animals of our latitudes look like. To solve this problem, you can make some toys yourself. For example, a small toy squirrel is quite easy to sew. To make it, you can use a pattern in the tilde style.
DIY squirrel photo
- Cold steel weapons of Germany for connoisseurs and collectors
- The journey through Crimea continues. And so far no accidents.
- Finding inspiration by the sea in a minibus
Squirrel
Hello my felt friends!
Today, together with you, we will sew another toy for the New Year tree! Let's put a Squirrel on our tree!
So, to sew such a figurine with a height of 14-15 cm, we will need:
2. Felt: red, white, pink, black, green (I will use the thinnest (1mm) soft polyester Spanish felt)
3. Threads: red, black, white, pink
5. Great New Year's mood and desire to create! =)
So from red felt we cut out 2 parts of the head, 4 parts of the lower legs, 4 parts of the upper legs, 4 parts of the ears, 2 parts of the tail and 2 parts of the body.
From white felt, according to the pattern, we cut out one piece of the muzzle, one piece of the belly and one piece of the pattern on the tail. From pink felt we cut out two parts for the pink part of the ears.
Take one of the head parts and attach a white muzzle to it. Sew the muzzle with white threads using a “back needle” seam, as shown in the diagram, along the upper edge
Using the same seam we sew the white belly of the squirrel along the inner edge.
We apply a white pattern to the tail part and sew it completely with white threads using a “back needle” seam.
Now let’s attach the pink parts of the ears to the corresponding red parts and sew them with pink threads using a “back needle” seam. The bottom edge, which will be sewn into the head, does not need to be stitched
We also randomly cut out a wide triangle from pink felt and round its corners. We got a wonderful nose for our squirrel
We attach the nose to the squirrel's muzzle and sew it with pink threads using a “back needle” seam.
Using a self-disappearing marker, draw a smile and teeth on the face. We embroider the details with double black thread using a “back needle” stitch.
We will also draw future eyebrows with a self-disappearing marker and also embroider them with double black thread using a “back needle” stitch.
Now we begin to sew and stuff the parts with padding polyester. We arrange the lower paws in pairs
Finish the overlock stitch and trim the thread. We sew the second paw in the same way.
We put together the parts of the upper paws in pairs. We sew and stuff the legs with padding polyester, as we did earlier
Source
Working on crafts with your child is not just an interesting way to diversify your leisure time. It is very useful for the overall development of the baby, as it allows you to activate fine motor skills and use imagination. Collaborative creativity will become even more fun if the result is a craft that you can fully play with.
The squirrel is considered one of the cute and interesting representatives of the animal world. In addition, children are familiar with it from fairy tales.
Read also
SOFT TOY “FLIRTY DUSYA”
SOFT TOY “FLIRTY DUSYA” This model provides enormous scope for flight of fancy: various sizes, various fabric textures, original decorations. This future soft toy Dusya may not be Dusya at all. Choosing her name and character -
SOFT TOY “FOX”
SOFT TOY “FOX” You will need Red and white fur, thick fabric, foam rubber, leather and buttons of a suitable size or ready-made eyes, accessories of your choice, padding polyester or other filler, flexible wire, strong sewing threads to match the fur, thin threads, paper,
Source
New Year's garland
A quick and easy craft to make.
Material you will need:
- bumps
- glue gun
- rope
- dye
- glitter
Step-by-step instructions for the craft:
- We prepare the cones in advance and paint them with paint. The paint can be chosen in different colors. Or make it in one color that matches your interior design. You can also use glitter to make the product more elegant.
- We take a rope and mark the distance between the cones.
- We leave 10-15 cm from the edges so that there is room to attach the garland.
- Using a glue gun, attach the pine cones to the rope. Glue along the entire length.
- We are waiting for the glue to dry. And Voila! The New Year's garland is ready.
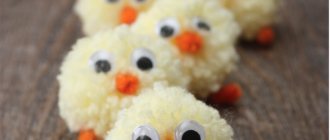
Note!
For kids and schoolchildren it will be easy to make crafts from pine cones and plasticine of funny animals: Teddy Bear, Hedgehog, Squirrel, Owl, etc.
Mishutka
We will use:
- Cones of different types (pine, spruce, open, closed)
- Scissors
- Plasticine
Step-by-step instructions for making crafts:
Body. From the collected material, select an elongated pine cone. Apply glue to the connecting parts of the scales. We connect the parts so that the scales secure each other.
Paws. We choose 2 larger cones for the lower paws, and 2 smaller ones for the upper paws. Glue the parts to the body, pay attention to symmetry.
Head. We make the head from open pine cones. They perfectly convey the fluffiness of a bear's fur. We attach it to the base with glue.
Note!
Ears, eyes and nose. You can make it from plasticine, and the tip of the nose, for example, from black peppercorns.
If you want to surprise everyone around you, then you can make a big bear. You choose the size of the bear, the main thing is to collect the required number of cones.
We cover the frame with pine cones, and make the ears and muzzle from plasticine or pom-poms.
Festive wreath
You can convey the New Year's mood to your guests right from the doorstep. To design the New Year's wreath we will use:
- Cardboard
- Spruce or pine branches
- Cones
- Satin ribbon
- Not real snow
- Dye
- Glue gun
- Decorations for decoration, optional.
Many materials are used to make the base.
For example: plastic, cardboard, branches, bending wire, and even newspapers.
We settled on cardboard; it is quite simple and convenient to work with.
On cardboard we cut out the diameter of the circle that we need. Next, we attach the branches and cones, forming a symmetrical circle.
After the cones are glued, we continue to decorate our wreath. Take a can of artificial snow and spray the edges of the cones.
If you couldn't find snow, you can paint the scales with white or silver paint.
We tie it with a satin ribbon, choose the color yourself.
Note!
For a more interesting and rich wreath, you can add additional decorative elements: red beads, acorns, nuts, flowers.
Use your imagination and you will succeed!