A completely useless thing at first glance - a burnt-out incandescent lamp can be turned into an exclusive work that reflects the creative position of the author.
Unrealized creative ideas can be brought to life by making original crafts from burnt out light bulbs with your own hands. By involving children in this activity, you not only instill in them work skills, but also make the family even more friendly and united.
The significance of the holiday increases significantly when children take part in its preparation. Crafts from old light bulbs made by children with their own hands contribute to the development of their creative abilities and teamwork skills.
For a child, a master class with parents on making crafts from light bulbs with their own hands is joint creativity, not hard and boring work, but a fun game and fun with their closest people.
A photo of children against the backdrop of hand-made light bulbs for a significant event will decorate a family album and allow you to preserve memories of this holiday for a long time.
Warning
When working with glass, you should strictly observe safety precautions: work only with gloves and carefully remove the fragments after finishing work.
Children who are too young should not be allowed to work with glass products and light bulb crafts.
Snowball
Many children want to have a snow globe at home. Such a product can be created with your own hands from an ordinary light bulb. You just need to prepare the composition correctly.
It consists of glitter, 70% water and 30% glycerin, although the proportions can be adjusted to your liking. This will result in the following:
- with a small amount of glycerin, the glitter will fall more slowly;
- If the amount of glycerin is exceeded, the glitter will remain in one place, no matter how much or how much you shake the flask.
Miniature light bulb vase
For work you will need: a screwdriver, pliers or a pocket knife. Using these tools, it is necessary to remove all parts located inside the flask. When doing this, proceed with caution, otherwise the product may be damaged.
The lamp with the internal elements removed is a ready-to-use vase. Such vases can be hung on a wire or a stand can be made for them. Plants that do not need watering, moss, or succulents are placed inside.
The material for the stand can be cork or any other material suitable for fixing the product.
Toy with a surprise inside
Beautiful toys in the form of a “magic ball” are often brought back from long trips. Probably every child or adult has observed how beautifully shiny flakes of artificial snow fall when turning such a souvenir.
You can make an interesting craft with your own hands from an ordinary incandescent lamp. For creative work you will need a transparent lamp, any cork (rubber or metal foil), large glitter for decoration, your favorite toy, a twig, water and glycerin.
Instructions on how to make a craft from old light bulbs:
- Using tweezers, the filaments and wiring are removed, but the base itself is left behind.
- A hole must be made in the center of the prepared cork.
- A strong wire is threaded into the hole, one end of which is fixed on the inside. At the end of the work, the second end of the metal wire is wrapped around the neck of the lamp.
- Any toy you like is placed inside the glass flask (it can be twisted from wire).
- The future toy is filled with a mixture of water and glycerin (there should be 2 times more water), and then large glitter is added to the resulting mixture.
A plug is installed in the metal base, and the remaining end of the wire is wrapped around the neck (neck) of the lamp. To make the toy airtight, the wire is fixed with glue.
Manufacturing stages
You need to fold 5 light bulbs so that they form a pentagon or other shape.
Mark the contact points with a felt-tip pen, and then apply glue to the marked places and glue the lamps together. Glue can be replaced with adhesive tape. Place a working lamp inside the resulting figure.The easiest way to make a lamp
Around the burning lamp, hang several burnt ones on a thin chain, cord, fishing line or wire.
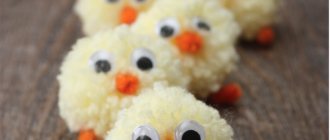
Bee idea and instructions for making crafts
Let's move on to more decorative crafts that will look great under a chandelier or in another interesting place. First you need to prepare materials and tools, including the light bulbs themselves, yellow paint, a brush, a black marker, white pipe cleaners, black paper, plastic eyes, scissors and glue.
First, paint the light bulbs with yellow paint, and then let them dry completely and then apply another coat of paint. Using a black marker, you need to apply stripes like a bee, and it is also important to completely paint over the metal part. When the marker dries, which will happen in just a minute, glue the eyes to the light bulb socket.
The white brush needs to be divided into two parts, and then bend each one so that you get wings, glue them slightly higher than the base of the cartridge. Cut thin strips of black paper, and then slightly round them at the ends, while the other end must be glued directly behind the eyes, so you will get antennae, like a real bee.
You need to cut out a small piece from white paper and roll it into a cone shape, and then glue it to the top of the lamp to make a sting.
Toys and decorations for the New Year tree
The shape of incandescent lamps serves as an incentive to create Christmas tree decorations: heroes from fairy tales, penguins, various animals, snowmen and others. Lamps are painted with paints, covered with fabric or paper using decoupage technique.
Hats, mittens and scarves can be knitted or cut from a variety of fabrics or felt. Having awakened your imagination, you can surprise not only children with such crafts, but also all adults present at the New Year's party.
Christmas decorations
This is the very first way to use old light bulbs. There are several variations on this theme:
- Funny little rabbit. Paint the surface a light color. Draw a funny face with eyes, nose and antennae. Draw a carrot along the bottom and legs. From a soft white or other color fabric, cut out 2 ears - make them double, sew along the edge, then turn them inside out. Fix with glue to the top part, preferably to the cartridge. To fix the loop, you need to make a hole through the cartridge and thread a beautiful ribbon.
- They also make gnomes in funny hats, which are placed directly on the patron or Santa Claus.
Decorative decorations
Using your creative imagination, fill the clear lamp bulb with soil, moss, small rocks, shells or twigs.
Such crafts are hung or mounted on a support, which is most easily made from thick copper wire. The stand also uses sticky silicone holders, sold in many stores.
Vase
For this craft, you will need a support so that the lamp stands still, because there will always be water inside. An excellent place for one or a couple of flowers that are pushed through the hole in the cartridge.
Oil candle
Remove all the parts through the hole drilled in the base, insert a cotton wick and fill the flask with oil.
Making a candle
Drill a hole in the base, get rid of the internal elements of the lamp, insert a cotton wick and fill the flask with melted paraffin. Then break the flask and clean the candle from fragments.
Various original crafts:
- Miniature plant in a lamp;
- In the same vase are plants that require little water (succulents, for example, cacti) or do not require watering at all (aerophytes);
- Various small objects in the flask, from gravel to coins. This easily accessible and stylish decor makes a big impression;
- Gifts in a light bulb: money, congratulations, messages, etc.;
- Spices, salt, miniature cookies in former light bulbs;
- Ladybugs from light bulbs in the garden;
- A miniature kerosene lamp made from a burnt-out lamp.
Florariums
Fresh cut flowers do not live very long. Unlike those that have roots and a nutrient medium. Some miniature plants can be placed in a mini-florarium made of a light bulb, where it is easy to maintain the humidity and temperature suitable for them. Mosses and succulents are suitable for this purpose.
Florarium
First, a little fertile soil and sand, small pebbles and pieces of tree bark are placed in the flask. Then the plant is planted in the prepared soil using tweezers. You can carefully water it without making dirty splashes using a syringe with a flexible tube attached to the tip.
If you don’t have time or don’t want to care for living plants, you can easily replace them with artificial ones and decorate the composition with pebbles, shells, coarse sand and other natural materials.
Mini florarium in a light bulb
You can also make a mini aquarium out of a light bulb. Of course, it will be cramped and uncomfortable for live fish, so it is better to throw silicone figures into it, which fishermen use as bait.
Mini aquarium
The decoration of such an aquarium will be artificial plants.
Benefits from inoperative LED lamps
DIY crafts from LED light bulbs:
- The LED lamp is wrapped in threads, possibly multi-colored, symbolizing eco-style;
- Non-working lamps painted in different colors can serve as decor together with working lamps;
- Floating decorations made from painted lamps in the nursery.
Lamp pendant
You can use a lamp to make a cute necklace – a pendant. But despite the beauty of the product, you should not use it for its intended purpose, because there is a high probability of breaking the pendant while wearing it and getting injured.
We recommend reading:
- Can compulsory motor liability insurance be issued by someone other than the owner?
- Stencils for crafts - beautiful stencils and a master class on making beautiful crafts (125 photos + video)
Crafts with a jigsaw - 85 photos and videos on how to cut beautiful jewelry and crafts with a jigsaw
Photos of DIY light bulb crafts
The sophistication of decoupage: master class on decoupage of an old light bulb
Of course, the painted faces are too simple and lack some kind of sophisticated work. The decoupage technique will be just right. An exquisite, beautiful Christmas tree toy will be made from simple New Year's napkins and will not require such artistic skills as drawing characters. Simple, quick and very beautiful, especially if you add a little sparkle. Here is a short master class on decoupage:
- Prepare the light bulb for changing it, wipe it with alcohol, this will degrease it and remove dirt. Get some primer and prime the light bulb with a thin layer using a piece of foam rubber.
- After the primer has dried, paint the future toy white with acrylic, although the choice of color is yours, it all depends on your idea. While the acrylic is drying, choose a suitable New Year's motif, a napkin is just right.
- After cutting out the desired piece, use decoupage glue to glue a piece of napkin onto the dried light bulb. If extra wrinkles appear, you can go over the dried bulb with sandpaper.
- The toy already looks festive, but this is not enough, there is not enough background decor. Using a sponge, add a little blue tint to the toy at the bottom and top. Glitter will add a festive touch to the toy; you can use it to outline a picture, an inscription, or draw a snowflake. A pair of large snowflakes and small dots near the base will not harm the toy.
- Secure your piece with glossy acrylic and add a thread. If desired, the base can be masked with an acrylic outline, depicting icicles.
Necessary materials
Making Christmas tree decorations from light bulbs is not at all difficult. And almost any materials from home will be used. You may need:
- Actually, the light bulbs themselves are used.
- Glue (“super”, PVA, from a hot-melt gun).
- Pliers, an awl, a drill, protective gloves if you are removing the base and insides of the light bulb.
- Any scraps of fabric, lace, ribbons, braid.
- Acrylic paints of different colors.
- Scotch tape, scissors, pencil for marking and drawing.
- Threads, yarn.
- Various decor. They can be sparkles, buttons, sequins, beads, rhinestones, beads and other small things.
- Perseverance and imagination.
Tips from needlewomen
In order for the work to end in success, experienced craftswomen advise organizing the work surface properly. This is already a third of success.
Recommendations:
- Need good lighting. It is important to see your work clearly, clearly, so that colors and details are not distorted due to insufficient light.
- The table must be covered with cloth or oilcloth so as not to get dirty. If you need to use beads, it is advisable to use saucers for them rather than pouring the material onto the table.
- To secure small parts, it is better to use tweezers rather than your fingers.
- It is important to remove all the insides from the light bulbs, but if you are not sure what will happen, you don’t have to risk it, because instead of a New Year’s toy, you risk getting a bunch of broken glass.
Also, you should not do crafts of this kind with small children. They should not be allowed near fragile glass at all for up to 6 years.
Important! If you are not confident in your artistic abilities, you are advised to always use ready-made sketches, transferring them to a future New Year's toy. Or start with very simple options.