Instructions: do-it-yourself circular saw carriage
To simply cut wood for kindling or make longitudinal profiles for cladding or construction in a home workshop, a master will be completely satisfied with one stationary circular saw . If he needs to perform a series of more severe carpentry manipulations and make a clearer cut, straight or with corners, he uses a carriage.
This tool is a clamp that moves on a special slide for wood blanks or blanks, which, with the help of a few tips, every craftsman can easily make for himself.
- Tools needed
- Step by step summary
- Step 1: Attaching duralumin profiles
- Step 2: Making the carriage base
- Step 3: Installing the Walls
- Step 4: Making a Combination Square for Miter Cutting
- Aspects at work
Step 4: Making a Combination Square for Miter Cutting
So, ordinary carriage
I’m ready with a straight broach, but what if the master needs to cut something at a different angle, for example 60, 40 or 30 degrees? For such operations, an additional structural element is useful, which is called a combined square.
It is no coincidence that the title is put in quotation marks; the fact is that the base of the workpiece is indeed a square wooden platform. It is cut out so that it fits freely between the stops of the main carriage and one of the sides is fixed against the bottom wall.
After that, the workpiece is cut, cutting pieces out of it at suitable angles; the resulting bevels will serve as guides along which the part that needs to be sawed at this angle is laid.
After production, the square is aggressively mounted (using glue or screws) on the carriage. Another, more advanced option is to cut rounded grooves into the square and the base of the carriage using a router, which allow the square to move along the base on a movable lock. It is made from a self-tapping screw, a nut and 2 iron washers.
Detailed how to make the cross-cutting carriage described above:
Another example at:
Carriage for circular saw and installation of front and rear stops:
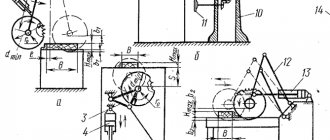
- The additional rail (F) on the carriage, Figure 1, is needed for working with long workpieces. (Note: The rack can be installed on the right side; the T-nuts for the bolts are inserted into the pockets on the inside of the stop.)
- Next, drill through holes in the stop and additional rail, insert the nuts and tighten the bolts.
- Make a cut at the base of the slide, no more than 1/2 of the total length of the carriage, photo C.
- Turn off the saw. Using a square, set the back stop perpendicular to the saw blade, photo C. Secure the stop firmly to the base using clamps.
- Using a wide piece of scrap wood with absolutely parallel sides, make a test cross cut, Photo D. Once cut, turn one of the halves 180 degrees and place its cut against the cut of the other half. The adjustment can be considered complete when there is no gap between the cuts, photo D insert.
- After all the adjustments, it’s time to screw first the back stop (C), and then the front stop (B).
Installing the disc guard and skid stop block:
- Glue and secure the blade guard (E) to the stop (C), photo E.
- For safety reasons, the table carriage should stop the moment the top of the saw blade touches the blade guard, Figure 1.
- Two pieces of wood rigidly fixed to the carriage and to the side of the circular table solve this problem, Figure 1.
- To avoid losing the handles, Photo G, drill holes to match the size of the rubber O-rings on the inner surface of the additional rail, Photo H.
- Make a stop block for the workpiece as shown in Figure 2, it consists of three parts: the front stop block (G), the main stop block (H) and the stop block strip (I). Before gluing the three pieces of the block together, make sure all the faces and edges are square to each other.
- The circular carriage is lubricated with wax at the bottom of the slide and slider, this will allow the carriage to slide smoothly.
The preliminary dimensions of the circular saw carriage are shown in the table below:
Required Tools
In order to construct a carriage for a circular saw with your own hands and then comfortably use it in a home workshop, you first need to prepare a set of materials and tools for its production:
- Stationary circular saw on a sawing table;
- Screwdriver or drill, also a hand router;
- Epoxy is suitable for mounting adhesive;
- A hacksaw or grinder may come in handy to saw off protruding parts of the structure;
- Self-tapping screws to secure parts of the product;
- The diameter of the iron nuts is smaller than the thickness of the profile hole; they will be briefly poured into it;
- 2 U-shaped corrugated channel pipes made of metal (for example: aluminum);
- Two slats made of plywood or wood will serve as guides. In terms of thickness, they should fit freely into the U-hole of the profile;
- Square narrow plywood strip for the base;
- Two wood walls to produce stubborn carriage walls.
Drawing one Drawing 2
Step 3: Installation of walls
So, the base is ready and then stubborn walls are installed on it. To do this, take two pieces of wood: one of them is aggressively fixed, using screws, along the edge closest to the master so that it is strictly perpendicular to the cutting edge of the saw blade; The second one is fixed along the top edge, but only on one side. This is necessary so that the master can align this wall strictly parallel to the bottom. The operation is performed using a square.
After the walls are leveled, a test cut is carried out. It has two purposes: with its help, they cut holes in the walls and base of the carriage, and then measure the sawn workpiece and check whether the right angle of the cut is correct.
Circular cutting
When it is difficult to purchase such an instrument due to lack of finances, you can make it yourself.
For installation you will need:
- Thickened sheet of metal.
- Steel corners for pressing (use an old bed).
A welder is used to cut holes in a steel sheet, and its ends are processed with a file.
A particularly powerful electric motor is not required to use the tool; 0.9 kW is enough. It is mounted on the base with an additional spring, which performs a stabilizing task. To rotate the unit, you need to attach a handle, as a result you will achieve gradual movement of the saw. The characteristics are as follows:
- 0.2 m – diameter of the cutting disc;
- 1500 rpm – rotation speed.
This will allow you to easily process wood up to 0.07 m thick using a hand-made tool. Take care of adjustable racks and supports. For pendulum risers, take a channel attached to a metal base. As a result, our tool will become stronger and heavier, but thanks to it, cross-cutting work will be done with ease. You can take a three-phase electric motor (2.3 kW) and a swinging plate on hinges.
Place the belt on the motor pulley. The pendulum can be fixed to the base of the frame material. For convenient work with wood, the saw diameter must be 0.42 m, and the rotation speed must be from 2800 rpm. We cut a slot for the disk.
As you can see, it is possible not only to purchase a high-quality instrument, but also to make it yourself. Here's what we got:
Step-by-step instruction
So, the design details and the necessary tools have been selected, you can begin assembling and the next installation of the homemade carriage.
READ How to Cut Tiles with a Tile Cutter
Step 2: Making the carriage base
Next, a mobile base for the cross-cutting carriage is constructed. To do this, take two strips, which in thickness fit freely into the U-shaped groove. But there is one point : the carriage
will have to slide freely on the table, and to do this it is raised 2-3 mm above the table. To do this, nuts of similar thickness are placed into the profile grooves at equal distances, after which guide rails are placed on them.
Then glue is applied to them, which fixes the plywood base strip. To press it down more tightly, you can attach clamps along the edges.
When the resin has dried, the nuts are removed from the profile grooves and the master inspects whether the carriage moves freely along them. After which, for the convenience of future use, the carriage is cut along the edges along the table profile.
Nuances when working
In conclusion, here are a few subtleties that are useful to know if you want to make a homemade carriage for a circular saw:
- It is recommended to install a thick block on the supporting wall in the place where the blade passes through it, which will prevent the saw from jumping over the edge of the wall, which can lead to injury.
- In order to give the structure greater glide, it is recommended to clean the runners with sandpaper, and occasionally lubricate the grooves with a candle stub (paraffin or stearin). From time to time wax is used, but it is not recommended to use it because it melts during use and sticks to the runners.
- Before applying glue to parts, blow the structure away from particles of wood dust and shavings to avoid unevenness after gluing.
- After cutting through the walls, make sure that the saw can pass through them freely. To do this, you can make a sawn hole slightly larger than the thickness of the disk.
Having made an end carriage in a home workshop using this simple method, the craftsman will have at his fingertips a successful, universal tool that can be used in most types of carpentry work.
Desktop device
Table design for a circular
manual type is so trivial that most professionals produce it without preliminary drawings and techniques. This is a dense workbench that is created from wood and plywood.
Stronger table bases are made from alloy. They are heavier and require the presence of a welder. That’s why coasters are often made from leftover lumber. A radial saw is attached under the tabletop, the drive protrudes above it through a specially made slot. The lumber is advanced along the table top and sawn with a disk. For convenience and correct operation, the table is equipped with additional devices: an angular and longitudinal stop.
The table top absorbs part of the working plane of the disk, the depth of cut will decrease by the thickness of the table top. For this reason, it is advisable to choose a circular saw with a large diameter disk, and a table top that is narrow but rigid.
If you have not yet purchased an electric saw, choose modifications with the highest power (from one thousand two hundred W). They can handle cutting large-sized wood. Holes will be drilled to secure the base. The solid base may tear. For this reason, it is better to select a different type of mechanism.
Manufacturing technology
Using 20 mm plywood, you must make a blank for the tabletop, all of which must be controlled with the selected dimensions. The canvas is marked using a marker and a ruler, and then sawed with an electronic jigsaw. The edges need to be processed with a router. The material is sanded.
On the underside of the tabletop you need to mark for the saw. To do this, the blade is turned over, and the saw should be installed without a disk at the intended location. This way you can mark the characteristics of the sole. Using a milling cutter, a recess is made in the tabletop within the limits of eight to 10 mm, and in all this you need to follow the seat that was marked in advance.
Turning the saw on and off
When someone is ready, you can decide how the equipment will turn on and off. If you have proper knowledge in the field of electrical engineering, then the power button can be bypassed by you. In this case, the control button is placed on the outer surface of the rib.
READ How to Make a Chain Saw from a Grinder
If you made a table for a hand-held circular saw
do it yourself, but automating the operation of electrical equipment is a very difficult task for you, then the button can be pulled together with a wire, and the device itself can be turned on and off using a power cord. The above table design is quite ordinary. Any home craftsman can handle the manufacturing task. If you want to expand the functionality, you can take care of safety by making the design more complex.
Algorithm for assembling a homemade circular saw
The assembly of a woodworking machine according to the drawing given earlier is carried out in the following sequence:
- a rectangular frame is made from the corners;
- four legs are welded to it at the corners of the required height;
- at a height of about 200 mm from their lower edge, they make a binding from the corners;
- a shaft is mounted on the upper frame;
- fix the driven pulley on one side and the disk on the other;
- a table with a lifting mechanism is made and attached to the frame;
- on the lower frame they make a platform from corners or sheet metal for the electric motor;
- the drive pulley is fixed on the motor shaft;
- put the belt on the pulleys;
- On and off buttons and an electrical panel are mounted on the side panel of the unit;
- using wires of a suitable cross-section, connect the elements of the electrical circuit of the equipment (motor, buttons, protection);
- supply power to the machine from a stationary network.
The final stage is to check the functionality of the assembled equipment. First, you should make sure that all moving parts rotate freely: to do this, simply twist the drive pulley by hand. After which you can start the unit in test mode. If strong vibration is detected, you will need to check the reliability of the bolted connections and fixation of the disk.
You can make a circular saw with a table consisting of two halves or a solid one. In the latter case, you will need to cut a rectangular slot in it for the disk. The design of the machine with a table consisting of two halves is shown in the video below. This video also demonstrates the design of the lifting mechanism for these parts.
Additional Important Information
Carpentry work requires special attention. If you want to make a high-quality and highly reliable table for a circular saw , then be well prepared for the job.
Do the following:
- Purchase all the necessary materials and equipment without exception.
- After installing the frame in the inflexible mode, install it on a level surface and check that the cover of the structure does not overhang in any direction.
- It is better to install the table for the circular saw in the area where it will be located in the future, in order to eliminate possible problems associated with the convexity of the floors.
- If, due to the rough floor, the table vibrates during operation, then you need to adjust the length of the legs using compacted material or rubber.
- The product tabletop can be either single or folding. In order to form a folding saw table, you will need to spend a little more time and material and pay attention to increasing the strength of the frame, which is in a disassembled state.
- The dimensions of the material used to create the table are determined experimentally. As a standard, the level of the design should be correlated with the height of the master.
- The hole that will be made in the tabletop must correspond to the dimensions of the specific saw available.
- To extend the service life of all materials used, assembled into a common structure, they must be treated with special chemical substances that can increase the performance characteristics of wood or metal (for example, protect their surface from rust, decay, mold, etc.).
- It is better to process wood or iron outdoors, rather than indoors, so as not to get poisoned by saturated fumes.
Inspired by this article, you can make a sturdy table saw stand for your circular saw.
What is needed to create
To get started, you need to prepare thoroughly.
Materials and tools
A homemade table will require a strong metal or wooden base. Some craftsmen prefer to make tables from aluminum or steel.
It is difficult to work with large volumes of wood with a regular circular saw, so it is better to place it on a table.
Important! The wood must be treated with a special agent that has an antiseptic composition to prevent rotting processes. Materials that will be required during the work process:
Materials that will be required during the work process:
- base, the thickness of which is at least 22 cm;
- beams for strengthening and making a support (you can use 5 pieces of edged board);
- wooden dowels, 10 cm in size (12 pieces or more are required for work);
- wood glue;
- metal fasteners (at least 4 pieces, and the exact number depends on the dimensions and length of the table);
- metal corners in the amount of 10 pieces;
- self-tapping screws
Before work you need to prepare your tools. To make marks, take a pencil or marker, a meter, a tape measure, an electric jigsaw, or a hand-held router. To process wood, you will need a sanding machine, sandpaper of different grit levels, which removes nicks.
A modern jigsaw is equipped with a built-in safety feature, electronic speed controls, and vibration and noise dampers.
You also need a plane, drill and screwdriver. Materials and tools are prepared in advance and placed at the workplace.
Things will go much easier if you use a screwdriver.
Definition of design and construction
To choose a design, you need to decide on the base material. For wooden countertops, sheet species of trees are suitable, which are resistant to rotting processes with proper antiseptic treatment. A special hole is made in the base for the disk.
You can build a table for a circular saw yourself, strictly following a certain pattern.
For a wooden base, use a strong frame of four sawhorses and boards measuring 50x150 mm. It must be stable to ensure safety. Curved or bent sheets of metal are not suitable for work because there is a high risk of injury.
Constructing the element with your own hands allows you to make the saw most suitable for individual conditions.
You can make a simple design or equip it with a removable riving knife. Additionally, disk protection is provided so that work chips do not fly towards the person who will be working at the table. To make miter cuts, you need to add parts to adjust the angle of the blade.
You can adjust the product to the desired size, distribute everything so that it is convenient for you.
For circulation, a table guide carriage is made. It includes the following elements:
- guide bars;
- plywood;
- drank;
- sides for reliable support;
- removable bar.
After choosing the design of the structure, you need to make drawings of the table for the circular saw with your own hands.
A handcrafted model will be one of a kind, which makes it unique.
Drawings and diagrams
Note! The drawing is needed to prevent errors during the work process. First of all, they calculate the dimensions in order to transfer them to cardboard
A hole is made in it that should fit the dimensions of the saw. Before creating a drawing and diagram, you need to buy a cutting tool. Universal holes are not provided in this design, because they will not provide maximum stability, safety and withstand heavy loads
First of all, they calculate the dimensions in order to transfer them to cardboard. A hole is made in it that should fit the dimensions of the saw. Before creating a drawing and diagram, you need to buy a cutting tool. Universal holes are not provided in this design, because they will not be able to provide maximum stability, safety and withstand heavy loads.
Making a table for a circular saw is within the capabilities of every craftsman.
You can leave a little extra space for tools or wooden pieces. Suitable dimensions: 120x120 cm.
An example of a drawing of a table for a circular saw:
There will be no difficulties in the process if you carefully study the issue.
Diagram with detailed description and dimensions:
The table is made taking into account the fact that the hand tool will be installed and secured on the table, thereby turning into stationary equipment.
Design requirements
Experienced craftsmen are ready to make a table for a circular table with their own hands without any techniques or drawings. But certain conditions still need to be taken into account.
The essential requirements include:
- rigidity (stability) of the system;
- flat, smooth surface of the table;
- safe fastening of the saw;
- presence of fencing from the cutting disc;
- free access to the start and pause buttons.
The availability of various functions depends on the operating criteria and the wishes of the specialist. These include the ability to produce high-quality longitudinal and cross cuts.
Standard products, of which there are hundreds in shopping centers, are made of stainless steel. This is a beautiful material, but next we look at creating a table for a saw from wood.
Prices for popular models of welding machines
The structure needs to be painted to give it a neat appearance and protect it from corrosion processes. All that remains is to make holes in the frame for mounting the table top.
The table can also be made from timber or boards with a section of 10 x 5 cm. Iron corners, dowels and screws are useful for assembling the frame.
Fundamentally! When using wood blanks, do not forget about their mandatory treatment from exposure to water and temperature. For this purpose, special formulations are produced.
You can also use old furniture, such as an office table, as a base for a circular saw. It is only necessary that its base be strong. Almost always, the standard dimensions of such structures are completely suitable for sawing wood. But it is recommended to install a new countertop itself. As an option, glue together two sheets of plywood 1.2 cm wide. This thickness will be enough to install a saw weighing about 5 kg.
You can glue two sheets of plywood
After producing the base, you can begin the most important step of preparing the surface and installing the saw.
Table. What may be useful for carrying out work.
Circular saw design
General diagram of a stationary circular saw
At the first stage, you should understand the design features and determine the optimal manufacturing scheme. It directly depends on the characteristics of the work performed, the dimensions of the workpiece, and the type of wood. Only after this can a circular saw be made with your own hands.
The main component of the saw is the disk, on the end surface of which the cutting teeth are located. They can differ not only in geometric dimensions, but also in the angle of inclination relative to the plane of the disk. To perform cuts, the design includes an electric motor. It can be connected to the disk directly (via a shaft) or using a torque transmission system. This tool is designed for making longitudinal and transverse cuts; in some models it is possible to make angular cuts relative to the plane of the workpiece.
Before making a circular saw with your own hands, you should select the processing depth. To do this, you need to familiarize yourself with the equipment classification:
- small - from 40 to 46 mm;
- medium - from 55 to 55 mm;
- large - from 65 to 70 mm;
- professional - from 65 to 140 mm.
Blueprints
Scheme for the production of a table for a circular saw
It is recommended to go through the preliminary step before work. You should definitely make a drawing. This will facilitate the process of creating the design. First, calculate the dimensions of the table, then transfer the acquired data onto paper. The hole made in the structure must exactly match the dimensions of the saw. Everything depends on the brand of equipment. Therefore, to make a universal hole. The base must be stable and can withstand mechanical loads well.
DIY table drawing for a circular table
It is unacceptable to overhang the structure to one side. The dimensions of the tabletop must be suitable for the sawing flow. The final option is determined based on personal desires. Some work comfortably with a folding table or a product with small dimensions.
READ How to make a brush cutter from a trimmer
Drawing of a universal tabletop machine
A fundamental point should be taken into account in the drawings. If you plan to leave tools or materials on the table while working, then the dimensions of the tabletop must be increased to a square meter in area. A suitable size would be 100 20 by 100 20 cm. You should draw the drawing carefully and slowly to make
Everything is fine.
DIY circular saw carriage drawings. Using a rail miter box
The use of a rail miter box is targeted if it is necessary to quickly and efficiently process a huge number of boards. In production we use:
- two similar iron corners;
- Chipboard or plywood sheet more than 1.5 cm wide for the base;
- four pairs of bolts.
Metal corners are installed on a plywood base. The corners are fastened with bolts, which act as studs, at the corners of the base. The corners are located on the same plane strictly parallel to each other. This is necessary so that the circular saw slides freely along the rail during operation and does not jam or slide off it. Using pins, the fixing height of the corners is set, which is necessary for the free movement of the processed material between the base and the rails. With all this, the edge of the cutting circle should not be very high from the base, while at the same time eliminating the possibility of damaging it.
To make the saw slide more easily, they glue fluoroplastic strips onto the corners or make a frame for it with wheels, which is better.
The initial material is sawn into workpieces using a rip fence for a circular saw during operation. You can easily make
from a wooden plank or an iron corner, secured to the workbench with clamps.
Having made the markings on the workbench, the tire is set at the required distance from the stop and, resting the end of the board against it, the workpiece is cut off.
If you need to cut the workpiece at an angle, it is fixed using a stop made of a pair of screws screwed into the base, and the angular inclination of the cut is set using a protractor.
Manufactured carriage for a circular saw in parts.
- The size of the base of the slide (A) corresponds to the size of the circular table in the workshop, Figure 1.
- For the back (C) and front stops (B), straight grain, moderately dense wood such as cherry, maple was used. Make sure the stops have absolutely perpendicular edges. The lengths of the stops correspond in size to the width of the base (A).
- As shown in Figure 1, the front and back stops (B) and (C) where the saw blade passes through have a significant increase in stop. Use a band saw or jigsaw to round the sides of the stops to reduce weight and make them easier to handle.
- To make a guide bar (D), use dense hardwood, the size of the bar (runner) corresponds to the size of the groove in the circular table.
- Based on the size of the saw blade, make a protective guard (E), and then round off the near upper corner. (Warning: The guard is not a handle. Do not use it while the slide is moving!)
ASSEMBLY OF BASE, SUPPORTS AND GUIDE.
- Secure the back stop (C) to the base (A). Drill and ream holes in the bottom of the base for flat head screws to adjust the stop later.
- Insert a guide bar (slider) (D) coated with a small layer of glue into the groove of the circular table. Place the base (A) perpendicular to the saw blade on the table and on the guide bar (runner) and leave it until the glue is completely dry.
- Then take some screws and secure the guide bar first to the outside and then to the inside of the slide, as shown in Photo B.
- Turn the base over and check its fit in the grooves on the table, using a scraper or sandpaper if necessary to remove any excess wood on the runner. (Note: You can use a graphite pencil to identify tight areas. Rub the inside edges of the slots on the table with a pencil, then insert the slide into the guide and move it back and forth. The graphite mark on the slider will indicate areas that need trimming.)
Instructions: do-it-yourself circular saw carriage
To simply cut wood for kindling or make longitudinal profiles for cladding or construction in a home workshop, a master will be completely satisfied with one stationary circular saw. If it becomes necessary for him to perform a number of more severe carpentry manipulations and make
For a clearer cut, straight or with corners, it uses a carriage.
This tool is a clamp that moves on a special slide for wood blanks or blanks, which, with the help of a few tips, every craftsman can easily make for himself.
Did not like?
Advantages of homemade tires
An important advantage of working with such a device is the ability to process workpieces of any size. You just need to remember to securely fix the trimming tool, as this ensures a high-quality result and guarantees safety.
Homemade guide bar for a hand-held circular saw
Interskol, Makita, Bosch are functionally no worse than those made at the factory, but a couple of times cheaper. It is easy to assemble at home. There are several options for producing homemade tires, using different starting materials:
- laminate tire;
- building code tire;
- rail miter box;
- tire made of duralumin profile.
Below we carefully consider the guide bar production process for each of the listed options.
Guide bar - what is it?
Basically, a guide bar is a rail that helps allow a handheld table saw to slide back and forth while keeping the tool from straying from the cutting line. But a properly made guide will not only ensure an even cut, but will also help reduce the number of chips in the area of contact between the material and the saw.
The remote carriage and miter box are the most difficult to implement. A tire made of plywood or one made from a profile will be much simpler in design features, but this does not mean at all that the cut made with its help will not be as high quality. The difference between these varieties is largely in how convenient it is to use one or another device.
Nuances when working
In conclusion, here are a few subtleties that are useful to know if you want to make a homemade carriage for a circular saw:
- It is recommended to install a thick block on the supporting wall in the place where the blade passes through it, which will prevent the saw from jumping over the edge of the wall, which can lead to injury.
- In order to give the structure greater glide, it is recommended to clean the runners with sandpaper, and occasionally lubricate the grooves with a candle stub (paraffin or stearin). From time to time wax is used, but it is not recommended to use it because it melts during use and sticks to the runners.
- Before applying glue to parts, blow the structure away from particles of wood dust and shavings to avoid unevenness after gluing.
- After cutting through the walls, make sure that the saw can pass through them freely. To do this, you can make a sawn hole slightly larger than the thickness of the disk.
Fundamentally. The master, no matter how experienced he is, should not forget that a circular saw is a unit with an increased risk of injury, therefore, when making a carriage and working on a saw with its help, you should always be attentive and careful and keep safety precautions in mind.
Having made an end carriage in a home workshop using this simple method, the craftsman will have at his fingertips a successful, universal tool that can be used in most types of carpentry work.
Sources:
https://moy-instrument.ru/podelki/kak-sdelat-stol-dlya-tsirkulyarki-svoimi-rukami.html https://sevstroyinvest.ru/strojka/karetka-dlya-tsirkulyarki-svoimi-rukami-chertezhi.html
How to choose a saw
Of course, when you have work experience and you do not want to invest large amounts of money in the purchase, you can make such a machine yourself
When purchasing a saw for it, take into account:
- Buy a device with protection that must cover the disk not only in peace, but also during operation.
- Select the weight and dimensions of the device taking into account your own goals. It will be more difficult to interact with volumetric ones; you will get tired after half an hour of activity.
- Consider the convenience of the saw so that you can work comfortably with it.
- Consider the diameter of the disk (no more than the 0.2 m mark). Examine the dimensions of the cut - when cutting volumetric parts, you need to select a larger size.
- Make sure the rotary block and bed are of good quality.
Regardless of whether you decide to buy a factory version or create a saw yourself, it should be easy to work with and the result should be of high quality.