A true hostess, preparing to receive guests, thinks like this: “Today everything must be perfect.” Every holiday, be it a child’s birthday, New Year, Maslenitsa, will bring a lot of positive emotions and pleasure if you start decorating the room in advance. Have all kinds of balloons, toppers, ribbons already hung around the rooms, and have the cards been prepared? So let's start decorating the holiday table!
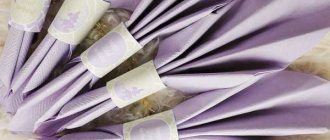
Decorative napkin holder for wedding
This design will look rich and elegant on a New Year's or wedding table. We offer a step-by-step master class with detailed manufacturing instructions.
To work, you need to prepare the appropriate tools and materials:
- Cardboard paper towel rolls;
- Knife and scissors;
- Several satin colored ribbons;
- Golden ribbon;
- Mesh ribbon;
- Artificial pine branches;
- Bright beads on wire;
- Hot glue gun.
The technique is not very complicated; even a non-professional can do it. The result will be a wonderful decorative element.
To see this, here are a few colorful photos of napkin rings for the holiday table.
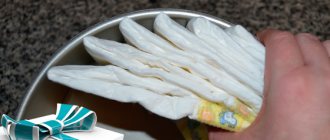
- Now determine how many holders you will need. Take the sleeve and cut it into equal parts, about 3 cm each.
- Wrap each piece with a green satin ribbon. The first skein should start from the inside of the product.
- Secure the ribbon with a hot gun. In the same way, fix the ribbon of a different bright color, for example, red.
- Wedding napkin rings are usually decorated with a decorative bow. To do this, tie a mesh ribbon in the middle with golden rope.
- Take a red satin ribbon and tie it in a figure eight loop. After cutting off the excess, tie the figure eight to the base.
Additionally, add a green ribbon in the same way, only on top of the red one.
The bow will turn out more beautiful if you tie some golden wire with beads and place a pine twig. Glue the composition to the prepared ring.
Decorating jars
This glass jar cuff is called “Eye Treat.” Everything is completely calorie-free.” Indeed, the colors are chosen simply wonderfully, or rather deliciously, lifting the mood and involuntarily causing a smile. Clear glass jars are cuffed with wonderful ribbons and materials, sparking inspiration for new creations. The most favorite buttons, ribbons or laces are stored here, which are surprisingly pleasant to contemplate. But it can also be a spice jar in your kitchen.
Product size 36x10 cm. Materials:
- Cotton 0.2 m red and white check (5 mm)
- Ribbon with decorations – with doves and red and white apples 0.4 m
- Ribbon with ruffle in blue and white checkered 0.4 m
- Red and white checkered ribbon made of mini Vichy fabric (checkered cotton fabric for home dresses and aprons) 0.8 m
- Textile glue
The length of the cuff is adjusted to the circumference of the glass jar, plus 2 cm of sewing allowance. The sticker pattern in our example is made of cotton in a red and white checkered pattern, measuring 38x19 cm.
Fold the pattern piece in half flush along the long side and sew along it (the resulting size is 38x9.5 cm). Turn the tape, push the seam in the middle and iron it. Now sew a ribbon with decorations - with doves and red and white apples - in the middle, leaving 2 cm at the top and bottom. Fold 1 cm inward at the ends of the cuff and lay 20 cm of Vichy ribbon between the top and bottom layers of material at the top and bottom (see photo in the APPENDIX - cuff ties). Close the ends of the cuff along the seam. To finish the work, glue a blue and white ruffle behind the top edge, and then sew it on.
These beautiful handmade items for sale or gifts can be made quite simply to wonderful effect. You are guaranteed to delight your friends and family.
- Trace the saucer onto brown tissue paper and cut out. Place the circle in the center of the jar lid and wrap twine around the neck.
- Pull the twine into two different colored buttons and attach them to the jar as shown and secure.
- Trim some of the wrapping paper to fit the size of the body of the jar.
- Make a circle of decorative wrapping paper to attach to the lid.
- Print an image or text onto an oval label and attach to the body of the jar.
DIY burlap napkin ring
Here's another good master class on how to make a napkin ring using only the most affordable materials.
You will need:
- Paper towel rolls or hot roller covers;
- Scissors;
- Colored paper or burlap;
- Glue.
Cut the cardboard sleeve into equal parts, approximately 4 cm each.
Cut a strip of colored paper twice as wide as the cardboard ring. Glue it to the ring and fold the edges on the inside. Decorate the top with decorative lace.
Instead of colored paper, you can use burlap. But it’s better to glue it not to cardboard, but to something more solid. For example, hot rollers.
Wire or wire clamps
No matter what your dining room decor style is or your event hall decor, wire rings will fit seamlessly into any table decor. You can make a set in gold, copper or silver by purchasing wire from a hardware store and wrapping a loop to fit the napkin. If there is no wire or wire of the desired color, it can be spray painted.
Knitted napkin rings
Unusual DIY napkin rings are created from knitted lace. Many people choose this particular idea for serving a festive table, which adds warmth and comfort to the evening atmosphere.
- A very beautiful and durable holder will be made from a strip of knitted lace. There is no need to fasten them with buttons, because the products stretch easily. But instead of a button, you can use some kind of decoration.
- One of the good examples of knitted products is a crocheted ring like a napkin with openwork lace.
- Prepare the base in advance by cutting a small circle from a plastic cup. First, tie the entire perimeter with cotton threads. Then move on to knitting in a half ring.
During knitting, the ring may become wrinkled and lose its desired shape. To keep it stable longer, we recommend starching the product in a solution of high concentration.
Creative ideas
Craftsmen use a variety of things to decorate rings: a variety of buttons and decorative wire, artificial and real flowers, children's toys and souvenirs. Rings can be personalized, with photographs. Origami offers its own version of paper in two colors. Here is a diagram for folding.
Need rings today? Then print these templates on a color printer, cut and glue the ends into a ring of the desired diameter. How to arrange a buffet table, read this article.
New Year's napkin rings
If you are looking for good instructions on how to properly make napkin rings for the New Year's table, we offer you a suitable example. We will create a holder in Santa Claus' fur coat.
What will you need?
- Cardboard blank;
- White faux fur;
- Red and black braid;
- Glue.
Paper towel rolls work well as a cardboard base. They need to be cut into several equal parts of approximately 4 cm.
- Attach a wide red and narrow black braid to the outside of the workpiece. This is how Santa's red suit is drawn, belted with a black belt.
- All that remains is to turn the edges of the fur outward and glue them with glue.
- Your handmade product will pleasantly surprise all guests and household members. Fir branches, Christmas tree decorations, and fairy-tale characters are also used in the design of the rings.
- Additional Ring Design Tips
Here are a few more striking examples of what you can use to make a napkin ring. Which option to choose depends on you.
Evening tea time: tea jar
Size approx. 9x9 cm. Materials:
- Cotton 2 samples of 10x110 cm
- Edging tape 75 cm
- Double-sided non-woven material (spacer)
- Tea tin
- Printable letter templates, Arial black 200pt font
The upholstery material pattern is a rectangle 9.5x34 cm. Close the upholstery material piece in a circle with a wide basting stitch along the short side and put it on a tin can. Outline the letters in a mirror on double-sided non-woven material, on the wrong side, iron and cut out
Remove the base paper from the letters and place them evenly on the upholstery material and iron them carefully. Spread the basting on the upholstery material and sew the letters with a sewing machine using any finishing seam
Finish the top and bottom of the upholstery material with edging tape and sew the upholstery part around the can again. Sew together the still open edges of the material with edge stitching. You can also decorate the lid of a tin can with a bow.
Autumn colors in holiday table decor
Felting wool is not an easy task, but it is enjoyable.
- To design these rings, felting wool and real acorn caps are used.
- The masterpiece is created using a felting needle, felt, thread, floral cord and braid.
- Once you learn how to felt, you can create a craft with a summer design, such as a strawberry.
Secrets of success and choice of materials
Before folding napkins for table setting, you should select the right materials. When choosing paper table aids, you will need to take into account shade palettes. For example, rich and bright colors are suitable for fun events. The solemnity of the event is emphasized by a snow-white tablecloth and a similar tone of the elements.
When choosing paper table aids, you will need to take into account shade palettes.
If the housewife prefers cloth napkins, it is recommended to choose one with a dense texture - cotton, linen, viscose. Such options hold their given shape well, do not wrinkle much, and therefore look very harmonious and solid.
If the housewife prefers cloth napkins, it is recommended to choose one with a dense texture - cotton, linen, viscose.
It is better to start your journey in origami with simpler variations. Having thoroughly studied the patterns and manufacturing methods, you can safely move on to three-dimensional complex shapes. The success of the event depends on the organization in advance. We recommend trying out the napkin folding technique in advance, rather than on the day your guests arrive. This way you can slowly realize your creative ideas, correct mistakes or make the required number of accessories for each participant in the feast.
We reveal several secrets to achieve spectacular results:
- Don't be afraid to experiment with shades of tablecloths and table accessories;
- Choose the right materials that perfectly hold the given shape;
- Start small and gradually increase the load and complexity;
- Take plenty of time to arrange fabric and paper decorations for serving;
- Give preference to a unique palette of shades, taking into account the holiday and the concept of the organization.
By listening to the recommendations, you will get a stylish decor that is guaranteed to receive positive feedback from event participants.
Give preference to a unique palette of shades, taking into account the holiday and the concept of the organization.
Homemade elements for table setting will become a wonderful decoration. Using the proposed methods, every housewife will give the feast an aesthetic appearance. The ease of manufacture (rolling, unfolding) and the availability of materials make it possible to involve assistants, for example, children, in the procedure. A beautiful tablecloth and an unusual presentation of napkins will make the home atmosphere luxurious and elegant.
Beads in the design of rings
A very simple idea for decorating napkin rings. Here it is enough to have at hand an ordinary wire on which multi-colored beads are strung.
Both ends of the wire are twisted with pliers. The excess is bitten off with nippers.
Floral option
Dinner is always a joy when there are fresh flowers on the table. You can complement the vase on the table with napkins. Use carnations or chrysanthemums to create stunning napkin rings that your dinner guests will admire.
Personalized napkin rings
An option suitable for any occasion. For example, on Thanksgiving Day.
- To make them, you need to choose a suitable dense frame, which is decorated with a satin ribbon, colored paper with ornaments and sparkling decorations.
- A name plate is attached to the front side. This idea is a great alternative to regular place cards.
It will be easier for guests to find their place at the festive table.
Ribbons, lace, fabric, braid
The most classic and simplest option. The cardboard blank from the ring is wrapped with silk ribbon or braid, placing the turns tightly together and securing the edges with glue. Or they cover the cylinder with fabric (gift paper) on both sides. Light braid and lace look good on a dark base. You can’t do without rhinestones, beads and bows here either.
Knitted napkin holders are an idea for craft lovers. Of course, it requires patience, time, accuracy, and a certain crochet skill.