Pottery making has become very popular lately, especially among children. This is not only interesting, but also develops hand motor skills, coordination, attentiveness and determination. In addition, it will be very important for the child to see the final result of his work. To practice pottery, you need equipment that you simply cannot do without. When making clay products, you definitely need a furnace to fire them. Unfired clay will not gain normal strength and will simply crack. Another indispensable attribute of a potter is a potter's wheel. Without it, it is impossible to make smooth cylindrical parts.
There is no point in buying a pottery wheel for your child's activities. Firstly, it is far from a fact that a young hobby will not disappear in a few weeks, and a rather expensive unit will simply take up space in the garage. Secondly, pottery wheels are not very cheap, especially electric driven models. A way out of this situation may be to rent a pottery wheel or make it yourself. Learn how to make a pottery wheel with your own hands later in the article.
Types of pottery wheels
The construction of the potter's wheel, according to historians, is several thousand years old. During this time, she practically did not change. It is a solid wheel made of solid material (it can be wood, stone or steel), on which a clay workpiece rotates at a given frequency. When rotating, it is processed manually or using a special tool.
Pottery wheels are distinguished by the type of drive, thanks to which the workpiece rotates. They can be:
- Foot. The simplest design of a potter's wheel, which has been used for many hundreds of years. It is a shaft on which drive and working circles were mounted from different ends. The rotation of the drive wheel was given by the potter himself, pushing it clockwise with his feet. This design is not very convenient, as it requires significant effort during operation. Making a pottery wheel with your own hands is very simple, which is its main advantage.
- Mechanical. Such a circle was developed by the famous English potter Bernard Leach. Lich's design turned out to be quite successful, so industrial production of such circles began in the middle of the last century. The principle of operation of such a circle is based on the transformation of the reciprocating motion of the pedal into the rotational movement of the circle shaft due to the crank mechanism. This was much more convenient; it became possible to more accurately regulate the rotation of the wheel, which is very important when processing materials with different properties.
- Electrical. With the advent of electric drives, the mechanization of pottery wheels took a step forward. Thanks to such machines, the potter no longer needs to exert force to rotate the part, but can directly concentrate on processing it. Precise adjustment of the rotation speed of the part has also become possible. In addition, the dimensions of the machine have become much smaller.
How to sculpt from clay at home
Pottery art strictly adheres to traditions that were established dozens of centuries ago. Since man first made a lopsided plate, little has changed in the technology for producing such products. If the wheel has already been invented and proven to be effective in practice, then why try to jump over your head and come up with a replacement for it? The entire process of making pottery goes through several stages:
- Forming the product using available tools. Usually they mean an “inseparable couple” - a potter’s wheel and the hands of a master.
- Now the product needs to be dried and then sent to the kiln for firing.
- After hardening, the product is decorated: painted, glazed, and small details are added.
This completes the production process. All that remains is to securely package the products and send them to the store.
Electric pottery wheel design
The design of an electric pottery wheel is quite simple and its installation is not particularly difficult. To bring the project to life, skills in handling electrical devices, installing electrical equipment, and welding are required. If you have all this, you can get to work.
The design of the circle consists of several main components:
- Bed. Welded metal structure onto which all machine components are attached.
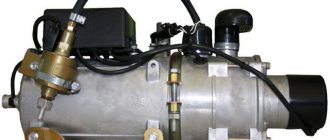
- Electric drive. Low power electric motor for rotating the shaft.
- Driver and driven pulleys. Designed to transmit torque from an electric motor to a potter's wheel. The pulleys are connected using a V-belt.
- Circle. A steel disk of the required diameter on which the workpiece is directly processed.
- Electrical equipment. Frequency converter, power regulator, circuit breaker.
- Drive shaft with hub and bearings. Serves to transmit torque from the driven pulley to the wheel itself.
- Production bowl. Designed to protect the room from dirt during clay processing. Under the influence of centrifugal force from the rotation of the circle itself, poorly secured pieces of material can simply fly apart. To prevent this from happening, the circle is placed in a production bowl, most often made of plastic.
How to make a clay pot
It's best to go to a pottery workshop because they have everything you need. Material: clay. The potter's wheel is untwisted and after wetting your hands in water, it is with your hands that the object is formed. Your hands must be wet. Then, the resulting clay pot is dried. Then it is thoroughly wiped with a rag - this is called “etching” and sent to a special kiln for firing. After the pot is ready, it is covered with a special glaze
When creating pottery, it is very important to maintain the correct temperature, which varies for different types of clay products.
Nowadays, hardly anyone makes dishes at home, but clay modeling is very useful for children's creativity. Dishes and interior items such as vases, flowerpots, pots for storing and cooking food are made in special workshops.
Let's watch a video about how ceramic dishes were created in the old days, how they were molded and what they consisted of. Children's clay art can be quite fun. Clay, water and a pottery wheel in the workshop and a lot of positive emotions for the children!
Then you can start with something simpler - for example, by sculpting a flower pot.
To make a pot you will need clay and water. Mix the clay with water until a homogeneous mass is obtained in the form of a thick dough. The resulting mass should be free of bubbles, for this you need to knead thoroughly. Adjust the consistency of the clay with water to prevent it from drying out. As a result of kneading, you should get a lump that does not stick to your hands.
We begin the work of sculpting pots by making the bottom. Separate a small lump from the total mass. Roll out a pancake from it, then cut out a circle. You can use improvised objects to achieve the perfect circle shape (mug, plate, etc.) If you want to see various examples of clay pots, go to the website.
To make the walls of a homemade pot, you need to make clay “sausages” with a diameter of no more than half a centimeter. Do not forget to moisten the bottom and walls of the pot with water so that the product does not dry out. “Sausages” (bundles) of clay can be made in advance, or they can be rolled as needed.
We carefully sculpt the clay strands one at a time to the bottom of the pot, laying them out around the circumference. Try not to go over the edges. When building up the walls, do not forget to moisten the clay with water. After completing one bundle, take the next one and continue the manufacturing procedure. Be careful to ensure that the pot is even and symmetrical.
If you want to make the pot “pot-bellied,” apply tourniquets, leading them out. If your pot should end up with the parameters “90x60x90”, follow the same steps, but inward. Do this until your product reaches the desired shape.
Once you have finished sculpting the pot, slowly wrap it in a rag or newspaper, then set it upside down. It will take at least 2 days for it to dry completely. Once the pot is well and thoroughly dry, you can start firing it.
Watch the clay modeling lessons on video, they show many nuances.
Firing is the last stage of the work, which takes place in two stages. When you fire a pot for the first time, excess moisture evaporates from it, and only with repeated firing will it become durable.
During the initial firing, the temperature should be controlled: it should not exceed 300 degrees. Continue heating the product at this temperature for 2 - 3 hours. Be careful: sudden changes in temperature will only ruin your work. Do everything carefully and in a hurry. When firing the pot again, we will increase the temperature to 580 degrees, but we will reduce the time to only 15 minutes. And in the end, we heat the product to 900 degrees for the same duration. At the end of the heating process, do not rush to remove the product from the oven, let it cool to room temperature. The pot is ready!
Preparing materials, tools and spare parts for a pottery wheel with your own hands
Before starting work, it is best to make a drawing of a pottery wheel with your own hands. This will help determine the required amount of materials and outline the sequence of work. To build a simple electric pottery wheel with your own hands you will need:
- Profile pipe measuring 80x40 mm. Designed for the manufacture of a bed frame. To install the engine mount structure, a pipe of smaller cross-section is used.
- Engine. The engine must be low-power (no more than 500 W) with a maximum speed of up to 1500 rpm. If you have a working but unused washing machine, the drive mechanism can be taken from it.
- Pulleys. The drive and driven pulleys for the belt can be taken from the same washing machine. In some cases, if a different engine is used, a pulley for the belt can be machined directly on the rotor shaft. The driven pulley must be of a larger diameter.
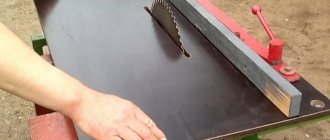
- Potter's wheel. It is made from sheet steel up to 10 mm thick, preferably stainless steel. It is cut and processed on a lathe. The faceplate must match the diameter of the drive shaft.
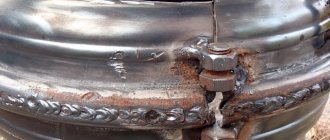
- A shaft and bearings are used to connect the driven pulley and the potter's wheel. The most suitable bearing is the wheel bearing from the Zhiguli nine. Its advantage is that when crimping the clip it centers itself. To install it, you need to grind out the glass and weld it into the frame crossbar.
- Shaft. The shaft is machined to the size of the pulley.
Tools for assembly you will need:
- Welding machine with a set of electrodes.
- Grinder with a set of circles for cutting metal and cleaning welds.
- Drill for drilling holes.
Techniques for working with clay by hand
Anti-vibration stands for washing machines: types, selection and installation
The technique of work is the basis, without mastering which no beginner will advance further. For some reason, many beginning ceramists want to sit down at a pottery wheel at their first lesson, even though their training begins with modeling.
Modeling
For many centuries, masters who worked with clay tried to improve existing techniques and methods. What’s interesting is that most of the skills that a ceramist has were invented a long time ago and have changed little.
Traditional sculpting methods involve:
- hand-sculpted from a single piece of material;
- tape-tow technology;
- plastic (textile equipment);
- kneading into the finished form;
- casting them in plaster mold;
- drawing an object on a potter's wheel.
Hand sculpting does not conflict with drawing on a circle! Yes, it arose before its invention, but did not stop developing with its use. And a huge number of craftsmen around the world continue to make clay products by hand. First, practice on plasticine: this will help you understand whether your hands like this kind of work, whether you are ready to do it for hours, and wait patiently for the result.
Potter's wheel
It was not invented by chance, since, unlike modeling, it allowed the production of clay products to flow - that is, it significantly accelerated the process of making ceramics. The pottery wheel requires the right approach: it is like a musical instrument that needs to be mastered. Positioning your hands correctly and feeling confident in them are important technical points.
Cooldown
Beginning ceramists dwell on this technique in detail, since it is simple and understandable, while being illustrative. Soft clay is poured into a plaster mold: it hardens, and the finished product is taken out of the mold. Why gypsum? It has one very attractive feature - it is able to absorb excess moisture, and the product hardens and dries out.
Casting
In casting, molds are also used, but different ones. The diluted material is poured over them, the blanks are thoroughly dried, taken out and started to paint. The craft will acquire strength only after firing: it is impossible to make pottery with your own hands without exposure to temperature.
Making a pottery wheel with your own hands
Work order:
- The first step is to weld the metal structure of the pottery wheel frame. It is a rectangular frame made of a profile pipe with welded legs. It is better to connect pipes at an angle of 45°. To do this, the ends of the pipe are trimmed with a grinder.
- Closer to one of the edges, a crossbar from the same pipe is welded into the middle of the frame, only with its larger surface facing up. It will serve as the basis for installing the shaft and faceplate.
- After this, a supporting structure is welded at the engine installation location. It consists of a transverse pipe, which is welded to opposite frame pipes, and two longitudinal ones, which are welded perpendicular to the transverse one.
- Guides and skids are installed on the longitudinal pipes. The engine frame is attached to them. The skids are needed to change the distance from the engine to the driven pulley, thereby increasing or decreasing the tension of the V-belt.
- The engine base of a homemade pottery wheel, made with your own hands, is a sheet of metal, in the middle of which a hole is drilled for the shaft and mounting bolts. It is better to do this on a radial drilling machine. Drilling a hole for the shaft with a hand drill will be problematic.
- The engine is secured with mounting bolts. The slides are made of steel, with milled grooves and welded to the supporting structure. Now the engine can “walk” back and forth, changing the belt tension.
- The next step is to weld a cup for installing the shaft bearings, after which all the mechanics are assembled: the shaft and drive pulley are installed. Be sure to check the alignment of the engine pulleys and drive shaft. Their centers must be on the same axis, and the pulleys themselves must be in the same horizontal plane. Otherwise, the belt will become distorted, which will lead to rapid wear.
- Next, a protective casing is installed on the machine frame. For the latter, you can use any plastic container (large dish or bowl). Holes are drilled in it for the mounting bolts and one hole for the shaft on which the pottery wheel (faceplate) will be attached. After this, it is installed in place.
- The last step in assembling the mechanical part of the potter's wheel is installing the faceplate.
- After the mechanical part of the potter's wheel is assembled, you can proceed to the electrical part. It consists of several parts:
- a frequency converter;
- switch (regular light switch);
- adjustable resistance.
The motor is directly connected to the frequency converter. One of the suitable models of the latter is the Vesper-8100. It allows you to adjust the engine speed from zero to 1500 rpm. At the same time, engine power does not decrease. A variable resistance (rheostat) is connected to the frequency converter, which allows the user to change the number of revolutions. The rheostat is connected to the converter according to the diagram indicated on the device itself or in its operating manual. Switching on the voltage in the network is carried out by a conventional switch, which breaks the alternating current phase. Instead of the latter, it is better to install a 10A circuit breaker, which will serve as additional network protection.
What to cook
To make a pottery wheel with your own hands, you will need an old washing machine, the components from which can be used to create a pottery wheel
It is important that the washing machine used is of the activator type (for example, the Malyutka washing machine). In this case, the axis of rotation of the motor will be directed vertically
The pottery wheel that will be installed will rotate while in a horizontal position.
In addition, you will need the following materials:
- A piece of plywood of the required size that is resistant to moisture.
- The simplest board with a microcircuit that will make it possible to switch the rotation speed of a pottery wheel.
- It is necessary to prepare varnish and paint that are resistant to moisture.
- White Spirit.
- Wheel of the required size for the design.
- A plastic medicine bottle is required.
- Electric switch.
- A roll of insulating tape.
- To seal against leaks you will need silicone sealant.
- In order to solder, you will need tin and rosin.
- In order to connect the parts, you will need screws with nuts and self-tapping screws.
To carry out the work you need to stock up on the following tools:
- soldering iron;
- multimeter;
- a hacksaw with small teeth;
- well sharpened knife;
- felt-tip pen for making marks;
- keys and screwdrivers of different sizes;
- pliers;
- ruler.
When all of the above has been collected, you can begin making a potter's wheel.
Adviсe:
- If during long work it is noticeable that the drill is overheating, then you can place several wooden blocks under the plastic bucket for cooling and better air circulation.
- In the pedal of a sewing machine, you can make a speed limiter in the form of a thin stick - it is placed under the lid. This must be done in order to avoid too high a speed of rotation of the wheel, because this can cause the pots to turn out uneven, and the clay will fly off while the wheel is rotating.
- If you have to work often and for a long time, then it is better to use a more powerful drill. For example, if there is a large amount of clay, a low-power drill may not be able to cope with the load.
Additional tools
If you seriously or even just at an amateur level have decided to master the craft of pottery, then in addition to the already known circle, you will need some other tools that greatly facilitate the work and allow you to perform various manipulations with the material. The main tools of both the sculptor and the potter are stacks - wooden, metal or plastic spatulas of various shapes and sizes. You also cannot do without a metal string with two convenient handles at the ends, with the help of which the finished product is cut from the circle after molding.
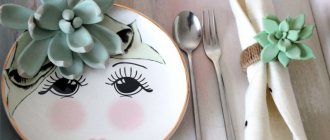
Other photo ideas for flower pot design
Using the tips above, you can create a truly unique pot at home, as well as decorate and decorate it with your own hands.
What do you think people did when there were no computers, televisions, plants and factories, and in general, when there was no electricity. Maybe they sat on a bench and did nothing? But doing nothing is simply not interesting. They came up with various necessary things for the home and thought about how to make them with their own hands. There was always the question of what to cook in. And they figured out how to make a clay pot, jars, jugs of different sizes, and later flowerpots. The video will clearly show the process of clay modeling by children in a creative workshop.
When there was no electricity, people were engaged in various crafts: they carved wood, worked in forges and blacksmiths forged various objects from metal, women weaved threads and fabrics, embroidered, people engaged in pottery and created beautiful clay jugs, pots in which they prepared beautiful healthy and natural food from quality products.
Nowadays, many different creative circles exist in our time. And more and more often there is a desire to try to plunge into the world of crafts. Pottery skills and modeling of clay dishes also attract people. Moreover, it is very good to cook in ceramic dishes.
It should also be noted that the property of earthenware, pots, jugs and jars is the ability to retain odors. It is for this reason that it is advisable to have a separate pot or jug for each type of product: for meat dishes, dairy dishes, cereals and potatoes. So that odors are not transmitted.
Modern technology for processing clay pots allows you to cook in a modern oven. To do this, it is better, of course, to use ready-made clay pots and other ceramic dishes, such as this one https://kuzaranda.ru. Glazed ceramic pots with a lid are very convenient and can be used to cook whatever you want, from roast to borscht.
There are also clay pots for storing vegetables. They do not cook in them, but they store fresh herbs, tomatoes, cucumbers and even mushrooms. Ceramic dishes are easy to clean and fit perfectly into a stylized interior.
comments 2
- Daria Khomyak:
10.26.2017 at 17:57
The shaft he turned from round timber cannot be 1/4″ in diameter, not at all. If only because he cut a 1/2″ hole in it
Answer
- Yuri Gorniy:
10/27/2017 at 07:07
What attentive readers we have) This is a question for the author - VertDude
Answer
: Glue everything together
Surprisingly, the lightweight materials worked well when I filled the bottom bucket with small rocks. I placed the weights around the center hub and this somehow helped slow down the rotation a lot as the circle was moving too fast and wobbly and things were getting out of control. Not all 360-degree mop buckets are built the same. Some have better mechanisms than others and operate more smoothly.
Glue all the buckets and trays together in a suitable order. Use a level to make sure everything is level. The design of this pottery wheel can be changed in many ways - it's up to your personal taste. You'll want to find buckets and trays for your flower pots that will reach the height you feel most comfortable with. If you need to redo your design, hot glue can be easily removed by spraying some Lysol alcohol and using pliers.
If the wheel of the circle is below your waist level, then you can use leverage and your body weight to lift the walls of the product. This way, your body will be positioned more ergonomically and this will avoid back pain.
Tags
Potter's wheel with your own Potter's wheel with your own pottery wheel. Pottery wheelwhat pottery making Pottery wheelon a potter's wheelmaking a potter's wheel.potter's machine workshop potter's wheel.Design of a pottery machinepotter's wheel diagramcost. Pottery production with your own hands with your own hands with your own hands quickly with your own hands with your own hands with your own hands various with your own hands with your own hands with your own hands. with your own hands Furniture with your own hands circle with your own hands make with your own hands circle with your own hands evaluate your material time free and free space with your tasks. engine your own characteristics.
articlesmasterscommentsmaterialsinteriorspeedhomeinstructionsfurniturerepairconnectactionheresharelinkvoice