Stages of work
After the preparatory part, you can safely begin manufacturing the structure.
First stage
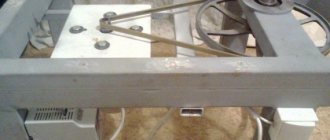
We take three disks and cut out the middle using a grinder. The process can take a long time because the discs have an uneven shape, making it difficult to reach the middle.
Cutting out the core of the disc is quite difficult, but it is necessary
Second phase
The next step will be welding. We weld a square metal sheet to the lower wheel rim. It must extend beyond the walls of the disk so that burning coal or a spark from the furnace falls onto it. This is a guarantee of fire safety.
We weld the disks together in a circle. You need to be careful not to leave unwelded holes through which smoke from the potbelly stove will escape. We also weld all the holes for the valve for the camera.
We weld the seams
Third stage
Next, we cut out the doors for the firebox and ash pan. We recommend cutting a hole for the ash pan in the lowest disk, and for the firebox in the second one from the bottom. The metal pieces that remain can be used as doors. There is no hole for the ash pan, so that the draft goes well, you can open the doors of the ash pan or firebox.
Installation of a chimney pipe. We weld the pipe into the center of the uppermost disk or onto a sheet of iron that can be welded to the upper disk. In the second case, your potbelly stove will be more fireproof and reliable.
Fourth stage
Coating the oven with special paint
The last step is to install the stove on the base. Its height can be equal to the height of one brick, since the entire stove does not weigh very much. First you need to make a square formwork from bricks and fill it with cement mortar. After the solution has dried, you can safely install the potbelly stove.
To ensure that the stove lasts longer and the metal does not corrode, we recommend covering the potbelly stove with a special paint that can withstand constant high temperatures. It is especially important to paint the upper part of the structure: it is there that moisture constantly evaporates, so the metal becomes more vulnerable to losing its properties.
As a result, from the maintained materials you will get an excellent, reliable potbelly stove that will heat the room no worse than a new one.
Process of creation
Constructing a furnace device from disks with your own hands begins with converting the disks into the necessary structural parts.
Such metamorphoses begin with a disk, which will be the upper compartment of the furnace being manufactured
It is positioned so that the fastening part is at the top. Next, a circular hole is cut using a grinder along the mounting holes and the cut out contents are removed. The dimensions of the circle are determined in relation to the existing cauldron, which will make it possible to achieve the stability of this specific dish. The hole must certainly be perfectly round, and therefore all flaws are corrected immediately.
The disk for the lower compartment of the furnace device is installed with the mounting platform facing down. Then the top one is placed on it, and their mating edges are carefully welded in a circle.
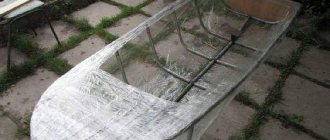
The result should be a welded structural blank
Let's move on to the combustion chamber system. To create it, a rectangular fragment is cut out at the base. Its approximate dimensions in centimeters are ~ 20x12 (for rims from passenger cars). When marking the location of the combustion chamber, it is necessary to make an indent of ~ 2 cm from the lower edge of the disk. Such a trick is guaranteed to provide not only high structural rigidity, but also facilitates the operation of the firebox.
The disk fragment cut out for the combustion chamber is preserved. In the future, it will serve as an excellent firebox door.
After completing the operation of forming the combustion chamber, you can choose two options for the stove under the cauldron from disks. One of them is extremely simple, but the second will require some additional steps.
Fire safety rules when installing homemade stoves
An oven made from car wheels heats primarily with infrared radiation. To convert this flow into warm air, the stove needs to be shielded: surrounded by a casing of steel sheets installed at a distance of 7-10 cm from the heater and with the same gap from the floor.
Safety rules for operating metal furnaces:
- A reinforced concrete slab or steel sheet must be laid on the floor so that the fire-resistant structure extends beyond the contours of the furnace by at least 60 cm in each direction - this will protect against fire if coals accidentally fall out of the firebox.
- The metal stove and chimney must not come into contact with flammable materials. Use insulating pads if necessary.
- Before lighting, always check for draft in the channels. If it is not there, you need to warm up the chimney with a small amount of burnt wood or clean the passages and ash pan.
- Do not use liquid lighters - they may cause fire to escape from the firebox opening.
Which type to choose for yourself
Taking into account the above-mentioned features, it is necessary to correctly select the appropriate type of disk furnace. The need to independently construct a furnace from car rims occurs in the following cases:
- If you need to heat small non-residential premises, for example, a country house or a workshop. The use of high-quality rims will allow you to achieve maximum quality of the furnace, and will also significantly simplify production.
- If you need to equip the main “fire” part of the furnace structure without using expensive heat-resistant steel.
- If you are going to use the stove for cooking. In this case, you will have to make a stove for the cauldron from car wheels.
Most often, car wheels are used to create mobile (portable) outdoor and garden cooking stoves, as well as for arranging fire pits. The simplest version of a disk hearth stove involves the use of a large mass and side height, which significantly improves heat transfer rates and provides reliable protection from the effects of wind.
Trial fire
A self-made oven must sit for 24 hours so that residual stresses are completely resolved. Then it needs to be tested with a full load of fuel for three hours. The doors - at the firebox and the ash room - must be open.
Carrying out a trial fire
During the first test fire, the internal surfaces of the device are annealed. If minor defects are found on the welding seams - no more than two on one - they should be corrected a day after the stove has cooled. Then the test fire is repeated.
Small oven with grate for food
How to make a potbelly stove from car rims with your own hands for the garage
If everything you need is at hand, you can get to work
It is important to follow simple recommendations and do everything in a certain order. Therefore, for simplicity, the instructions are divided into several stages.
Housing assembly
First, clean the discs from dirt and corrosion. If possible, remove the paint so that it does not burn or emit an unpleasant odor at first. Usually the structure is made of four elements, this is enough to create a firebox of the required height. Do the work like this:
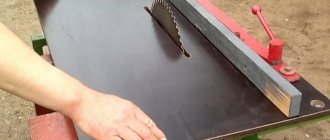
- Cut out the inside of the discs to create a cavity inside. Work carefully, you must remove all excess, but do not damage the outer walls. It is best to do this with a gas cutter; it turns out quickly and accurately.
- If the elements for the bottom and top have not been prepared in advance, make them from sheet metal. Next, stack the disks on top of each other, make sure that they fit together evenly; if there are uneven edges, you can straighten them with a hammer. Also, be sure to clean the surfaces to be welded; they should be free of paint and traces of corrosion.
- First, carefully scald all the connected disks around the perimeter. Try not to miss a single section so that you get a continuous, strong seam that will withstand numerous heat without problems.
- Next, weld the bottom and top to form a sealed housing, which will serve as a stove in the future.
When welding, it is best to first grab the elements in several places. Once you have ensured that the joint is smooth, you can weld the joint along its entire length. At the end of the work, you need to let the parts cool completely.
How to make legs and doors
Since the surface of the disks is uneven, it is best to buy ready-made doors or weld them in advance from corners and sheet steel. There are no special requirements, the main thing is to make the elements of the appropriate size
It is important that the hinges are strong and the latches are simple so that the doors can be opened and closed easily. The work is carried out like this:
To begin, make a small vent door at the bottom. With its help, you can regulate the air supply, and ash is also removed from there as it accumulates. An opening of a suitable size is cut, corners and plates are welded into it to create a frame, then a door is installed. Place the main door of the firebox higher; it should be of such a size as to ensure convenient loading of firewood.
Here it is important to cut the opening, reinforce it with a corner and weld or bolt the sash. It should open easily and close tightly, secured with a latch. The legs must ensure the stability of the structure and prevent it from tipping over.
It is most convenient to pre-weld the base from a corner or square pipe, and then weld it to the bottom of the potbelly stove. Weld several pieces of angle iron between the doors inside the housing. They will serve as a support for the grate, which is easiest to weld from reinforcement. Make the grate smaller than the diameter of the stove so that when heating it does not rest against the walls.
You can use ready-made doors made of cast iron; in this case, a frame from an angle is welded to the body and screwed through the holes. Standard-sized elements that are sold in hardware stores and are designed for conventional stoves are suitable.
How to make an exhaust pipe in a homemade potbelly stove
To ensure normal draft and eliminate smoke in the room, you need to make the chimney correctly. For this, a thick-walled steel pipe with a diameter of about 100 mm or slightly larger is most often used. Procedure:
- Determine the location of the pipe entrance to the stove body. The easiest way is to do it in the middle from above, this will ensure a good outflow of combustion products and improve traction. If the upper part will be used as a stove for cooking, then it is better to connect the pipe to the side.
- It is easier to arrange the insertion location using an adapter, which you can make in advance. Then you won’t have to make a perfectly even hole in the potbelly stove, which will simplify the work.
- After welding the pipe to the body, take it outside and securely fasten it. Remember that its length should be at least 2 meters, and preferably even longer - to improve traction.
To reduce wood consumption, you can make bends in the chimney. But remember that in places where the direction of the pipe changes, soot is deposited especially heavily. Therefore, it is advisable to make small hatches there and clean the pipe at least once every 2 months.
It’s also worth watching a video on how to make a potbelly stove from car rims for your garage with your own hands. There the process is clearly shown, which will help you understand it even better and simplify assembly.
Additional recommendations
To make the stand for a cauldron made from car rims more convenient and practical to use, you need to take care of the special features:
Additional stability can be added to the assembly using legs. They are made from profiled steel, which is cut to size. The blanks are welded to the sides of the furnace or the bottom and flanges. A tripod is the best option in terms of stability and economy. A good solution would be to make a separate stand for the stove from car rims for the cauldron. Its advantage is that it is not rigidly connected to the main structure and can serve as a support for anything. If there is a stand, the profiled bottom of the lower section will work as a grate. This will significantly increase draft and increase the temperature of the arch. You can simplify the project, reduce labor intensity, and save on materials if you make the oven from two segments. In this case, the roof of the structure will become lower, which will negatively affect heat transfer. This is due to the fact that during combustion pyrolysis gases are released, their contribution to the total heat release is decisive. If the arch is not high enough, they do not have time to burn completely. Contact with the cold walls of the casing causes soot deposition. Over time, the inner surface of the vault becomes coked. The heat output of the furnace is noticeably reduced. Soot fire cannot be ruled out. The versatility of the design allows you to convert the cauldron oven into a grill and barbecue with minimal changes. Without unnecessary cuts, you can get by with ready-made holes on the surface of the product - they will create several temperature zones. If you install a grate on top, it will combine the functions of a flame divider and a rasper - this will allow you to simultaneously cook roast beef of varying degrees of doneness
It is important to understand that a large company will need a more solid stove; Gazelle disks are suitable for its manufacture. They do not need to be welded together, which is a definite plus.
Heat-resistant metal adhesive can successfully handle the functions of a weld seam. Good potbelly stoves are obtained with horizontal wheel rims. It is better to cut off their convex parts with a grinder. The sections welded together form a capacious thick-walled cavity with a complex surface. Such a potbelly stove will heat up the room faster and take longer to cool down. To make such a stove, it is better to use wheel rims from trucks; they will provide a sufficient firebox volume and increase heat transfer. The efficiency of such devices is higher.
The area under the supports must exceed the parameters of the cauldron: the higher this ratio is, the more stable the entire structure will be.
Convenient stoves with installed legs. You can install a grate and use it as a barbecue.
Potbelly stoves heat better with horizontal disks
Step-by-step algorithm
The first thing you need for construction is a pair of classic stamped car wheels made of durable metal. The sizes of the disks should be selected to suit your cauldron; option 13 may be suitable, or maybe 15, although a very large design is not needed.
Two stamped white discs
On one of the disks we mark a cutting line, exactly above the round holes, and cut off this circle using a welding machine.
Mark the cutting line
The cut circle will work perfectly as a lid on which you can put pots or a kettle, so don’t rush to throw it away.
The part is cut out
On the second disk, you need to weld the main central hole, which will require a small piece of thick metal.
Preparing the welding machine
We carry out welding work
Then the two disks are placed on top of each other and, using the same welding machine, they are connected into a single structure.
Circular welding process
Welding from all sides
This creates an impressive seam that firmly connects the two discs. To make it more presentable, you can modify it with a grinder, cutting off strongly protruding elements and grinding the edges.
Weld seam
In order for the structure to stand stably at the required level, you will need legs. The legs can be tightly welded to the grill if you are preparing a summer cottage, or you can make the structure detachable. In the second case, the device will be mobile; it can be easily carried in the trunk of a car and, if necessary, assembled. Small pieces of a profile larger in cross-section than the legs themselves can act as fastenings for the legs. These three parts should be welded to the grill on three sides (in this case, a tripod is made).
Leg parts
There is no need for precise calculations here; it is enough to roughly estimate equal distances and weld the necessary parts to the bottom of the grill made of disks at the same angle.
Leg clamps are welded
We also cut out the legs from metal, in particular we use a rectangular profile.
The legs themselves, cut from the profile
It is worth trying on the legs by inserting them into the prepared grooves. If they enter with difficulty, you should process the edges of the parts with a grinder, and then hammer them into the grooves with a hammer.
Legs installed
Next, mark the door that will open directly into the firebox and cut it along the line.
Marking the location of the door
At the next stage, you will have to use your imagination and engineering skills to create a decent hinge for the door. For example, you can make it from one bolt. It is necessary to cut off the cap from it, then select two nuts that are screwed onto it. One nut should be welded to the door, and the second to the wall of the grill. By screwing the bolt onto the threads of both nuts, you get a convenient loop. You can weld any piece of metal of suitable size as a handle.
The door is cut out
You can make two loops using the same bolts, here all the work is done at the discretion of the master.
Loop manufacturing option
To make it easier to transport the grill, you should weld lugs to it on both sides, or at least on one side. Such improvised handles will allow you to comfortably carry the barbecue without fear of getting dirty with soot, soot or dirt.
We weld the handles
For a more uniform smoke output, you can make four even cuts along the diameter of the disk. At this point, work with the hearth to form its shape is completed.
Making cuts from the top
To remove paint from car rims, you should burn the resulting grill on all sides. For final processing, you can use a brush or sandpaper.
Removing paint using improvised means
Then, using heat-resistant paint, you need to paint the structure in a suitable color. Black looks very harmonious.
Paint it black
As you can see, making a grill for a cauldron is quite simple; there are no special tricks here. A simple and convenient design will allow you to install a cauldron and cook pilaf, and if desired, you can make a shish kebab on it using skewers of suitable length.
Ready product
In this simple and uncomplicated way, we create excellent conditions for outdoor recreation, which is accompanied by cooking delicious and healthy food.
Potbelly stove made from wheel rims
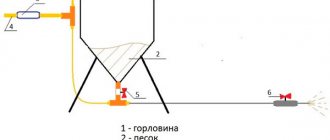
A model of a metal stove, popular at the beginning of the 20th century, is easily assembled from steel wheels. It is made according to the instructions for the stove from disks, but with minor changes. At the first stage, the workpieces are prepared for work by trimming the edges and cutting out the middle part of all but one. Next, the metal rings are welded into a single tank and grates are made. A round bottom is welded from below.
Three holes are made on the side: two for the firebox and one lower for air supply. Weld the doors. They make a bolt and a handle on each one. A potbelly stove made of disks must have a closed top. For this you will need a steel sheet. A circle is cut out of the sheet according to the diameter of the welded body. The edges are sanded so that they are not jagged. Then the part is welded to the upper steel wheel.
Since the top panel was made closed, the stove will need a chimney. In order for the top panel to retain its hob function, it is left intact, and a hole for the chimney is cut on the side in the wall of the casing. The diameter of the hole must match the diameter of the pipe. The edges of the window are made smooth so that the welding seals well the joint between the pipe and the body.
Video of stove assembly - potbelly stoves made from disks
The process of making a mini-stove from wheel rims like a potbelly stove from A to Z is shown in the video:
Having the skills to work with cutting and welding equipment, it is not difficult to make a simple model of a wheeled furnace. This could be a simplified mobile barbecue or grill, a stove for installing a cauldron, or a real potbelly stove. If desired, car wheels are suitable for laying a more complex stationary sauna stove. Such heating devices are convenient, practical and durable to use.
Required materials and tools
Before you start making a mobile stove, you need to calculate its dimensions and determine the material consumption. A pivot table will help you cope with this task.
| Name of material | Standard size | Quantity | Detail | Note |
| Wheel disc | 13” | 3 pieces | Furnace casing | Can be replaced with larger diameter discs |
| Bar | D8x200 | 1 piece | Handle for damper* | Can be replaced with D10 |
| Bar | D8x250 | 2 pieces | Carrying handle | Can be replaced with D10 |
| Pipe | D50x1.5x1500 | 2 pieces | Chimney | – |
* Material for valves and hinges is selected locally from availability.
The basic set of tools includes:
- welding machine;
- angle grinder;
- set of nozzles for metal;
- a set of locksmith tools;
- bench vice.
Consumables:
- welding electrodes;
- cutting discs;
- cleaning discs;
- individual protection means.
It is important to follow safety rules and work only with working tools
Useful tips
It is important to lay a high-quality seam at the welding site - no defects should be noticeable on it. When working with a welding machine, you cannot try to weld everything at once - the work is done in stages
After welding the parts together, you need to wait until the seam cools down to touch temperature. When assembling the structure, do not forget that for proper operation of the stove it is important to provide the size of the combustion chamber for the type of fuel you plan to use. After completing the work, be sure to test the design and eliminate any identified deficiencies.
Attention! All welding work must be carried out in compliance with safety regulations, wearing protective clothing and a mask. Do not touch parts until they have cooled down
Improvements for a homemade sauna stove from a cylinder
Firing a homemade stove from a gas cylinder showed that very strong heat was coming from the body. There are two options: make a large mesh for stones on top or cover the stove with a brick screen. It was decided to make a heater on top. It was welded using 14-diameter reinforcement.
As you can see, in order to protect the log wall from heat, they built a half-brick brick wall. Its height is not lower than the laying of stones.
Even with a heater on top, the chimney becomes very hot during combustion. There are also options for this:
- Make a mesh for stones on the chimney. This will increase the inertia of the stove; after the wood burns out, the bath will remain warm for a long time. Hard heat will also be removed, and the temperature of the flue gases will become lower, and this will increase fire safety. The design is visible in the photo; you can use a mesh with a wire thickness of 3-4 mm or weld it from a thin rod.
- Make a heat exchanger on the pipe. It can be in several versions: Water jacket. Make a sealed tank around the pipe with two pipes, which are connected to an external water tank (you can power a couple of water heating radiators).
- Just a heat exchanger to increase heat removal. Another cylinder is simply welded around the pipe, only a long and narrow oxygen cylinder. Due to the larger area, heat transfer increases.
- Coil on a pipe. Instead of a water jacket, you can wind several turns of a pipe, preferably copper, around the pipe, through which you can run water to the remote tank.
An ash pan in a design as described above is inconvenient: you will have to clean it with a poker, scooping out the coals into some container. Not the best option. A retractable one is more convenient in this regard. It is also used as a combustion intensity regulator. The temperature is raised with the ash pan open, combustion is active. After reaching the specified parameters, the ash pan is pushed in, little air flows in, and the combustion almost dies out.
Adjusting combustion using an ash box is rough. Fine adjustments can be made by welding a metal cup with a slide valve onto the door. By turning the gate, you increase/decrease the amount of air and combustion intensity smoothly, achieving exactly the mode that you need at the moment.
This idea was taken from Buleryan stoves. It's simple and effective. There are several photos of devices for adjusting the air supply to the firebox below.
Please note that the gate valve disk must be made either smaller in diameter than the inner diameter of the glass (by 5-10%) or a part is cut out in it (a sector, part of a circle is cut off). This condition is mandatory. This ensures minimal draft, and it is mandatory for safety: it carries away combustion products, preventing people from getting burned
This ensures minimal draft, and it is mandatory for safety: it carries away combustion products, preventing people from getting burned.
Potbelly stove made from two barrels
Even more different homemade potbelly stoves. There are a lot of designs. From the most basic to quite complex designs.
The most common heating devices for garages and cottages are potbelly stoves
A very interesting version of this potbelly stove is made from two barrels of different diameters nested one inside the other. How to make it: you need two barrels of different diameters, bricks instead of legs (you can weld metal ones if you wish), doors and hinges, metal for making a grate and a lid. You will need pebbles, clay and sand to make the backfill.
Potbelly stove made from two barrels
- Let's start by making the backfill: mix pebbles, sand and clay and heat them on fire.
- We cut identical holes in both barrels for the blower and fuel filling. But this needs to be done with an offset. We start with the smaller barrel. We cut out the ash door 2-3 cm above the bottom, and above it 10-15 cm above the door for loading fuel. We also do it in a larger barrel, but the bottom hole is already at a distance of 10-15 cm from the bottom, respectively, the second door is also higher (the distance between the doors is exactly the same as on the smaller barrel).
- In a smaller barrel above the hole for the blower door, weld a circle-grid in which holes are cut.
- Pour the prepared backfill into the bottom of the larger barrel. We select the level so that the holes for the doors coincide. Moreover, the barrels are in contact with their front sides, and a decent distance remains behind. Fill this entire distance with the same backfill, compacting it well.
- Having aligned the holes, weld them around the perimeter, weld the hinges and doors, and install the locks.
- Next you need to install the stove cover, cutting a hole in it for the chimney pipe, and weld it well.
- The last step is to install the chimney.
That's it, the potbelly stove from the barrel is ready. The uniqueness of this design is that it produces softer heat: most of the hard radiation is absorbed by the backfill. This structure can probably even be filled with stones by modifying the lid to make it possible to service the stones (replace destroyed ones).
Whatever design you choose, there are some rules that should be followed in order to comply with fire safety:
- A stove of any design must be placed on a base made of fireproof materials, for example, heat-resistant tiles, bricks or asbestos board sheets.
- The dimensions of the stove must be such that the space in front of the stove to the wall is at least 1.2 m.
- You cannot place a metal stove closer than 1 m from the wall. If the wall of the bathhouse is covered with metal or plastered with a layer of at least 2.5 cm, this distance can be reduced to 80 cm.
- Sufficient insulation of the chimney is also very important. The safest way to make it is from a sandwich pipe.
Follow these simple rules, and your homemade metal sauna stove will delight you with excellent performance and intense heat for a long time. You can read more about how to install a stove in the article “How to install a metal stove for a bath.”
How to make a door and vent in a disk oven
A disk stove, like a conventional stove, must have a door for loading fuel and an adjustable blower to control the draft.
PHOTO: YouTube.com To make a door, you first need to cut a square hole in the body, make a rim for the door from sheet metal and make a leaf from it. All this is welded to the body, and the door is placed on strong hinges by welding. PHOTO: YouTube.com Don’t forget that the door should have a handle and, preferably, a lock, so that the burning log does not accidentally fall out and start a fire. PHOTO: YouTube.com The author made an adjustable ash pan from a piece of square profile. He welded it into a hole in the body and made a movable plate inside, secured to a bolt with a handle on the outside. By turning the plate, you can regulate the flow of air into the oven and control the intensity of the fire
PHOTO: YouTube.com To complete the work, all that remains is to weld the exhaust pipe and lead it into the ventilation hole. It would also not hurt to make legs for the stove so that the floor under it does not heat up from the heat and, God forbid, does not catch fire
To ensure that the heat from the stove quickly fills the room, the author uses a regular floor fan located nearby. It blows hot air around the garage. For the final touch, you could sand the surface of the stove and coat it with heat-resistant paint.
That's it, the oven is ready. And if you doubt your abilities, here is a small useful video on the basics of welding that will help you cope with the task:
Watch this video on YouTube
Don’t waste your time in quarantine, do something useful, and then you will remember these days as well spent. Time flies by very quickly while working.
Features of the location of the rims
The wood burning in the firebox will give off its heat through the walls of the first rim, in which the bottom is cut out. It is welded to the second disk, where the bottom is in place, making it possible to fill it with stones. There is a pipe running inside through which combustion products will escape. The pipe should go inside the third rim, where instead of the bottom there is a gas divider. It is made of sheet metal. The last stage of gas cooling takes place inside the last rim, which looks like a tank with a tap and a lid. As a result, the stove works no worse than factory models, and in terms of durability it turns out to be even better than any of them.
Making a sauna stove with your own hands
Construction of a furnace includes preparation and the manufacturing process itself.
Use of truck wheels
If suddenly you only got rims from trucks, don’t worry - they are also suitable. A stove made from them will last even longer due to the thickness of the metal.
Important! Only steel wheels are used; light alloy wheels are not suitable for this purpose.
Necessary equipment
To build a heating unit you will need:
- 4 identical rims of the required size;
- Bulgarian;
- welding machine;
- thick sheet of metal or furnace insert;
- legs (optional).
Scheme of a sauna stove made from KAMAZ rims, drawing
If you take disks from trucks, for example, Kamaz, then the service life of the device will increase two to three times. The essence of this design comes down to the fact that 4 disks are installed on top of each other and fastened with a welding seam.
Photo 1. Drawing of a sauna stove made from car wheels. Includes firebox, heater, water heating tank.
The first disk serves as a firebox: a window is cut out in it for loading fuel and a door is attached. The second disk serves as a heater. The third is used as another heat exchanger, the fourth is a tank for heating water.
If it is necessary to impart stability to the structure, metal legs are welded.
Preparation
Take the correct size wheel rims and clean them of any dirt, rust or flaking paint residue. To do this, heat them over a fire and brush them over the metal. Decide which disk will be at the bottom of the structure. Make chalk markings for the combustion hole.
Furnace construction process
The lower two disks will serve as the combustion chamber and heater. For the firebox, cut out a window approximately 20 by 12 cm
Here it is important not to cut close to the edges - step back 2 cm from them, and the structure will not lose its strength. Next, the second disk is welded, and a grate is installed between them, on which the stones will be placed
The water tank must be made airtight, so a bottom made of metal sheet must be welded to the disk. A water tap is installed on the side.
- Next, all individual parts of the structure are welded together.
- Place a stove insert or a plate cut from an iron sheet at the bottom of the combustion chamber.
That's all - the oven is ready. If desired, legs can be welded to it.
First make cuts along the intended contour, and then cut through to the end. Be sure to sand the edges of the cuts to avoid injury.
Reference. Difficulties often arise when cutting a combustion hole. The metal is thick, and the disk constantly falls or turns. The advice is simple - use a vice. Clamp the disc into them and cut a hole.
Having completed the design work, it would be a good idea to paint the new stove with heat-resistant paint. But you can only paint cooled metal, so wait until the structure cools down. The black unit looks best.
Design Features
We have looked at one of the features of constructing a furnace of this type, let’s move on to others. In the vast majority of cases, a disk furnace is configured as a combined furnace. The key reason for this decision is that the steam obtained from the stove, made up entirely of disks, is quite hard and uncomfortable
For a sauna, with its low humidity, this is not so important, but in a Russian steam bath this circumstance is certainly worth paying attention to
To obtain high-quality soft steam, you must have a stove with a brick firebox. The discs are used as a container for laying closed stone backfill and as a mounted hot water tank for heating water. The use of an open heater is very limited due to the impossibility of burning the fuel in the stove to its fullest extent, so soot fragments will settle on the stones, which will cause them to enter the steam room atmosphere the first time you try to add steam with a ladle of water.
If it is not possible to build a stone firebox, then it is worth making a full-size stove from cargo disks, which are much larger than passenger cars and have a main seat diameter of about 20 - 22 inches. To reduce the overall height and laying of the disk segments, the design should be made with an embedded-type grate, made of a steel circle with a thickness of 6-10 mm along the diameter of the internal fit and reinforcing rods with a thickness of 12-16 mm.
A hole with a diameter of 150-170 mm is cut in the center of the circle onto which reinforcement sections are welded at intervals. The air passage of such a grate is enough to accelerate to a power of 25-27 kW. When installing the grate, it is necessary to provide a thermal gap within 8-10 mm; a metal ash pan with a diameter of about 200 mm is placed under the grate hole.
Again, taking into account the fact of the formation of hard steam in conditions of high humidity in a Russian steam bath, it is better to use a stove of this type for arranging a Finnish dry steam sauna. In general, step-by-step instructions for making a stove of this type can be viewed in the attached video
In general, step-by-step instructions for making a stove of this type can be viewed in the attached video.
Any type of sauna stove, made with your own hands from available materials, is characterized by its simple design and ease of installation. Thanks to its compact size, the wheeled sauna stove heats up quickly and therefore has high heat transfer.
A homemade disk oven has a number of advantages:
- availability and low cost of building materials;
- ease of manufacture;
- high strength and durability;
- ergonomic design that does not take up much space;
- accelerated heating and high thermal output;
- resistance to mechanical damage and deformation;
- inertness when exposed to high moisture and high temperatures;
- possibility of using different types of fuel - wood, coal, pellets.
We suggest you read: How to install a stove in a wooden house?
Among the disadvantages of the device are the following:
rapid heating of metal discs can lead to injury and burns if the stove is handled carelessly; rapid cooling of the structure will require a doubling of the volume of fuel used.
For these reasons, a stove made from car wheels should not be considered as the main heating equipment for a country house or cottage, but it is quite suitable for temporary heating of bathhouses and technical rooms.
Step-by-step guide to making a wheeled stove
Assembling a stove structure from wheel rims is an activity that does not require special training, but does require skills in working with a welding machine. Before you get started, you need to decide on the type of device. It could be a stove, barbecue or potbelly stove. The furnace manufacturing process consists of several stages. The very first thing is to prepare materials and equipment.
List of materials and tools
The main components of the furnace are car wheels. The most suitable are steel rims from passenger cars or small trucks. Large specimens left over from large-tonnage trucks require efforts to seal the joints, and ovens made from disks of this size are cumbersome. For work you also need to prepare the following materials:
- wheel rims – 4 pcs.;
- Sheet steel;
- fittings;
- door hinges;
- square pipes;
- thermal paint.
To cut and connect parts you will need a grinder, a hacksaw (for fine cutting), a welding machine, a drill, a file, pliers, a tape measure, a hammer, and sandpaper. Brushes will be needed for painting.
First stage: preparing disks
All irregularities and dents on the rims are corrected - the shape should be symmetrical. The surface is cleaned of rust. If there is old paint, then the disk sources are calcined and sanded. But the most important thing is that car wheels must have smooth, even edges. This will ensure that the circles are in close contact and that there are no gaps through which smoke can penetrate. To level each disc, it is ground in a circle.
One disk out of four is left in its original state; it will be needed for the hob. The remaining three copies require additional processing. They cut out the core using a grinder. The result should be a hollow, wide pipe. When these three components are combined, the furnace body is formed.
Second stage: making grate bars
The grate is a lattice plate that separates the firebox and the ash compartment. Firewood or coal is placed on the grate, and the air coming from below provides draft and promotes their combustion. The easiest way to make grate bars is from reinforcing bars. They are cut into pieces and welded inside one of the disks. It is not necessary to make a lattice; it is enough to weld the rods parallel to each other.
Instead of reinforcement, you can use a sheet of steel. Slots are cut in it or holes are made. The steel must be thick enough to withstand the high temperature. A thin sheet will quickly burn out and will not cope with its function.
Third stage: welding parts
For welding work, 5 mm electrodes are chosen. The blanks are welded circumferentially to each other. The auto disk with the whole core should be the top one. First, the edges are pinched by welding. Then, making sure that the cylinder is smooth, weld along the entire edge. The result is a barrel-like structure. If necessary, the number of ring segments can be reduced or increased.
A circle is cut out of a steel sheet. If you plan to use the stove indoors, then this sheet should be larger in diameter so that the coals fall on it and not on the floor. If the stove will operate exclusively outdoors, the bottom can be the same size as the body. Four legs are cut out of a small diameter pipe and welded to the base of the stove.
Fourth stage: installation of a firebox and blower
The next step is the combustion and ventilation windows. The height of the firebox is determined at your discretion, but most often it is made in the second disk from the bottom. The blower is located under the firebox (in the lowest rim). The hole for it is smaller than for the firebox. The marked rectangles are cut out with a grinder. Frames for the holes are made from steel plates and welded. Doors are cut out of metal sheet and hung on hinges welded to the wall of the body. Handles are attached to the doors.
There is a simpler option for installing a firebox and a vent - without using frames. Rectangles cut from the cylinder barrel are used as doors. The hinges are welded directly to the body of the disk stove.
Fifth stage: painting
The finished structure is painted to give an aesthetic appearance. To do this, first all welds are processed with a grinding machine. The remaining areas with rust are also cleaned. After this, the body is coated with heat-resistant paint. Another option is to use a can of high-temperature paint. After the paint has dried, the oven made from car rims is ready for use.
Disc furnace assembly video
The entire process of making a stove from car wheels is shown step by step in the video: