A pre-heater is a device to simplify starting and extend the life of the engine. In addition to these basic functions, installing a heater provides:
- saving fuel in winter. Since in the cold, the engine consumes more
- the interior is heated at the time of landing, which is especially important with leather seats
Heater: brew yourself
When choosing a preheater, you need to take into account the design of the engine, how often you operate it in cold weather and, of course, the cost. The price of a normal pre-heater is about 8,000 rubles, and the weight is about 8 kg, but you can make an engine pre-heater yourself.
In order for the engine to start without problems, it is necessary to heat the oil in the crater. It’s dangerous to do this with open fire, but here’s what you can come up with:
- Take a pipe bent in two places and in different planes (or weld it yourself)
- Weld 3 legs to it for stability and place a nozzle under it
- Since there is no longer an open fire due to the bend, and heating is on, you can place the structure under the crankcase and after 20 minutes, you can drive even in severe frost
It’s a good idea to carry such a device with you at all times, especially for those who like winter fishing and hunting. Nowadays there is a large selection of modern devices of similar action on sale.
The spark plugs are connected as follows
– two spark plugs are connected together with their pluses using a jumper;
– the remaining spark plug is connected separately.
With this connection, it will be possible to use different degrees of heating: on one candle, on two candles or on all three candles (in severe frost).
To connect candles, you can use automatic machines that are placed in electrical panels (220 Volts).
To connect one candle, you need to use a double wire (each 1.5 sq. mm) and a 16 Ampere circuit breaker. To connect two spark plugs, the thickness of the wires should be 2.5 square meters. mm, and the machine should be 25 Ampere. Also double wire of 2.5 sq. mm. used to connect both machines and ground. The circuit breakers used will perform the functions of both a switch and a fuse.
Severs-M installation
One of the most popular of them is Severs-M. To install on a car you will need:
- Rubber hose, diameter 16 mm
- Two tees: the first is 32*16, and the second is smaller - 16*16
- Two clamps 30*40 and six clamps 12*20
- Sealant and 5 liters of antifreeze
Since this device is an electrical type, it is necessary to determine in advance the length of the cable and where the 220V outlet is located. It is better to install it under the air filter, and heat it through the stove. The antifreeze intake is from the pipe between the radiator and the stove.
- To get started, you need to drain the coolant and cut the hoses and pipes
- Then install the tees, lubricating them with sealant in advance
- We attach hoses to the tees and tighten everything with clamps
- After this, you need to pour liquid into the cooling system, wait a little until the air comes out, start the car and add liquid
- If after a visual inspection there are no drips at the joints, it means that the installation was successful and heating will be
- The power cord must be secured to the body so that it does not come into contact with heating or moving parts of the machine.
Advantages and disadvantages of 12V devices
The 12 V antifreeze heater operates from energy supplied from the battery. Such devices also have certain advantages. Many owners choose just such devices for easy engine starting. Their main advantages include:
- Excellent mobility of devices. There is no connection to a place with a 220 V outlet.
- Some models of heaters of this type are based on the principle of a thermos. It is as follows: for several days, the heated liquid can maintain optimal operating temperatures.
- Superior functionality.
The disadvantages of devices that provide heating of 12 V antifreeze should also not be overlooked. After all, information about this can protect you from making the wrong choice. The main disadvantages of such devices include:
- high cost;
- difficulties with connecting the device to the vehicle’s on-board network;
- When using the heater, the battery discharges.
If you decide to install such equipment in your car, you will first have to replace the battery with a more powerful one. If there is a weak battery in the engine compartment, then a battery with a capacity of 55 or 65 Ah should be placed instead.
Autonomous heater option
Another, one of the most common types of this equipment is an autonomous pre-heater. It is capable of heating large volumes of air quickly, consumes little energy, and its operation is almost silent.
Installation can be carried out both in the power supply system and in the cooling system of a car with a gasoline or diesel engine. There will be heating in any case. The energy source in this case is the fuel tank.
This preheater consists of a small chamber with a fuel-air mixture and a special pin that ignites it. In the walls of the chamber there is a constantly circulating coolant, the pump is responsible for heating it. Further, it enters the small circuit of the cooling system, which provides heating.
The installation is quite simple: you need to connect the heat exchanger of the device to the small cooling system office, and the electrical component to the machine’s electrical network. For example, in a Mercedes car, glow plugs can be installed in the same row with the injectors in the cylinders, the wires of which can be connected to the relay.
Total
Homemade antifreeze heating for a diesel car aims to speed up the warming up of the engine and interior. The essence of its work is that glow plugs heat the coolant when the engine is turned on in a certain temperature range. The installation is easy to assemble yourself using components from VAG.
The heater fits into the inlet of the cabin radiator, the temperature sensor into the outlet of the heater. There are no special comments regarding the installation of performing equipment. Regarding the electrical wiring connection, the only warning is not to mix up the 30A and 70A relays.
Engine preheater manufacturing and installation.
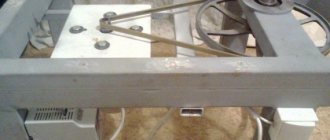
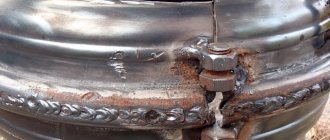
- One of the most important and labor-intensive processes is the manufacture of a heat exchanger; for this you need to make an expansion tank from a piece of pipe and plates using solder and a blowtorch. Make three holes on the top of the tank and solder nuts to them, and on the sides there are pipes, one at the top and the other at the bottom. Example in the photo.
- Install the spark plugs into the heat exchanger housing.
- Insulate the heat exchanger using splen or other insulation to avoid wasting energy and reduce the warm-up time of the liquid.
- The heater will be able to operate in three modes: at mild frosts of 0 - -5 degrees one candle will turn on, at -5 - -15 degrees two candles, severe frosts above -15 degrees three candles. To do this, connect two glow plugs with a jumper, and one should remain independent.
- Then you should connect the device to the car battery; the device must be connected with wires with a total cross-section of at least 5 squares. The wires are connected through breakers 16 and 32A, respectively; this must be done for safe operation of the device in different modes, with the expectation that one candle will consume 15A, and two 30A. Depending on the number of candles involved, power consumption can vary from 180 to 670 W.
- The engine pre-heater is installed in the lower radiator pipe on a small circle, and an electric pump for pumping coolant is also installed there.
You need to warm up the antifreeze in the morning for no longer than 10-15 minutes; this is enough for the liquid to warm up a little. After starting the engine, do not turn off the heating; it warms up the car much faster.
In winter, starting a frozen power plant causes many problems for car owners. Thickened oil, poor fuel volatility, and increased resistance in the battery make the power unit very reluctant to start. But there is a solution to this problem - install and use pre-heaters. These devices allow you to warm up engine fluids, providing relatively easy engine starting in severe frost.
The car accessories market offers a large number of such devices. But many car owners are in no hurry to spend money, preferring to make an engine heater with their own hands. And this is quite possible; in terms of performance indicators, homemade devices are not inferior to factory ones, and the financial costs will be significantly lower.
Heating the fine fuel filter of a diesel engine
The manufactured fuel filter heater is non-removable and must be assembled on a filter that will be directly installed on the vehicle.
Good to know
If you do not have the necessary knowledge and skills, you should entrust the connection of the fuel heater to a professional electrician. Improper modifications to the vehicle's electrical circuit may cause a fire.
First way
The main goal of this method is to create a heating field around the outer contour of the filter device.
What will you need?
To complete the task you will need:
- from 7 to 10 meters of copper wire with a cross-section of up to 1 mm (nichrome material can be used);
- four-pin relay;
- 10 amp safety device;
- heat-resistant sealant or fiberglass;
- two couplers or plumbing clamps;
- device activation and deactivation button;
- connecting electrical circuits of appropriate length;
- elements for soldering cables - rosin, tin and soldering iron.
Algorithm of actions
Independent work on installing and connecting a liquid heater is done as follows:
- At the first stage, you need to lubricate the fiberglass with sealant, and then glue the material to the outside of the filter device housing.
- Then this structure is dried for 24 hours.
- The body element is wrapped with wire, and the ends are fixed with clamps.
- Then the made coil, coated with sealant, is wrapped in fiberglass.
- The resulting structure is dried.
- Terminal clamps are soldered onto the ends of the wire to connect power lines.
- The device is assembled in accordance with the diagram shown.
Connection diagram for bandage filter heater
Second way
The main difference compared to the first method is that in this case ready-made heating equipment is used. Such a device uses a heating system for side mirrors or a special flexible heater.
What will you need?
To complete the task you will need:
- insulation;
- conductors of appropriate length;
- button to activate and deactivate equipment;
- four-pin relay;
- foil thermal insulation 0.5 mm thick;
- 10 amp fuse;
- plumbing or plastic clamps or a piece of wire.
Algorithm of actions
Installation of the electric fuel filter heater is carried out as follows:
- A heating thread or special material is wound around the filter device. Fixation is performed using insulation.
- The wiring is being connected and laid.
- The thermal insulation material is attached on top of the heating device.
- The resulting structure is fixed using clamps or wire.
- The resulting device is connected to the battery.
Some nuances
A few details about the features of using both types of heaters. If you take a regular passenger car, the volume of lubricant and coolant is not much different (on average, 3.5 liters of oil are poured, and 4.5 liters of antifreeze). That is, theoretically, approximately the same energy will be required to heat both liquids. But there is one nuance - the oil is in one place - the pan, and the antifreeze is located throughout the system. Therefore, in the case of using a device for heating the coolant, circulation is required, but when heating the oil this is not necessary.
And one more thing - the antifreeze needs to be heated quite strongly (at least to 50-60 degrees), but the oil does not require this; you can only slightly increase its temperature to increase fluidity.
Due to these features, it is not advisable to use a 12-volt heater to heat antifreeze, since proper heating will require a lot of energy. Therefore, autonomous devices are mainly used to influence the lubricant, but those operating from a 220 V network are installed in the cooling system.
Next, we’ll look at how to make a pre-heater with your own hands for a VAZ or any other car. Note that there are a lot of variations of homemade devices, but we will describe only two devices that are relatively easy to manufacture.
Advantages
These devices have gained such popularity due to their remarkable qualities:
- they are easy to use and perfectly heat antifreeze even in severe frost;
- they heat up the coolant long before the first start of the car engine;
- uniform heat exchange occurs between the engine elements and the antifreeze, due to which the parts included in the cylinder-piston group do not wear out during the process of starting the engine, even at very low temperatures;
- antifreeze heater ensures 100% engine starting even in severe frost;
- the load on other units, including the starter, is significantly reduced during the process of warming up and then starting the engine;
- fuel consumption becomes significantly lower when starting a warm engine;
- The antifreeze heater also has additional capabilities that allow you to warm up even the interior of the car and quickly melt the ice on all its windows.
Antifreeze heater 220 V
The first will be an antifreeze heater operating from a 220 V network. To manufacture it you will need:
- heating element;
- Pipe sections;
- Plumbing fittings, tees, adapters;
- Materials for sealing connections;
- Clamps;
- Cable with plug;
- Insulating materials;
Below are the plumbing items that will be required for assembly:
Regarding the heating element. It is best to purchase a heating element for a water heater (for example, “Ariston”), equipped with a thermostat. Installing it in a homemade device will not be difficult, and in addition it will be possible to adjust the heating range. As for power, a heating element of 1.2-1.5 kW is suitable for a passenger car.
The diameter of the pipe and its length should be selected based on the size of the heating element and its mounting thread. The pipe itself should be thick-walled.
To assemble the device you will not need many tools:
- Bench vice;
- Taps and dies for threading;
- A set of keys;
- Angle grinder with cutting wheel (“grinder”).
Having prepared everything, you can start working. Assembling the pre-heater is done as follows:
- We take the pipe and make the necessary measurements, taking into account the existing bends and tees;
- In plumbing tees, the threads are usually already made, so you can immediately screw the heating element into it using sealing materials;
- We cut threads on a piece of pipe (external on one side, internal on the other);
- Screw the prepared section into the tee;
- On the other side, screw the adapter into the pipe;
- We screw another adapter into the third terminal of the tee;
- We connect the cable to the heating element and isolate the connections;
After assembly you should get a device like this:
As you can see, assembling an antifreeze heater is very simple. It is only important that all connections are well processed in terms of sealing, since even the slightest leakage of antifreeze is not allowed. Therefore, after assembly, you should carefully check the device before installing it on the car.
Additionally, you can weld a mounting bracket to the pipe. Installing an engine heater yourself is also not difficult. It can be mounted using either a sequential circuit (embed the device into the antifreeze supply pipe into the interior heater) or parallel (organize the supply from the cylinder block, and the drain into the pipe leading from the main radiator).
Difficult choice
To answer the question of which diesel engine preheater is best to purchase, you need to take into account various nuances. This includes the frequency of use of the vehicle, the characteristics of the vehicle itself, as well as the conditions of its operation and the service life of the engine.
If the climatic conditions are satisfactory, then there is no particular need for the device. Also, if the car is in a heated garage most of the time, then a heater is unlikely to be needed. It’s another matter if the car is operated in a harsh climate, where winters are usually long and frosty. Then the preheater will be truly in demand.
Naturally, a modern new car will easily start even in cold weather, but the wear of its engine parts will accelerate, since they are subjected to additional and heavy load. Therefore, those car enthusiasts who want their vehicle to last as long as possible should take care of it and purchase a diesel engine pre-heater.
Reviews from those who already use the device are mostly positive. Some people prefer domestically produced models, while others choose only imported ones. Both have their advantages and disadvantages.
Let's look at the brands that are most in demand among car enthusiasts.
How to connect and use a water heater?
Let's consider the procedure for connecting and using homemade heaters.
Solar
The solar collector must be connected to the pool circulation system . The order in which the tubes are connected does not matter much - the installation works equally in both directions.
Electric
The electric heater is connected to the gap in the circulation system, after the filter, but before the dispensers. This is important because chemicals are added to the dispenser to purify the water.
Operation of electric heaters consists of setting the operating mode (switching the power of the heating element, achieving maximum effect). If the device does not work, change the heating element. Other than this, no special arrangements are required.
Fuel (wood)
The wood heater is connected by connecting the coil leads to the circulation system (into the gap).
The heater's operation begins after the combustion chamber is loaded with wood and ignited. While they burn, the water heats up.
If there is no fire, the installation simply passes water through itself. The user is required to regularly clean the firebox from ash, soot, and coals. In addition, you need to monitor the condition of the chimney, check the connections and the walls of the firebox - they can burn out.
Webasto or Hydronic
Those who trust only foreign manufacturers should pay attention to diesel engine pre-heaters Webasto and Hydronic. The first are represented by three models:. The first are represented by three models:
The first are represented by three models:
- E - for cars;
- C - for engines from 2200 cc;
- P - for SUVs, minivans and minibuses.
The advantages of the models include the presence of an automatic programmable timer and remote control. The disadvantages are the possible freezing of the liquid crystal screen and the high cost of the equipment.
The pre-heater for the Hydronic diesel engine is available in five modifications:
- 4 - for small cars with an engine capacity of up to two liters;
- 5 - for cars with an engine of more than two liters;
- МΙΙ - for trucks and special equipment - from 5.5 to 15 liters;
- ΙΙ Comfort – for engines from two liters;
- LΙΙ - for trucks and special equipment - over 15 liters.
The devices are capable of self-diagnosis, but their glow plugs can often become clogged, which will have to be replaced at your own expense.
Finally
Engine starting in cold weather is a problem in many regions of the country. Therefore, the presence of a heater sometimes saves and helps out of difficult situations.
But I will make one remark. Many PPD manufacturers claim that from the moment the heater is started until the engine is completely warmed up, no more than 30 minutes will pass. In fact, when the temperature is very low, it can take 1-2 hours to warm up. So you shouldn't always trust the manufacturer.
But if the outside temperature is 10 degrees Celsius or higher, there is no need to turn on the PPD. Don't waste your energy.
Whether you need such a unit or not is a purely individual question. For some regions this is a really important component. But for others, buying PPD will simply be a waste of money.
Write your opinion regarding heaters and share your experience of using them using personal example. Don't forget to subscribe and invite your friends to join us!
( 1 ratings, average: 5.00 out of 5)
Did you like the article?
Subscribe to updates and receive articles by email!
We guarantee: no spam, only new articles once a week!
All motorists clearly know that for safe driving in the cold season, it is better to start driving with a pre-warmed engine in the car. Especially if you live in regions with a cold climate. The best solution would be to heat the antifreeze at 12 volts.
Advantages and disadvantages of 12V devices
The 12 V antifreeze heater operates from energy supplied from the battery. Such devices also have certain advantages. Many owners choose just such devices for easy engine starting. Their main advantages include:
- Excellent mobility of devices. There is no connection to a place with a 220 V outlet.
- Some models of heaters of this type are based on the principle of a thermos. It is as follows: for several days, the heated liquid can maintain optimal operating temperatures.
- Superior functionality.
The disadvantages of devices that provide heating of 12 V antifreeze should also not be overlooked. After all, information about this can protect you from making the wrong choice. The main disadvantages of such devices include:
- high cost;
- difficulties with connecting the device to the vehicle’s on-board network;
- When using the heater, the battery discharges.
If you decide to install such equipment in your car, you will first have to replace the battery with a more powerful one. If there is a weak battery in the engine compartment, then a battery with a capacity of 55 or 65 Ah should be placed instead.
What types of converters are there?
In the modern world, there are many types of current converters, both small for minimal needs and large ones capable of providing energy to several electrical appliances.
For the simplest needs, you can use converters powered by the cigarette lighter in a car. Of course, they will not be able to ensure the operation of the refrigerator, but they will be able to handle a radio or charge a phone, tablet, or laptop.
Thanks to PWM controllers, converters have taken a significant step forward. The efficiency has increased, and the current shape has come closer to the pure sine wave form familiar to devices. And the maximum power increased to several kilowatts.
Of course, all this applies only to expensive and massive converters. But the simpler ones also did not stand still and improved their characteristics.
The operating time will be limited by the power and capacity of the battery. And if you go on a trip for a long time, then you should not load the battery too much and limit yourself in electricity consumption.
For outdoor recreation, a compact, low-power converter is best suited. It is quite enough for everyday needs on a hike.
But do not forget that simple inverters do not produce a pure sine current, but an almost rectangular one, which leads to limitations.
Not every household appliance will be able to work with this form of current and may become completely unusable. Therefore, you should be careful when choosing devices for outdoor trips.
There are three types of voltage converters from 12 to 220 V:
- Automotive;
- Compact;
- Stationary type.
We also must not forget that the higher the load on the converter, the lower its efficiency. And if this is not necessary, it should be loaded minimally so as not to waste precious energy.
Preparing a sleigh in the summer: ways to eliminate thermal deficiencies
The solution to the problem of reliable supply of combustible mixture to the power unit was found a long time ago - to heat the elements of the fuel line:
- fuel intake;
- pre-filter (separator);
- the pipeline itself;
- fine filter.
Modernized elements are already on sale, which, along with their functional capabilities, can additionally receive heat. However, their cost is quite high. Experienced motorists say that it is much cheaper to make a diesel fuel heater with your own hands , while providing a much longer service life.