30.10.2019
Galina Kaptsova
Goals: to teach children to compose a geometrically correct and accurate product that the children are planning to make ( robot
)
; teach children to see the shape of the future robot
;
develop the ability to monitor the progress of your work, learn to work with various materials (
matchboxes , tape)
;
develop creative imagination; cultivate patience and accuracy in work, and artistic taste. Materials: 9 empty matchboxes
, tape, PVA glue, scissors, colored paper.
Sample :
1. First, glue together 4 matchboxes with tape - this is the body
.
2. Then each box
and cover the body with colored paper using PVA glue.
3. When all the individual parts are covered with colored paper, we immediately begin to create a robot
.
4. On one small box we drew eyes for the robot
, nose and mouth with a black marker, and glue it to the body.
5. After this we make an antenna for the robot
.
We take a piece of plasticine, make a ball out of it and insert two matches
, attach it to the head of our
robot
.
These are the wonderful robots we have created.
!
Publications on the topic:
Pedagogical project Construction from matchboxes Pedagogical project of MADOU "Kindergarten No. 6" "Construction from matchboxes"
The bright holiday of EASTER is approaching! On the bright Sunday of Christ, let your soul be pure and bright! It will be a hospitable treat, Sun.
A robot is an automatic device created on the principle of a living organism. Modern robots have different appearance and design.
The group spent a week on the lexical topic “Pisces”. The following tasks were set: to clarify children’s ideas about fish and their appearance.
April 1 is a day of laughter and fun. A wonderful holiday took place in our kindergarten. And to consolidate children's emotions, we decided to make.
Goal: making a three-dimensional craft “Car” from matchboxes. Objectives: develop cognitive interest, encourage children to...
The master class was prepared by Irina Valerievna Kashina, teacher at the kindergarten No. 49, Perm region, Berezniki. I think it's a master class.
Our entire country was looking forward to celebrating the 70th anniversary of the Great Victory of our people over Nazi Germany. And I want to tell you.
Crafts from waste materials: unusual crafts and toys from matchboxes - robots and transforming toys. Crafts for boys.
Amazing crafts from matchboxes
You can make many different crafts with your children from waste materials. Such creativity develops children's fine motor skills, imagination, spatial thinking, design and modeling skills, etc.
What crafts can be made with children or for children from matchboxes? Usually a mini-dresser and 2-3 other ideas come to mind. But it turns out that you can make very interesting toys from matchboxes. For example, robots and cars, and also transforming toys.
These crafts made from waste material (matchboxes) are more suitable for boys, but my daughter and I really liked them!
Crafts robots and transformers from matchboxes
A samurai craft made from matchboxes glued together and covered with colored paper (or even simpler -). The samurai's swords are made of cardboard, attached to the box hands with ordinary paper clips, so they can be easily removed and attached in place.
Made from 14 matchboxes, this adorable yellow transformable robot can turn into a car.
The red fire truck can transform into a robot and back.
And this transforming toy can turn, in addition to the robot, into two different models.
The video makes it clearer how this happens. Amazing, right?
And in this video there is another transforming robot, it is not in the photo.
About creating these crafts from matchboxes and other waste materials
Sergei replied that he used to be interested in modeling - gluing together models of military equipment. After they became more expensive, I began to come up with my own models from matchboxes and lids, because... This is a waste material that requires almost no material costs.
Once during his vacation, when he had a lot of free time, Sergei began making robots from matchboxes. Then he complicated them until he started to get transformers. Gradually I began to make crafts not only from matchboxes, but also from lids and other waste materials.
The first matchbox craft was this robot. Then other robots, transformers, cars and even a dinosaur appeared.
How to make robots from matchboxes with your own hands
Descriptions of making robots are in the book. This is a small brochure. Master classes on making transformers and other crafts will be in a new book, which should be published this fall.
And using these ideas as a basis, you can come up with your own crafts from matchboxes.
I suggest looking at others and in particular,.
Happy creativity! © Yulia Sherstyuk, https://site Copying site materials is prohibited and is punishable by law.
All the best! If the article was useful to you, please help the development of the site by sharing a link to it on social networks.
Posting site materials (images and text) on other resources without the written permission of the author is prohibited and punishable by law.
- Books about crafts made from waste materials: robots and...
Due to their dress code, costume parties (Halloween, etc.) require first-class costumes. In addition, at such holidays there are usually competitions for the best, most detailed superhero costume. Who wouldn’t be pleased to take part in such a competition dressed as their favorite hero?
I present to your attention an article on how to do
DIY Optimus Prime costume
.
Necessary materials:
- Hot glue gun + rods for it;
- Adhesive tape (red, gray);
- Masking tape;
- Rulers of different sizes;
- Stationery knife;
- Scissors;
- Aerosol paints (primer, red, blue, white and silver);
- 4 mini flashlights;
- Helmet;
- Velcro;
- Cardboard or foam board;
- 2 empty tin cans;
- 2 plastic “visors” (for windshields);
- Hockey gloves;
- PVC pipes.
Simple paper robot
To create a paper robot craft, you need to stock up on the following materials:
- robot diagram;
- paper;
- scissors;
- glue.
In addition, you may also need cardboard, a needle or awl, felt-tip pens and rubber bands to connect the parts.
In the diagrams you can see several types of lines. The cut with scissors is provided along a continuous line. The dotted outlines are for folding the paper.
If you need to make holes, use a needle or utility knife before cutting out the design. For a visual representation of the finished toy, bend all the parts along the dotted lines, as seen in the photo of the robot craft.
It is necessary to glue the craft with PVA glue, which has strong adhesive properties and does not stain the paper. When assembling the base, you must follow all the instructions, otherwise the robot will not be able to move.
This is how you make a robot craft from cardboard:
- print out the diagram on cardboard;
- use scissors to cut out all parts of the diagram, following the instructions;
- bend the cut parts along the dotted lines;
- we connect the necessary parts with glue;
- We assemble all the robot parts into one paper structure, following the instructions.
Work without using glue
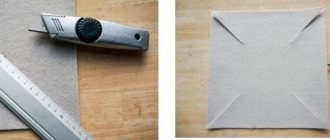
Crafts made from matches without glue will be an interesting practice for beginners. The most traditional product of this type is the house.
The principle of its creation is very simple:
- First of all, a pair of matches are placed parallel to each other on a solid and level base.
- Eight matches are laid out on them perpendicularly and evenly in one row.
- The next layer of eight elements is placed at right angles to the base. In this way, the foundation of the future structure is formed.
- The next seven rows are formed from four matches each. In this case, the heads are placed in a circle. This is an analogue of a log cabin.
- Then an “overlap” is laid out from eight matches, and a row of six parts is placed on top. A coin is carefully placed on them, placing it in the center of the workpiece.
- You need to insert a match into the gaps formed between the last rows.
- In this case, gaps are formed along the walls, into which another match is placed in the same way.
- These manipulations are performed slowly and very carefully, otherwise the structure may collapse.
- Having formed the entire perimeter, they begin to create the roof.
- To do this, matches are placed in the middle of the workpiece so that a roof with two slopes is ultimately formed.
The last step is to form the chimney, for which two or three matches are carefully inserted vertically into the roof.
A more complicated version of the animal
More complex versions of animal figurines consist of a larger number of boxes and should schematically resemble the outlines of real samples.
To design the body, you can also use paper or several layers of gouache.
The muzzle can be drawn by hand or cut out of paper and then glued.
Add a tail, ears, tusks if it requires it.
The complexity of this method lies in the need for a schematic representation of animals. Before starting all operations, if children will do them, you can try to simulate the intended gluing by placing the boxes on the table.
Another option for this work is to use only one box, when the legs and arms are made from a thin strip of paper folded like an accordion. The animal's face is drawn on a sheet of paper, painted, cut out and glued on top.
Another way is also using one box. It is painted in the color of the animal’s skin, after which a muzzle is drawn on a separate sheet and then cut out, which is glued to the base.
Military equipment
On the eve of the holiday on February 23, we will first of all talk about models of military equipment. They can be given to dad and grandfather, taken to kindergarten and school, and used for playing at home. See what theater of war your son or grandson can play out. When independently producing such toys, the child develops excellent fine motor skills, perseverance and the desire to achieve the goal; the child develops interest and motivation, and gains self-confidence from the fact that he can do all this himself. Let's not deprive children of this, right? Next, we offer detailed assembly diagrams for military vehicles, an armored personnel carrier, and even a missile launcher. All this is from matchboxes!
Special equipment
Various cars can be made from this wonderful scrap material. For example, an ambulance, a fire truck, a bus, a taxi, a traffic police car. With such crafts you can participate in various competitions.
Fairy tale characters, animals
Using colored paper, glue, and matchboxes, you can make characters from your favorite fairy tale or cartoon. Look, which fairy tale heroes are depicted in the photograph? Wonderful African animals and our native Cheburashka are also made from matchboxes. Little children love small toys and interesting attributes that come with them. Inside a matchbox there may well be a whole house for an unusual animal. You can put it in your pocket and carry it with you everywhere.
Educational games made from matchboxes
Games for child development can be made using matchboxes. This could be an association game, learning letters and numbers, and so on. Make thematic images: who lives where; who eats what?
Toy furniture made from matchboxes
Matchboxes are the basis for making toy furniture, and then everything depends on your imagination and decorative material. The furniture assembly diagram looks like this: You can decorate the furniture in your own way: with colored paper, fabric, toothpicks, wallpaper and self-adhesive film, using the decoupage technique.
Using matchboxes you can make unusual interior items: a TV, a washing machine, a piano, a suitcase, a frame for photographs or paintings in a doll’s house.
Let us emphasize once again that everything ingenious is quite simple. And the interesting new is the well-forgotten old. Now you're less likely to throw away matchboxes and waste material for a wide variety of creative designs!
Suitcase
To make this miniature retro-style suitcase, you need thick brown paper (two shades), an empty matchbox and funny pictures (these will be “icons”). We cover the boxes with paper, make a handle, “straps” and decorate with retro “badges” - the suitcase is ready
Miniature photo album
Do you want to surprise and please your loved ones? Then give them this miniature photo album as a gift. For this you will need: a matchbox, glue, paints, postcards or scrap paper, scissors, brushes and, of course, tiny photographs. Decorate the box and put a miniature screen of photographs inside it. You can always carry such an album close to your heart - in your breast pocket.
Screen book
Using the same principle, you can make a baby book. Print out short fairy tales, come up with illustrations, make a screen and stick it in a box. Perhaps such an unusual form will awaken a child’s interest in reading
Giraffe
You can use 7 empty matchboxes to make this cute giraffe. You just need to make a frame, cover it with paper and decorate it. This is a great idea for sharing creativity with children.
Mini zoo
You can make not only a giraffe from matchboxes, but also an entire zoo. Take four boxes, paint them gray (hippo), orange (lion), light and dark brown (bear and donkey). Glue the corresponding faces on top. You will get a bright and original gift for your baby.
Valentine's card
You can (and should!) confess your love not only on February 14, but all year round. Moreover, it’s so simple: take a matchbox, cover it with beautiful paper, attach a couple of hearts - and you’re done. You can (and should!) put something tasty inside - it will be a very sweet confession.
Garland surprise
For the New Year, as well as any other holiday, you can make such a bright garland with surprises. Cut out stars from glossy paper and glue matchboxes with sweets, nuts and other goodies to them.
Advent calendar
In America and Europe, on the eve of the New Year holidays, it is customary to make so-called Advent calendars. This is a kind of postcard consisting of 24 “pockets” (according to the number of days before Christmas). Inside these cases are sweets, small gifts, notes with biblical quotes or just kind words. One surprise is opened per day, thus recharging the pre-holiday mood. You too can make such a calendar. A simple but very beautiful way is a mosaic made from matchboxes.
Christmas decorations
Christmas decorations in the form of Christmas deer and Santa Claus are matchboxes covered with paper, with faces made of felt. If you show your imagination, the Snow Maiden, Snowman and other New Year's characters may also appear on your Christmas tree.
Gift wrap
In such an original box you can give a ring, earrings or other “little things”. And it is still unknown what will be more valuable - the box or its contents. After all, as you know, the best gift is one made with your own hands. To turn a matchbox into an original package, you need scrap paper and other decorative elements, as well as your imagination.
Airplane
The boys will probably love the idea of making a plane with their own hands. For this you will need a matchbox and colored cardboard. You need to cut out blanks from cardboard: two wide strips, one long narrow strip and two narrow small ones. And then, as they say, it’s a matter of technique.
Children's educational game
Another game that is useful for a child’s development is called “Who Lives Where?” And it can also be made at home using matchboxes. To do this, you need to stick a picture on the label with the habitat of a particular animal (for example, an aquarium), and inside the box - with the animal itself (a fish). Thanks to this, the baby will quickly and easily remember who lives where.
Sources
- https://gidrukodeliya.ru/podelki-iz-spichek
- https://www.DomSpichki.ru/1039-avtomrbil.html
- https://sdelala-sama.ru/podelki/3679-robot-svoimi-rukami.html
- https://moreidey.ru/igryi-i-igrushki/podelki-iz-spichechnyih-korobkov.htm
- https://ratatum.com/podelki-iz-spichechnyh-korobkov-svoimi-rukami/
- https://materinstvo.ru/art/podelki-iz-spichechnyh-korobkov-dlya-malchikov-i-devochek
- https://Lifehacker.ru/25-interesnyx-shtuchek-iz-spichechnyx-korobkov/
New Year costume
A costume is often required for a kindergarten matinee. It’s easy to create it yourself from cardboard boxes from household appliances. If a child wants to be a robot, then for this it is necessary to combine two elements. One of them will be the body, the second will be needed for the head.
You need to make a hole in the top box. It can be rectangular or square in shape. This will allow the baby to see what is happening around.
The robot's arms and legs can be made from ventilation pipes. You can decorate a fancy dress costume or use foil for decoration. It is worth taking care of the weapon, adding an antenna and other parts.
Possible benefits
We could not ignore some important aspects of the benefits of this lesson.
If something similar was assigned as homework in a labor lesson, then the feeling of responsibility increases to the need to complete it and find a way to solve it. We, as adults, can help our children.
The challenge of coming up with something from a simple matchbox develops ingenuity. Fine motor skills and perseverance in small children develop.
The materials used are extremely fragile, so you need to be careful when working with them.
How can we improve
Using an old alphabet, or buying an inexpensive one at the supermarket, you can cut out the letters and stick them on the blanks you have already received.
To improve the appearance of crafts, you can paste paper not across, but along.
Craft stores sell small magnets; they can be used to allow your child to play “the alphabet” on the refrigerator.
Make repeating letters so that children can form words for you using the letters.
To involve children in the game, you can leave some messages on the refrigerator for the kids, don’t doubt that they will pick up this idea.
You can take it a step further and print out sheets of animals and insects and what they eat. After that, stick pictures on the top of the box and the supposed food inside, then ask the child to guess.
Complicated version of the house
The complicated version of the house involves a more careful attitude to details and differs from the simple one in that you must glue the matchboxes on both sides.
Before doing this, invite your child to first draw a diagram of the house on paper on all four sides, and then plan how many “building blocks” you will need. You should have room for a door, a window, a roof.
It is best to build walls in this option separately; if it does not have a window, then simply trim the paper sticking out from the sides and glue it.
If the wall has a window or door, first make the wall, then lay it on a piece of paper, trace the obstacle and cut it out, then apply glue and place it. The same will need to be repeated for the second side.
Small photo album
This work can be offered to your child, for example, you make a photo album for him, and he for you.
You will also need smaller copies of your photos. Pre-print them and cut them out.
Next, cover the box or paint it with several layers of gouache, and then start decorating.
Take a sheet of thick paper and measure out a strip slightly smaller than the width of the box. Fold like an accordion in several layers.
Glue the photos and write small captions on them. You can also decorate the pages with glitter, drawings, or whatever you want.
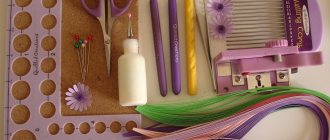
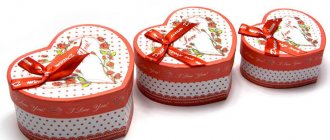
Tools and materials
- Light green scrapbooking paper – 1 sheet
- Ready-made picture templates: sewing machine, mannequin, bird, crown, lady, inscription
- Ruler
- PVA glue
- Pink paper with small roses – 1 sheet
- Large pink rose made of fabric – 1 pc.
- Small peach roses made of fabric – 2 pcs.
- Pale pink rose made of foamiran - 1 pc.
- Branches with berries made of fabric and wire – 2 pcs.
- Small flowers made of peach-colored fabric – 3 pcs.
- White beads – 3 pcs.
- Peach threads – 1 pc.
- Borders and paper scraps with ornaments for scrapbooking in pale green, blue, pink and beige tones.
- Matchboxes – 32 pcs.
- Medium-sized peach-colored beads – 32 pcs.
- Scissors
- Hot gun with silicone glue
- Thick A4 paper – 2 sheets.
- Large needle
- Beading needle
to contents