Every girl and woman has a box with jewelry for her head. Using beautiful accessories, you can always add a thematic touch and elegance to your hairstyle. Even mature ladies do not deny themselves the pleasure of decorating their hair with a hairpin or headband. A distinctive feature of such products is the presence of natural stones and precious metal.
The desire to decorate the head has been traced since ancient times, when stately persons complemented their costumes with kokoshniks, tiaras, and headbands. Even commoners did not deny themselves decorations made of fresh flowers or satin ribbons.
It is not always possible to find a hair accessory that matches a suit in a store, so many women show talent and imagination by making various jewelry with their own hands. The result surprises even professional craftsmen. Having mastered several techniques, you can create real masterpieces at home that you cannot pass by indifferently.
What can you make jewelry from?
There are too many ideas and types of hair decorations to list. Everyone's creativity, imagination and decorative elements are different. But the main materials are:
- beads;
- beads;
- rhinestones;
- ribbons;
- laces;
- ropes;
- shells;
- buttons;
- glitter;
- decorative figures made of plywood or metal;
- polymer clay;
- foamiran;
- knitted elements.
A wire usually 0.4 mm thick, a glue gun or a thread with a needle will help to connect these materials.
Such materials are easy to find in sewing and online stores for creativity and handicrafts, or in joint purchases. If all this is already at hand, it’s worth reading the instructions on how to make the decoration.
Varieties
Most of the accessories meet the requirements of multitasking. They not only serve as the finishing touch to the look, but also allow the hairstyle to stay in place. Often there are exclusively decorative elements. Therefore, consider the functional features of the product before creating or purchasing.
Modern fashion has many types and styles of head jewelry. For example, the eastern style is characterized by the use of floral motifs, large stones, and national symbols. Popular jewelry of this style are tika and lalatika.
The Greek style involves the use of headbands and headbands that stand out on the forehead and collect the hair at the back. Looks especially impressive on curly hair.
Branches made of beads and wire
This romantic accessory is suitable for the office, for a summer walk and even for a wedding.
You will need:
- white beads;
- 11 rhinestones 7x15 mm in the form of petals of the same color;
- wire;
- nippers or scissors.
Technique:
- Cut a wire 1.2 m long and bend it. Make a small loop on the bend, bending the sides of the wire crosswise. At the intersection of the wire, twist it 5 times.
- A rhinestone is strung on one end of the wire, face up. That is, the wire comes in from the top and comes out from the bottom on the other side of the wire. The rhinestone needs to be moved back to the point of twisting and left there about 0.5 mm.
- Thread the end of the wire through the first hole again (the end of the wire comes out from the top). Twist the wire around the rhinestone.
- Twist 2 sides of the wire 3 times.
- Take the other side and repeat the same with a new rhinestone.
- Scroll 2 sides 5-6 times.
- To the side where the first rhinestone was put on, take 1 bead and bend the wire 7 mm from the main branch. It is better to twist the bead with pliers, pressing lightly.
- Roll 2 sides again 5-6 times.
- Place the white bead on the other side and do the same.
- Alternate rhinestones and beads, one on each side. After putting on 11 rhinestones, scroll the base so that it becomes a straight line. On the 11th rhinestone there will be the beginning of a branch with leaves, so direct the rest of the rhinestones and beads in its direction.
Attention! To make a decoration at home according to your own design, it is better to draw it on paper.
Tiaras
This is the most regal decoration, as the tiara is considered a sophisticated variation of the crown. This attribute has long been characteristic of the male sex. Since biblical times, they have been used to decorate the heads of high priests, then priests and ancient rulers of Asia.
The base is made of metal, plastic and inlaid with stones. They are popular among brides, at New Year's and themed parties.
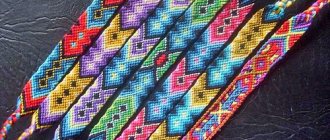
Headband made of twine and shells
The marine theme looks unusual. Who doesn't want to be a little mermaid Ariel when coming to the sea?
You will need:
- metal rim;
- leg-split;
- shells;
- pearls;
- golden rope;
- glue gun
Technique:
- Wrap the twine around the headband, securing with glue.
- Attach pieces of twine at equal distances from each other.
- Make a loose weave from pieces of twine: throw the rope over the rim and pull it through the resulting loop. Do not tighten, pass the twines through the free rings nearby.
- Attach the largest shell to the center of the weaving. Place a little less nearby. Attach small shells along the edges.
- Decorate with pearls and wrap with golden rope.
Accessories for special occasions
For a special occasion, you can choose flower hairpins, which have become quite popular lately. They are quite large, but look luxurious and at the same time elegant. The wild orchid decoration looks especially beautiful and is simply impossible to pass by. Two hairpins connected by chains look just as chic. There is also an option for a hairpin with a chain, but it is attached in such a way that it forms a decoration like for Indian girls. If you can’t live without hats, then you should consider a hairpin – a hat. And, probably, the most original hairpin is the sprout. It will rise above your head, tender and thin, like a sprout that has just grown from the ground.
Ordinary elastic bands are replacing silk spirals. Velvet and lace continue to captivate the attention of their fans. With such elastic bands, you can make a ponytail, decorate the bun, and fix the braid.
If you don't like elastic bands, then try ribbons. Bows are back in fashion. Of course, a ribbon will not always be able to hold a chic ponytail, but for this you can additionally use a regular elastic band. The ribbon can be tied into a modest or chic bow.
That's it, a little imagination, and an original decoration for any occasion is ready.
Ribbon bow with elastic band
You will need:
- tape 2.5 cm wide and 34 cm long;
- narrow tape;
- needle and thread to match the wide ribbon;
- a narrow hair tie.
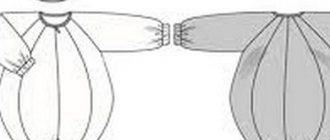
Technique:
- Bend the wide ribbon in half and find the center.
- Hold the ribbon with the wrong side facing you and bring one end over the top to the crease. It turns out to be a loop.
- Make a loop with the other end: take it and pass it through the bottom to the crease. It should look like an inverted 8.
- The edge of one side is brought to the center and placed so that the front side of the tape is facing down. Do the same with the other side. If you turn the bow, then the ribbon should go diagonally from the front side.
- Using a thread and a needle, stitch the center from bottom to top. Do not cut the thread, wrap it in a bow and tighten it.
- Attach a bow to the elastic band using a glue gun.
- Tie a bow with a narrow ribbon and connect with a glue gun.
Hairpins
Hairpins are considered to be a base with a mechanical type clamp. On top they can be decorated with bows, metal appliqués, stones, and plastic elements. Depending on the thickness and type of hair, you can choose one suitable for both adult women and girls.
In addition to standard mechanical hairpins, hairpins with clips are popular. They are suitable for those with short hairstyles that do not hold regular hairpins.
The assortment is huge: crabs, brooch pins, heagami, banana clips.
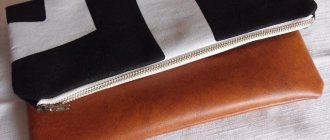
Leather triangle headband
The look of a wild Amazon will be completed with a headband made of leather triangles. Stylish, beautiful and unusual!
You will need:
- leather in 3 colors (can be brown, beige, white);
- paper;
- scissors;
- pencil.
Note!
- Macrame: diagrams, interesting projects and detailed descriptions of making crafts
- Crochet amigurumi - examples of how to make a beautiful toy with your own hands (75 photos)
- Coffee topiary: step-by-step master class on how to make a small decorative tree from coffee beans
Technique:
- Draw templates on paper: a rhombus with sides of 5 cm and triangles of different sizes.
- Cut out triangles of 2 pieces of the same size and 1 piece with a beige rhombus.
- Place a rhombus and symmetrically place the triangles on the sides of the same color and size, overlapping each other.
- Secure them with hot glue.
- Cut 2 thin strips from light leather and 1 from brown leather, about 5 mm thick. Fasten the strips together so that the brown one is in the middle, and the light ones cross on the cross at an angle on the edge.
- Carefully braid the stripes into a reverse braid.
- Attach the end of the braid to the outer triangle at the edge.
- Make the same braid on the other side.
- Cut 1 strip at a time and attach it to the braid with glue - these will be the ties. Tie a knot at the attachment point.
If a themed party, wedding or celebration is planned, the image can be thought out in detail and effectively stand out from the crowd. The main thing is to approach this creatively.
How to make it yourself
Lalatika
To make an oriental decoration you will need the following materials:
- pendant or pendant;
- dense thread or fishing line;
- beads with small pearls or beads:
- small pendants (coins).
Instructions:
- Make a blank from fishing line. To do this you need to connect two threads. The length of one should be equal to the circumference of the head, the other should be the distance from the frontal part to the middle of the back of the head. The result will be a T-shaped thread.
- Attach the pendant at the connection point of the fishing line.
- On the thread that determines the circumference of the head, string beads on both sides.
- String beads onto a fishing line covering the parting.
- Connect the threads, decorating the joining place with large beads. This point will be located on the back of the head, but the connection still needs to be masked.
- Attach small pendants to the fishing line that determines the circumference of the head at intervals of 3-4 cm.
The finished product should follow the contours of the head without sliding to the sides. Additionally, you can secure the accessory to the tanks with invisible ones if you plan to perform dance or rhythmic movements.
Flower headband
For work you will need the following materials:
- blank rim;
- artificial flowers;
- felt scraps;
- satin ribbon;
- thin ribbons of different colors;
- glue (it is recommended to use the hot type).
Instructions:
- Cut off buds (to the very base), leaves, and beautiful fragments of twigs from artificial flowers.
- Carefully wrap the base of the headband with satin ribbon, masking the ends. Secure each turn with glue. You can continue working only after the surface has dried.
- Place the decorative blanks into the composition (on the table). On the rim, this fragment will be located on one side.
- Glue a base of a piece of felt onto each element of the selected decor. Let it dry.
- Alternately fix the composition on the base of the hoop.
- Complete the decor with bows of multi-colored thin ribbons to create volume.
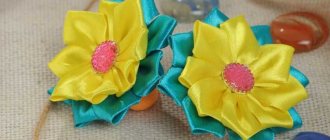
Hair flower
For work you will need the following materials:
- a simple hairpin that fits the size;
- hot glue;
- a piece of felt;
- artificial flower;
- beads.
Instructions:
- Degrease the surface of the hairpin with a cotton pad soaked in nail polish remover.
- Cut a small circle from a piece of felt and glue it to the base of the flower.
- Attach the flower to the hairpin using adhesive.
- In a chaotic manner, fix small beads along the platform of the accessory.
Decorative comb
To make a beautiful decoration you will need:
- regular plastic comb;
- artificial flowers;
- wire;
- small beads of different colors;
- hot glue;
- pieces of felt.
Instructions:
- Make stamens from wire. To do this, string beads or seed beads of certain colors (green, yellow, orange, blue) onto each piece (10 cm length). Leave the 4 cm long mounting bases blank.
- Cut flower buds from the branches. Make a composition out of them according to the size of the comb (layout and fitting is carried out on the table).
- Glue felt circles to the bases of the flowers so that the attachment to the comb is secure.
- Screw the prepared stamens to the flowers to create three-dimensional decor.
- Glue all the elements one by one to the base of the scallop.
Such accessories are used not only to decorate hairstyles, but also to secure veils and capes on the head. A beautiful comb can decorate any hairstyle.
Photos of hair jewelry
Ganutel
This decoration came from the Maltese monasteries. To make it you will need wire and silk threads. Initially, the wire is wound on a thin knitting needle or any other rod, the thinner the better. The result is a spring, which can be bent to form petals and leaves. The thread is wound around the resulting frame so that even lines are formed that fill the formed elements.
There is a simplified option, when a frame of the desired shape is bent and twisted from wire, and a colored nylon is stretched over it and fixed, for example, with tape.
- How to decorate clothes | Ideas, types, types and rules of decoration. 145 photos of options for decorating children's and teenage clothing
- TOP best ideas on how to decorate a window: methods and options for simple and beautiful decoration of windows and window frames (115 photos)
- How to decorate a room for a child’s birthday: 130 photos of decor options and the best ideas for DIY festive decorations
Crest
A comb and bobby pins as a veil holder are the best option, but veils come with or without a comb. If the veil is not equipped with a comb, you should build a base of cross-shaped bobby pins, and then secure the veil in this place using a comb.
The location of the veil can be one of three - either it is the lower occipital part of the head, or the crown, or at ear level. After that, the veil must be secured along the hair from the inside using large pins. In order for the veil to become lush, you should fold each level and attach it slightly higher than the last.
But what if the hair for the veil is short? Firstly, it is necessary to secure the veil to your hair more firmly, since there is a possibility that it may simply fly off at the most inopportune moment. Secondly, you should make small ponytails of hair at the place where the veil is attached and attach directly to them. In this case, the veil is also pinned with a comb, or you can use hairpins with curved legs.
Mesh
It appears as a cobweb that hangs from the top of the head along with the hair. This product serves as an assistant when creating difficult hairstyles, as the hair underneath becomes more flexible.
In order to give a special shape to your hair, you just need to place your hair in a net and give it the shape you like. Tip: the length of the mesh must be at least 35 cm for the intended hairstyle to hold.