Pet stores sell a variety of equipment for four-legged pets. But you can make a dog collar with your own hands. A homemade accessory will turn out to be original and will cost several times less than a purchased one.
When making your own collar, you need to take into account three parameters: length, width and strength.
The length is measured using a measuring tape along the pet's neck or using an old collar. Additionally, a few centimeters are added for seams and fastenings.
The width depends on the thickness of the neck and accessories: rings, latches, rivets.
The standard size for large dogs is 2.5 cm. For a puppy and small breeds (Chihuahua, Toy Terrier) - half as much. The width of the fastenings should be the same.
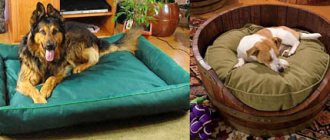
The material is selected based on the owner’s taste and needs. The most durable and wear-resistant accessory is made of nylon, leather and textile sling. It is universal; any leash can be attached to it, including a show leash.
A noose collar is best made from a braided cord, and a collar across the body (harness) is made from textiles.
To make an original dog collar, use beautiful accessories: beads, beads, metal rivets, ribbons.
Simple collar made from belts
This type of collar will be simplified. The volume of the neck will not be adjusted in it (collars with adjustment are made a little more difficult and take longer). For it you will need:
- belt;
- latch;
- yarn;
- scissors.
The basis for the collar will be a woven fabric strap. Its width is two centimeters. Instead of clasps, it has two loops at the end, into which you just need to thread the belt, and it will hold. Such loops will later be useful for attaching a leash carabiner.
In addition, you will need a skein of yarn for sewing and decorating the collar. An ordinary plastic latch will be used as a lock , which can be bought at a sewing accessories store. It is important that the width matches the waistband.
To begin with, you need to cut out the iron loops and the second iron edge (if there is one) from the belt. If the belt is too thin, it can be folded in half and stitched. One of the parts is inserted into the lock, and at this stage you immediately need to decide on the length of the future collar. To do this, measure the girth of the dog's neck. The next step is to sew both ribbons together. In addition, you need to secure the lock with a seam so that it does not “walk” on the strap.
After both belts are sewn, the second part of the lock and the loop are attached to which the leash will cling. The loop should be located near the second part of the lock. Such collars can be made not only from a belt, but also from any other suitable braid, sling or nylon.
Step-by-step sewing of a harness
In order to sew a high-quality wool or textile collar, you must adhere to the following pattern:
- To make the accessory attractive, the nylon sling needs to be sheathed with colored material. This can be done using a sewing machine;
- The stitching must be done both diagonally and along all free edges;
- the free end of the object is threaded through the ring and secured with a strong double seam;
- the second end must be attached to the buckle and also securely stitched.
Use of weave
The pattern that will be woven into this collar is quite well-known, that is, it is very often found, for example, in various bracelets. For weaving you will need the following:
- two skeins of rope 2.5 mm wide (preferably in different colors) or one skein 5 mm wide;
- plastic fastener;
- metal ring for attaching a leash.
Making angels from satin ribbons and foamiran
The skeins are unwound and the rope of each color is folded in half, after which it is threaded through one part of the clasp and tightened through a loop. Next you need to immediately outline and attach the second part of the lock along with the ring for the leash. To do this, first measure the length of the collar by eye and fold it into a loop. Then all four ropes are threaded first into the ring and then into the clasp. The free end is not cut off; it is useful for weaving.
Next, take a ready-made collar for the dog, if there is one, and use it to measure the exact length of the collar. When the clasps are at the desired distance from each other, you can tighten the loop at the other end (where the ring is attached). Now the weaving stage begins. For convenience, it is better to secure the locks on both sides by gluing them to the table with tape.
Braid order
The first (left) strand is passed under the warp and a large loop is formed. The second (right) strand is placed under the left one, i.e. the first strand goes under the base and above the second strand. After this, the end of the right strand is pulled into the loop of the first one formed at the beginning and tightened tightly on the base. The same thing is done on the other side. The right strand is pulled under the base and over the left strand. The end of the left strand is pulled into a loop and tightened on the base. In this way, the entire distance between the latches is braided.
DIY winter fairy tale: making a festive tablecloth from snowflakes for the New Year
Completion of work
When the weaving is completed, the ends of the ropes are tied together as follows: one of the strands is threaded through the fastener so that all four ropes are on the same side, after which both ropes are tied into a knot (closer to the weaving). The remaining tails are woven into the pattern using a hook, and the ends are trimmed.
Required Tools
When the issue of manufacturing material has been decided, pet owners select tools. If you have a sewing machine at home, then the process is greatly simplified - in this case, you only need to choose the right needle and thread corresponding to its thickness.
But you can easily do it without a machine by sewing belts and connecting the parts manually. An awl often comes to the rescue here if it is difficult to pierce a canvas or leather tape with a needle. Without fasteners and double-slot buckles, a finished finished product will not work - accessories (plastic or metal) must be purchased in advance.
How to measure a dog for a collar
DIY address book
There are different address cards for dogs. In general, they can be divided into accessory tokens and functional addressers, i.e. with useful information. The latter usually contain the phone number or address of the owner, which will help return the dog if it gets lost. Many dog lovers do not recommend writing the animal’s name in the address book. It’s better to write your contact information with some funny phrase like: I’m lost, I want to go home + my phone number.
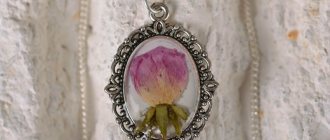
The most reliable are metal address cards with engraving, but this is quite difficult to do at home. As a replacement, you can make the following option. A number with a phrase (optional) is printed or written on thick cardboard. This inscription is then carved into the shape of a token, which can be made into a bone.
Squeeze some hot glue onto the baking paper. A token is placed on top of it and also covered with a layer of glue. You need to act quickly so that it does not harden prematurely. After this, the glue-coated token is covered with a loose piece of paper and lightly rolled out with a rolling pin to smooth out any irregularities.
Homemade Valentines: 10 most unusual examples
The parchment will stick tightly to the glue, and with it the surface of the address card will turn out to be cloudy. Plain water will save the situation here. The token must be held under the tap for some time, and then rolled into paper with your fingers. Use scissors to remove unnecessary parts of the glue along the contour of the token.
Note: When cutting, it is important to try to leave a couple of millimeters around the edges and not go into the paper.
This pendant will withstand both rain and dirt. At the end, a small hole is made and a ring is inserted, which is attached to the collar.
How to take measurements from a dog
Taking measurements is a responsible, but not difficult task. The animal should not lie down or sit - it is important that it stands calmly on all four legs.
Take a tailor's measuring tape and measure the neck circumference at the widest point. Do not tighten the tape too much - it should turn slightly to the right and left, the owner’s finger should fit under it.
The result obtained during measurement is multiplied by 1.7, and, based on this indicator, a sling, tape or belt is purchased.
Making a leash
This will be the so-called noose leash, and the ability to make it will come in handy if the leash is suddenly lost during a hike . To quickly create such a leash you will need:
- nylon braided cord 3.5 meters long;
- scissors;
- knife;
- lighter;
- a small piece of saddle leather.
First, to prevent the cord from unraveling, you need to melt its ends. Next, a loop is made into which the cord will be threaded. But in order to prevent the noose from tightening the dog’s neck to a critical state, a special locking knot is made. Then a loop is marked, and a sliding loop is carefully tied with the free end, turn by turn. The remaining tip is tucked into the second loop, which will pull it inward.
After this, a locking knot is knitted, which, if necessary, can be freely moved along the rope. It is better to make it larger and more prominent so that it brakes where needed. Then the end of the cord is threaded into the created loop - and the leash for the dog is ready.
You can choose a method for making a collar yourself from those listed, or you can develop your own and create a truly exclusive item for your beloved dog.
Useful video
Video about DIY dog collars:
Now on the shelves of pet stores there are a lot of different accessories for pets, including collars. They can be of completely different sizes, made of different materials, all kinds of shapes to suit every taste. But often you want the collar to be non-standard and moderately original. Why not, when there are all the possibilities for this. Making a dog collar with your own hands is not difficult, but it is advisable to know the basic principles of this process.
You can create a stylish collar for your pet from paracord or beads. It's quite easy, not particularly expensive and fast.
For a larger pet
To make your pet stand out from the rest, you can choose a variety of materials for the base. The step-by-step instructions will show in more detail an example of a collar that you can make with your own hands. For it you will need:
- 2 paracords;
- vice;
- lock buckle;
- D-ring;
- scissors;
- tweezers;
- measuring tape;
- lighter or matches;
- beads.
Paracord is a smooth, lightweight, elastic, durable material, making it great for creating a collar. In order to get started, you need to know the size of the dog’s neck in the place where the collar will be in the future; you can use a measuring tape. To this figure you should add 4 cm. Then multiply by 4. The resulting figure is the size of one skein of paracord. You can start weaving.
2 cords need to be folded in the middle and pulled each through the end of the buckle (lock) with one slot, now we thread 2 cords into the D-ring, while moving them tightly to the buckle. We thread the ends of the paracord into our loops and tighten.
Now, on a well-stable surface, you should clamp the buckle in a vice, take the left pair of cords, wrap it around the right pair of cords and then thread it between the two so that it looks like tying a knot. The same must be done with the right pair of cords, thereby continuing to weave the collar. You need to finish weaving five centimeters from the end.
Related article: Do-it-yourself hut on chicken legs made from natural material
Now we take the right and left cords, wrap them around the free area and thread them through the loop from above. It is better to hide the ends, cut off the excess and burn it. Here you have a wonderful paracord collar, made with love.
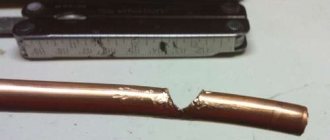
We assemble the electronic part.
I don’t have a soldering iron and the last time I worked on radio electronics was more than 10 years ago, so forgive me for such a barbaric assembly method. But what we will do is not difficult and anyone can do it.
I simply stuck LEDs on both sides of the tube and tied wires to their legs - not the best solution, but the entire structure can be removed from the collar and replaced. Perhaps in the future I will make a zippered pocket for a 9 volt battery.
At first I wanted to use one LED, but then I decided to connect two in parallel, so they would shine with approximately the same brightness.
Application
A luminous collar can be put on the dog immediately before a walk in the dark or used constantly. At the same time, to save power and if there is no need, the light can be turned off. Almost all models have a leash attachment, which allows you to use them as a multifunctional device and not remove them from your pet.
Modern USB products require recharging approximately once every two days . It is recommended to remove the device during bathing, since even water-resistant models are not designed for this procedure.
Dear readers, do you use such a device for your dog? Which models do you prefer?
Source
Choosing a time
When working on creating a talisman, choose the right time to activate the energy shield. The phases of the Moon influence the flow of energies and help enhance the effect of prayers, spells, and divination.
To fill a hand-made amulet with power, make it on the waxing Moon. Choose hours closer to midnight, so you can provide the peace and quiet necessary for work and enhance the impact of the positive properties of the celestial body.
The waxing Moon symbolizes plus, the waning Moon symbolizes minus. If you want to get rid of negativity, melancholy, bad thoughts, perform rituals in the second half of the lunar cycle, if you want to achieve growth and prosperity - cast a spell on the rising night luminary.
Choice
Among the many offers, it is difficult not to get lost among this abundance and purchase a useless but expensive thing. Such pet products are quite expensive, so you should be especially careful when choosing them in order to get a truly useful item that will help you monitor your pet and ensure its safety.
When choosing a luminous collar, pay attention to those options that have only one glow mode - constant, with a function to turn off during the daytime. Flashing LEDs will last much less and will fail very soon. In addition, such an accessory can be worn during the daytime, while turning off the glow. This way you will get much more out of your purchase.
Prefer devices with USB charging. This option is much more practical and will last longer. There are battery-powered models that cannot even be replaced. They cost less, but after the battery set expires, the product will have to be thrown away.
Another quality that allows you to extend the life of the luminous collar is protection from moisture, which some models have . Thanks to this protection, the product will not fail while walking in the rain, which cannot be said about conventional models. However, you should still take it off when swimming.
Some specimens are additionally equipped with reflective material, which makes your pet visible under car headlights. This will help protect your pet from accidents. Many models have the ability to reflect light at a distance of up to 300 meters, which will allow the driver to notice an animal running onto the road in advance.
When choosing such a product, pay special attention to the quality of the material from which it is made. The seams should be smooth, the material should be strong and reliable. The leash mount must be made of stainless steel and not bend. Otherwise, such a product will serve only a decorative function and will break the first time the dog tries to break free from the leash.
Most of the items presented in stores are made in China. That's why their price is reduced, as is their quality. We recommend giving preference to European manufacturers who guarantee the quality of the product. They are significantly more expensive, however, having bought such a luminous collar, you will not worry about it stopping working at the most inopportune moment. When, for example, a dog disappears in the dark and finding it there with a broken device will be problematic.
Ammunition requirements
A chain for a dog must be chosen carefully, taking into account the strength and length of the product. Requirements to be met:
Swivel harnesses with fixed runners are recommended to reduce the likelihood of entanglement and injury. It is best to use a leather dog collar, which should be attached to a swivel attached to a cable approximately three meters long. You should choose only metal chain ropes because safety precautions are important: rope and other ropes can become frayed, broken, or tangled. The chain should be of appropriate weight and strength for the dog that is going to be placed on it, but not so heavy that it interferes with the animal's normal movement. The other end of the rope should be attached with a swivel to a strong wire, which should be approximately 1.5 meters above ground level. The rope must be securely fastened at both ends to trees, fences or poles. The chain must be equipped with stops at both ends to avoid injuries and cuts to the animal.
Why do owners tether their dogs?
People keep their dogs on a leash in their yard for a variety of reasons. Most owners who do this do not realize the harm of the restraint chain. There are certain rules regarding dog equipment; they must be strictly observed.
Puppy on a leash Please note! Social norms about pet ownership have made tethering unpopular, so many people have stopped practicing it.
In some cases, there are compelling reasons to put a dog on a chain:
- The dog ran away repeatedly and the owner ran out of ideas. Sometimes for this reason the pet is kept on a heavier chain. For example, if the animal gnawed through lighter tethers or otherwise tried to avoid the difficult fate of a dog on a chain.
- The owner is trying to protect his dog from the threat on the other side of the fence (children, strangers) in order to protect him from unwanted harm.
- When the fence is damaged or the owner does not have a fenced yard.
- Due to the dog's behavior, it is difficult to keep it in an apartment or other premises. For example, a puppy tries to bite the hand, jumps on the neck, and the owner does not know how to deal with the problem differently.
- The landlord may not allow the tenant to keep a dog on the premises or install a fence on someone else's property.
- The pet owner comes from a family that has always had a kennel dog on a leash, so they may not realize that there are better options.
Still, it is worth periodically releasing your pet to the wild in order to harmonize the dog’s emotional state.
We glue.
Gluing is not necessary, but I find it easier to stitch if the two pieces don't move.
I applied leather glue around the perimeter of the collar, except where the battery will be placed and removed, on the buckle side. First I pressed one side of the collar, then I placed the tube with LEDs inside and pressed the other side.