Requirements for hair bands
Such accessories are a must for long hair. When planning to make hair bands with your own hands, you must comply with a number of requirements:
- The product must be made of elastic and elastic material that can retain its shape well and hold hair.
- The rubber band must be safe to use. It should not injure the hair and scalp.
- For work it is necessary to use materials that are safe for health.
The elastic band for fixing the hairstyle should not catch the hair or have protruding sharp decorative parts. The product should be comfortable and safe for hair.
Tips and tricks
When making accessories, you should adhere to the following recommendations:
- At first glance, it seems that making a hair elastic is a simple matter. But some options require certain skills, so if you have no experience, you should start with simple basic models.
- When making it, it is better to take a little more fabric than required to be sure that there is enough material.
- In order to evaluate the harmonious combination of fabric and threads, you should sew a small piece before the creation process and select the appropriate color.
- Professional hairdressers recommend that when using a hair tie, secure it with bobby pins. Thus, the hairstyle will not change shape for a long time.
- Not every girl focuses on choosing a hair tie. But as with other accessories, it is important that it matches and harmonizes with your look.
Materials for hair-fixing elastic bands
You can use various available materials to make decorative elastic bands to secure your hairstyle:
- ribbons;
- braid;
- grosgrain ribbon;
- satin fabric;
- velvet;
- any other beautiful fabrics.
For additional decoration, it is easy to use beads, beads, buttons, lace, and rhinestones.
A non-standard approach to work will help you make stylish and beautiful hair ties from any leftover fabric.
For the base of the product, it is easy to use existing rubber bands, old hairpins, or purchase an inexpensive option for remodeling.
Often, underwear elastic is used for crafts. Much depends on the design of the future product.
It’s easy to make elastic bands to decorate your hair and hold your hairstyle in place. Making baby rubber bands will take no more than an hour. Detailed master classes will help you cope with the work.
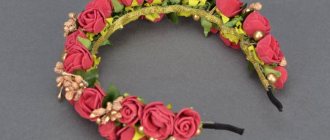
Wedding decoration
You will need: 4 cream roses, 3 white lisianthus flowers, flower sprigs, a metal veil comb, scissors, floral wire, green tape.
Master Class
- Prepare flower buds.
- Thread a piece of floral wire through the base of the bud, bend it in half and twist. Do this process with all the buds.
- Hide the floral wire by wrapping it with tape. It is worth noting that the wire needs to be wrapped around the base of the bud, but most of the wire should be free for further fastening.
- Form 3 compositions from twigs and secure them with tape.
- Use tape to connect the branch arrangement with a cream rose bud. Make 3 such compositions.
- Secure the white lisianthus to the center of the ridge by wrapping the wire around it. Excess wire is cut off for an aesthetic appearance.
- Secure one white lisianthus near the center one, and attach the second lisianthus to the edge of the ridge.
- Secure 3 arrangements of cream roses and twigs, filling the entire perimeter of the comb.
The wedding decoration is ready! This floral arrangement looks very delicate and elegant. It is suitable not only for the bride, but also for her bridesmaids.
Tools
Working on decorative rubber bands to secure your hairstyle does not require the purchase of special tools.
You will need:
- regular ruler;
- sewing needle;
- small scissors with sharp tips;
- a burning device or a simple lighter;
- glue gun
When creating bows, it is convenient to use stationery clips to fix the workpiece on a piece of cardboard.
bunny ears
You will need: thick fluffy white and pink wire, glue gun, headband, white mesh fabric, scissors, wire cutters.
Master Class
- Cut the fluffy wire and form teardrop-shaped blanks for the ears, as shown in the photo.
- Form the bunny ears.
- Glue the white soft wire onto the rim.
- Glue on the ears.
- Glue white mesh into the inner ears.
- Make a bow out of white mesh and secure it in the center with fuzzy wire.
- Glue the bow to the side of the headband.
Soft wire bunny ears are ready! This creative head decoration is perfect for a children's party or a themed photo shoot.
A simple elastic band made from a piece of fabric
The simplest elastic band for fixing hair from a shred is a sewn strip of fabric, inside of which an ordinary underwear elastic is inserted.
It’s easy to use a flap for work:
- velvet;
- knitwear;
- suit fabric;
- chiffon;
- silks.
The width of the textile blank varies from 30 to 45 cm. The length of the blank for a narrow elastic band is 7-8 cm, and for a wide one it is better to measure 12-14 cm.
Note!
- DIY satin ribbon bows: photos of original design ideas, step-by-step DIY master class
DIY shadow theater: step by step how to do it at home! 175 real photos
- DIY photo frames | How to make a simple and beautiful photo frame as a gift or for yourself from scrap materials
After cutting the workpiece, it is sewn along the seam by hand, leaving room for threading the elastic. Having passed the elastic inside, it is sewn together with several stitches. The remaining seam is carefully sewn up.
Japanese decoration
You will need: sushi chopsticks, beads, thin fishing line, ruler, pencil, glue, glitter.
Master Class
- Place the stick on the ruler and make a mark at 8 cm.
- Prepare 4 pieces of fishing line and tie them after the marked line, placing them at the same distance from each other.
- String beads onto the fishing line and tie a knot. In this way, fill 3 more pieces of fishing line with beads.
- Apply glue to part of the stick, sprinkle generously with glitter and leave to dry.
- Twist the bun and insert the decoration.
Japanese hair decoration made from sushi sticks is ready! I recommend watching this video!
Children Headband Foam for 10 minutes
Children's master class on making rubber bands
Even a child can beautifully decorate an elastic band from satin ribbons with his own hands. Detailed instructions will help with this.
To work you will need:
- satin lilac ribbon 5 cm wide;
- crimson satin ribbon 2.5 cm wide;
- sewing needle and thread;
- a piece of glass;
- a device for burning;
- steel ruler;
- button or bead;
- universal glue;
- scissors.
Operating procedure.
- Cut 5 pieces of 7 cm length from the raspberry ribbon.
- Treat the sections with a burning device and place them on glass.
- Fold each piece in half, shiny side up.
- Run a running stitch and pull it together a little.
- Combine the petal blanks into a flower.
- Make 5 pieces of 10 cm long from lilac ribbon.
- Repeat the work according to the previous scheme, obtaining a slightly larger flower blank.
- Straighten the resulting flowers, glue or sew them.
- Secure a button or bead in the middle.
- Sew an elastic band on the wrong side.
Hair clips “Cat ears”
You will need: 2 metal pins, thick white felt, shiny pink foamiran, Crystal moment glue, second glue, scissors, wooden skewer, ear templates.
Master Class
- Draw two sizes of cat ears on cardstock, then cut out the ear templates.
- Transfer the larger ear template onto white felt and cut out 2 blanks.
- Using a skewer, trace the template of the smaller eyelet on the back of the foamiran and cut out 2 blanks.
- Glue the glitter ear to the felt eye with Moment.
- Glue the ears to the hairpins with instant glue.
The “Cat Ears” hairpins are ready! I recommend watching this video!
DIY ♥ Mickey Mouse ears ♥ Cat ears ♥ Bunny ears ♥ DIY
"Strawberries"
It’s easy to make your own hair bands in the shape of berries. The child will certainly be pleased with such decorations.
DIY elastic bands made from satin ribbons look elegant and very attractive.
Note!
DIY bird feeder - interesting ideas on how to make it quickly and easily from scrap materials- Do-it-yourself cold porcelain: the best options for porcelain products, step-by-step instructions and recipes for making it yourself (photo + video)
- DIY curtains - types of curtains, choice of materials for sewing and design + step-by-step instructions and simple patterns for beginners
To sew interesting strawberries you will need:
- red satin ribbon 20 cm long and 5 cm wide for a pair of products;
- green satin ribbon 5 cm wide and 10 cm long;
- a pair of elastic bands for the base;
- soft stuffing material;
- beads of light brown or yellow color.
Operating procedure.
- Make two pieces of red ribbon, 10 cm long, and two green pieces, 5 cm long.
- Cut 5 cm twice from a narrow ribbon.
- Carefully process the cuts with a lighter.
- Fold the red ribbon in half, right side inward. Sew the edge by hand so that you get a berry-shaped piece.
- Place the filling inside and sew it up.
- Cut leaves from green ribbon. Burn the edges with a lighter.
- Sew a narrow braid to the elastic band.
- Attach a berry with a leaf to the braid.
- Sew the second strawberry in the same way and sew it to the elastic band.
- Add berries with beads.
It will take no more than an hour to make these berries.
Star
After practicing with a simple bracelet, the difficulty level can be increased. To do this, it is proposed to make a bracelet made in the shape of a star. It will look very impressive on your hand.
An interesting appearance is created by combining several basic elements. The product has a large star in the middle. Smaller stars diverge from both sides of it.
It’s worth starting from the middle, gradually combining all the elements. The accessory is available in different colors. The monochromatic version looks impressive. A combination of two or three colors that harmonize with each other would be appropriate.
Elastic band made from ribbon
Using ordinary nylon or satin ribbons, you can beautifully design an elastic band to secure your hair in literally half an hour.
There are many ways to make elastic bands from ribbons with your own hands.
Ribbon rose
To make a lush rose you will need:
- any tape (the longer the better);
- elastic band for base;
- sewing needle and thread.
Operating procedure.
- The prepared ribbon will need to be folded in half along its entire length.
- The edge at the junction of the halves is stitched manually with strong thread.
- The thread is pulled together to form a lush flower.
- The resulting rose is sewn to an elastic band.
Having a pair of identical ribbons, it is not difficult to make a beautiful set of two decorative rubber bands.
Bright decoration
You will need: artificial flower, metal hairpin, green felt, glue gun, scissors and pliers.
Master Class
- Cut off the bud of an artificial flower.
- Cut out a small rectangle from green felt.
- Clamp the felt rectangle into a bobby pin.
- Apply hot glue to the front of the bobby pin and the felt part.
- Glue the bud and wait for it to dry.
The bright hair decoration is ready! Such a flower will definitely not go unnoticed. This decoration is perfect for a photo shoot and theme party.
I recommend watching this video!
Elastic band for a bun made of glitter foamiran / DIY Tsvoric
Casual option
To fix your hairstyle at home, it’s easy to decorate a boring elastic band with tape.
- To do this, just wrap the elastic band with a ribbon, securing it with hand stitches.
- It is easy to sew a sausage from a wide ribbon, then passing a regular linen elastic band through it. Fasten the elastic band and stitch the edges of the sausage manually.
Elastic band with bow
Various bows are a classic option for decorating hairstyles.
To create an elastic band with bows you will need:
- a pair of rep ribbon blanks 20 cm long, 4 cm wide;
- a piece of tape 52 cm long, 2.5 cm wide;
- a pair of blanks made of narrow 0.6 cm tape, 20 cm long;
- elastic band for the base.
Operating procedure.
- Singe the cuts to prevent material shedding.
- Fold a wide ribbon 20 cm long in half. Iron the fold.
- Unfold the piece and fold the edges inward. Place them overlapping at the fold.
- Sew.
- Using a similar pattern, make a second bow and connect them together.
- Wrap a long ribbon three times around a cardboard blank, placing the turns sequentially.
- Sew exactly in the middle.
- Remove the cardboard to form a bow.
- First sew the first bow to the elastic band, taken as the base, then fasten it on top of the second one and straighten it.
- Make a bow from a narrow ribbon, add rhinestones, and glue it to the center.
Showing your imagination, it’s not difficult to make various bows with decorative additions from grosgrain ribbon.
Easy way to create
How to make an elastic band with your own hands? This option is one of the easiest to manufacture. To create such an accessory you will need:
- fabric of arbitrary width (length 40-50 cm);
- linen elastic (15-20 cm);
- needle;
- pin;
- scissors.
Process of creation:
- A piece of prepared fabric should be folded in half and sewn along the edge.
- We fold the stitched product with its edges facing each other and stitch it, leaving a small hole for turning it inside out.
- Turn the workpiece inside out.
- Insert the elastic band and tie it.
- Sew up the hole.
The finished accessory can be decorated with various stones and beads, but it is also suitable as an independent product.
Kanzashi elastic band
To create a delicate chamomile using the kanzashi technique, you need to prepare in advance:
- white satin ribbon 0.5 cm wide;
- yellow tape 1 cm wide;
- a piece of yellow felt;
- glue;
- elastic band;
- sewing needle and thread.
Operating procedure.
- Make 29 pieces of white ribbon, 8 cm long.
- Fold in half and burn the edges with a lighter.
- Sew a yellow ribbon and assemble it on a thread.
- Sew a circle from the resulting accordion.
- Cut a circle of felt 4 cm in diameter. Cut, retreating half a centimeter.
- Glue the petals in rows to the felt base.
- The first row consists of 16 blanks.
- For the second one you will need 13 petals.
- Glue the yellow piece of tape in the middle.
- Sew an elastic band on the back side.
If desired, you can complement the magnificent daisies with buttons in the shape of butterflies or ladybugs.
Making rubber bands with your own hands is a fascinating process, and it’s easy to involve a child in it. There are a lot of options for decorating rubber bands. They are limited only by the imagination of the master.
Tiara
You will need: thick jewelry wire, pliers, glue, golden cord or rope, decorative figures (we have stars and moons), tongs, golden spray paint.
Master Class
- Prepare a piece of wire the size of your head. It is worth noting that the tiara is not a closed decoration.
- Give a round shape to the jewelry wire.
- Wrap the ends of the wire with a golden cord, secure with glue and leave the strings at the desired length.
- Paint the decorative figures with golden spray paint and leave to dry.
- Lay out the figures around the circumference of the future tiara.
- Glue the decorative figures onto the wire using strong glue and pliers. It is worth noting that it is better to place the parts at the same distance from each other.
- Leave to dry.
The precious tiara is ready!