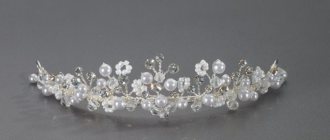
A headband with flowers adds femininity and tenderness to the look. A girl with such a headband will look natural and graceful.
A headband with flowers with your own hands is suitable for photography, because it can turn a girl into a forest nymph or fairy, or allow a girl to emphasize her individuality by decorating her hair with such a beautiful decoration.
A hairstyle with such a headband will add fabulousness and originality to the image.
You can also find models wearing such jewelry in fashion magazines.
Accessories made from artificial flowers
For such headbands, artificial flowers are often used because this is the most practical option, since real flowers cannot be used more than once.
A wreath of artificial flowers is not difficult to make yourself. All you need is glue and flowers. To create a wreath, you need to paste over the rim, taking into account the color scheme.
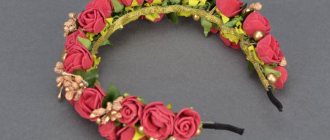
The most successful decoration is considered to be one made from large flowers, such as roses. This option is suitable for a wedding, birthday, and will create an original look for a long-awaited event, but it is unlikely that it is appropriate for daily wear.
If the buds on the headband are smaller, it is appropriate to wear it daily. This headband is also suitable for the bride.
Making such a wreath will not be difficult even for novice craftswomen. Using your imagination, you can easily make such a wreath at home.
Let's look at the stages
Before you start work, decide what material you will make it from. A paper crown is made very easily and quickly. You will need to print a suitable template from the Internet and, after choosing the color of the product, cut out the sketch. Glue the edges, decorate with various things, and you're done.
But these are children, they are in a constant rhythm. One awkward move and your work will be irreparably ruined. Paper is good, but its main drawback is that it wrinkles easily and tears quickly.
Cardboard is another matter, because it is dense and reliable. You can already be calm about your creation. And another advantage of a crown made of cardboard is that it will not bend under the abundance of decorations. So don’t be stingy and feel free to create.
- Cut a rectangle of the required width according to the volume of your child’s head. If you do not have the required color of cardboard, you can cover it with paper of the required shade;
- attach the leaves in any order, in any way that suits you;
- To prevent the leaves from shrinking, after drying, cover them with large transparent tape.
Real autumn leaves will serve as an excellent decoration. For a girl, you can fill the leaves with glitter hairspray.
Don't be discouraged if you don't have the required attribute on hand. They can be cut out of colored paper, and they will be no worse than the real thing. Look in the pictures for more details.
One important tip: involve your child in the craft and do it together. This will help him develop accuracy and thriftiness with things. It’s also just fun and interesting, and this day will remain in children’s memory for a long time.
Accessories made from fresh flowers
For a wedding arrangement, it is better to use real flowers, because live buds will be the best option for such an event. When choosing flowers, you must take into account the fact that they fade quickly, and this decoration will not last more than a few hours.
In order for the wreath to last at least one day, you need to choose flowers that do not dry quickly and spray them with a special solution. Then the accessory can last the entire event.
Large rosebuds will help create a memorable image, and wildflowers will surprise guests at the wedding and give the bride’s style an unusual look. Chamomiles, cornflowers or dandelions will add even more charm to the image, and will not spoil it in any way. Roses attached to a thin elastic band will create the image of a sophisticated and elegant bride. Such an accessory can only be limited by the color scheme and your imagination.
You can add beads and various types of berries to the headband. It is also simple to do: all the selected components are glued to the base, which will add a piquant look to the image.
Trend of the season
The first place is occupied by long thick flowing hair and a headband with large flowers in addition. You can use this decoration for every day and combine it with bright accessories.
A braid braided on one side with a rim of large flowers will look beautiful. Or a retro hairstyle with an accessory of medium-sized flowers.
Edible crown
You will need: chewing paste or sweet dough, rolling pin, knife, ruler, sheet of paper, pencil, jar, baking paper, pastry spray paint, pastry glitter.
Master Class
- Draw a crown template on a piece of paper.
- Roll out the paste and transfer the template.
- Cut and remove excess paste.
- Wrap the jar in baking paper, place it on top of the pasta and carefully attach the pasta by rolling the jar in one direction.
- Leave for a day to harden or place in the oven.
- Remove the crown from the jar.
- Paint the crown with confectionery spray paint and decorate with edible glitter.
The edible crown is ready!
Selecting a base
It is better to choose classic shades (black or white) for the base-rim. These colors will harmoniously combine with this or that clothing. Decorating in classic shades is appropriate to go to a party or to work. For older women, wide, plain headbands are suitable.
Also, the color of the decoration depends on the choice of event or weather conditions. It is better that the color scheme matches the bag or shoes.
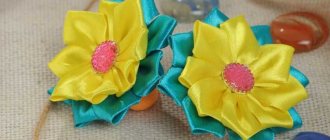
Japanese motifs - kanzashi style
The kanzashi style originated in Japan more than 400 years ago, and kanzashi products are still traditional Japanese jewelry along with kimonos. Each season and month corresponds to a certain style of kanzashi products that should be worn at that particular time.
To make this decoration yourself, you will need:
Wide satin ribbon (from 5 centimeters wide) - 40 centimeters per 1 flower.- Two narrow satin ribbons (0.5 - 1 cm wide) for braiding the headband. The length of the ribbons is approximately 130 - 150 cm.
- Rhinestones or beads for the flower core.
- Base: headband or large hairpin.
- Scissors, tweezers, pencil, file for processing the surface of the rim, lighter, superglue, ruler.
- Scissors and needle.
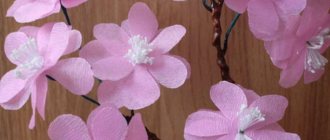
Corrugated paper flowers
Corrugated paper is a budget-friendly material for creating jewelry.
It’s not difficult to create such an accessory; you will need:
- Paper of different shades.
- Headband.
- Toothpicks.
- Scissors.
- Threads.
- Glue.
Cut out rectangles from paper, then cut out petals from these rectangles. Wrap the petals around a toothpick and secure with thread. This is the fastest way to create buds. When you have the required number, you can start attaching them to the headband.
You can create beautiful headbands with available materials at home. Such decorations definitely have a right to exist.
Royal crown
You will need: foam board, stationery knife, corrugated paper or newspaper, red velvet, beautiful fabric, candy, double-sided tape, decorative ribbons, needles, beads, foam plastic, threads, glue gun, skewers, cross, decorative stones.
Master Class
- Cut blanks for the crown from polystyrene foam and polystyrene foam, as shown in the image.
- Wrap the foam in corrugated paper and wrap it with thread.
- Cover the crown blanks with fabric and cover the edges with shiny ribbons.
- Cover the sides of the crown with velvet and create a drapery using beads, needles and glue.
- Assemble the crown in this way: glue the middle onto the base of the crown, then the small side parts, using skewers and glue. At the end, glue the voluminous red blanks.
- Glue the candies to the crown using double-sided tape.
- Glue a cross to the top of the crown and decorate it with stones and other decorations.
The royal crown is ready! I recommend watching this video!
TUTORIAL: HOW TO MAKE A DIY CROWN HEADPIECE USING NECKLACES | FOR FASHION PHOTOGRAPHY ON A BUDGET
Satin ribbon accessories
To create such a decoration you will need:
- Satin ribbon.
- Headband.
- Threads.
- Matches.
- Glue.
Cut off part of the ribbon and singe the ends to prevent it from unraveling. Sew the ribbon along one of the edges using regular stitches and tighten the thread. One of the flowers is ready.
When you have the required number of flowers, you can start gluing them. You can cut out leaves from green ribbon and start gluing them.
Types of headbands
Most often, hairbands are very feminine and delicate. But for a bright and unusual look, you can make an accessory with multi-colored feathers, beads and ribbons of the boldest shades. The most common ideas for designing hair accessories:
- Kanzashi headbands and hairpins. A master class on this technique can be found below.
- DIY headbands made of satin ribbons.
- Handmade products decorated with beads, bows, rhinestones.
Clay buds
For this decoration you will need:
- Clay.
- Toothpicks.
- Headband.
- Glue gun.
Progress:
- Mix clay with water until a thick mass is obtained.
- Form petals from the resulting mass.
- Make leaves from green material.
- Glue the flowers and leaves with glue and cover them with varnish.
- Glue two ribbons crosswise to the headband and wrap them around it.
- Trim the tails of both ribbons and secure them. The color of the ribbons must match the color of the hair, otherwise the image may be ruined.
Hair plaits
Jewelry such as hair plaits appeared relatively recently. Especially popular among Americans. They look very interesting. The most complex harness is called the Celtic knot.
Making such a rope is not difficult, you need to take a thick rope, cut it into pieces 75-80 cm long. Next, take fabric or knitwear of the same length and width, equal to the diameter of the rope plus 1 cm. Stitch from the wrong side and turn it inside out. We make a Celtic knot and stitch it with a needle and thread to match the color of the fabric. This is necessary so that our knot does not come apart. Trim off the excess. Sew on elastic or tape.
This type of tourniquet is also called Greek. You can also make a tourniquet from an old T-shirt. It is enough to cut the strips, stretch them by the ends so that they curl into tubes. Tie a knot, sew the ends together, or simply tie.
Flowers from foamiran
There are many instructions for creating headbands with flowers from foamiran with your own hands. To create such a decoration you need:
- Foamiran of different shades.
- Mold.
- Headband.
- Glue.
- Scissors.
- Wire for beads.
- Beads.
- Satin ribbon.
- Foil.
For roses you need to take pink and red material. You don't need patterns.
- Cut into 2*2cm squares. – 15 pcs. and 3*3cm. – 20pcs of pink material.
- Cut into squares 2*2cm – 5 pcs. - made of red material.
- You need to cut out the petals from them.
- Petals, size 3*3cm. heat with an iron.
- When the petals are heated, you need to twist them, make small indentations with your fingers, twist the edges in different directions, giving them shape.
- Petals 2*2cm. also heat at the same temperature, fold like an accordion and make indentations.
- Make four bases for future roses from foil. Glue the petals to the resulting base to form buds.
- Make buds in the amount of three pink, one red.
- Glue together two pieces of 3*3cm petals.
- Insert a bud into a pair of such petals, attach a second such pair to one third of the petal, to one second of the previous pair, then glue another pair.
- Thus, a closed pink rose and an open one are assembled.
- For a blossoming flower: cut the red material into pieces 3*2.5 cm. – 20 pcs. Cut out petal droplets.
- As before, heat the petals and form them into a shape with a depression.
- Next, you need to make a base for the flower: twist the petal, paste it with other petals.
- Cover the base with four petals, which should be at the same level.
- Glue the next five pieces in a checkerboard pattern, and glue the last five overlapping.
- Cut out the sepals, also iron them, and give them the appropriate appearance and glue them to the base of the flowers.
- Cut out the leaves, iron them, and form them onto the mold. You can tint them with pastels to give them a darker shade.
- When everything is ready, you need to take the headband and satin ribbon. Wrap the tape around the rim and glue it.
- In the final stages, first attach the leaves to the rim. Make small branches from wire and beads.
- Attach the resulting twigs, leaves and roses to the rim.
- To hide the defects, cut grass from the material and glue it between the buds, flowers and leaves. The work is completed.
If it is not possible to make a headband yourself, then such a decoration can easily be found in online stores, a shopping center, or in a regular department for craftswomen. Or make such an accessory to order. There are many needlewomen who can make a headband of flowers with their own hands, taking into account all your wishes.
Craft in the form of a crown of leaves for the autumn holiday
And these interesting crowns with leaves were given to my daughter by her friend, who made them herself. Therefore, I couldn’t help but share such ideas. They are suitable for the autumn holiday in kindergarten or school. Of course, it can also be used for children's games.
It’s quite easy to make, twist a wreath out of wire and screw the leaves to it in a circle. Looks very harmonious.
A similar wreath can be made with the addition of flowers.
On this good note, I end today’s selection of master classes and ideas. Don’t forget to click on the social media buttons so as not to lose such valuable material. And I say goodbye to you, see you again online!