Over the past few years, concrete hummock paths have become widespread in the design of summer cottages and garden plots. The popularity is explained by the unique combination of original appearance, ease of manufacture and affordable price. This path made of concrete in bags will decorate any landscape. The finished concrete coating is reliable and designed for increased loads. The manufacturing procedure consists of several stages. All the work can be done by one person, but it is best to involve assistants. A prerequisite for the construction of a path from plastic bags is compliance with the rules.
Material selection tools
To build a concrete path in bags with your own hands, you will need a large container made of metal and plastic for preparing the concrete mixture. You should also prepare in advance a stick for mixing the concrete solution, a bucket for water, and thick cling film. When preparing the solution, sand, cement, screenings or small crushed stone, as well as a plasticizer are used. The quality of the solution’s connection depends on the last component. All tools and materials are sold in regular stores.
Ring stand
You can make an unusual jewelry stand out of concrete. The process is so simple that even those who have never worked with such material can handle it.
Master Class:
- We print out the cone templates and cut out blanks from contact paper based on it, carefully securing the edges with packaging tape.
- Take a paper plate or strong cardboard, cut out circles with a diameter of 2.5 cm in it and insert cones.
- We mix a solution from concrete and water and fill the cones, first put a little concrete, shake it so that it flattens, then add more. The more often you shake the solution, the fewer air bubbles will remain in it.
- Leave for 12 hours, then cut off the tape and unwind the cones.
Ring stands can be painted any color, you can add gold, paint splashes or polka dots, or stripes on top. Don't be afraid to show your imagination.
Preparing the base
The main load from concrete falls on the soil, on the surface of which the concrete solution is laid.
The old path, which has been walked on for many years, does not require special preparation. A small layer of sand will help level the base. This preparation will simplify the procedure for laying bags of concrete. The new site needs more thorough preparation. The compacted surface can withstand any load. When carrying out compaction, different methods can be used. When manually tamping, boards, logs, and metal sticks are used. This option is recommended to be used only if it is necessary to prepare a small area. If the track area exceeds 30 square meters. m., it is recommended to rent a vibrating plate. Sometimes for high-quality pressing of sand it is necessary to pour in a large amount of water. This option is considered budget.
Features of care
Whatever design option is chosen, some effort will have to be made to ensure that the flower bed growing upward looks good. To do this you will have to:
- carefully observe the watering regime , otherwise the enclosed space will provoke the death of the plant;
- organize drip irrigation , it will reduce moisture deficiency and facilitate daily care;
- when the first signs of various diseases appear, treat flowers and herbs with pesticides ;
- in the cold season, bring vertical flower beds into a heated room , or use annual plants .
Even a beginner can handle such work, so growing vertical flower beds is not difficult.
Convenient drip irrigation system Source rmnt.ru
Preparation according to the rules
In accordance with the rules, it is necessary to prepare a dry mixture of cement and sand mixed in a ratio of 1:5. Due to the low quality of cement, it is recommended to use a proportion of 1:3. The mixture should be laid on the path in a layer of 2-3 cm. Only after this the bags with concrete mortar are laid out.
Laying concrete mixture on an already compacted path does not make sense. In this case, it is recommended to use only sand. This approach will help save time, money and energy.
Mushroom glade
After the product is completely dry, it can be coated with paint and decorated with various elements.
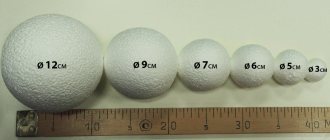
On the site, such mushrooms look much more impressive if they are made in different sizes. By the way, you can make them from a variety of containers: bowls, jars, etc.
Solution for bumpy paths
The quality of cement plays an important role.
It is recommended to buy the dry mixture in trusted construction stores; the quality is indicated by the markings on the packaging. When preparing the concrete mixture, the proportions must be observed. Cement, sand and screenings or fine crushed stone (fraction 5-15) must be mixed in a ratio of 1:2:3.5. An important component is the plasticizer; it is recommended to add it to the mixture in accordance with the instructions for use. If necessary, you can buy ready-made concrete. This option should be considered if you have assistants who will carry bags filled with concrete. The tray should be prepared before the mixer arrives. Cellophane film at the bottom of the container will help prevent the concrete solution from drying out quickly. Adding water will help extend the hardening time of the concrete solution.
How to make an artificial boulder with your own hands
It is very easy to buy decorative material for the garden, but you can make an artificial boulder with your own hands. For the simplest method, you will need a wire mesh, a solution of cement and sand (1:3), for filling - polystyrene foam and old bags. First of all, it is necessary to make the frame of the future stone from the mesh. The second stage is filling the frame with polystyrene foam and plastic bags. This move lightens the weight of the future boulder and reduces the volume of required solution. In addition, filling will prevent the cement mortar from falling through.
Now you need to prepare the solution. To do this, 1 part of cement is mixed with three parts of sand. Enough water is added so that the solution is not liquid and does not slide down the frame. It is better to apply the solution to the frame in small “cakes”. After the first layer is applied, it needs to dry a little. Next, you need to prepare a more liquid solution, which you need to coat the future stone with. This can be done with a spatula or by hand, forming natural depressions and bulges. The product is covered with a film for the solution and left to harden, after which it is turned over and the bottom is formed in the same way.
If you are interested in how to make an artificial boulder more natural, then you can use special pigments for these purposes. The best pigments for stone imitations are warm toned pigments and black for color fixation. It is better to purchase more expensive dyes, since cheap analogues can fade in just a few months.
For small stones, a mixture of sand and cement is poured on top, and for large ones, a solution is used. First, the stone is sprinkled with light pigment, then black. The surface is sprayed with water and the pigment is fixed with brush movements. This way you can alternate between warm and black shades several times to achieve the desired color.
After final drying, it is recommended to apply a sealant intended for interior concrete work to the resulting surface. Thanks to this, the boulder stone will be protected from bad weather, which in turn will make it more durable.
Pouring and creating a stone shape
When packing concrete in plastic bags, it is recommended to take into account the rate of hardening of the solution.
Fast packaging will avoid this. Involving a large number of assistants will optimize the process. If necessary, lay 25 sq. m. The area should invite assistants in the amount of three people. When packing concrete mortar, food stretch film is used. For packaging concrete for an area of 10 sq.m. 140 m of film will be required.
The next day after packaging, the cellophane must be torn and the concrete moistened with water. After a couple of days, the cellophane can be removed. The dry mixture will concrete the remaining film. If necessary, cellophane can be paid for using a burner.
The next step is to pour the dry mixture onto the path. Excess must be removed with a brush or broom, and the surface should be watered. After drying for two days, the surface of the path must be coated with impregnation, varnish or primer.
Other ideas
If you have mastered the production of such figures, then you can also expand the range of materials and skills used to create:
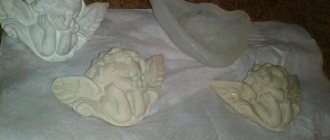
- Frame sculptures. Using reinforcement (frame), you can make an angel, a dog or any object. In this case, cement is applied directly to the frame of the composition, and a construction mesh is used to ensure that the finished decorative element remains hollow.
- "Drowning" sculptures. Unusual and sometimes frightening figures, as if crawling out of the ground, are made from gypsum, which is diluted with water until a solution has the consistency of sour cream. The finished composition is poured into a clay mold and left to dry for a day at a temperature of about +15 degrees.
In your garden plot you can create very believable and creative figures from plaster
Mosaic figures. The finished cement turtle or mushroom can be decorated with colored mosaics, which are laid directly on the raw mixture.
In the same way, you can make creative trash cans for your summer cottage, decorate the sidewalk, and much more.
Track service life and manufacturing cost calculation
The service life of concrete paths in stone packages depends on compliance with installation rules. The coating is durable and strong, with a service life of up to 10 years. All costs for laying concrete stones are covered.
The cost of laying concrete paths in packages under stone depends on the prices for building materials in a particular region. The final cost is also affected by the thickness of the concrete layer and the area of the garden path. 1 cu. m. of road with an area of 10 sq. m. m. thickness 10 cm) costs an average of 3.5 thousand rubles. It should be noted that purchasing ready-made concrete with delivery often costs 30-40% less.
Types of vertical flower beds
The design of a vertical flower bed is divided into:
- wall;
- ground;
- hanging;
- wall-mounted
The design of a vertical flower bed consists of a body, a soil base and an irrigation system. The frame gives the flower garden a shape that can be formed into a pyramid, a ball, figures of animals, birds and fairy-tale characters, a composition of flower pots, an arch, a column, a cube.
Hanging flower beds are made up of exquisite phyto-panels.
Useful tips and tricks
Expert opinion
Dmitry Anatolyevich
I have been working in the construction field for more than 15 years. I am engaged in landscaping garden and sidewalk paths. I share useful tips and life hacks.
Compliance with track construction technology does not guarantee the absence of problems. There is a risk of individual elements falling out due to poor quality of gluing.
- The construction will be strengthened by applying a sand-cement mixture to the surface at the final stage of the work. After this, the remains should be carefully swept into the seams. After rain, the strength of the seams will increase. The stones will adhere tightly and will not fall out of the masonry.
- If necessary, you can also install reinforcement, nails, and stakes in the seams between the stones. Only after this should the surface be filled with dry mixture and filled with water. This installation option will allow you to create a smooth path, tightly gluing the stones together.
- A layer of primer will protect the path from destruction under the influence of temperature changes. Strength is achieved by applying 2-3 layers of mortar.
- The speed of work completion depends on the number of assistants. If necessary, laying can take only a couple of hours.
- Adding color to the concrete mixture will help you create a path of any shade. The choice of color depends on the features of the exterior and landscape design.
Animal figurines
You can build a whole zoo out of cement in the garden. A few ideas:
- Hippopotamus . The base can be made from large boulders or large basins, or simply pour a pile of gravel and cover it with a mounting mesh. The solution is applied in several layers. This craft looks good near a pond.
- Hedgehog . The figurine is constructed from a boulder or a large piece of foam. In the second case, rounded shapes are formed, and then the mounting grid is laid. The solution is applied in several layers, the latter imitating a needle-like coating. To form the nose, take the neck of a plastic bottle.
A typical example of a frame figure can be considered the “Fish” craft. First, the wire frame is assembled. Thick steel wire outlines the outline of the fish, and then rounded sides are formed. Filler is stuffed inside the frame, and the mounting mesh is laid on top. The solution is applied with a spatula in 3-4 layers.
Cement allows you to create a variety of crafts for the garden and home. A novice master will be able to do simple figures. Complex designs require specific sculptor skills. A creative person is capable of realizing any idea. In the process of work, you need to take into account certain nuances and listen to the advice of experts, and then the summer cottage will become a cozy and favorite corner for family and guests.
conclusions
The garden path of their plastic bags can become a real decoration of any landscape design. It is versatile and can be combined with different styles. Making such a path with your own hands is quite simple. In manufacturing, it is recommended to use cement 500; it will provide the necessary strength of the coating. If necessary, you can always order ready-made concrete mortar. Inviting a large number of assistants who will quickly package the concrete into plastic bags will help optimize the process of laying the path. Adding color to the concrete solution will create a colorful garden path.
Artificial boulders in the landscape
Artificial boulders are used to add interest to an existing landscape or when creating a new one. With their help you can diversify dense vegetation.
And, of course, synthetic stones are used in the construction of artificial waterfalls, rocks and other structures when the use of natural material is not economically feasible. Boulder stone is an indispensable attribute of modern landscape design. And since today naturalness and naturalness prevail in design, boulders are a great way to decorate a garden in a natural style.
The artificial material used in the landscape looks as if it was not placed here by a skillful designer's hand, but has been there for a long time. The boulder stone is lighter than its natural counterpart, but it is no less durable and can easily withstand human weight. In addition, artificial stone is difficult to distinguish from natural slate, quartzite, granite, dolomite, limestone, sandstone, etc. This similarity is achieved through the use of special imitations technologies, special dyes and pigments.
The main advantages of artificial stone:
- Strength;
- Light weight;
- Environmental Safety;
- Weather resistance;
- High similarity to natural material;
- Variety of shades and textures.
What to focus on
In stores, prices for plaster figurines sometimes reach several tens of thousands of rubles. However, the cost of material for an entire army of funny gnomes or mushrooms will barely reach several thousand.
To save money on purchasing additional equipment or travel, it is advisable to familiarize yourself with new ideas for garden crafts.
Today the figures can be divided into several components:
- Stands - there can be funny turtles on which small pots of flowers are comfortably placed.
- To decorate a pond, these can be clay frogs or other inhabitants.
- For decorating beds - for example, gnomes, which do a good job of scaring away birds and animals.
- For lighting, in tandem with lighting you can create a fabulous atmosphere.
You can use all options, but experts recommend not to overdo it. To make everything look harmonious, it is advisable to follow the general style.
Garden decorations
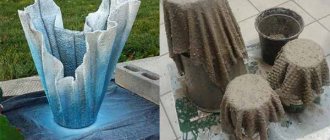
Cement crafts are very popular in garden landscaping. You can make a fountain from concrete leaves. It is manufactured in the following order:
- A plastic pipe is installed to raise water to a height of 70-100 cm.
- A stencil of a large leaf is made or a natural leaf of a large size plant is selected.
- A hole 4-5 cm deep is cut out in sand or soil using a stencil. The bottom is formed in the form of a concave surface and compacted. A stencil is placed on it.
- A reinforcing frame is made from wire, which simultaneously imitates the veins of a leaf.
- The solution is poured to form a concave surface on top and veins along the wires of the frame.
- At the installation site of the structure, wooden posts of different heights are mounted vertically so that they form a cascade for the water flow.
- Concrete leaves are fixed on wooden posts.
To give the finished look, plants and flowers are planted around the fountain and a stone border is laid.
Craft ideas for beginners
It’s worth starting with the simplest figures and sculptures. These can be mushrooms, gnomes, animals, various characters from fairy tales. Moreover, when it comes to bright figures, it is worth considering not so much the complexity of making the sculpture itself, but rather giving it brightness and compliance with the sketch. So, an ordinary mushroom is a stalk and a semicircle, but the correct coloring gives it a similarity with the idea.
The same applies to animals and characters from fairy tales - the shapes themselves are simple, but not everyone knows how to beautifully paint the figures they make. Below are many options for simple crafts with which you can start creating sculptures and concrete products.