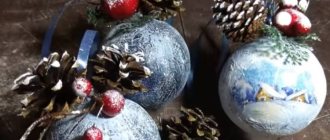
Now it is difficult to imagine the New Year without a Christmas tree decorated with balls and other toys. This tradition dates back several hundred years. And it originated in Thuringia. The first Christmas tree balls were made there. They were made of glass and decorated with sparkles. Nowadays you can buy Christmas tree decorations in any store. But it’s much more interesting to make them yourself. Any materials are suitable for this - paper, fabric, thread, foamiran, foil, foam. A Christmas tree decorated with Christmas balls made with your own hands will look original and unusual.
Volumetric paper balls
Paper is a wonderful material for crafts. It can be found in any home and is easy to work with. Even if these are ordinary white sheets, you can make many original things from them. Don't think that paper crafts look too simple. The balls turn out to be unusual and original. The only negative is that they are difficult to store. Most paper toys will only last one season.
Simple crafts
Together with your children, you can make New Year's balls from double-sided colored paper. To do this, you will need to cut out 4-6 circles of the same size, fold them in half and glue them together. These balloons turn out bright and festive.
Interesting options are made from paper with a New Year's print. With paper balls you can decorate not only the Christmas tree, but also hang it from the ceiling or window, or make a garland.
Another option for a simple paper ball is made from paper strips. Children of almost any age can also easily cope with this craft.
Also very simple to make, but no less original, a paper Christmas ball.
The same version of the ball, but in a different design:
How to make a paper ball without glue
Many people made balloons from postcards as children. Over time, they have not lost their popularity. To create such a ball, you only need scissors and paper.
It is better to choose thick paper so that the craft holds its shape.
Flower-shaped figures are cut out of it and cuts are made on the petals. A ball is assembled from the resulting parts, interlocking them with each other.
Or another version of a three-dimensional paper ball, the manufacture of which does not require glue.
Christmas origami balls
From the outside it looks like magic: from a simple sheet of paper, without the help of scissors and glue, intricate figures are obtained. Making origami is fun, and the result will delight you. Christmas balls made using this technique look stylish and original, in no way inferior to ready-made toys sold in stores.
Kusudama Balls
Kusudama has much in common with the origami technique and, in fact, is its variety. Identical module elements are made of paper. It could be a star, a flower, a diamond, or just an intricate figure. The modules are glued together to form a figure.
Kusadama balls look stylish. They can not only decorate the Christmas tree, but also be used as an element of home decor. They perfectly highlight the interior design and create a feeling of mystery and magic.
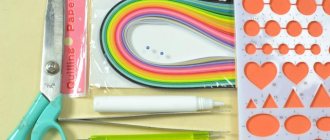
Christmas balls using quilling technique
New Year's balls using the quilling technique are made elegant and delicate, light and airy. They are made from paper cut into thin strips twisted in a certain way.
The individual elements make up a pattern. They can be glued together to form the desired shape. But it is better to glue it to a base, ready-made or made yourself, otherwise the ball will turn out to be very fragile.
Christmas tree balls made using the quilling technique look truly wintery. Twisted strips of paper look like frosty patterns on window glass. Such decorations create an atmosphere of magic in the house.
Kusudama "Diamond"
You will need: 6 sheets of A4 double-sided colored paper, PVA glue, scissors.
Master Class
- Make squares from A4 sheets.
- Bend the squares diagonally on both sides.
- Fold each corner toward the center of the square, then straighten them out.
- Fold the sides of the squares to src=»https://sp-ao.shortpixel.ai/client/to_webp,q_glossy,ret_img,w_700,h_517/https://mypapercraft.ru/images/wp-content/uploads/2018/ 06/43-700×517.jpg" class="aligncenter" width="700″ height="517″[/img]
- Fold the top and bottom sides towards the center.
- Use your finger to reach the hidden edge of the paper on the right from the inside, holding the center of the workpiece with your palm.
- Lay out part of the workpiece as shown in the image.
- Place one finger on top in the center of the workpiece and place 2 fingers under the paper at the top and bottom.
- Remove your finger from the center, and bring the two extreme ones together and press the sides together. Do the same process on the left side.
- Pry your finger and open each corner.
- Fold the corners towards the center to form a square on top. Fold all 4 corners in this way.
- Fold the sides of each square toward the center.
- Lift and straighten each side.
- Fold the 4 overhanging corners under to create an octagon.
- Make 6 blanks this way.
- Glue the 4 side elements at the corners, then glue the bottom and lid.
Balls made from foam bases
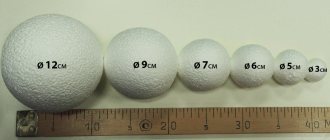
Styrofoam balls are an excellent basis for New Year's crafts. You can buy them at the store or cut them yourself. Christmas balls made from them are durable. They will not break, will not wrinkle and will last for many years.
Ball using kimekomi technique (patchwork)
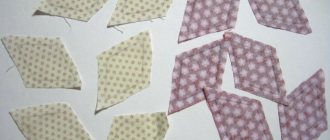
If you have small scraps of fabric left over, you can use them to make New Year's balls using the kimekomi technique. It came to us from Japan and attracts us with its originality and ease of execution.
Making a New Year's ball using the kimekomi technique is very simple. A pattern is applied to the foam blank, along the lines of which slots are made. The parts are cut out of the fabric according to the pattern. They should be a little larger in size for the allowance. The fabric parts are applied to the workpiece, tucking the ends of the material into the slots. Using this principle, you can create any, even the most intricate and complex pattern.
Patchwork balls look stylish, especially if you use silk, brocade, or velvet to create them. The drawing, made independently, will not be found anywhere else, and this makes such a toy unique, one of a kind. Christmas tree balls made using the kimekomi technique are suitable not only for decorating a Christmas tree, but will also be a wonderful New Year gift for family, friends and acquaintances.
New Year's balls decorated with sequins
A New Year's ball made from sequins is bright and shiny. They are attached to the foam base with regular pins or simply glued. They try to place the sequins as close to each other as possible, then the ball will shine and look like glass.
Which sequins to choose depends only on your preferences. The ball can be made monochromatic. Bright and shiny sequins will not allow it to get lost among other decorations. You can combine several colors or try to lay out a pattern. Such balls will also look original and will decorate any Christmas tree.
You can also use sequins on ribbon. It will be much faster and easier!
Balls with beads
Instead of sequins, you can use beads. They can also be attached to the base with safety pins. For a stronger fixation, add a drop of glue to the bottom bead.
Or, if you plan to only have one row of beads, they can be placed directly on glue.
Christmas ball with button decoration
Using the same principle, a button ball is made. They are attached to the foam base using pins. Although the buttons do not shine like sequins, they still look unusual and original.
A Christmas ball made of buttons can be made in the traditional New Year's colors - red-green, blue-white. And you can combine everything available in the house, of any colors and sizes. Then the ball will turn out bright, and just looking at it will lift your spirits.
Decor of a foam ball with buttons
The foam base can also be decorated with push pins. Fast and original!
"Rose"
Kusudama, reminiscent of a pink bouquet, looks no less impressive on the New Year tree than “Venus”. Such decoration is difficult not to notice even among expensive and fashionable purchased toys. Kusudama “Rose” will also make a wonderful hand-made gift. It is not as complicated as it seems at first glance and is accessible to beginning origamists or children over 8 years old.
First, let's try to put together a simplified version. Diagram for one rose-shaped module:
Step-by-step instruction:
You will need 12 squares, 8x8 cm in size. You can use paper of several colors, but without patterns, they will interfere with the perception of the complex shape of the model.
- Fold one of the squares in half from top to bottom.
- Then from right to left. We iron the folds with a stack so that the figure does not open.
- Fold the new square, ¼ the size of the original one, diagonally, matching the upper left and lower right corners. Return the workpiece to its original position. Open the “pocket” on the left, straighten and smooth it out.
- We turn the model over.
- Repeat step 3 on the right side.
- We get the basic figure “Double Triangle”. We lower the top to the base and straighten it.
- We open the workpiece from below, flatten the central part into a square. Turn it over.
- Raise the triangle in the center vertically. Fold the upper left part along the dotted line. We do the same with the lower right quarter.
- The result is a cross-shaped figure, separated by vertical partitions.
- We take the protruding part and carefully twist it clockwise.
- Turn the workpiece over.
- We bend the protruding triangles inward.
- This is what the rose module looks like.
Assembly:
- We make 11 more identical parts, repeating steps 1 – 12.
- We take three modules of different colors. Apply glue as shown in the picture.
- Let's connect.
- In the same way we assemble three more structures. We glue them together based on the diagram.
- Christmas decorations with roses look best on classic-style Christmas trees:
Having mastered this kusudama, you can move on to a more complex ball, known as the “Curler Rose”, named after the unusual modules with curls. The author of the model was the Belgian origamist Herman van Gubergen, known for his innovative ideas and love for optical illusions. The master does not strive to blindly copy the techniques of classical Japanese paper-making; he offers his own concepts and “Rose Curler” is no exception. Those who start making it will receive double pleasure from both the learning process and the result.
The model will also require 12 squares with a side of 8 cm.
Balls with thread decor
Threads can become the basis for beautiful bright or snow-white New Year's balls. Different techniques are used to create them. In any case, the result will please and impress.
Simple
The easiest way to make a ball of thread is to wrap the finished workpiece, first lubricating it with glue. Additionally, you can decorate the craft with ribbon, sequins or beads, creating a unique pattern.
The combination of jute cord with openwork white lace turns out beautiful. Such balls will fit perfectly into eco-style. They are used not only to decorate the Christmas tree, but also for interior decoration.
Temari
The art of embroidering balls came to us from the East. Bright temari balls with unusual patterns attract attention and are very popular.
Making a temari ball is not difficult, although it requires patience and skill. First, the workpiece is wrapped with thick threads, on which the pattern is then embroidered with thin silk threads, creating a unique ornament.
Temari ball base
This New Year's toy is suitable for a gift. It is believed that it brings wealth and good luck to its owners.
Temari balls are so different and beautiful.
New Year's ball made of thread and glue
Balls of thread and glue are surprisingly light. They can be of any size: hang small ones on the Christmas tree, use large ones as a decorative element. Airy, openwork thread balls will fit into any interior.
The technique for making balls from threads is simple. The balloon is inflated to the desired size, wrapped in cling film and wrapped with threads coated with glue. All you have to do is wait for the workpiece to dry, carefully puncture the balloon and pull it out.
Surprise firecracker
You will need: wrapping paper, colored paper, sleeve, glue, shaped sequins, paper napkins, scissors, rhinestones, ribbons, surprise (candies, coins, small toys).
Master Class
- Cut 4 circles from a paper napkin, their size should be slightly larger than the diameter of the sleeve.
- Place the sequins on the two circles as shown in the image.
- Apply glue along the edge of the circle of empty circles and glue them, hiding the sequins.
- Cover the sleeve with colored paper.
- Place a surprise inside the sleeve and seal it on both sides with napkin circles with sequins.
- Wrap the cracker in wrapping paper and tie the ends with ribbon to form a candy.
- To activate the cracker and get a surprise: you need to pierce one of the napkin circles with sequins with your finger.
The surprise firecracker is ready!
Christmas balls made of foamiran
Even beginners can make a New Year's ball from foamiran. This is a very plastic, easy-to-work material. It is very easy to make a Christmas ball from it. Circles are cut out of foamiran, folded and glued together. For New Year's toys, it is better to take glitter foamiran, then the toys will turn out bright and will shimmer beautifully in the light of the garlands. Additionally, they can be decorated with chenille wire and beads.
Or this New Year's ball.
Well, you can make such a Christmas tree ball from foamiran with your own hands.
Preface
This process is very entertaining and creative, it will be interesting for both children and adults. You can create beautiful toys using various materials, and the basis is either foam blanks or an old glass ball - transparent or plain. You can create your own decoration on top of the boring drawing.
In this article we will look at several different options for making Christmas balls with your own hands. A detailed description of the work will help you make such crafts at home without much effort. Even if you have never made your own Christmas decorations before, then after reading the material you will be able to cope with the task.
Felt Christmas tree balls
Original balls can be sewn from felt, and it’s easy to do. It is enough to cut out the details according to the template, decorate them with ribbons, beads, rhinestones, and embroidery. Felt decorations can be voluminous or flat, sewn or made in the form of appliqué. Here, for example, is a Christmas ball made of felt using the applique technique.
Here is an example of embroidered felt balls.
You can come up with the decor for the balloons yourself (alternatively it could be buttons). Then the toy made with your own hands will look original.
As for volumetric balls, they do not have to be stuffed. Here is an example of a Christmas tree decoration made from felt circles.
Or this voluminous ball.
Creating spherical shapes
Beads are a voluminous material. To make bead balls, or rather, products as close to them in shape as possible, polyhedra are woven. There are at least three basic forms based on 3, 4 and 5 beads. To make them you will need very few beads: 6, 12 and 30 pieces, respectively. Depending on the size of the beads, the balls range from 1 to 10 cm in diameter.
For the simplest three-dimensional figure, it is better to take larger beads, otherwise it will be very small. Here is a short master class on making a ball with three beads:
- Collect 3 beads and close them in a ring. Leave one edge of the working thread 10-15 centimeters long for ease of tightening the finished figure.
- Add 2 more beads to the working thread. Secure them by threading the needle sequentially through the first and second beads.
- Pick up the sixth bead, pass the needle through the fourth, second, and third.
- Complete the figure by connecting the fifth, sixth and third beads again. The thread can be hidden.
If you want to weave a fullerene from beads, the ball weaving pattern starts with 5 beads. The initial stage of creating such a ball is similar to weaving a flower. When using small beads, such balls can be hung on a earring to make earrings, and can also be used as components of necklaces, bracelets, and key rings.
New Year's foil ball
Glittery foil is perfect for Christmas crafts. She will probably be found at home and is easy to work with. Making a New Year's ball from foil is very easy. You will need a base, such as a foam ball. Flagella are twisted from foil and roses are formed. The resulting flowers are attached to the base. The unusual New Year's ball is ready. Its shine will immediately create a festive mood.
A Christmas ball made of foil is a great idea for a toy for a street tree!
New Year's toys made of beads, master class, mini-wreath patterns
- beads of 3 colors
- pliers (to make it easier to twist the wire)
- PVA glue (if necessary)
1. Prepare a thin wire and wrap it around three fingers several times. Twist the ends.
2. Cut three pieces of wire of the same length - in this example, each length is 45 cm. Twist the ends of the wires on one side.
3. From the reverse side, start stringing beads - one color on each wire. The beads should cover each wire by 30 cm.
4. Start braiding three wires covered with beads.
5. Twist the end and then bend the workpiece so that it takes the shape of a circle, and fasten both ends of the wreath together. Here you will need the help of pliers.
6. Use wire cutters to remove excess wire.
7. Tie a ribbon to where the ends of the wire are attached and tie it so that you can hang a mini wreath.
8. If you wish, you can make a bow from a separate ribbon and glue or sew it to the already attached ribbon.
9. Using PVA glue you can better secure the braid to the wreath, but this is not necessary.
Christmas ball decorated with ribbons
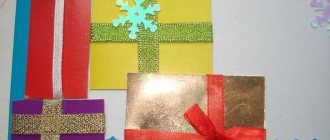
Impressive New Year's balls are made from ribbons. They are as beautiful as ready-made toys.
Simple ribbon balls
Even simple ribbon balls look stylish and elegant. Wrap the workpiece with satin or silk ribbons of one or more colors. Even without additional decorations, the Christmas ball will look impressive and stylish.
If we are talking about crafts with kids, make, for example, Ninja Turtles or any other cartoon character.
If you take multi-colored ribbons and add additional decorative elements (for example, beads), you can get this original ball. This MK combines felt and ribbons, but felt can be replaced with other fabric or ribbons.
Balls using the kanzashi technique
New Year's balls in the kanzashi style look graceful and elegant. This is a Japanese technique for creating jewelry from fabric. To make a Christmas tree toy you will need a satin ribbon. It is cut into small pieces, folded in a certain way and the ends are soldered with fire. The resulting petals are formed into flowers and glued to the base.
Additionally, the toy is decorated with beads and rhinestones. It is enough to understand the principle of operation, and then come up with your own patterns.
Christmas balls in artichoke style
The simple but effective artichoke technique came to us from France. It is somewhat reminiscent of the kanzashi technique. To create Christmas balls, small pieces of ribbons, most often satin, are also used. They are folded in a certain way, but the ends are not soldered, but attached to the base with pins. The result is petals that resemble artichoke leaves.
The technique is very simple, but thanks to the combination of different colors, a huge number of patterns are obtained, so that the craft will look original and unique.
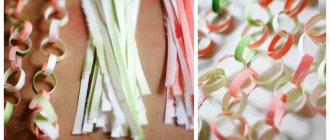
From fabric
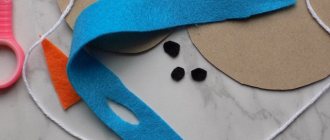
If you have an old blouse in your closet that you hate to throw away, then not recycling it was the right decision. You can make a cute Christmas tree toy from it. For production you need: knitted fabric, scissors, sewing needle and thread, cardboard, tape.
- Cut the longest strips of fabric 1 cm wide. Stretch each strip so that it curls the edges.
- Cut cardboard measuring 10 cm x 20 cm.
- Wind the resulting strips onto the cardboard along the width.
- In the center on one side and the other, connect the strips with a needle and thread. Pull out the cardboard.
- Cut the resulting loops along the edges.
- Fluff and attach the ribbon.
There is another method that involves decorating a foam or plastic blank with fabric. You need any fabric (can be of different colors), hot glue, scissors.
- Cut the fabric into rectangular pieces measuring 3 cm x 4 cm.
- Fold them like this: fold the two top corners towards the center of the bottom.
- Glue to the workpiece in rows, with curves inward, starting from the bottom.
- Cover the entire ball. Attach the ribbon.
Fabric appliqués can be made in a variety of ways, using additional improvised means - beads, braid, rhinestones, ribbon.
Christmas balls using decoupage technique
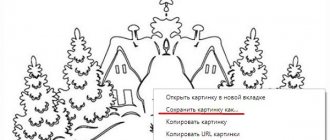
The decoupage technique allows you to turn the simplest thing into a real work of art. This does not require special skills. No drawing or modeling skills are needed, because a ready-made picture is used to create such Christmas tree balls.
The essence of the decoupage technique is to attach a picture to a surface on which it is fixed using varnish or transparent glue. To create a New Year's ball, use any blank - glass, wood, plastic, foam, metal. For decoration, choose napkins with the desired pattern, for example, abstract patterns or thematic pictures. The design is cut out, glued to a ball previously coated with a primer, and coated with acrylic varnish. Instead of napkins, you can use photographs printed on a printer. The principle of creation is the same.
Almost like a real “Snowball”
A Christmas ball, surprisingly similar to a snowball. True, he will never melt.
How to make it? Now we'll tell you. So, we needed:
- foam ball;
- white acrylic paint (gouache will also work);
- various beautiful ribbons, ribbons, lace, sequins for decorating toys;
- PVA glue;
- semolina;
- glue gun;
- wooden skewer;
- scissors;
- spoon.
Place the ball on a wooden skewer. Mix white paint with PVA glue in a 1:1 ratio.
Add the same amount of semolina to the resulting mixture of paint and glue. And mix everything thoroughly.
The resulting composition, which has a consistency similar to cottage cheese, is gradually applied using a spoon to the entire surface of our ball. Instead of a spoon, you can use some other tool, for example, a plasticine knife. Do not try to make the surface absolutely flat and smooth. On the contrary, it should be rough. Let the ball dry.
Let's start decorating. We took a piece of silver-gray lace and a blue ribbon, as well as silver sequins. We will attach them to the “snow” ball with pins and nails.
This is how we got it.
All that remains is to make the suspension. The toy is ready!
Shabby chic style
Made in an antique style, in calm soft shades, decorated with lace, Christmas tree balls in the shabby chic style are reminiscent of a distant past, steeped in romance. They are ideal for the New Year, a family holiday, they make you remember traditions and customs, and connections between generations. Such jewelry looks refined and sophisticated, creating an atmosphere of special warmth and comfort, tranquility and magic.
Balls in the shabby chic style are decorated in pastel colors, pink, silver, and ash shades. Ribbons, lace, beads and half-beads, outline and buttons are used for decoration.
Knitting toys for the Christmas tree
weaving with a hook
The scheme of work is approximately the same as when creating plaits. Following the layout, cast the required number of beads onto the thread. Then start knitting the ball following the 6 wedge circle rule. It is better to use it with an amigurumi ring, then the initial row can always be tightened. When knitting, use a spiral stroke and single crochet stitches.
It is important to ensure that the thread does not cling to already knitted beads. In such patterns, as a rule, the direction of the set of beads and the knitting stroke are indicated
They will be opposite.
Using this technique you can create entire Christmas tree pictures. Depending on the final size, a base may be needed. An old faded New Year's decoration, as well as a ping-pong ball or a surprise ball, are suitable for it.
Ball with photo
A great gift for the New Year is a Christmas ball with a photo. An old childhood photograph, a family photo, or pictures that capture the best moments of the past year will do. Such a souvenir will take its rightful place on the Christmas tree and become a family heirloom.
The simplest option for a Christmas tree ball with a photo is to cut out the photo and glue it onto cardboard, add a ribbon and you can hang it!
The cardboard rim can be additionally decorated with a thematic design or, as in the MK below, miniature pompoms can be glued on.
If you want a more serious toy, then you will need to get a transparent blank and place a photo there. Additionally, you can decorate the ball with artificial snow, an outline, and decorative ribbons.
How to make draped packaging for a rectangular gift
Shiho Masuda YouTube channel
How to pack a gift
Cut two identical large rectangular pieces of wrapping and corrugated paper. Place the wrapping paper face down and place the corrugated paper on top. Fold the bottom narrow edge a couple of centimeters.
Shiho Masuda YouTube channel
Fold the same edge so that the new folded strip is twice as wide as the previous one. To avoid mistakes, watch the video instructions below. Fold this strip over four more times.
Shiho Masuda YouTube channel
Unfold the paper. You should still have noticeable folds.
Shiho Masuda YouTube channel
Turn the paper face up. From the middle of the bottom edge, cut the corner to the beginning of the fifth bend.
Shiho Masuda YouTube channel
Slightly straighten the corrugated sheet to the left. Fold the entire paper into a fan along the marked folds. Find details in the video.
Shiho Masuda YouTube channel
Turn the package over and secure the fan with tape in several places.
Shiho Masuda YouTube channel
Place the gift on the paper. Fold the part with the fan as shown in the photo. Place the opposite side of the package on top. See how much you need to cut off so that this part is hidden under the first one. Then cut off the excess.
Shiho Masuda YouTube channel
Open the paper. Place the left side on the gift and secure the right side to it using double-sided tape.
Shiho Masuda YouTube channel
Turn the gift over. On one side, fold the side edges of the paper inward.
Shiho Masuda YouTube channel
Fold the top edge of the paper inward and trim off excess if necessary. Secure the bottom edge with double-sided tape.
Shiho Masuda YouTube channel
Repeat the same on the other side of the gift. Tie a ribbon if desired.
What other options are there?
Instead of a fan, you can make a straight drapery:
Diagonal drapery also looks impressive:
And another cool packaging option with a tie especially for men:
Snow globe on the Christmas tree
When you look at a snow globe, you immediately feel the approach of the New Year, a time of magic and miracles. You can do it yourself. To do this, you will need a glass or plastic Christmas ball, into which small figures will be placed - a Christmas tree, a snowman, Santa Claus, a house or any others.
You can use ready-made ones or make them yourself from polymer clay. Salt, foam chips or glitter are used as snow. This winter magic ball will become a real decoration for the Christmas tree.
Paper lanterns
Even a 3-year-old child can make such a decoration - of course, under his mother’s supervision. To do this, fold a rectangular sheet of colored paper lengthwise. From the fold side, make parallel cuts towards the free edges, not reaching them by 1 cm. The distance between the cuts should be the same. Next, unfold the workpiece, overlap the edges of the lantern and glue them to each other.
The second rectangle is the core of the flashlight; it should be slightly narrower than the main part. Glue it into a tube shape and attach it inside the flashlight. Cut out the handle and glue it to the figure. The flashlight is ready.
Christmas balls decorated with beads
Another original option for decorating a Christmas ball is beads. There are many ways: it all depends on your desire and skills in beading. The simplest one is to coat the ball with glue and sprinkle with beads.
By the way, there are no rules here. You can, for example, cover the entire ball or just a part.
In a chaotic manner.
Or lay out a specific pattern.
Of course, beads can be used to make braids for a ball, like a New Year’s cape. In this case, you will need fishing line and a diagram. Here, for example, is a simple diagram for beginners.
Here's another diagram:
And another one.
And like this
Or weave a cape according to this pattern.
In general, those who understand the general principle can come up with their own patterns. In addition, you can use beads of different sizes and shapes, then the “cape” will turn out even more original!
If beading is not your thing, here is another way to make a ball decorated with beads or beads! To do this, in addition to beads or seed beads, you will need fishing line and a balloon.
What is papier-mâché
The papier-mâché technique is original. Not without paper, a balloon, a brush and homemade glue. The recipe is simple, prepared from one glass of wheat flour and five cold water, plus a pinch of salt to prevent mold from appearing.
The main task is to cover the inflated balloon with scraps of paper soaked in an adhesive solution in several layers.
When everything is dry, wait at least 12 hours, there will be a light, even sphere. For beauty, you can paint it with acrylic paints.
Christmas ball made from pasta
An original New Year's craft will be a Christmas ball made from pasta. It is made simply, and most importantly, from scrap materials. A craft made from pasta and a balloon will be light and delicate. The pasta is glued together to form a ball, which is then removed.
If you don’t want to mess around, the pasta can be glued to a base, for example, foam or the same balloon.
After gluing is completed, the finished toy can be painted; it is most convenient to use spray paint. But if the ball is on a base, then you can apply the paint with a brush.
Any type of pasta you can find will be suitable for this craft!
With pasta
If you don’t have sequins or beautiful brocade on hand, don’t worry. Ordinary curly pasta in the form of shells, flowers, bows, etc. can be used.
To work you will need:
- pasta;
- round blank;
- glue gun;
- ribbon;
- spray paint (bronze or silver).
Operating procedure
The process is so simple that even a child can do it. First, we attach a ribbon for hanging, then we tightly cover the entire surface of the ball with pasta. You can use one type, or you can combine several types of pasta.
Cover with different pasta
After the workpiece is pasted over, we cover it with spray paint.
We get an interesting decoration for the Christmas tree
Instead of pasta, you can use penny coins, acorn caps, seeds, buckwheat, millet and other available materials.
We paint, make a loop and you're done.
Christmas ball painting
An ordinary glass or plastic ball can be modernized with hand painting: an inscription or a thematic design.
Acrylic paints are best suited for these purposes. If you don't have any, use a marker, nail polish, stained glass paint, or glitter glue.
As a gift for grandparents and kids, make a Christmas tree decoration with a handprint.
Well, with older kids - Mini Mouse.
How to decorate champagne bottles for the New Year? Of course in the form of Father Frost and Snow Maiden!
What would New Year be without Father Frost and his companion Snegurochka? We invite you to decorate bottles of champagne with these indispensable characters of the New Year celebration. At first glance, it seems that making such bottles of champagne is very difficult. I would like to assure you that this is only at first glance. In fact, the main thing is accuracy and a little patience. Each bottle is made in just one evening. Thus, by spending just two evenings, you will receive unique bottles of champagne.
- We will need the following materials and tools:
- • Two bottles of champagne
- • Red and blue ribbons
- • Synthetic winterizer or cotton wool
- • Glue
- • Scissors
- • Beads
Instead of beads, you can use sequins and beads for decoration.
2. First you need to prepare the bottles. To remove labels from bottles, soak them overnight in cold water. After the bottles are cleared of all labels and glue, you can begin making Father Frost and the Snow Maiden. Let's start with making Santa Claus. Apply glue to the middle of the front and back of the bottle. You should not apply glue in a circle around the entire perimeter. Two drops of glue on the front and back of the bottle will be enough.
3. We glue our tape evenly on the back side of the bottle, and form a corner like this on the front side. Cut off the excess part of the tape. The main thing is to carefully tighten the tape. Make sure that the tape does not wrinkle or sag.
4. Similarly, we cover almost the entire surface of the bottle. This will be the top part of Santa Claus's fur coat.
5. We glue the lower ribbons strictly horizontally.
6. From a piece of padding polyester we form the fur part of Santa Claus’s fur coat. And at the same time we hide all the unsightly joints of the tape.
7. Glue the ribbon with beads along the contour of the fur part. We glue the fur on both sides.
8. We complete the work with the obligatory attributes of Santa Claus. We sew a small bag with gifts and tie it with a belt. We make a beard from the same padding polyester. We cover the bottle cap with red cloth or ribbon and decorate it with a white edging. Santa Claus is ready.
9. We use the same principle to dress the Snow Maiden. To do this, cover the bottle with blue tape. The only difference is the length of the upper and lower parts. The Snow Maiden's legs are longer, so there are slightly more horizontal stripes.
10. In the center of the bottle we glue the white part of the Snow Maiden’s fur coat, under which all the seams are hidden.
11. Cover the bottom edge of the fur coat with beads. On the front of the fur coat, we glue the beads only on the outside.
12. We make a fastener for a fur coat from two beads.
13. We make a Snow Maiden hat from ribbon and padding polyester and glue it to the bottle. Decorate the hat with beads.
14. Glue the braid woven from padding polyester. That's all, our Snow Maiden is completely ready!
15. The wonderful couple Father Frost and Snow Maiden are ready to start celebrating the New Year!