Store-bought toys do not have the same charm and do not have the same fabulousness as those made by hand. They are unique, original and not similar to each other. They not only look great, but also bring a festive atmosphere.
There are many ways to create balls, but today we will look at my favorite and quickest technique. To decorate the room, I also recommend making a three-dimensional Christmas tree, paper snowflakes, a Rat toy, and then, for sure, the holiday spirit will reign in your home.
The idea itself is very simple and accessible, a few years ago, my children and I attended master classes on creating products in the decoupage style, we made a lot of everything, some were left, some were donated. Today, I offer interesting and most beautiful ideas, so let’s get started.
DIY Christmas plastic balls using decoupage technique
You can decorate a plastic product from a store very beautifully; I recommend taking one-color ones, without patterns or ornaments. And create beauty at home using simple objects. As a rule, needlewomen have everything they need at home, all that remains is to find the time and get down to business.
As decoration we use cones, berries, twigs, beads and other little things that will decorate and make it shine in a new way. They will add decoration to the interior of your home or room.
What you will need:
- Plastic balls
- PVA glue
- Napkins
- Soft brush
- Acrylic paint
- Sponge
You need to cut or tear napkins with beautiful designs. We apply a little glue to the ball, apply a napkin, and paint with glue, from the center to the edges, or rather, we don’t paint, but glue it.
A very important rule is to glue it like this, put a point with a brush in the center, and apply it by extending the brush to the edge, and so, from the center to the edges, the pattern with this method of applying glue does not wrinkle, and we release all the air under the napkin, there are no bumps or irregularities.
You can dilute the glue with water, 1:1, or, if it is very thick, then 1:2, or not dilute it.
You can also cover the entire ball with napkins, then paint over it, leaving only one pattern. Let the paint dry, and use white paint to highlight the relief that is obtained using a brush or sponge.
I usually cut off a piece from the sponge I use to wash dishes, then throw it away as the paint dries and hardens. Mine is acrylic.
When the product is dry, you can glue beads or sequins in a circle, you can use half beads, or use other decorative elements.
Then let the paint dry and coat it with varnish in 1-2 layers, and let it dry again. They can be decorated, if desired, using cones, twigs and decorative berries, gluing them to the ball.
To make the pattern better saturated and set, it is recommended to dilute the glue with water, but not too much, literally 1 part water and 2 parts glue; if you add a lot of water, the patterns will tear when applied.
Which foundation to choose
Decoupage can be made on a New Year's ball from any material. But you need to understand that each surface reacts differently to acrylic varnishes and paints. The result will depend on the correct preparation of New Year's decorations and the type of products. When choosing a base, you should consider the method of its processing and compatibility with various solutions:
- Wooden ball. An old toy is cleaned of dust and grease with an alcohol swab. If there is old paint left, it should be removed with sandpaper and the ball should be coated with varnish. After drying, the surface should be cleaned again;
- Metal ball. For such a base, regular degreasing will be sufficient. If there are old images left on the ball, they should be removed with a fine metal brush or sandpaper. After this procedure, any acrylic material will lie flat and adhere well to the surface;
- Paper ball. You can add greater strength to a fragile material using an acrylic primer. It should be applied in one thin layer. It is better to remove the gloss from the paper ball before priming;
- Glass bowl. The surface of the Christmas tree decoration before decoupage should be extremely smooth and there should be no engravings. Before applying the primer, it must be degreased;
- Plastic ball. The sliding surface must be roughened. Then, for better adhesion, apply a layer of gypsum and sand thoroughly. Before applying paint, the priming procedure must be repeated several times;
- Styrofoam ball. For such material, gypsum and construction paint can be used as a primer. The use of Moment glue is unacceptable. It will simply corrode the surface of the ball.
If a child is involved in the work, it is better not to use the glass base of the ball. Such material requires careful handling. If you apply too much pressure, the fragile toy can easily break and injure your hands.
How to decoupage a wooden ball for a Christmas tree
One day, while passing by the “Handicrafts for the Whole Family” store, I noticed wooden blanks; they would make a wonderful toy; working with wood is more pleasant than with any other material. You can decorate in different ways, here is one of them.
What do you need
- Wood blank
- White paint
- Printouts or napkins
- Glue
The surface of the wooden workpiece is cleaned with an abrasive sponge. Cover with 2-3 layers of white paint and let each layer dry well.
We cut out the drawing; for this we take napkins or laser prints. Then we apply it to the figure and cut it from the sides with scissors so that it does not look like an accordion and fits beautifully on the product.
Glue it with PVA glue and apply it to the ball.
Then we cover the drawing with film, take a piece of fabric, and press the drawing to the surface. Let it dry.
Next, you can add details and surfaces from the drawing in different directions, thereby highlighting the drawing, as well as the details on it. We use different paints and a thin brush.
Paints can be mixed with each other, you can do this on a palette. This is a rectangular or square container for mixing colors.
To create a glossy effect, the product is varnished several times.
Toning
The glue has dried, you can start tinting. For those who are familiar with pastels, it is advisable to tint with it, but for beginners, paint is quite suitable.
(Step 3)
We create the desired shade by mixing. Try to give a tone that will be close to the main shade on the paper material. We paint the ball with paint, it is advisable that it does not get on the edges of the design, and dry the workpiece again.
Decoupage of New Year's balls from polystyrene foam with handmade napkins
Polystyrene foam is the most affordable material, stores are now filled with it, if only there was time and desire. It’s my tradition to make one beautiful and unusual toy every year and hang it on the Christmas tree, without breaking this tradition, I’ve already bought a foam blank. I also love to give, teachers and educators received quite a few handmade gifts from us.
What you will need:
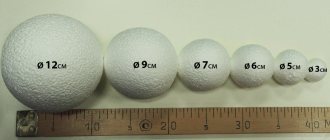
- Foam balls (optional size)
- Acrylic paint
- Napkins
- PVA glue
- Brush and sponge
- Varnish for coating the product
First, prime the surface, fix the ball with a toothpick or skewer, and apply paint with a sponge. I usually apply 2-3 layers and give each one time to dry. You can stick a skewer into a piece of foam so that it does not fall and become smeared.
Using a sponge layer by layer, a beautiful monochromatic background is formed. I recommend applying it with a sponge rather than a brush.
When the workpiece is completely dry, you can apply a design; for this you can cut out fragments from napkins. You need to buy 4 layers, and separating layer by layer, get to the drawing.
It is on a white background that the drawing acquires special expressiveness and clarity of all lines. And we just covered the blank with white paint.
Dip the brush into PVA glue; for convenience, it is better to cast it into a lid or any other container. Apply quickly but carefully, spreading from the center to the edges.
So we apply any fragments of the drawings we like, let them dry well, and coat them with varnish, maybe several times, but after each layer we let it dry well.
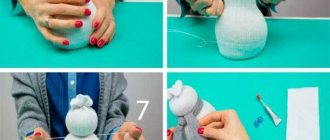
Felted wool toys
Felting wool is a simple and fun activity. Volumetric figures are light and soft. For this you will need pieces of padding polyester and a skein of wool yarn. It is better for beginning needlewomen to give preference to simple forms of New Year's toys.
We cut out the blanks in 2 copies (hearts, circles). The elements should have a diameter twice the size of the desired toy. Using a needle, assemble the outline along the outer edge (basting type), leaving the thread free, without knots. We fill the resulting bag with padding polyester, tighten it and tie it. Parts of a different shape can simply be sewn together.
Now the workpiece needs to be covered with wool. We pull out the strands and wrap them around the base in different directions. They must be fixed with a felting needle to prevent bald spots from forming. The simplest thing remains. We place future toys in a nylon stocking and put them in the washing machine on a standard washing cycle. After drying, we get neat lumps. You can decorate with beads, braid, bows and other cute little things.
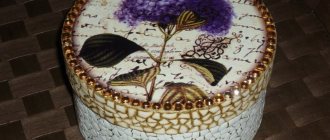
Christmas tree balls in vintage style with lace (decoupage master class)
I really like antique products, they are unusual, they add a special atmosphere, they are fascinating. Doing this kind of work is not difficult, it is important to think through everything in advance, step by step, to make it easier for you, I offer step-by-step instructions.
What do you need:
- Foam balls
- Lace fabric with a beautiful pattern
- Dye
- Scissors, brush, sponge
To begin with, I covered the ball with white paint, pierced it with a toothpick for convenience, let it dry well, and in the meantime, I cut out flowers and beautiful fragments from the lace.
The lace elements need to be glued and then covered with white paint, it is more convenient to cover with a sponge, I cut off a piece of the sponge and work with driving movements. I dip the sponge into the paint and work it in, but I don’t need a lot of paint. Or cover with a brush.
Then, after complete drying, apply silver or gold paint using driving movements with a brush or sponge. Then we rub the surface using a piece of cloth, rub it until the dark paint is visible in the contours and recesses.
Thus, a beautiful blank is obtained, because vintage is antique products. They are extremely beautiful and always attract the eye.
We had a trading place in the shopping center, they sold such toys there, it was so fascinating, I always stood and looked at the elements and details, it was so interesting. There were also master classes, which we attended with pleasure.
Using a stained glass outline
To make the lines on the ball voluminous or when decorating the painted base with patterns, use a colored glass outline. This is a thick paint of different colors in tubes, on which it is convenient to apply thin lines, follow the drawing and lightly press the tube.
Leaves, berries or other elements of the image can be highlighted with a colored glass outline. Apply to an already pasted and dried image. The paint is thick enough and does not spread, so it will not harm the image.
If you want to create a general background using a stained glass outline or create a thick border, use a brush.
Using gold stained glass, you can apply curls to the base of the ball or draw snowflakes, because we have a New Year's theme.
Decoupage of New Year's balls with volumetric elements
For this craft you need ordinary round balls, which are sold in any store, only plain ones, without a pattern, you can take plastic or glass. But we work with glass with extreme caution, remembering that it can break.
What do you need:
- Plastic balls
- Glitter
- Tassels
- Napkins
- Semolina
- PVA glue
We take the ball and cover it with white paint, using a piece of washcloth for this. We do the work using driving movements, we get a loose, beautiful surface.
You can cover it tightly, or you can cover it so that the color of the ball itself is visible. Next, the product must dry for at least 1 hour.
Next, we cut out the parts we like from the napkins, and separate them until the very last layer, usually they are three-layer or four-layer. There are special napkins for these purposes with bright and colorful designs.
I cut these out with nail scissors; they allow me to work out all the lines and make the design best.
Then we apply the pattern to the workpiece, and start gluing it, dip the brush in the glue, and move from the center to the edges. We do it quickly, but carefully, keep in mind that the drawing may tear, we do it as carefully as possible.
Glue drips can be carefully blotted with a cotton pad, but it is better to not put too much of it on the brush so as not to fill the design.
To make the product voluminous, mix acrylic paint with semolina to make a thick paste, you can make it on a piece of thick cardboard, or use a palette, it will be more convenient with it.
Apply this mixture to the elements that you want to highlight to give them volume and beauty. Let it dry well, and then cover these places with varnish and immediately sprinkle with glitter.
Ordinary plastic balls can be bought in any store, but they are boring and of the same type, to give them a fabulous look, I suggest making something like this beauty, you will only be happy with the design.
If you have time, you can watch a video on how to create a toy; everything is explained in the most detail, so that everyone can repeat it.
This is a great gift for the Christmas tree, you can make them for yourself, or give them to your family, you know, I’ll probably say, you can sell them. On the eve of the New Year, they are selling very well.
Drawing
Our ball dried and the pattern was cut out. Take glue and dilute it with water. This is done 1k1. Now, as carefully as possible, starting from the middle, glue our drawing onto the base of the ball. Using a brush, carefully spread the glue from the center of the pattern until the pattern is completely intact. At this stage it is important that there are no folds. We try not to tear the thin layer of napkin with the brush.
(Step 2)
Upon completion of gluing, we hang our ball to dry, but for about an hour. While we are washing the brush, if you don’t wash it, it will also dry out.
DIY balls with antique photographs
This is a good idea for a gift, first of all you need to decide on the photo, they can be adjusted to size in a special program, and made in a vintage antique style. These can be group, narrative or portrait photos.
You can print on paper or a paper towel, so that the edges do not wrinkle, stick sheet A on them 4. Print black and white or color photos.
What do you need:
- Photo
- Wooden ball
- PVA glue
- Dye
- Brush
Having selected and printed a suitable photo, you need to cut it out.
We cover the ball with ivory or white paint, let it dry, apply glue to part of it and apply a design, make notches on it with scissors, and apply glue on top of the design.
Take a brush and move from the center to the edges, I hope you already understood this, judging from the previous tips. Let it dry well and file off the edges with sandpaper or a file.
Using paint and a thin brush, we highlight the details and those moments that need emphasis to make them brighter and more beautiful. So, the photo turns from dim to bright.
We cover the drawing with varnish, let it dry, and paste it with beads. You can use this paint to decorate the sides and back of the ball itself, or leave it as is.
To speed up the drying process of paint and products, you can use a hair dryer, but there is no need to rush, make sure that the product is dry.
To get the effect of cracks, use craquelure varnish, so by covering in one layer we get cracks through which we can see the bottom layer of paint and the base of the product. We apply the brush once, as it rolls off.
Final stage
In principle, the ball using the decoupage technique is ready, but many will be puzzled here, since the place near the handle of the toy looks ugly. Sometimes this transition is poorly painted over or the part itself remains dirty. Therefore, let's complete the product.
Finished balls after decoupage
In order to give the product a finished look, we will use tinsel. We will tie it around the stalk and make a bow. You can simply decorate the product with festive rain and secure it with wire. To make the part better fixed on the handle, it is advisable to drip a little super glue or varnish.
Now our Christmas tree toy has a completed look and can go to the Christmas tree. By decoupaging your Christmas tree balls, you can be sure that the toys will have a beautiful appearance and will be presented in a single original copy on your Christmas tree!
Styles
Decoupage styles can be very different. Let's look at the most popular ones.
Kimekomi
Eastern technology appeared in Japan almost 300 years ago. Initially, wooden dolls were made using kimekomi, but now this method is mainly used to make Christmas tree decorations and decorations for the holiday. The technique differs in that designs and textures are applied using pieces of felt and scraps of colored fabric onto a foam base (be it a ball or any other shape that suits you). For fastening, regular office glue is used. A special feature of kimekomi is the geometric nature of the patterns and lines.
Vintage
First, let's figure out what vintage style is. These are artificially aged objects that create a special mood. They are perfect and will serve as a wonderful gift for lovers of retro interiors.
When making vintage Christmas tree decorations, it is recommended to use soft, muted tones and colors. Shades such as dusty pink, light blue, gray, silver and porcelain are perfect. The details of the drawing can be made a little brighter by highlighting a few accents using clearer lines.
Drawings that are preferred for this technique are pages and illustrations of old books, pieces of postcards and photographs depicting old Europe, retro pictures depicting children, angels and, of course, New Year's motifs. Images can be printed on a color printer, or you can use ready-made images. In specialized stores for creativity you can find many suitable materials (for example, napkins).
An important element of vintage decoupage is the aging effect, which can be achieved in various ways, for example, using the “craquelure” technique (artificial aging of the surface by cracking the top layer of coating). Using this technique when making jewelry if desired is not a difficult task, and toys made using craquelure will look completely special.
Provence
Very reminiscent of vintage style, but in Provence, floral motifs and light soft colors are more often used, often with references to French themes. In this stylistic direction, the effect of wear and tear is also often used. Provence balls are worth making if this year you decide to decorate your Christmas tree in a romantic style using ribbons and artificial snow. The Eiffel Tower or delicate roses would be a great print.
Victorian
Characterized by the presence of rich and deep shades of red, green, copper and gold (due to the shades used, a Victorian-style toy is perfect for decorating a Christmas tree decorated in a classic style).
Often used are patterns such as checks and stripes, hunting scenes, still lifes and scenes from the life of English society. All plots are done in muted colors.
These decoupage styles are among the most suitable for decorating items and decorations specifically for New Year and Christmas themes. As you develop in your creativity, you can explore other interesting and beautiful areas of decoupage art. For example, such as ethnic (characterized by bright details related to a specific ethnic culture and traditions), shabby chic (soft blurry tones, performed mainly with floristry themes), or simple style (simple style, suitable for beginners who love handmade techniques).
Children's room
New Year's holidays promise more miracles for children than for adults, so often the bulk of DIY New Year's decorations for the home are located in the nursery. We suggest watching a video about creating various design elements; children can also be involved in some of the work.
Important: if there are children under three years old in the house, small objects and easily torn decorative parts should not be placed within their reach! By pulling a seductive toy into his mouth, a son or daughter can easily turn a wonderful holiday into a tragedy
You should be very careful when decorating a children's room with electric garlands; it is better to avoid candles with live fire. If the Christmas tree is mounted in the child’s bedroom, it should be secured as carefully as possible
If the Christmas tree is mounted in the child’s bedroom, it should be secured as carefully as possible
You should be very careful when decorating a children's room with electric garlands; it is better to avoid candles with live fire. If the Christmas tree is mounted in the child’s bedroom, it should be secured as carefully as possible
New Year's decorations made of paper, felt, fabric, fir cones and branches are considered optimal for kids. By the way, placing pine tree branches in the bedroom will make the microclimate healthier. If a child has allergies, a “live” Christmas tree can be mounted only after consultation with a doctor.
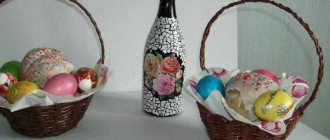
Decorating the bottle
Create bottle decor from different materials
It is possible that items are stored unnecessarily in your closet. So today is their finest hour. I use at work:
- beads;
- rhinestones;
- lace, satin and silk ribbons;
- old brooches;
- cones and tree bark;
- cotton wool;
- silver and gold spray paint;
- leg-split.
Wrap the neck with twine and paint it if desired.
I also practice various design options. Today I am pleased to offer them to you:
- Tie colored satin or cotton, colored or checkered ribbons and bows onto the bottle hangers.
- Glue pearls or rhinestones along the bottom contour with super-moment glue.
- Wrap the neck with twine and paint it silver or red.
- Paint the pine cones with gold paint and attach them to the project.
- Artificial rowan or viburnum berries are suitable as decoration.
- Powdered New Year's balls.
I ask you to maintain a sense of proportion. The bottle should be bright, stylish, beautiful. Don't overload it with unnecessary details and decorations.
Red ribbons look great when paired with golden cones, and the romantic motif is ideally complemented by stylish pearls and lace.
Additional decoration
When carrying out decoupage, you can only get by with the above methods, but the toy will be much more attractive if you provide additional decoration.
The most common decorating technologies include:
- Volumetric patterns. For this purpose, special structural and contour pastes and relief gels are used.
- Dot painting and patterned outline.
- Vintage technologies for artificial aging of surfaces.
- Gilding with gold leaf.
- Additional stylistic painting.
- Imitation of various materials. In particular, imitation of ice, snow, wood, and stone is used.
What do we need
Blanks for toys. In our example, these are plywood figurines that can be bought at any online store for needlewomen. Where there are products for decoupage artists, you will definitely find a variety of unprocessed blanks for boxes, cutting boards, and figured flat blanks.
Not only animal figurines, snowflakes and fairy-tale characters are suitable for decoupage of New Year's decorations for the Christmas tree. Even simple round, oval or diamond-shaped blanks can be made exquisite and charming.
Materials and tools:
- acrylic paint;
- decoupage varnish;
- decoupage varnish with glitter;
- bitumen varnish (required if you want to create an aging effect);
- PVA glue;
- decoupage napkins;
- tassels;
- wet hand wipes;
- great desire and creative mood.
All the necessary materials can be bought in specialized stores for needlework or ordered online. They will also tell you which varnish is best to choose.
White acrylic paint to imitate snow
The simplest, most obvious, but despite this, a great way to create the effect of snow on a suitable surface is white acrylic paint.
Paint applied with a sponge or foam sponge quite naturally imitates a frost-covered surface dusted with snow.
You can also tint the tips of an artificial Christmas tree, the scales of cones or the edges of a panel with a brush, but when applied, a sponge gives a characteristic uneven surface, more like snow.
Progress:
Dip a piece of dish sponge into white acrylic paint, remove the excess and apply with light stamping movements.
Towards the edges we increase the density of the paint by repeating the application process.
When applied with a sponge with varying degrees of intensity, white acrylic paint itself is a self-sufficient imitation of snow cover and an excellent addition to any technique with various combinations of materials.
Creating compositions
Decoupage becomes especially popular during the New Year. New Year's style is especially favorite among both ordinary people and creative people. Before you start decoupage, you need to create a composition so that the implementation is harmonious, without chaos.
We offer you basic options for New Year's compositions that can be used to decorate both balls and other items.
- Encircling lines. The strips can be made of fabric, paper, serpentine, they are glued around the main product. They can be placed parallel, obliquely, at different angles, or perpendicular to each other. Keep in mind that the width of the strip affects the ease of smoothing it out.
- Capes or hats. This method is that the composition is located only on top of the background, for example, a ball.
- Placer. On the toy to be decorated, elements of a homogeneous type are arranged randomly or in a certain order: circles, triangles, stars, hearts. You can use regular confetti.
- A combination of elements of different sizes. The combination of large and small decorative materials looks very impressive. For example, one large one and a scattering of small ones around it.
- Dividing the original basis into shares. This is done using a wide-sized tape, which is cut into narrow strips. They, in turn, when glued, form different zones for decoration.
- Big drawing. This composition is created in this way: one or several images with a single plot are taken and placed on different sides of the subject. Or a drawing is taken and a supporting composition is formed using painting and patterns.
These compositional options allow you to decorate part of the surface of an object. You can decorate the surface completely.
- Patchwork method. A large image is taken, capable of covering the entire surface of the base, and divided into fragments. Then they are applied, overlapping, to the surface of a Christmas tree decoration or tableware.
- Globe method. Suitable for decorating balls and round objects. An image is prepared that is equal in length to the circumference of the base and no more than half in height. The strip is divided into equal parts, then they must be glued, carefully joining.
In addition to the basic compositional solutions, consider additional decor. It is this that allows you to add the finishing touches to the ensemble, giving the decoupage item chic, expressiveness and originality. Experts highlight the following additional decoration techniques:
- volumetric type ornament, made using relief gels, contour and structural pastes;
- dot painting, contour patterns;
- vintage and surface aging;
- gilding;
- stylistic thematic painting;
- imitation of different materials: stone, wood, snow and ice.
Popular articles When is Forgiveness Sunday 2022 - March 14, 2021
Historical facts
In ancient China, people learned to create beautiful dishes using pictures from rice paper.
Decoupage, or the technique of implanting paper designs into objects, has a rich and interesting history, and takes its roots approximately from the 17th century.
Even in ancient China, people learned to create beautiful dishes by applying pictures of rice paper to them. This kind of work was considered difficult and was expensive.
France became the trendsetter for decoupage
France became the trendsetter in decoupage fashion. World-famous ladies, Louis XV's favorite Madame de Pompadour and Queen Marie Antoinette, whiled away their evenings doing this activity.
The royal hobby was picked up by the inhabitants of Foggy Albion, and after them, the love for the decoupage technique swept across the United States. In Russia, this fashion trend became known much later, only at the beginning of the 21st century.
Idea 8 Lights in the forest
LED garland is an integral attribute of any winter celebration. The soft light of light bulbs fills the house with comfort, making the heart beat in joyful anticipation of the holiday. Of course, garlands are good on their own - just hang them on a Christmas tree or cornice to complement your home decoration with bright decor. But you can show a little imagination and come up with a completely unusual decoration, which will not be difficult to make. For the advanced mini light bulb garland you will need:
- garland;
- branches with a large number of branches;
- board;
- heat gun.
Procedure
- 1. Take a flat board 10-20 centimeters wide. If desired, decorate it with artificial snow. The length of the board should be approximately equal to your window sill. Mark places for attaching branches. If you have a suitable tool such as a drill or at least a chisel, make small holes.
- 2. Apply the mixture with a glue gun and attach the sticks to the board.
- 3. Wrap the garland around the branches and admire the lights in the forest!