The wonderful and magical New Year holiday is getting closer and closer, and there is still so much to do, including decorating your home beautifully. And Rainbow Loom silicone rubber bands are a very good material for making decorations not only for the interior, but also toys for the New Year tree!
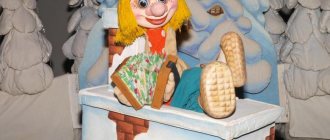
In this photo tutorial we suggest making a figurine of a New Year's candy from rubber bands on a slingshot . This lollipop will fit perfectly into the New Year and Christmas interior, and will also become a beautiful and original decoration for the Christmas tree.
Weaving toys on a machine: step-by-step instructions
As a result of experiments and hard work of creative individuals, new weaving patterns for figurines and toys are created every day. Particularly popular are products depicting cartoon characters, animals or vehicles. To learn how to weave them yourself you will need a little:
- Set of rainbow looms.
- Large size machine.
- Hook.
- Beads, clips, ribbons for toy decoration.
Doll made of rubber bands
Interesting, unusual dolls can be created using Rainbow loom. Such figures will be valuable for children, especially if they make them themselves, and the presented master class will help with this. To create cute dolls using rainbow rubber bands you will need:
- Big machine.
- Rainbow loom of different colors.
- Hook.
Step-by-step production of a doll:
- To create all the details of the doll, a standard scheme is used: we put rubber bands on the posts in pairs, combining them. We wrap one element three times around the last peg, and start weaving from it: remove the lower loops and throw them to where the second turn of this element is located.
- It starts with the doll’s hair: we put on rubber bands, combining the columns of one row in pairs. The length and dimensions of the curl depend on the number of elements used. We weave four such parts according to the pattern described in point 1 (a larger number is possible if desired).
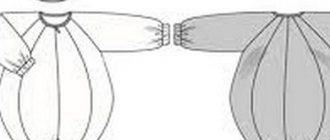
- We create arms with T-shirt sleeves: take two colored Rainbow looms (the color of the clothes) and place them on the first columns. Next, flesh shades are used, which connect the pegs according to the pattern: 2-3, 3-4, and at the end of the product one elastic band must be wound three times in order to secure the work and it does not fall apart after weaving. We weave the details, adhering to the pattern.
- We make the protruding parts of the skirt: take a couple of elastic bands of different colors to create a pattern, a stylish design and place them on the posts in the order 1-2, 2-3; around the 3rd peg we wind one element three times. We weave two parts according to the diagram.
- We begin to assemble the doll. We place silicone rubber bands on the machine, combining the first column of the central right and left rows. Next, we arrange the elements according to the diagram with the photo:
- We remove the prepared curls from the hook and place 2 parts at a time on the first side elements of the machine.
- To make eyes, take elastic bands of the chosen color and make 4 yarn overs around the second columns of the side rows. We put on the Rainbow loom, combining the pegs with the “eyes” and the middle column, after which we remove the yarn overs and move them towards the middle.
- For the neck we place two elastic bands on the pegs of the central row.
- To weave the T-shirt, we use the colors that were used for its sleeves. We connect the lower central peg with the right one, then with the left one and down one step at a time. We shift the hand blanks to the upper side columns of the body.
- To make a skirt we use pairs of elastic bands, taking three steps in each row.
- Making the legs: take two flesh-colored Rainbow Looms and take 3 steps down. To create a boot, we connect the last two pegs with three elements of a different color. We secure the end of the work with an elastic band, which is wrapped in 4 turns around the post. Do the same for the second leg.
- We fasten the extension of the skirt and begin weaving, using the pattern described in point 1, first shifting the loops of the left row, then the right and at the end of the center.
- If desired, the resulting girl can be decorated with accessories.
To learn more about the step-by-step creation of a doll, watch the video tutorial:
Furby toy
Making a fun Furby toy is very simple, and the process will be fun and interesting. For weaving you will need: multi-colored Rainbow loom, a large loom, a hook.
Technique for making the figure:
- For work, two rubber bands are always used, and the machine is adjusted so that the middle row is slightly shifted forward.
- We place the elastic bands, combining the first/middle, middle/left pegs and then down 5 steps in the right and left rows, 6 on average. We connect the lower side pegs with the central one.
- To create volume, we weave 2 simple chains of three paired rubber bands and connect them with the middle columns of the outer rows from the outside.
- For the ears, single rubber bands are used, twisted in half in a figure eight. We put Rainbow loom on 4 central pegs and connect them to the side ones. We weave, transferring the lower loops to the previous elements of the machine. Remove from the product, securing with an elastic loop. We weave two such parts and connect them to the first columns of the side rows.
- To make a foot, we make 4 loops around the hook, transfer them to a folded elastic band, the other end of which we put back on. We repeat the action 3 times, after which all the resulting elements are moved to 1 Rainbow loom. We make two parts and place them on the lower pegs of the side rows.
- By analogy, we make eyes, 4 yarn overs, alternating the colors white/black/white, after which everything is transferred to the purple element. We make two parts and attach them to the main work.
- Nose: we wind two orange elastic bands around the hook, making 4 loops each and remove them onto the purple Rainbow loom. We attach the parts to the three pegs of the side rows.
- We attach the elastic band with a triangle at the bottom of the product. We weave the toy, moving the lower layers to adjacent posts. We remove all the loops - the wonderful Furby is ready.
To see the implementation in detail, watch the video:
Rubber band car for boys
To weave an interesting car figurine from Rainbow loom for a boy, you will need a machine with evenly set rows, silicone rubber bands, and a hook. Step-by-step work:
- We make wheels: we twist the rubber bands in half and place 6 pieces on the side row. We wind 4 turns of the element around the last peg. We remove the lower loops, throwing them onto the previous column. We remove everything with a crochet hook and combine both ends of the chain. We make 3 more parts in the same way.
- We put on the Rainbow loom according to the pattern, according to the photo:
- We connect the lower elements of the machine in pairs with rubber bands of three pieces.
- We attach the wheels to the product.
- We begin to weave from the end of the work, removing the lower loops and throwing them onto the previous pegs.
- We create 2 headlights: we wrap 4 loops of one yellow elastic band around the hook and remove everything with a purple one. We attach it to the base in the front.
- To weave the cabin, we place the elements according to the pattern as for the main part.
- We put on the transverse fasteners in the form of a Rainbow loom and weave it in the same way as the base of the car.
- We make the roof by placing rubber bands, as for weaving the base, but in smaller quantities.
- We weave the roof of the car, removing the lower layers and moving them to the previous pegs. We remove the work from the machine and connect the three parts of the work.
- An unusual car from Rainbow loom is ready to delight its owner.
Watch the video to see how the toy is weaved and assembled:
How to weave a little mermaid
The following master class will help you create a cheerful mermaid with rubber bands:
- Let's prepare the necessary tools and attributes - rubber bands, a machine (the middle posts are pushed forward), a hook.
- We braid the hair using a simple chain pattern: we combine the pegs in pairs, and after the end of the work we transfer the lower loops from each element to the previous ones. Create the required number of curls.
- We start creating the body from the head, placing the elastic bands in a certain order, checking the photo:
- We make a neck by connecting the bottom column of the central row and the next one with 3 elastic bands of the main color.
- We create the basis for the shoulders by connecting the central column with the side and bottom ones.
- To create the torso, we put on elastic bands according to the diagram, according to the photo:
- Let's start weaving the tail: we throw a pair of dark elastic bands on the posts of all rows and finish with light ones until the end of the pegs.
- We prepare 2 blanks for the tail: we wind 4 turns around the hook, thread everything through 2 elastic bands. We carry out manipulations until we get 4 loops.
- For the eyes, alternately twist 2 blue elastic bands around the hook, 4 turns each, and remove them onto the yellow one. We fasten the element to the second columns on the side.
- According to the pattern of how the tail was woven, we make two arms and attach them to the shoulder elements.
- Attach the hair to the upper side pegs.
- We start weaving from the tail, throwing the lower layers of loops onto the posts from which the elastic comes.
- We straighten the products and the delightful mermaid is ready.
Watch the video to understand the technique of making the figure:
Hello Kitty on the machine
Hello Kitty can be woven from rainbow rubber bands and a classic large loom. A detailed master class on creating a figurine will help you do this:
- We prepare the necessary attributes: rubber bands, a machine where all the rows are located evenly, a hook.
- To create a head, you need to put rubber bands on the machine, using 2 pieces each, in the order shown in the photo:
- We add 1 more layer of elements to the side rows to give the toy volume.
- To create ears, we put on elastic bands in a triangle on the right side and on the left. At the top we twist the element with 4 loops, and remove the lower layers, placing them on the pegs where the second end of the Rainbow loom is located.
- To create the body, we connect the columns with rubber bands in the order shown in the photo:
- To make the legs, we put 2 white elastic bands on the side rows, and 4 for the second step; We do the same with the other side. We secure the last columns with an elastic band, twisting it into 4 loops.
- We braid 2 arms with a simple chain, creating a sleeve from 3 elastic bands of a different color. After making them, we place them on the first pegs where we began to weave the body.
- We connect the posts in the center of the work and in the head area with transverse elements to strengthen the product.
- We make the eyes: we twist 2 black elastic bands onto the hook 4 turns each, remove everything onto the white one and fasten it in the head area, combining the second columns of the side rows.
- You need to start weaving from the bottom of the work: lift all the loops located at the top and place them on the post where the second part of the elastic is located. In the process we make decorations and a nose for Kitty.
- We remove the product from the machine, straighten it and the wonderful Hello Kitty is ready.
Watch how to weave Kitty toys in the following video:
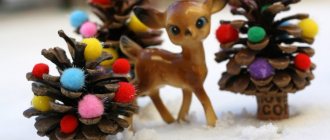
Volumetric mini-Christmas tree made of cones
Without filling, a Christmas tree can be made in the following way, by weaving 3 separate cone-shaped parts with each other. To create such a Christmas tree you will need the following rubber bands:
- 10 gold;
- 28 red or white for balls;
- 139 green.
Each part is woven separately on the loom. We leave all the rows on the machine, move the central one out a little, the holes on the machine should point to the right. For the lower cone, 10 columns are used, for the middle one - 8, and for the upper one - 6. Then all 3 parts are connected together.
Video tutorials for beginners on weaving toys without a machine
Rainbow loom rubber bands are wonderful because you don’t need to have a machine to weave, since you can make an unusual figurine or a chic, stylish decoration using a fork, a hook, or simply. For those who are concerned about the question of how to learn how to weave toys, interesting video lessons and master classes on making unusual figures using Rainbow loom will be useful. A detailed description, step-by-step instructions, and a visual demonstration of the process will help you make an interesting toy even for those who are new to such unusual creativity.
Weaving a little bouncing ball
How to make an easy slingshot toy
Creating a three-dimensional 3D toy on a hook
Find out how this happens in step-by-step master classes.
Found an error in the text? Select it, press Ctrl + Enter and we will fix everything!
Do you want to make an original craft on a winter theme and don’t know what to come up with? I'm already tired of ordinary appliques and paper crafts, so young needlewomen weave original crafts from Rainbow Loom rubber bands. In this article we have put together a video collection for you on how to weave a Christmas tree from rubber bands.
, make beautiful winter bracelets and creative voluminous crafts.
How to weave a bracelet from rubber bands on a French braid machine
This bracelet is ideal for the winter season and will look stylish on your hand. Blue and blue Rainbow loom elastic bracelets are the best way to add some zest to your image.
3D Christmas tree, part 1, lesson 4
A voluminous Christmas tree is a great idea for a DIY winter craft at school or kindergarten. Surprise your friends and family by weaving a 3D Christmas tree from Rainbow loom rubber bands and presenting it as a gift.
Snowflake, Irises Rainbow Loom
Is it already snowing for the first time? Then hurry up to weave beautiful openwork snowflakes from Rainbow loom elastic bands. You can make not just white or blue snowflakes, but also bright colors. Create a whole collection of different snowflakes and give them to your friends.
Rubber band monkey Lumigurumi Rainbow Lum
Don’t forget about weaving toys from rubber bands; such funny monkeys will not leave either teachers or your parents indifferent.
We hope that our winter selection of videos on how to weave various crafts from rubber bands will be useful to you. Now take to school for craft lessons not only glue and paper, but also Rainbow Loom rubber bands.
The wonderful and magical New Year holiday is getting closer and closer, and there is still so much to do, including decorating your home beautifully. And Rainbow Loom silicone rubber bands are a very good material for making decorations not only for the interior, but also toys for the New Year tree!
In this photo tutorial we suggest making a figurine of a New Year's candy from rubber bands on a slingshot.
. This lollipop will fit perfectly into the New Year and Christmas interior, and will also become a beautiful and original decoration for the Christmas tree.
Symbol of enlightenment
The owl is a wise bird that is a symbol of knowledge. Such a small gift can be presented to a student or student. A small keychain in the shape of an owl can be woven on a loom.
Read also: Named the most timid zodiac signs
The whole point of working with this tool is to sequentially put rubber bands on the posts, and then sequentially throw them off towards the center.
To work you will need:
- Rainbow Loom machine;
- Hook;
- Rubber bands.
Carefully follow the attached step-by-step instructions and you will succeed.
Pull out the middle row of the machine slightly. The notches of the posts should face you. Put on elastic bands, connecting the columns in pairs. There is one elastic band at the edges and two in the center. In the second row there is only one elastic band in the center, there are pairs everywhere. Look at the photo.
How to make a New Year's candy from rubber bands on a slingshot?
The lollipop is woven very easily. The entire manufacturing process is based on the fishtail weaving technique, which every beginner knows.
We start with the correct location of the machine - with the open parts of the posts facing you, so that it is convenient to insert the hook under the elastic bands.
We wrap a red rubber band around the right pin, wrapping it three times. Then we put a couple of white elastic bands on both posts in the usual way.
We lower the triple red one from the right side to the center, and then we throw three red ones on both pins.
The next step is to remove the bottom white elastic bands from the posts, and then put on three white ones in the usual way.
Again, we throw off the previous ones, and then put on three red elastic bands.
Again we drop the bottom ones into the middle from each of the pins and put three more white ones on both pins.
We weave the bottom elastic bands again, sending them to the center. Let's put three red ones on both columns.
And we throw off the lower white ones from both columns. We put on the last white three-piece.
We take off the red ones from both pins, and put one white one on two pins.
We send the lower rubber bands from the slingshot to the white one.
We throw one of the rubber bands onto the adjacent pin.
We throw the bottom one off the post and tighten the loop.
To give the candy the desired shape, insert the hook into the red loop, grab the last loop and pull it out.
Then we insert the hook into the white loop, which is below the red one, and pull the loop out again.
To lengthen the last loop, insert the hook into it and throw a white elastic band over it.
Let's pull out one part, and then put the second one on the hook.
We pull the left side of the elastic through the right and tighten it well. Give the New Year's candy the required shape.
The candy figurine is ready! Happy New Year!
Since the New Year holidays differ from everyone else in their colorfulness and fabulous unsurpassedness, many people try to make every effort to make their home look magical. To achieve this goal, everyone strives to resort to their talents, thanks to which they create unusually beautiful decor not only for the Christmas tree, but for the entire room interior as a whole. The most popular and widely used materials at hand are not only paper, fabric, plastic, wood, cardboard, foil, beads, satin ribbons, beads, spruce branches, cotton wool, nuts, wire, but also, of course, elastic bands for bracelets, of which wonderful decorations are created, through a certain weaving on a special machine, a fork or by hand, not only for someone’s personal image, but also for the elegance of the home. This type of needlework appeared relatively recently, but due to its simplicity and excellent results of the process, it has won the hearts of many people. If you have never done anything like this, then check out our article in which we will provide you with 5 photos of ideas for cool crafts made from rubber bands for the New Year 2022 with your own hands at home. Here you will find a lot of useful and interesting information and master classes, with the help of which you will significantly expand your own knowledge in this area and acquire mastery skills. By the way, don’t forget to include your children in this activity, because it will be very exciting for them.
Knitting a giraffe
For this craft you need to prepare multi-colored Rainbow Loom elastic bands, a special hook and stuffing for soft toys, for example, silicone balls. The work begins with the creation of a magic ring consisting of 6 elements. It is made in the same way as for a bird.
Torso and neck
In the second row, the number of loops is increased to 12, adding one loop to each element. The third row is knitted with additions through one loop, that is, 1 is woven from one, 2 from the second, 1 from the third again, and so on until the end of the row. Rows 4, 5, 6 and 7 are woven in the same way.
To ensure that the color of the giraffe is not monotonous, the rubber bands are alternated in color: 1 row - yellow (you can take red or orange), 2 row - pink, 3 - yellow again, etc. Having reached approximately the middle of the height, 3 rows are woven with rubber bands of a third color . That is, if pink and red were used before, now you can take orange.
When the time comes to reduce the volume, they do this: knit 1 from one loop, 1 from the second, and knit 3 and 4 together, and so on until the end of the row. In the next 2 rows, decrease 1 stitch. Then weave 2 rows, decreasing loops after 1. As a result, after a few rows there will again be 6 elements on the hook. Now you can fill the giraffe’s body with soft material.
Head and legs
For the head, white lumi is used. The initial row is woven from 6 elements, in the next row 2 are woven from each loop. In the third row 2 are woven from the first loop, 1 from the second, 2 from the third, and so on until the end of the row. 6 more rows are knitted in the same way.
They begin to decrease like this: knit 1 from 2 loops, make the next one without decreasing, then knit 1 from 2 loops again, etc. The next 2 rows are woven without decreasing. Now fill the head with padding polyester and continue to decrease until 1 loop remains. It is tightened, and this completes the knitting of the head.
The front legs are woven from white lumi. The first row is a magic ring of 6 elements. The second is woven with an increase in each loop, the third and fourth - without changes. The next row is knitted from red rubber bands with a decrease in each element. Then 7 more - without decreasing. Now fill the paws with filler and braid the hole. They do the same with the other leg. The hind legs are woven similarly, with only one difference: 2 rows are knitted without decreasing, and not 7.
Ears, horns and eyes
The ears are made from white rubber bands. Work begins with the creation of a magic ring, then weave 1 row without adding. The next one is made from red elements, adding one in each loop. Then again without adding, and then they begin to decrease through the row.
For the horns they make a magic ring consisting of 4 elements. The first, second, third and fourth rows are formed without adding, then decrease, leaving one loop on the hook. They tighten it and hide the end of the rubber band. The second horn is also made.
The eyes are made from elements of black and white. Place a black elastic band on the hook, wrap it twice and remove it onto the white element. The edges of a white elastic band attach the eye to the front of the head. The second one is knitted and attached in the same way, trying to ensure that both eyes are located symmetrically.
Now all that remains is to assemble the animal figurine from all the connected parts. To prevent them from falling apart, use wire. The head is also held on the neck by a wire. There you have it, a cute giraffe knitted using the lumi gurumi technique. Using basic techniques, you can weave whatever your heart desires and decorate the interior with fun crafts.
Bracelet as a gift
If you have no experience in weaving elastic bands, then you can use any master class.
Usually, each step is described in detail there, as well as recommendations for obtaining an original item. Since it is customary to give gifts on New Year's holidays, you can make a wonderful bracelet out of them.
To do this you will need:
- pencils;
- hook;
- clasp;
- elastic bands of different colors.
Progress:
- The master class of this DIY craft for the New Year 2022 consists of 2 stages of work. During the first one you need to create a flower. To do this, you need to make 6 petals, which include orange, pink and purple. Weaving should take place according to the “chain” principle. The petals need to be connected to each other, and to do this they should be strung on a red one. The product is secured with a green element.
- The second stage involves making a bracelet. The tourniquet should be created according to the fishtail principle. To do this, put an elastic band twisted in the shape of a figure eight on two pencils. The next two should be put on in the normal position. The first one should be removed and pulled through the subsequent ones. Weaving occurs to the desired length. Then the ends are connected to each other and the clasp is attached. The bracelet and flower must be connected. Having completed the work step by step, you get a wonderful bracelet for a gift.
Master class on making a fishtail bracelet from rubber bands
Weaving a snake using 2 forks
Weaving bracelets on forks seems difficult to many, but this video explains in detail how to make an interesting figure in just 20 minutes. You will need:
- 2 forks (in this case they had three prongs);
- Hook;
- Rubber bands – 1 red, 2 black and from 20 to 100 of the main color (depending on the length of the figure).
To create such a snake, you will need high-quality rubber bands, since already in the first step a strong tension is formed in the rubber bands.
Everything is done entirely - from the tip of the tail to the head and is quite simple. It is somewhat reminiscent of weaving on a slingshot, so if you already have experience, then using forks you can quickly make a keychain.
Snowflake
Snowflake is one of the symbols of the New Year. It is made from various materials, and in each case it turns out original. A snowflake made from rubber bands looks wonderful and quite interesting. The master class for making this craft is perfect for children to make with their own hands.
To do this you will need:
- elastic bands;
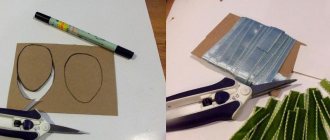
- cardboard;
- scissors;
- tapes.
Progress:
- It is better to make the basis for a snowflake from cardboard, but you can use thick paper. It can be of any shape. Then you need to weave a tourniquet from rubber bands with your own hands using the simplest “chain” technique.
- After this, the chain needs to be secured to a cardboard snowflake. You can use thread or glue for this. Beads, beads and sequins are used to decorate the product. A hole should be made for the rope. This craft will look great on the Christmas tree for New Year 2022.
Don’t forget to look at our photo ideas on this topic, and we also have a cool article with many more cool crafts, go see for yourself.
Step-by-step video tutorial on weaving snowflakes
New Year's garland
If you don’t know how to decorate your home in an original and unusual way on the eve of the upcoming holidays, then make a craft from rubber bands for the New Year 2022 with your own hands in the form of a garland. It will fit perfectly both on the Christmas tree and somewhere on the wall. Better yet, create many similar works and decorate your entire home with them. To help, we invite you to familiarize yourself with the next master class, which contains step-by-step instructions that are easy to understand.
This will require
:
- elastic bands;
- New Year's toys;
- tapes.
Work process:
- The main part of the garland will be a bundle of rubber bands. You can take any weaving, but the “chain” principle is suitable for starting. To create a decoration you need to make a long chain of different colors, you can alternate them.
- After this, you need to tie them with toys, tinsel or handmade products based on the above-mentioned material. Homemade garland is ready! Even just by hanging such a craft around the room for the New Year 2022, you can create a magical atmosphere.
Master class on creating a New Year's garland
Little souvenir
Simple crafts, keychains, and figurines can be woven without a machine using a special slingshot or hook. They make nice souvenirs.
You can make many items and characters on the slingshot. For beginners, it is better to start with simple schemes. For example, you can weave a lollipop keychain.
How to weave:
- Throw a white elastic band over the slingshot in a figure eight pattern;
- Put colored and white elastic bands on top, and then throw loops from two horns onto them;
- Put on 1 elastic band, for example, yellow, and throw the lower loops from the horns onto it (in the photo these are pink elastic loops);
- Repeat point 3, alternating colored and white elastic bands, and weave a rope of the required length;
- Throw the bottom loops into the center without adding a new elastic band on top (the end of the weave);
- Transfer the loop from the left horn to the right;
- Throw the bottom loop over the horn to the center;
- Remove the tourniquet from the slingshot, tighten the loop and lengthen it: pass the end of the elastic through the loop, and then through the elastic itself, tighten (it should look like in the photo);
- Start weaving the second part of the candy with white color: wind the elastic band in a figure eight in two turns;
- Without twisting, place the elastic band on top in two turns;
- Pick up the bottom loops and throw them to the center;
- Repeat points 10-11 until the desired length (use approximately 10 elastic bands);
- At the end, transfer the loops from the left horn to the right;
- Connect two parts: pass the loop of the first part through the loops on the horn and remove it from the slingshot;
- Roll the colored part into “caramel” on the table;
- Pass the hook through the center of the spiral to the base of the stick, grab the loop and bring it to the center;
- Insert the hook from the opposite side of the stick through the colored rows and pick up the loop, pull it out and tighten.
Ready!
Star on the Christmas tree
The instructions will allow you to transform the New Year tree, because with such a craft as a star, it looks much more festive.
To do this you will need:
- elastic bands;
- wire;
- threads
Progress:
- To create a beautiful star for the Christmas tree with your own hands for the New Year 2022, you need to make a wire frame. To do this, you need to bend it and form a star.
- Then you need to weave a long rope of multi-colored elastic bands and secure it to the frame. The result will be a bright homemade star. You will be shown how to make this wonderful craft in the video I posted below.
Master class on making a Christmas star from rubber bands
Tools slingshot and hook
A slingshot for weaving is sold in stores with almost every set of elastic bands. This is the most common lumigurumi tool due to its compactness and ease of use. A mini-machine slingshot is a plastic device with two “horns” and a handle for holding the tool. The horns on one side are convex, which gives shape to the elastic and protects it from twisting. On the other hand, they are equipped with concave grooves, from which it is easy to pick up the elastic band. When working, the slingshot is positioned with its horns facing up.
Read also: How to use oil and what is oil?