You have finally become the proud owner of a summer cottage! And then the first question immediately arises: “What to do with it next?” A lot of work awaits you, and a wide variety of it. However, almost all summer residents are faced with the need to measure the site and level it.
The need to measure a plot usually arises among summer residents at the planning stage. In order to properly place buildings, gardens, flower beds, vegetable gardens and other objects on the territory, you need to have a plan. And drawing up a plan begins with determining the size of the site.
How to measure the area of a plot yourself: various methods and devices
How to measure a site without the help of specialists and what is needed for this?
In what units is the area of a plot measured?
Most often, the area of a small summer cottage is calculated in acres, a large one - in hectares (ha), and the measurement is usually carried out in meters. How to convert one unit to another? We'll have to remember the school mathematics course.
What is 1 hundred square meters? This is an area equal to 100 sq.m. In Soviet times, dacha plots most often had an area of 4-6 acres (400-600 sq.m.).
What is a hectare? A hectare is a larger unit of measurement and is equal to 10,000 sq.m. There are 100 acres in one hectare. Therefore, if the area of your plot is 0.5 hectares, then this means that it is equal to 50 acres.
Thus, by measuring the length and width of your plot and multiplying one by the other, you will get the area of the plot in square meters, which can be easily converted into hundreds or hectares:
100 sq.m = 1 hundred square meters = 0.01 hectares
1000 sq.m = 10 acres = 0.1 hectares
10,000 sq.m = 100 acres = 1 hectare, etc.
You can convert square meters to hundreds even without memorizing this table. To do this, you need to divide the number of square meters obtained by 100 - you get the number of acres: 500 sq.m / 100 = 5 acres.
You can measure an area in different ways. Let's talk about the most common ones.
Steps
You can find out the area of the site even in the absence of any devices. Your own steps will help you with this. There are two options here:
- Measure the length of the area in your normal steps. Then measure your stride length using a tape measure and multiply it by the number of steps taken. You will get the length of the section in meters. For example, 100 steps × 0.7 m (step length) = 70 m. Then do the same with the width. After this, all that remains is to multiply the length and width.
- Try to step so that your step length is equal to a meter. Learn to walk in just these steps, and then walk around the area, measuring its length and width. Multiply one number by another and you get the area in square meters.
Measuring an area in steps is the simplest, but also the most inaccurate method. It will only show the approximate area of the site. If you need more accurate data, use other options.
Surveying compass
Land-measuring compasses were used back in pre-revolutionary Russia, and then they called it a land-measuring sazhen. Now this tool for measuring area is popularly called differently: walking triangle, pedometer or “goat”. It can be made from any wooden materials: slats, sticks and even branches.
Knock down two sticks at the top point. Then take the third (it will act as a crossbar) and nail the connected sticks to it so that there is a distance of exactly 2 m between them. Make a mark in the middle on the crossbar - it will be needed if during the measurement (usually this happens at the end) the length The “step” will be less than 2 m.
Take a surveying compass, stand in any corner of the site and walk along its length, and then along its width. Multiply the number of “steps” obtained by 2 - get the length and width of the site in meters. And then everything is the same as in the previous version: multiply the length and width, get the area, convert it to hundreds.
Roulette
Using a tape measure is the most accurate way of measuring the area of a plot of land available to ordinary summer residents (non-specialists). Find the starting point (corner of the site) and measure the length from it, and then the width.
It is most convenient to use a special geodetic tape measure for this purpose. Unlike the usual one, it has a number of advantages:
- the length of a geodetic tape measure is longer than a regular one and can be 30, 50 or even 100 m;
- the instrument is equipped with a soft tape, so it is convenient to take measurements even alone;
- At the end of the tape measure, most models have a small ring, with its help the tape measure is hooked to a peg driven into the ground to mark the beginning of the countdown;
- Many tape measures designed for use in open areas come with a sharp peg that can be driven into the ground at the starting point.
In addition, such a tape measure is not much more expensive than a regular one. It will be a good purchase and will be able to help you more than once at your summer cottage.
How to measure an irregularly shaped area
Calculating the area of a rectangular or square plot is not difficult. How to measure an irregularly shaped area? This is more difficult, but you can also do it yourself.
Many people remember from school mathematics that the easiest way to calculate the area of such figures as a rectangle and a triangle. To measure the area of a complex shaped area, try dividing it into rectangles and triangles. Then calculate the area of each of the figures and add up the resulting values - this will be the total area of the entire site.
In practice this happens as follows:
- Measure all sides of your site.
- On a checkered sheet of paper, draw a reduced area according to scale.
- Divide the entire area into rectangles and triangles.
- Calculate the area of each figure using the formulas from your geometry textbook.
- Add them up and divide the resulting number by 100. You will get the area of the plot in acres.
Measuring distances on the ground
Tools
The distance between two objects can be measured, for example, with a tape measure or a surveying compass (Fig. 12, 13). Small distances, such as the length and width of a room, can be measured with either a tape measure or a meter.
Steps
On a hike or on an excursion, you may need to determine the length of the path traveled or the distance between two local objects. You may not have a tape measure or a meter at hand, and measuring with them can take quite a long time. Then the distance can be measured in steps. To do this, you only need to know the average length of your step.
To determine the average step length, you need to measure a distance of 100 m on the ground using a tape measure or meter. Then walk this distance at a normal pace, counting your steps. Let's assume that you walked 100 m by taking 110 steps. Therefore, your average stride length is approximately 66 cm (10,000 cm / 110 ≈ 91 cm).
When measuring large distances, it is more convenient to count steps in pairs (for example, only under the left foot), remembering that the length of one pair of steps will be twice the average length of your step. So in our example, the length of one pair of steps will be 1 m 82 cm.
Time
Distance can also be measured by the time spent walking. So, if you walk 1 km in 10 minutes, then you will walk 6 km in an hour. Knowing how long you have been on the road, it is easy to determine the distance you have traveled.
Rangefinder
It is very useful to learn how to determine distance by eye. To develop your eye, you need to practice determining distances this way more often. The training is as follows: determine the distance by eye to the local object you have chosen, and then, to check, measure this distance with steps or with a tape measure.
Sometimes special instruments called rangefinders . Using a simple rangefinder (Fig. 14), you can determine the distance to a walking or standing person. To do this, the rangefinder should be held at arm's length.
It is easy to make such a rangefinder yourself from a piece of cardboard or plywood (Fig. 14). Material from the site https://wikiwhat.ru
Why level the area?
A plot of land is rarely ideal. One of the common problems is difficult terrain. In this case, it becomes necessary to level the area. Why is this necessary?
- Garden. In an area with a slope, there is an uneven distribution of moisture. Vegetables growing at the top receive almost no moisture, because... During irrigation, water immediately flows down. But in the beds located below there is too much moisture.
- Paths. Difficult terrain makes the arrangement of paths problematic, because... For most coatings, a level base is preferable.
- Facilities. An ideal foundation (and the reliability of the structure depends on it) is much easier to build on a flat surface.
How to level an area with your own hands
On a large area, it is better to level the site using equipment: a walk-behind tractor, cultivator, tractor or bulldozer. But you can level a plot of 4-6 acres with your own hands, without the use of special equipment, although you will have to spend time and effort.
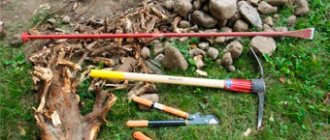
To work you will need:
- shovel,
- rake,
- wheelbarrow,
- wooden pegs, long cord and tape measure,
- level,
- manual roller.
Stages of site leveling
Let's look at the main stages of leveling a summer cottage with our own hands.
Preparation
Before starting the main work, the area should be completely cleaned.
- remove all rubbish from the site;
- remove unnecessary vegetation: roots of large plants, dried and diseased trees, old bushes, etc., mow down weeds;
- uproot the stumps;
- Eliminate all buildings that you don't need.
For convenience, divide the entire area into squares of 1.5 × 1.5 m or 2 × 2 m. For this you will need pegs and a cord. Drive the pegs into the ground at a distance of 1.5 or 2 m from each other. Pull the cord over them so that it is strictly horizontal. When pulling, check the position of the rope using a building level. It is the cord that will become a guideline that will help you make the area absolutely level.
Creating an even terrain
Using a shovel, remove the high spots and fill the holes with the excavated soil. While working, constantly focus on the markings made.
If the unevenness is very small, then simply dig up the area, trying to evenly distribute the soil throughout the area.
If you are leveling an area for a vegetable garden, then carefully remove the top - fertile - layer of soil to a depth of about 30 cm, take it to the boundaries of the site, and return it to its place after finishing the work.
Final surface leveling
When the entire area is leveled in this way, remove the markings. At this stage, your goal is to completely level the ground. A rake or hand cultivator is suitable for this. Walk the tool over the entire area, removing the roots.
Compacting the area
The last stage of work when leveling the site is soil compaction. Take a roller (you can make it yourself from a barrel and pipes of different diameters) or tie boards to your shoes and walk across the entire area, compacting the earth. Then pour it thoroughly with water and leave for 2-3 weeks. During this time, the earth will settle and it will be possible to use it.
When building a house, it is better to level the territory in the fall, and start work only in the spring of next year.
Some summer residents prefer not to level the site, but to use the unevenness to give it uniqueness.
- Plot on a slope - 5 original ideas on how to develop an area with difficult terrain
Have you found yourself the happy owner of a plot that is located on a slope? Or still unhappy? Let's understand the pros and cons of such a place.
Making a compass
The basis was taken on a rounded slats with a diameter of 1.5 cm.
I made markings for two 35 cm sections.
I made a cut and got two pieces of 35 cm each.
Next, as a connecting element, I decided to use 2 canopies for attaching hanging shelves, their length is 7 cm each.
I attached them from below and from above, and made markings for the holes.
Then I drilled holes to the diameter of the bolts (4 mm) and installed them in their places.
Then fixed it with a nut, washer and engraver.
I clamped the right side tightly so that it would be motionless, and the left side lightly so that it would move freely.
I cut off the excess parts of the bolts.
Next, I began to make the sharp part on which the compass would rest. I decided to make it from an ordinary aluminum rivet.
I shortened it a little in length and sharpened the tip.
Before moving on, I decided to coat the wooden parts a little with aqualac.
The following happened.
Then I started making a fastening element for a pencil; a construction anchor with a skirt diameter of 12 mm was ideal for this; you only need a skirt.
Cut a piece measuring 5.5 cm.
Then there are three more through holes on the reverse side, only with a smaller diameter for a self-tapping screw.
When everything was ready, I began to attach it to a wooden base, using self-tapping screws 12 mm long.
Now it’s time to make the movable part of the compass, thanks to which it will move apart to the desired size.
We make marks, retreating 7 cm from the edge, drill a 5 mm hole for a 6 mm bolt.
Screw the bolts into the hole.
Now, from an existing piece of plexiglass, we cut out a plate 26 cm long and 2 cm wide.
We divide it into blocks and apply markings.
We cut a strip in the middle of the plate for a 6 mm bolt, leaving space at the end for the hole for the bolt.
We install it in its place, put a washer under the plate.
I cut off the excess length of the bolt and put a washer on top.
Next I screwed on the cap nut.
Now we move to the other part, place the plate on the bolt, cut it to the required length, put a washer on top and screw on the wing nut.