Homemade creativity involves the use of various materials. For modeling, in addition to clay, cold porcelain began to be used more and more often. It is quickly produced, especially cold porcelain without cooking. The material turns out to be quite plastic, delicate, and products made from it are almost weightless. It makes flowers, berries, and small details successful. Due to ideal plasticity, the smallest details can be worked out.
What is cold porcelain
Cold porcelain is a wonderful and pliable material. The composition of the material is completely safe, so you can create various gizmos with your children. After cold porcelain decoration hardens, it looks very much like real porcelain.
Cold porcelain is similar to plasticine or dough. This material is very plastic and pleasant to the touch. It’s a pleasure to work with him; he doesn’t cause discomfort, but rather brings pleasure while sculpting.
The finished product does not need to be fired; it hardens at room temperature. Such porcelain can be purchased in a store or made yourself. All the necessary components for creation are always at hand and are inexpensive.
Homemade cold porcelain is distinguished by the fact that each craftswoman can adjust its consistency to suit herself and make the required amount of material.
Additional uses of starch
Don't think that starch is only suitable for washing; it can be used in many situations around the house.
If you apply liquid starch to the windows, let it dry and simply sweep away the remaining powder with a clean rag, then you can forget about buying special window cleaning products.
Starch absorbs liquid well, which can help with coffee stains on any surface.
The powder can remove unpleasant odors from shoes.
History of cold porcelain
Cold porcelain originates in the 19th century. Its homeland is Argentina. But many consider this information unreliable. There are beliefs that the Russian master Peter Ivanov had a hand in the invention of cold porcelain.
It is believed that it was he who made the first flowers from cold porcelain. He made them in order to decorate a bottle of perfume that was intended for the emperor and his family.
There is information that the origin of cold porcelain is mentioned in Chinese treatises. His name was different, but the composition was the same as that of Pyotr Ulyanovich. Peter created the most flexible material.
After his death, the recipe was never found. No one could replicate it and find the very elements that gave cold porcelain subtlety and grace.
In 2002, Evgeniy Andreev invented his own recipe. Cold porcelain prepared according to this recipe is very plastic and pliable when working with it.
Master class “Non-Newtonian fluid. The magical properties of a mixture of starch and water"
Valeria Merkulova
Master class “Non-Newtonian fluid. The magical properties of a mixture of starch and water" • Contribute to the development of cognitive research and activity.
• Introduce the properties of a mixture of starch and water .
• Expand your horizons and maintain an interest in the environment.
• Develop curiosity, mental operations.
• Promote sensory development through tactile contact with substances and objects.
Material and equipment:
• Projector for slide shows
• Liquid gouache of different colors.
•Special clothing: robe
• Glass with starch
• Container with water
Man has lived on Earth for 70 centuries, and during all this time he has never fully learned all its secrets and mysteries. From birth, when we come into contact with the natural world, we have many questions. They give us no peace. Trying to find answers to them, we become researchers, I would even say little scientists, who make their own discoveries.
By exploring, experimenting, observing, adults and children study and learn about a new unknown world. And today you will feel it for yourself by becoming participants in my master class .
Stage 1.
Educator: Every scientist has a laboratory, and today I invite you to our small laboratory, where you need to wear special clothes. (Participants of the master class come to the tables and put on robes)
Educator: You need to learn a few simple rules of behavior in the laboratory.
1. Do not touch anything without permission.
2. Do not put anything in your mouth without permission.
3. Don't run, don't jump, don't scream.
4. Be sure to wear special clothing.
5. Follow my instructions exactly.
Stage 2.
Educator: Guess the riddle. (the answer is accompanied by showing slide number 1 - potatoes)
A family lies underground:
Mom, dad, kids.
You dig up your family a little -
And (Potato)
That's right, these are ordinary potatoes.
Starch is obtained from potato juice . Here it is, it looks like white powder. (shows a glass of starch )
Take a glass of
starch and pour it into a large bowl. Touch it. What does it feel like? (It is loose, crumbly, crunchy, similar to white snow.)
also
make starch starch .
Do you want to know the unusual properties of starch ? Then let's start the experiment.
Take the same amount of starch and water , pour it out and pour it into a container, and mix everything with a spoon. Mix slowly. We have obtained an interesting mixture , which in science is called a Non-Newtonian fluid .
This mixture can become solid or liquid . Now we will make sure of this.
(Experiments are accompanied by a demonstration by the teacher)
Educator: We take a little non-Newtonian liquid with our fingers . Do it quickly. Feel something solid, this is our mixture becoming solid and we can pick it up. Now try to take it slowly. It doesn’t work because the mixture becomes liquid .
Educator: Let's take a little non-Newtonian fluid in our hand and make a ball. While we are rolling it, it is solid. Now put the ball on your palm, holding it above the cup. The ball begins to spread. Let us squeeze the remaining substance in our palms, it hardens again. Try this yourself.
mixture with it from above . The fist bounces back. Let's knock on it even harder, the mixture does not allow the fist to sink into it. Slowly lower your fist onto her. He goes down. We lower it to the very bottom. Quickly straighten your fingers. Does not exceed. Now let's do it slowly.
Educator: Do not remove your palms from the liquid . Let's try to quickly lift it up. The hand rises with the cup. Do it again. Slowly remove your hand from the liquid .
Educator: Let's take more mixture so that we can make a big lump, now quickly break it into halves. It breaks. Leave the halves on your palms. They spread and turn into liquid .
Educator: Let's try to shake our mixture out of the cup , quickly turning it upside down. The mixture remained inside . Repeat this again.
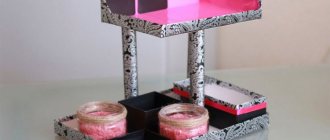
Experiment No. 7. (Conducted by a teacher)
Educator: And now I suggest you rest a little, and I will show you the dancing liquid . To do this, you will need a powerful speaker connected to music equipment and cling film. I cover the speaker with cling film, place our non-Newtonian liquid , and turn on the music. And, lo and behold: the liquid begins to “dance”
.
Let's drop a few different drops of liquid gouache and create a spectacular show.
How to cook cold porcelain (quick recipe)
Products made from cold porcelain are mesmerizing. Working with him brings great pleasure. It is quite soft, very flexible, and does not stick to your hands at all.
Making cold porcelain at home is very easy. There are many different recipes, here is one of them:
- We take any starch, PVA glue, baby cream or regular hand cream, glycerin.
- Mix starch and glue (1 cup glue to 1 cup starch).
- Add 2 tablespoons of glycerin and one tablespoon of cream. Afterwards the resulting mass is left for 15 minutes.
- The prepared mass should be used immediately. It can be stored for no more than 2 hours at room temperature.
- You can add citric acid to the mixture; it will allow cold porcelain to be stored longer. To add color, food coloring is added to the mixture.
- You can decorate the product only after it is completely dry.
You can use any other recipe for preparing cold porcelain; there are quite a few of them on the Internet.
Storage conditions and periods
As you can see, the recipe is quite simple; if the technology is followed, it makes it possible to obtain an environmentally friendly product of high quality. Store homemade potato starch in jars or containers with tight lids. Storage rooms should be dark, dry (humidity no more than 75%), without foreign odors, and have a temperature of about 10 degrees. Under good storage conditions, the product retains commercial quality for two years.
- I store starch in a container with a tight lid from used product
What tools are needed for sculpting?
You can make a simple decoration from cold porcelain using available tools. Beginners can buy tools gradually.
Let's consider what tools are needed to create jewelry from cold porcelain:
- Rolling pin. Needed in order to roll out the mass;
- Scissors. They are needed always and everywhere. Scissors can be any kind, the main thing is that they are convenient to use;
- Tweezers. It is simply necessary. If a speck or thread gets on the product, then you cannot do without tweezers;
- Stacks. You can use only one stack, or you can purchase a set. At first, you can use toothpicks;
- Tassels. They are needed to tint finished products;
- Paints. They can be different, whichever the master likes best. But many people use food coloring;
- Board or separate tablecloth. These objects are where the main work with the material takes place;
- Wire. It is needed, for example, for the stem of a flower.
These are the basic tools that are important when working with cold porcelain. You can purchase a lot of other accessories, for example, various cuttings, textures, molds, decorations for finished products, etc.
Advice from “advanced” craftswomen
- To avoid “crackling” of the plastic, you can add a little formaldehyde. It is mixed into the already cold mass. The substance is toxic, so take precautions!
- Replacing the plastic bag will help remove excess moisture from the paste.
- Knead the mass thoroughly, then it will be easy and even to roll out. And the fragments will smoothly curl into the product.
- From time to time coat the “non-working” piece with oil or Vaseline. Then the fungus will not settle in the paste.
- The drying time of the product depends on its thickness (3 – 5 days); paint the mass with almost any paint. Gouache, acrylic, crushed pastel and watercolor are suitable. They speed up the drying time of the craft.
Important! You can paint both the mass and the finished item. In the first case, calculate the required amount of material for the craft. And in the second, you can hold the freshly painted craft over steam. This way the item will absorb the dye better.
The sculptor's main tool is his hands. And you can use any available tools to help: plasticine stacks, scissors, brushes with artificial bristles, impressions, toothpicks, rolling pins.
Keep the mixture and finished sculptures out of the reach of small children to prevent them from being tempted to taste the polymer.
Watch the video on the topic: “Do-it-yourself liquid porcelain” at the end of the article.
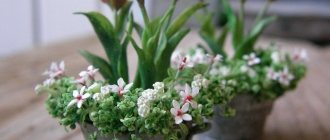
Cold porcelain flowers
In the photo of cold porcelain you can see a variety of products that can be used for inspiration. Such products impress with their beauty.
Consider a master class on creating a rose from cold porcelain:
- Let's prepare a workplace and the necessary tools: wire, rolling pin, scissors, green tape, glue;
- Before working with cold porcelain, lubricate your hands with glue;
- We will make blanks in the form of stems from wire;
- We attach a small circle of red mass to the tip of the wire; this is the beginning of our bud;
- Next we make the petals of the future rose. You can use a stack, or you can use a bead;
- We give the shape of the petal by smoothing. We make the edges a little thinner;
- We attach the finished petals to the bud with glue;
- We hang the finished flower with the bud down;
- Next we make the leaves. Again, you can use a ready-made form, or you can make do with improvised means;
- We add relief to the leaf using a toothpick;
- We wrap the wire with tape and glue the leaves;
- Let the rose dry.
If you want to make a bouquet of roses, then when they are dry you can fasten them with a beautiful ribbon.
In the pictures of cold porcelain you can see the elegant color scheme. You can make various things from cold porcelain. Earrings, bracelets, and rings made from this material look very beautiful.
You can decorate a mug, a vase, a headband with it, or you can make a whole bouquet. The bouquet will look very realistic. Flowers made from cold porcelain are very similar to real ones. Cold porcelain jewelry is great for a gift or a pleasant surprise.
They also make various figurines and decorative elements with which I decorate the house. The main thing is that such material is accessible and inexpensive, and is also safe for children.
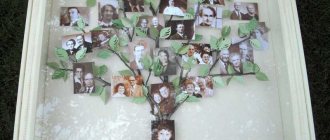
Cheerful giraffe
You will need “Pasta di mais”, cardboard, acrylic paints, “moment”, stencil for applique.
- Transfer the giraffe drawing onto the cardboard;
- mold a flat (0.5 cm thick) animal figurine and leave to dry;
- when the workpiece is dry, paint it with paints;
- Glue the figure onto thick cardboard.
If desired, the panel can be inserted into a decorative frame.
Cold porcelain is an amazing material for making elegant jewelry, tableware, and decorative elements. A simple technique for preparing polymer mass opens up endless possibilities for self-expression in creativity.
Photos of crafts made from cold porcelain
Features of the jelly toy
A viscous substance was invented back in the seventies of the 20th century. But it has not found application or widespread use. Only at the beginning of the 21st century did its unusual properties come to the liking of modern children. The jelly-like material quickly changes shape, sticks to any surface, and springs. It wrinkles well in your hands, curls and tears.
Among the negative aspects, one can note its ability to get dirty and dry in the air. In order for the toy to retain its quality longer, it must be kept in a tightly closed container, preferably in the refrigerator.
Tip: It is better not to use food containers to store slimes. They can release harmful chemicals.
Features of toy care
Slime is considered the favorite toy of most children, but over time its appearance loses its attractiveness and it becomes less elastic. In order to extend the life of the slime and preserve its external characteristics, you must follow some rules for caring for it:
- The slime must have a “house” - a storage container that should be placed in the refrigerator at least overnight.
- Frequently playing with slime causes small particles of dust and dirt to get into it. To clean the toy, place it in a bowl of water and rinse thoroughly.
- The slime can be “fed”, that is, if it has become dry and inelastic, you can add water to it, and if it spreads, you can restore its shape with salt. Sugar cannot be added to it.
- Slime should not be thrown onto the ceiling, walls or other surfaces; such manipulations will quickly damage the toy.
- Excessively long play with slime helps to reduce its size and become dirty.
Toys in which starch is the main ingredient cannot be called classic slimes, since they are more viscous. But this entertainment can be considered safe for children, because slime with such a composition contains only natural ingredients. In addition, you can easily make starch slime with your own hands without spending a lot of money.
Previous
Affordable recipes for a popular toy - how to make slime with PVA glue, shaving foam or other ingredients?
Next
Simple recipes for making slime from glue and soda. What is special about this slime?
Precautionary measures
You should not let your child make slime on his own, as he can burn his skin when working with chemicals. When stirring the mixture, wear gloves so as not to stain your hands with dyes. Also use a protective apron to avoid the risk of getting your clothes dirty. Be sure to wash your hands after handling slime.
In addition, you should not use utensils that are used for eating, as the components can cause poisoning to the body. Try to use disposable plastic utensils.
Why can't you make slime without glue?
If you did everything correctly, guessed the proportions and completed the task consistently, you should get a slime like soft plasticine or fluffy slime. The most common mistakes made are due to inconsistent addition of ingredients. Once again we draw your attention to the fact that first you need to pour shampoo into the container, then sunflower oil, then dye and only at the last stage starch. What to do if you couldn’t make a slime without glue?
- If the starch slime turns out to be too hard, try adding sunflower oil;
- If the handgam is very liquid, you need to add potato starch and stir until it thickens;
- If the “mucus” breaks, you need to add a little shampoo.
We recommend: A simple but interesting toy - slime. How to make slime from glue, choose the right raw materials: recipes and tips