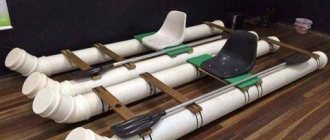
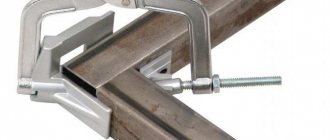
Pipes left in sight are not the best addition to a bathroom interior. In order for the room to have a neat and complete look, communications need to be hidden. Moreover, it is advisable to do this in such a way as to have access to pipe connections, valves, meters and filters. The optimal solution to this problem would be to make a box. Let's look at how to make a box for pipes in the bathroom from plastic panels.
How to make a laundry basket from plastic bottles
Store shelves are bursting with a huge assortment of gift boxes: small, large, shiny, matte.
However, you can save a lot of money by implementing one of the three gift box ideas below. If you are into the DIY hobby and are always up for creative solutions, then this is definitely for you! Nobody cancels the possibility of using beautiful bags to wrap gifts, but gift boxes are becoming increasingly popular.
These tips do not require special materials that would be difficult to find in a regular office supply store, and it also does not require much effort and time to make these gift boxes. But don’t forget that the time you spend will once again show the person to whom the gift is intended how important and dear it is to you!
Types of designs
There are many ways to disguise unsightly communications. Making a box that simultaneously performs a protective and decorative function is the most sound solution. The task is implemented in different ways; The most common configurations are:
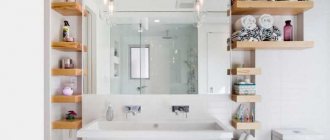
- In the form of a cabinet. It is chosen if it is necessary to hide a riser or other vertical system and leave free access to communications. Shelves help to rationally use the interior space.
- In the form of a partition. A convenient option for a large bathroom, all communications of which are located on one wall; Also suitable for wall-hung toilets. The pipes are separated by a wall-sized partition; The area of the room is slightly reduced. The bathroom looks neat, and behind the partition there is enough space to organize the storage of a variety of things.
- In a compact design. The box is constructed directly around the pipes. This option is used more often than others, as it does not clutter up the space, looks neat and is quickly made. Suitable for all types of systems, including those adjacent to the ceiling (floor).
Corner design with inspection hatch Source cleanipedia.com
How to make a Tetra Brik box
1. First, use a ruler to mark and cut out twelve squares from scrapbooking paper, divided into four columns and three rows. You must select the dimensions yourself, based on the size of the gift.
2. Mark some dotted lines using a hole punch and make folds along them.
3. Glue the valve on one side with glue and wait until it dries completely.
4. Then insert them into the four free sides at the bottom to give the shape of the future box.
5. Take the top sides and press down to secure the milk carton shape.
6. Bend the edges at the top and secure them with clamps if necessary.
7. The final step is to decorate according to your own taste and desire!
Preparatory work
Before you begin assembling the box, you need to carry out several preliminary activities.
- Inspect all pipes that will be hidden. Eliminate defects while communications are visible. If a new pipeline is being installed at the same time, try to keep the number of connections to a minimum.
p, blockquote 7,0,0,0,0 –>
- Decide what appearance the box will have in the bathroom. It can hide only a small area where the pipes pass, or occupy a fairly large area. The advantage of the first option is the saving of material and the absence of the need to sacrifice free space. When choosing a more voluminous modification, additional space inside the structure can be adapted for storing things.
p, blockquote 8,0,0,0,0 –>
Advice: if you are going to lay the walls with tiles, it will be more convenient to make a box first. It will hide part of the ceiling, and there will be no need to lay tiles in this place.
- Take the necessary measurements and make a drawing of the box. At this stage, provide such important additional elements as hatches for access to meters, valves and unreliable connections.
- Calculate the amount of material needed with a small margin.
We cover the frame with PVC panels
Once the supporting structure is ready, you can begin covering it. This should be done in the following sequence:
- Set up a starting profile. Carefully, avoiding deformation, secure it with fleas to the installed guide.
- Measure a strip of plastic panel to the required length and cut it with a sharp knife.
- Fix one panel in the starting profile, attach the second to the corner profile and install it to another plane of the box. To connect, use the same “fleas” or “bugs”.
- Assemble the second side of the box in the same way. Fix the starting profile on the last plastic panel, then secure it. If you do this with silicone, you can ensure ease of dismantling in the future if an emergency arises.
- Cut inspection holes in places where you need unobstructed access to important pipeline elements: taps, meters and joints. Using silicone sealant, secure special hatches in the holes.
- The last step will be the installation of plastic skirting boards at the junctions of the panels with each other, as well as with the floor, walls and ceiling.
The pipe box in the bathroom is ready. With the right coloring of the panels, it looks neat and harmonious even in combination with tiled finishing.
Gift box made of plastic
It is important to note that using plastic as a starting material is not only convenient (as it is easy to handle), but also correct in terms of the need for recycling plastic products! It is well known that plastic takes a very long time to decompose in natural conditions, so people should use this material rationally and economically. In addition to using plastic bottles for this craft, they can be used in many other ways around the house to contribute to protecting the environment.
Cutting bottles into strips
This is the most painstaking and critical stage, since the aesthetics of the finished product depends on the quality of the resulting “ropes”. There is a special tool that allows you to cut a plastic bottle into perfectly even strips. If you don't have a bottle cutter, you'll have to use regular scissors and a utility knife.
There are two types of weaving: corners and ropes. Depending on this, the material is cut. In any case, before slicing, you need to cut off the bottom and neck of the bottle. When weaving with corners, the resulting cylinder is cut along the seam and a plastic rectangle is obtained, which is cut into thin short strips . To make them even, you need to outline the material with a marker.
To weave in stripes, the bottle is covered in a spiral shape with electrical tape or an adhesive plaster of the required width. The thinner the stripes, the neater the weaving will look. Then the bottle is cut into a spiral using a utility knife along the joints of the electrical tape. Thus, one strip is obtained from one bottle. The cut pieces have the shape of spirals. Do not try to straighten them, as in this form they will more easily take the desired shape when weaving.
Advice from professionals
Plumbers and builders give the following recommendations for masking pipes:
- When hiding the risers, markings begin from the floor.
- Installing a door or forming an inspection hole is mandatory.
- Any material used for cladding is impregnated with an antifungal solution. This will prevent mold from forming.
- Wooden structures are not recommended for installation in the bathroom. This frame is suitable for a toilet.
- The cabinet for pipes cannot be assembled from chipboard, which absorbs moisture. The material swells and begins to crumble.
- Vertical parts are installed at a distance of no more than 30 cm. This gives the structure rigidity.
- Closely located pipes are not sutured separately. It is recommended to build a single structure.
The walls should not come into contact with communications. The minimum distance is 3 cm.
How to make a plastic box
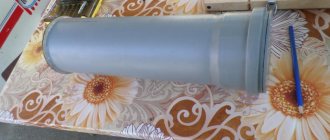
1. Take a plastic cylindrical bottle and cut off its top and bottom.
2. To soften the edges, turn on the iron and gently heat it on medium power.
3. To make the lid and bottom of the future box, take corrugated cardboard, make marks on it along two edges of the bottle, cut them off.
4. Then cut a strip two centimeters wide. Using a glue gun, glue it around the two circles.
5. To glue the base of the box, use a lot of glue on one of the inside edges of the lid.
6. Use another lid to close the gift box.
7. Decorate the resulting product with decorative elements as desired!
It is also possible to produce a triangular plastic gift box with a handle. To do this you need:
1. Cut a cylinder from a plastic bottle (height 150 mm).
2. Flatten the cylinder and iron one edge (you will get a teardrop shape).
3. Measure the length of the “circle” and divide it into three parts, mark each part with a marker on the bottle.
4. Bend two more ribs along the marked lines and straighten the installation.
5. Make small cuts along the ribs to then form the bottom.
6. Bend the resulting flaps.
Original options
If an ordinary box seems banal to you, then you can try to make cool packaging from a plastic bottle; we offer several options:
- Bullseye. A plastic apple is suitable for small gifts (for example, jewelry, a keychain or a flash drive). It's very easy to make. You need to cut off two bottoms from identical bottles and connect them to form a box. Next, make a small twig and leaf from the remaining material, attach it to the top of the box, put a surprise inside, and you're done.
- Triangle. A more complex option, but it looks very unusual. First, cut out the middle of the bottle (you need an even bottle so that you get a cylinder). Next, flatten the workpiece and iron one edge. Then smooth two more edges in the same way to create a triangle. Now you need to carefully cut the top in three places so that the package closes, do the same with the bottom. Place the gift inside, close the box and decorate with a bow;
- Barrel. Another simple way. To begin, make a cylinder out of a flat bottle, and close it with caps from the bottom and top. But it’s up to you to decide how to make the lids; you can make bright bottoms from paper; knitted lids will look just as original. Give free rein to your imagination, it will tell you how to complement your craft.
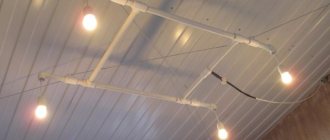
Installation of an invisible hatch
To provide access to pipes with a plasterboard structure, you can use a ready-made plastic door or make a disguised opening panel consisting of an aluminum frame, a door, a magnetic lock, and a structure of hinges and components.
An inconspicuous door (invisible hatch) installed in the wall will allow you to easily check water readings, turn off the valve, and also assess the condition of the pipes
In order to open the invisibility hatch, just press on its middle, after which the magnetic lock snaps off, releasing the door from the frame. The following article will introduce you to the details of the design of various plumbing hatches, which we recommend reading.
The hatch is installed as follows:
- At the preliminary stage, you should decide on the location of the door. Usually it is located in the center of the box or partition, which makes it possible to better maintain the symmetry of the pattern when tiling.
- When installing the frame, it is important to leave a niche (on two or four sides), the size of which corresponds to the parameters of the hatch. After its construction, the frame is attached to the profiles using long self-tapping screws (special holes are provided for them). According to the instructions included with the kit, the door and other hatch parts are attached to the frame.
- Next, the frame is covered with plasterboard sheets, which are overlapped onto the hatch frame (it should also be attached to the covering with self-tapping screws).
- Upon completion of the work stage, the drywall and door are covered with a layer of primer. After drying, the hatch and box are covered with tiles (one color or with a pattern). All seams between the tiles are covered with sealant, after which the structure is left alone for two days for final drying.
The final stage is cutting the hatch, which is done using a sharp utility knife pointed at an angle of 45 degrees.
Cardboard gift box
It’s probably obvious to almost everyone: cardboard is extremely popular for making various kinds of gift boxes because of its ease of use and accessibility. It is also possible to reuse cardboard boxes or even recycled cardboard boxes. Using ready-made boxes significantly simplifies the process of making a gift version.
Cardboard is very convenient and easy to use for any purpose.
What materials are needed for this product:
Hatches
No less important components than the boxes themselves are the hatches that are placed in the fences for access to pipelines, fittings and metering devices.
During installation, the following types of hatches are most often used:
Factory made for tiles. They are sold in standard sizes with an opening system and a lid, the surface of which is designed for gluing and holding ceramic tiles. Typically, such hatches have a rigid hinge system that allows them to hold a high weight of ceramics and cover large areas; almost all designs are designed to be torn off by pressure.
Factory made from PVC. These are lightweight hatches, usually white with a frame and doors, great for plastic panels; they are often installed in plasterboard lined with tiles. They are usually opened by turning the doors while pressing from the side.
Rice. 10 PVC and painted steel hatches
Factory made from steel. In everyday life, hatches made of painted steel are not used very often due to their low decorative value and heavy weight (not suitable for installation in a PVC panel); they are opened through recesses in the doors.
Homemade for drywall. The most popular option for installing hatches is to make them yourself from a profile frame and a piece of drywall, onto which tiles are then glued. The tile maker can make a handle in the hatch by drilling a through hole in the tile, or they can purchase a special vacuum suction cup to open it.
From tiles. In a tiled plasterboard covering, openings can be covered directly with tiles by gluing them onto a sheet of dense material (plywood, chipboard, gypsum fiberboard) along with magnets. When installed in a profile niche, the magnets will stick to the metal frame.
You can do the opposite - if the frame is made of wooden beams, steel plates are glued to the tiles, and magnets are screwed to the sheathing. You will have to use suction cups to open tile hatches with magnetic fasteners.
Rice. 11 Homemade hatches
Advantages of a plastic box
The structure for masking pipes can be made of plastic or plasterboard. Each of these options is good in its own way, but in terms of practicality, the plastic box is the leader. It has many undeniable advantages:
- Possibility of quick disassembly without damaging the material. This property of plastic construction is especially important for pipes joined using fittings and threaded connections that are not immune to leaks. After repairing a breakdown or scheduled maintenance of pipes, the box is easily reassembled.
- No need for further finishing. Plastic panels themselves are already a finishing decorative material, unlike drywall, which requires final processing.
p, blockquote 4,0,0,0,0 –>
- Resistance to deformation and ease of repair. The plastic used to make the panels is strong and flexible, so it is less likely to be damaged than tiles, which can be accidentally broken. Even if one panel is damaged, it can be easily replaced with a new one without damaging the entire structure.
- Moisture resistance. PVC is not afraid of water, does not rot, nothing will happen to the box, even if it is installed close to the bathtub or gets wet due to condensation forming on the pipes.
- Easy to install. Installation of the box will take only a few hours and will not require the use of expensive or specific tools.
- Affordable price. Plastic panels for bathrooms are one of the most inexpensive finishing materials.
- Spacious and compact. Thanks to the small thickness of the panels, the plastic structure is very roomy and will not take up much extra space in the bathroom, which is especially important for a small room.
The plastic box is very practical: it can be disassembled and assembled as many times as necessary.
Required tools and materials
If you have already decided which box is best to hide the heating, drainage and water supply pipes, then you should start preparing tools, fasteners and materials.
To build the box you will need the following equipment:
- a well-sharpened construction knife;
- roulette;
- metal scissors;
- level or square;
- screwdriver or screwdriver;
- pencil;
- fasteners (self-tapping screws, European screws, dowels);
- drill or hammer drill.
Materials you should purchase:
- galvanized metal profiles (types ud, cd);
- silicone sealant;
- GVKL, HDF, OSB boards or plastic panels (in the latter case, it is important to choose a shade that matches the color palette of the interior);
- PVC skirting boards designed to mask joints with walls.
To prepare the plasterboard box for additional finishing, you may also need putty and corners.
Master Class
Inspired by the New Year theme, we decided to show you a simple and stylish way to create holiday packaging.
But, before you start decorating, you need to make a PVC box that is the right size for your gift. You can easily find the diagram on the Internet. Next, we proceed directly to the design.
To work you will need the following:
- Double-sided tape;
- Scissors;
- Two sheets of crepe wrapping paper (different but matching colors);
- Colored tape;
- A small New Year's composition.
- When everything you need is at hand, cut out a piece of suitable size from one sheet of paper that should cover the top and two sides of the box. Attach the paper with small pieces of tape;
- Now take the second sheet, it should cover the entire box;
- Next, fold the second sheet (on the front side) so that you get a triangle;
- Secure everything carefully with tape;
- Make several cuts on the sides of the resulting triangle, the distance between them should be about 1 cm;
- Bend the resulting cuts upward (so you get something like a colored Christmas tree);
- At the end, decorate the box with colored ribbon (diagonally) and attach a New Year's composition.
Finishing
It is necessary to properly prepare the box for lining.
They do it like this:
- Use a knife to stitch the joints between the sheets of drywall. The resulting gaps and corners are cleaned with abrasive paper.
- The cracks are filled with putty and glued with reinforcing tape. All corners of the box must be processed.
- After the solution has dried, the surfaces are primed, applying the composition in 2 layers.
The plasterboard box is decorated with tiles. The wrong side of the material is treated with glue, which is smoothed with a wavy spatula. The facing is applied to the surface and pressed. The remaining elements are installed in the same way. The seams of the tiled product are treated with grout. The corners are covered with additional elements of a suitable color.
Making a New Year's gift box from PVC
The first association that most people have when they hear about the New Year is gifts. They are given to everyone and everyone, and the more gifts there are, the more fun the celebration is.
But we all understand that buying a gift is not everything; you also need to decorate it beautifully and in a New Year’s style.
Gift boxes, packages and bags can be bought at any shopping center, but it’s much more interesting to make them yourself. This article will tell you how to do this.