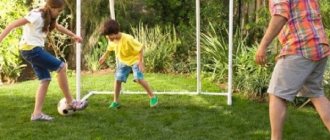
Passion for sports has a positive effect on human health. If during the cold season you can maintain good physical shape in various gyms and swimming pools, then summer significantly expands the range of training. Men's interest in football does not fade throughout their lives. Having organized a summer holiday at the dacha, your favorite ball game will help keep your body in good shape. Therefore, in order not to interrupt regular activities far from civilized stadiums, you will need to make a football goal at your dacha yourself.
Types of structures
Before you start studying possible models of football goals, you should carefully consider their location. The main condition is that there should be no windows or other fragile surfaces nearby. It is undesirable for football goals to be installed in front of a wall or fence, as this will cause premature destruction of the concrete or damage the soft corrugated sheeting.
Advice ! If there are no other possibilities, behind the football goal you can make a screen from a chain-link mesh, which will successfully perform a protective function.
Ideally, the missed ball should not hit the garden plantings. Having determined the location and established the dimensions of the football field, we move on to choosing a suitable goal model. As a solution, you can make the design yourself or select ready-made gates, available in a wide range in sports stores. Let’s take a closer look at what features each option has.
Instances for mini football
If you don’t have enough free time to make a football goal with your own hands, ready-made copies designed for mini football will come to the rescue. Their main advantage is mobility. What are they:
- Most often, portable football goals are made of steel pipes of different diameters.
- The main frame resembles a stretched letter U, vertical side posts are complemented by straight or curved pipes. They serve to tension the net and ensure the stability of the entire football structure.
- Some models of football goals are equipped with fixing fasteners in the form of four metal hooks for penetration into the soil.
The most convenient gate size to use is 180/120/60 cm, however, if desired, you can choose more spacious specimens. To protect against corrosion, football goals are treated with contrasting paints, which allows them to be clearly visible on any landscape. The size of the mesh cells varies from a minimum of 40/40 mm to a maximum of 100/100 mm.
Advice ! If you want to practice hitting accuracy, you should install a training screen made of nylon thread in front of the goal, which has two holes for the ball.
Stationary and mobile gates
It is not necessary to buy a standard goal; it is much more interesting and cheaper to make a football structure with your own hands. In what cases is it practical to make stationary inventory? There are several factors influencing the choice:
- Availability of the required material (wood or metal) in the required volume. This is important if there is no opportunity to purchase new raw materials.
- Professional welding skills or proficiency in woodworking tools (depending on the selected material).
- Operation of football goals on an ongoing basis.
- Confidence that in the event of a long absence from the dacha, they will not suffer from vandals.
- Lack of free storage space in winter.
If in most cases the answer to the above points is negative, it is worth considering making a mobile football goal. Plastic pipes are most often used as the basis for them.
A few words about the field as a whole
The field on which the main action is played is also subject to requirements for compliance with established standards. The history of the development of football tournaments has more than once been accompanied by changes in the parameters of the lawn and playing areas. The last time the markings of the football field were changed was in the late 30s of the last century, when an arc appeared in front of the penalty area.
The standard dimensions of a grass field are specified in section 1 of the Laws of the Game (translated from English. Rules of the game of football). Following the regulations, field sizes vary within the following limits:
| Options | Dimensions | |
| European standard (m) | English measurement system (yard) | |
| Length | 90-120 | 100-130 |
| Width | 45-90 | 50-100 |
| For international matches: | ||
| Length | 100-110 | 110-120 |
| Width | 64-75 | 70-80 |
The optimal size of a football stadium, according to FIFA documentation, is 105 by 68 meters. These are the parameters that are most often used in practice.
Comment! The minimum excess of grass cover to standard field sizes is 5 meters on each side.
The diagram of standard sizes of football zones is shown in the following photo:
Material selection
By studying the properties of each material used to construct football goals, it will be easier for you to decide on a suitable design.
If you like to work with natural raw materials and do not want to deal with seasonal assembly and disassembly, it is better to make a wooden copy of a football goal with your own hands. Of course, it is not characterized by increased strength, but the creation process is simple.
If you want to equip a stationary sports structure for a long period, it is practical to make it from metal. A prerequisite is the presence of welding skills; safety in winter also plays a role.
Attention ! If these requirements are not met, it is more practical to make a metal model using self-tapping screws.
The best option for a mobile football goal is one made from plastic pipes. A monolithic structure can be made using a special soldering iron; for a prefabricated version, PVC pipes of a larger diameter will be required. Lightness, strength and easy installation process are the main advantages of the selected material.
Drawings and dimensions
Obviously, an important criterion when choosing the size of the gate will be the age of the children. Typically, a children's design has the following parameters:
If desired, you can change the dimensions by making the gate larger or smaller. In this case, the most important thing is to maintain the proportions, otherwise the design will be inconvenient for games.
It is advisable to use drawings for work. Football goals for kids can be made using this option:
Drawing of a children's football goal.
For teenagers, you can build a large football goal according to the following drawing:
Drawing of a large football goal.
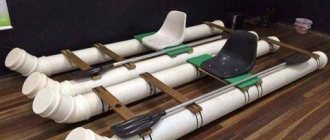
As you can see, both options have a fairly similar design, but differ in size. There is another design option - using a U-shaped frame fixed in the ground, to which a mesh is attached and tensioned with ropes.
The design of a football goal with a U-shaped frame made of plastic pipes.
Also on our website: do-it-yourself greenhouse made of plastic pipes.
Arrangement of wooden gates
It is almost impossible to make high-quality football goals without a preliminary drawing. When creating a sketch, consider the available space for the game and the age category of the players. Having a finished project allows you to move on to preparing the material and tools. Particular attention is paid to the connection method. Due to their low cost, wooden structures can be created in one piece, but if transportation is necessary, it is better to provide a collapsible version of the structure. So, the entire process of installing a football goal consists of the following steps:
- The wooden beam is sawn into individual elements according to the dimensions indicated in the drawing.
- For safety reasons, it is recommended that all wooden components be thoroughly sanded.
- Stainless steel bolts are suitable as fasteners.
- The main frame is supplemented with struts and a support board to provide greater stability. Their second purpose is to fix the mesh.
- The fastening of the struts must be done at an angle of 45 degrees.
Advice ! Treating a wooden structure with an antiseptic composition will prevent damage to the wood by fungi and insects and will extend the overall service life.
At the final stage, the frame of the football goal is painted with paint, which will ensure its good visibility in the landscape of the site. The final touch is attaching the mesh. How to make it and methods of fastening will be discussed below.
The process of assembling gates from plastic pipes
The initial steps for assembling a plastic structure are similar to the previous method: you need to make a project for a football goal. Followed by:
- Purchase of components. It is advisable to choose flexible plastic containing rubber. This will reduce the likelihood of it deforming when in contact with the ball or the player’s body.
- PVC pipes are cut according to the designed football goal design.
- At the next stage, you need to make two rods from pipes.
- Then they move on to forming the corners for the football goals.
- When assembling a plastic structure, pay attention to the location of the tee, where the additional support will be included. Only after choosing the correct angle of inclination can you make a weld with a special soldering iron.
- Next you need to connect the tees and rods using plastic pipes of larger diameter.
- It is recommended to fasten the tensioned net on the football goal with a special clamp.
It should be noted that for a full-fledged football competition you will need a pair of goals.4
Important ! Careful fastening of the frame of the football structure will help prevent injury to the goalkeeper.
Historical background
Playing with a ball is not a modern invention. Back in the 16th century it was known in England. During this time, it has undergone significant changes, but one thing remains unchanged - the restrictive structure, which is now called the gate. In addition to the gate itself, there was a limitation on the area through which players could move. Mentions of this are found in ancient records. Only in the century before last the gates received an appearance that is similar to the modern one. Initially, they were represented by two vertical sticks, between which a strong rope was stretched. Over time, it became clear that an additional limiter was required to fix the ball in the required zone. This is how the net appeared, which is an integral attribute of a football goal. This decision also made the match more organized, since you no longer had to run far to get the ball.
Mesh production
Of course, you can buy a finished product, but there are other options for equipping a football structure with a protective element. The easiest way out is to find among the avid fishermen some gear that has expired. But it’s not entirely aesthetically pleasing to decorate a brand new football goal with an old net. It’s better to go all the way and do it yourself. Choose the most convenient method from the options below:
- The ability to weave a fishing net, the presence of a shuttle and a wooden plate for setting loops allows you to make a net for a football goal in a couple of evenings. The width of the oblong plate is equal to the size of the square (cell) for the future grid. A spool of nylon thread is suitable as a material. The advantages of the method are the strength of the product, but the disadvantages include the complexity of the process and the need for related tools.
Standard sizes of football goals
It took Zhenya and I three long years to create a playing field at our dacha instead of a vegetable garden. And this spring we finally brought joy to our sons - we installed two football goals. In this post I will talk about our misadventures with lawn grass and how to make a football goal with your own hands from plastic pipes, rope and self-tapping screws.
Football instead of potatoes
In the first spring after, in May 2014, we made a big mistake - we created a vegetable garden almost everywhere. We plowed half the plot with a walk-behind tractor and planted potatoes. All summer the potatoes got in the way, taking up time for weeding, and in the fall it turned out that everything was in vain - “peas” grew on the sandy soil.
Since then, we decided not to plant potatoes at all, but to build a football field for Bory and Gleb in this place. They go to a sports school group, so a place to practice kicks and simply play outdoor games is necessary.
In May 2015, we plowed the garden, and I sowed a mixture of “Sport” seeds. The lawn barely appeared - it was “clogged” with weeds. And only by autumn something vaguely resembling a grass carpet appeared on the site.
But he was not destined to grow further. Because by the spring of 2016, we finally realized that nothing grows on the local soil, and we ordered a machine with black soil. A choice arose: either the truck would drive across the lawn and dump the black soil in a place convenient for us, or the soil would have to be transported in a wheelbarrow.
We spared our backs and chose the former. On the flat, already green field there were deep traces of a huge machine. The mounds reached 50 cm! The wheels compressed the soil so much that in the places where the car passed, it became stone. The site went in waves, and the dream of a football field had to be postponed until next year.
In the fall of 2016, we plowed up the uneven area and sowed lawn grass again.
And finally, the field became not only level, but solid (the legs don’t fall through), although not yet ideal. Along the edges where the very first lawn remained, the grass is like a carpet, and in the plowed area, soil is visible. But this little thing didn’t stop us.
It took Zhenya and I a day to manufacture and install two gates, one meter high and half a meter deep. We are writing this post because I don’t understand pipes and screws. Also, although the idea of a gate made of plastic pipes is not new, Zhenya himself finalized the design. We will be glad if our idea is useful to someone.
Assembling a frame from pipes
Connect three 1000 mm pipes together using elbows from above. Place two tees on the pipes from below, and attach two 500 mm pipes to them. Place a fourth 1000 mm pipe between the 500 mm pipes. The structure should look like this:
Secure the pipe joints with self-tapping screws. Put the 150 mm pipes aside for now - they will be needed for installation.
We weave a net for a football goal
Let's move on to the longest stage. You can skip it if you buy a ready-made sports mesh, but I was interested in weaving it myself. I offer it to you too.
On the back of the gate, use a felt-tip pen to mark points on the pipes every 10 cm using a tape measure. Markings must be on all six sides of the gate. Screw the screws into the points.
Wind the cord from the lower pipe to the upper one, fixing it with self-tapping screws.
The rope should not be taut like a string. It should sag slightly.
When the cord is stretched vertically, start weaving horizontally. I tied the sides with regular knots. For the first couple of rows I had to think about how it would be more convenient to pull the cord through, then it began to work out “automatically”, like with knitting. At the second gate, I was already weaving so fast that Zhenya began to jokingly call me Shnyuk (for those who don’t know, this is a good spider from the cartoon “Luntik”).
The sides of the cord should form a square. The photo shows the diagram well. But I am sure that you will succeed intuitively, because it is very easy and even calming - you make knots and think about your own.
I wove the sides last.
When the gate is ready, you can begin installation. This is a quick step, but very important. How you attach the gate will determine whether it will fall during strong winds.
Summary
As you can see, football is an exciting game that has no age limit. The gate remains its constant attribute. Even when playing in an open field or in a yard, a goal must be marked. To do this, two sticks can be used, which are stuck into the ground, stones or bricks. The difficult thing in this situation is tracking the goal if the ball went over the goalkeeper's head.
Recommended Posts
Feeder for dogs
Apartment renovation in a new building
Pictures made from plastic bottle caps + photos
How to attach a mirror to a wall with wallpaper
Marking on plastic bottles
Pellets for heating
Football goal installation
Place 150mm pipes onto the tees. Important! Do not fasten these connections with self-tapping screws, because this will make it inconvenient for you to remove the gate for the winter.
Choose a convenient place and use a drill or shovel to dig a hole 150 mm deep.
Insert the gate into the hole and cover it with soil. At the back and sides, additionally secure the 1000 mm lower pipe with pieces of wire, driving them into the soil with a hammer.
The gate is ready! To create a full-fledged playing field, you can put the same ones opposite.
I wish you an interesting and active holiday! Tell us in the comments if you like football and play it.
Instructions
The first step is to decide on the size of the future gate. It all depends on what site they are intended for. Do you want your game to be as realistic as possible? Then make a gate
according to the standards used in professional football. But do not forget that for such gates you need a field of the appropriate size. Unfortunately, not every yard has such a site. Therefore, you need to carefully consider the dimensions of your gate.
Make a detailed drawing. It must indicate the dimensions of all parts. Also pay special attention to the way the main parts are connected. The gate will be assembled from several beams, so they can be made collapsible, this is very practical. You can take them out onto the field, install them and enjoy any game. And then take it apart and take it back. This will help extend the life of your gate. They will also retain their original appearance for much longer and delight the players of both teams with their appearance.
The next step is choosing the material for manufacturing. Almost any material can be used. Gates made from aluminum beams or tubes are highly durable. However, football is a contact game, so players often hit the goal
.
The consequences of a strong blow to an aluminum gate
can be disastrous.
Wooden gates
require maintenance, but are much better than iron ones.
Gates
made of plastic
have the lowest level of injury risk The plastic must be selected flexible, with the addition of rubber, so that when it comes into contact with the ball or the player’s body, the goal
bends but does not break.
It is worth noting that goals
made of flexible plastic are not suitable for playing professional football, but they are ideal for backyard matches.
Make all the gate parts according to the drawing. Check for correct manufacture. All parts must have a rounded shape. If you are making gates
made of wooden blocks, then it is necessary to sand the surface to give it perfect smoothness.
The gate
also needs to be painted .
You can choose absolutely any color, but it must stand out clearly so that players can clearly see the football goal
.
After this, let the paint dry. Now you can take the newly made goal
under your arm and confidently step onto the football field. Remember that for a full match you need a pair of gates.
For a thrifty and hard-working owner, convinced that only he himself can do everything at the proper level, of good quality and on time, it is important to know and be able to do a lot. When building a fence around a site, the main attention is paid to the gate
, as to the central main entrance to the territory of your home.
Instructions
Before you start building a gate, you need to decide what model of gate you want to build. Will it be an automated lifting gate or a swing gate? Most often, gates are installed consisting of two leaves without any automation.
After you decide on the choice of gate design, you need to decide what material you will make it from. If the gate is made of wood, then you need to take wood that has been treated with antiseptics relatively recently; wood that has been treated for a long time against termites and can release toxic substances for resistance to the negative effects of the external environment. Gates made of iron are more durable, but they can be made either from a solid sheet of metal or be openwork forged. They are painted or treated with a special protective compound to prevent metal corrosion.
How long the gate will last and how reliable it will be depends on the foundation laid underneath it. It is usually laid at a meter depth. Fill the voids between the foundation masonry and the walls of the recess with crushed stone, which must be compacted and a thick layer of concrete placed on top.
If you want to make a wooden gate yourself, you first need to draw up a design drawing. This helps to more accurately imagine the scope of work and purchase the necessary materials in advance. When drawing up a drawing, you must try to ensure that all the details and structural elements are in full accordance with each other.
How to install gate supports
Vertical supports must be made from wooden beams. Their size should be calculated as follows: add another meter to the height of the gate for deepening. The greater the depth to which the supports are installed, the more stable and durable the structure is. This reduces the likelihood of misalignment during operation of the gate.
Remove debris from the area where the support posts will be installed. Dig holes - their diameter should be 20 cm larger than that of the supports. Compact the bottom of the hole and make a cushion of crushed stone. The part of the pillar that will be filled with concrete must be pre-treated with a composition that will protect the wood from rotting - for example, bitumen mastic. Use a plumb line to check that the post is installed vertically. The hole with the installed post must be filled with concrete and wait until it dries.
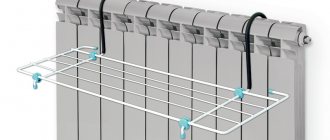
Battery dryer
A truly indispensable device for those people who have a small child. You can quickly dry baby diapers on it. Plus it's a great shoe dryer.
The finished design is not cheap, and an equally convenient dryer can be made from leftover polypropylene pipes. You will need the pipes themselves across the width of the battery, several corner connections and tees. The more rods you plan to make, the more tees you need.
In principle, soldering the dryer is not difficult, everything can be seen in the photo. The only thing I would like to advise is that first make one side part with a mount on the battery and tees, then insert the rods into the tees and lastly place the second side piece on them. Good luck!
Gate manufacturing
To make one of the gate posts, you will need one block each for the top and bottom, two bars for the side posts, and two for the middle lintel. Dimensions for gates are calculated depending on the size of the machine. All parts must be treated with antiseptic impregnation.
The frame parts are laid out on a flat surface, and holes must be drilled at the joints. Dowels are inserted into them - they add rigidity to the places where the parts are connected. Jumpers made of timber are installed in the middle of the frame. At the corners, jibs are attached, which are bars with cuts at the ends at an angle of 45 degrees.
When calculating the height of the frame, it is necessary to take into account that the sheathing boards should protrude beyond it from below and above by 20 cm. The boards must be prepared before sheathing - cut to the dimensions specified by calculation and worked with a plane. They can be attached to the frame and tightly to each other, and with a certain step. After all the sheathing boards are in place, the top must be trimmed and sanded. Now the hinges are attached to the sashes - for this, self-tapping screws with screw threads are used. Self-tapping screws can also be used to secure fasteners to racks.
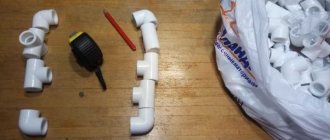
Branded sports facilities are a rather expensive purchase, but you can try to make simple ones. To work, you will need plastic pipes and some additional connecting elements for them.
Tees, pipes and angles can be purchased at any store or building materials department, or you can use unnecessary parts of pipes left over after repairing heating systems or plumbing.
If you buy pipes in a store, it is better to buy inexpensive ones. The gates don’t care whether they are pipes capable of withstanding high pressure or ordinary ones. Therefore, we take those that are cheaper.
Root irrigation system for greenhouse
This is a very convenient idea, because it allows you to water the plants in the greenhouse without opening the film. In addition, you don’t have to bend over each seedling with a waterer.
In general, we take a PVC water pipe along the length of the greenhouse and put a cap on one end. We drill holes in the tube for water at a palm distance from each other. This year I decided to make it more precise and drilled holes exactly at the distance of the seedlings. Then I’ll just plant the seedlings with this step. Next, we attach a corner to the free end of the pipe, into which we vertically insert an ordinary plastic bottle with the bottom cut off instead of a funnel. Now we just pour water from the sprinkler into the bottle, the holes in the pipe will do their wet work themselves.
You can go even further and make an entire irrigation system for several beds or even the entire garden (depending on how many extra pieces of PVC you have). You just need to solder the pipes like communicating vessels and connect the whole thing to the pumping station.