birdhouse made from a plastic bottle
If you are looking for an easy and cheap way to make a birdhouse, then the idea of using plastic bottles should interest you. Of course, this material is mainly used for feeders, since many people believe that plastic is not the most suitable choice for a nest. In fact , making a birdhouse out of a plastic bottle is not a bad idea because birds are more interested in the shape and size of the house rather than what it is made of.
Of course, there are materials that should not be used - metal, wood impregnated with chemicals, etc. But plastic food bottles are not dangerous for birds, and by using recycled materials, you will take care of the environment. Also in this article you will learn how to make a plastic birdhouse from PVC pipe.
Beautiful birdhouse from a bottle
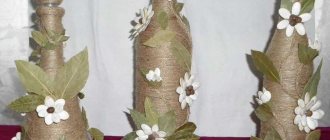
This is an interesting and creative project: small beautiful birdhouses made from plastic bottles . Perhaps not the most original design for a bird house, but the feathered residents should like it.
To make a birdhouse, collect the following materials:
- plastic bottles;
- sharp scissors;
- paint and brush;
- wire.
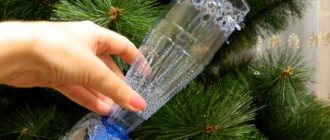
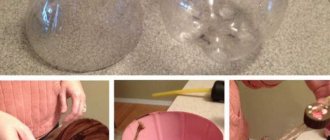
First, cut the bottle in half. The top part will fit over the bottom, so don't be afraid to shape the bottom side with your imagination, this will be the roof and it should be beautiful.
Then paint the two parts of the cut bottle as you like and leave to dry. Don't forget to punch a couple of holes in the lid. You will need these to thread the wire through and make the loop. This is for convenience so that the birds can sit inside the house. That's basically it, you have completed a project that will help the environment.
Now all that remains is to install the birdhouse on the tree and feel how you are filled with pride for a useful work.
Photo source: www.goodshomedesign.com/diy-plastic-bottle-bird-house/
What tools and materials will be needed
Working with plastic bottles is easy; the wall material is durable and can withstand heavy loads. The only negative is that due to the round walls, cutting plastic is quite difficult; to avoid mistakes, you will need skill and a high-quality tool.
To make a birdhouse from a plastic bottle you will need the following tools:
- A shoe awl with a comfortable wooden handle;
- A construction knife with a thin blade and a sharp tip;
- Scissors with short blades; when building a birdhouse, it is better to use kitchen scissors for cutting fish;
- Stationery stapler;
- High density tape;
- Fine-grain sandpaper;
- A marker for signing CDs, regular pencils and felt-tip pens leave nothing but small dots on the walls of the bottle.
You will need to figure out how to hang the birdhouse; it is best to use a single-core aluminum wire in PVC insulation. It bends easily by hand without any additional devices or tools, so the plastic birdhouse can be hung quite high.
In addition, you will need a certain supply of plastic bottles. Making a birdhouse from a five-liter bottle is not difficult, but due to lack of experience, the first attempts may not be entirely successful. Therefore, for each birdhouse model you will need to have on hand several of the same type of plastic bottles with a capacity of 5-6 liters. There will be no problems with two-liter ones, there are plenty of them everywhere.
It is advisable to take drinking water containers with smooth walls, without stamped relief. Birds smell no worse than dogs, so a birdhouse can be rejected by birds due to the residual aroma of Coca-Cola, oil, and especially technical liquids like soap.
Protection from ruiners
Birdhouses need to be protected from:
- Sonya.
- Dyatlov.
- Chipmunks.
- Protein.
- Bats.
- Domestic and wild cats.
The main protection of the birdhouse from woodpeckers is a tin collar around the entrance no more than 5-6 mm wide. You can also use upholstery with small nails at the same distance or attach an overlay to the taphole. For the overlay, it is recommended to use single-layer wood with horizontally oriented grains. Shielding is the preferred method of protection against woodpeckers, since the use of wood does not have a negative effect on the birds that have taken up residence in the nesting area.
The best way to protect a birdhouse from cats is to use a cat skirt. It is usually made from twigs or wire. The twigs are cut at the root part in such a way as to form small inclined stumps. The entire belt is fastened with wire passing under the rods. When attaching such a device, it is worth remembering that it is not recommended to survive the tree.
An alternative method of protection is to make and attach a wooden collar, which protrudes 3-5 cm around the entrance. This method is less labor-intensive, but such a threshold is inconvenient for either adult birds or chicks living in the nesting area.
A universal way to protect against destroyers of any kind is to make a tin belt. Today you can easily find a scheme according to which such devices are made and fixed to trees. When making belts, you must strictly adhere to all instructions and observe all dimensions with an accuracy of 3-4 cm. Otherwise, enemies of birds can easily catch on the bark located above or below the protective belt
It is also worth paying attention to the fact that between the belts there are no twigs, branches, feeders or any other potential support for predators
How to decorate?
Each person must approach this process individually and decorate the birdhouse in accordance with the design of the entire site and their own preferences. However, for those who do not know how to do this, here are some of the most interesting options to consider. A homemade bird house should be beautiful and appeal not only to you, but also to the birds living in it.
For example, you can decorate the entrance to the birdhouse in an original way. To do this, you can glue small strips of tape on the sides, preferably double-sided. Then attach a beautiful multi-colored braid on top. The bottom and top can be decorated with a row of large buttons, which are sure to be found in every home.
In addition, small decorative windows can be made from very thin plastic in several places. In addition to the roofs described above, others can be made. For example, a roof made from old wheels will look very beautiful and attractive. To do this, they need to be heated a little and then cut into equal parts. Each resulting piece can be painted with any paint.
Multi-colored “tiles” will look very beautiful. It is attached with good quick-drying glue.
In addition, for the convenience of the birds, the bottom of the bottle can be covered with either hay or cotton wool. The birds will like this decor the most. You can paint and paint the birdhouse, if possible. For this you can use acrylic paints and even gouache. However, the latter must be coated with varnish. By using all your imagination and creativity, you can make the birdhouse a real exclusive dream house for any bird.
Deciding on the format
First of all, we decide which birds we want to please with new housing:
- A birdhouse is a universal option suitable for most birds. Its dimensions are within the range: 40x15x15 cm, and the diameter of the flight hole is about 5 cm.
- The titmouse is a haven for sparrows, tits and other small birds. When making it, try to keep it within 30x12x10 cm, and make the flight hole no more than 3.5 cm in diameter.
- Wagtail is designed specifically for wagtails. Since these birds primarily walk and do not fly, the structure must be positioned horizontally, and also be provided with a protrusion in front of the hole. The average dimensions of the product are 15x15x30 cm, the tap hole is 3 cm.
- The nesting area often becomes a haven for pikas. Therefore, if these birds predominate in the area of the summer cottage, a new house for them should be made in the shape of a pyramid with dimensions of 25x25x15 cm, and a through exit, the diameter of which does not exceed 3.6 cm.
In this article we will talk about birdhouses, since they are universal and suitable as a temporary shelter for most birds.
Master class “Making a girl from flower pots”
Maria Vorobyova
Master class “Making a girl from flower pots”
Master class: “Making a girl from flower pots”
.
Master class: “Making a girl from flower pots”
.
Crafts from flower pots are an original and creative decoration.
Every gardener, as a rule, has a lot of empty flower pots. There is no need to throw them away, I propose to give them a second life and turn them into garden people with the help of your imagination and work. Make exclusive crafts with your own hands that can be used to decorate the area of a kindergarten, home, or dacha.
With the onset of summer, I wanted to make the idea of people made from flower pots a reality. I decided to build a little girl.
For work we will need:
-plastic flower pots of different sizes
-paints: acrylic and a can of red paint
-flower seedlings
Let's get to work. We have pots of different sizes. Large and smaller are the head and torso, medium are the legs, small are the arms.
We design the head. We glue the eyes, I took them from an old soft toy, you can draw the eyes according to your wishes and abilities. Next we glue the nose (mosaic)
and finish drawing the cheeks, mouth, bangs.
In a large pot, using an awl heated on a fire, we make punctures in the area of the arms and legs. Torso (dress)
and the feet
(shoes)
are painted with red spray paint, then we paint the polka dots with white acrylic paint.
We connect the large and small pots using a self-tapping screw, you can glue them together.
Take a rope of the required length and make a knot at one end. In a small pot - hand, we also make a hole with a hot awl and thread a rope into it, so that the knot is inside. We do the same with the second hand and legs.
We thread the free end of the rope into the holes on the body and tie a knot.
Let's do our beauty's hair. We fill the pot with soil and plant seedlings of flowers, herbs, whatever your imagination desires and the size of the pot allows, so that the plant develops normally. I have a small pot and I planted a begonia. That's such a funny girl I got
I wish you a good mood and creative inspiration!
Master class “Apron for a girl” So let's get started. We take measurements for the apron pattern. To draw a pattern we need the following measurements: measure A - distance.
Master class “Making dolls from pots to decorate the site” Our kindergarten is very young and the playgrounds have not yet been inhabited. I offer you an idea for decorating a small corner on the site, we did it.
Master class “Making a laptop” Master class by teacher Nadezhda Aleksandrovna Dorofeeva Topic of the master class: Lapbook as a means of supporting children’s initiative.
Master class “Making a lapbook” Goal: to teach how to make a lapbook and work with it. - Dear colleagues! I want to share with you my manufacturing knowledge.
Master class “Making a cap” “Cap”. 1. Can be used in skits, dances, matinees and entertainment, in children’s role-playing games (“Shop”, “Cafe”, “Restaurant”).
Master class “Making herbal flowers” Herbal flowers are interesting decorative decorations - plants in which grass grows. A wonderful teaching aid for children, p.
Master class “How to sew a skirt for a girl with your own hands in a couple of hours”
A children's holiday is an integral part of the educational process of preschoolers, and is also an important part in the life of a child. For the holidays
Master class on making flower hats for the flower dance for the March 8th matinee Dear colleagues! I offer you an idea for making your own flower hats from colored paper. The idea for the hats came about during the process.
Master class on making a crown for a star girl Master class Making a crown for a star girl. Materials and equipment: to make a crown we will need a headband for the crown.
Master class on making a “Chunga from Changa Island” costume for a girl. You can come up with an interesting ensemble, make a “Chunga from Changa Island” costume with your own hands and amaze everyone present at the holiday.
Dimensions of birdhouses and hole diameters for wagtails, titmice, and various birds: table
Wood is the only natural material that can provide birds with protection from the cold and rain. Let's not forget that birds are part of nature, and they are not adapted to life in an artificial environment.
What characteristics should a tree have:
- The most suitable types of wood for birdhouses are birch and oak.
- Pine trees are not suitable for these purposes because they emit resin.
- The thickness of the boards must be at least 2 cm to retain heat.
- The inside of the birdhouse must be rough so that it is convenient for birds (especially chicks) to get out of the house.
- Boards should not be fastened with glue; it can release harmful substances.
- There should be no nails or screws protruding from the boards, as this could injure the birds.
Let's talk separately about the size of birdhouses. Birds come in different sizes, which means that houses must be the right size for different species.
Table 1 “Sizes of birdhouses for different birds”
| Bird species | Taphole diameter (cm) | Bottom Width(cm) | Front wall height (cm) | Back wall height (cm) |
| Tits | 3-3,5 | 10-12 (square) | 22-25 | 28-30 |
| Wagtails | 5 | 40*15 (rectangle) | 15 | 18 |
| pikas | 6 | 16-18 (square) | 22-26 | 28-32 |
| Flycatchers | 4 | 10 (square) | 7 | 14 |
Features of bird houses:
- Wagtails will choose a house in the form of a rectangle with a threshold in front of the entrance, because this bird likes to trample in front of the entrance to the house.
- Pikas settle in birdhouses with two entrances. This helps them escape if cats attack.
- The flycatcher likes to settle in a semi-hollow - a house that looks like a natural hollow in a tree.
How to make a nest box step by step
Flycatcher house
Birdhouse for wagtail
Process
- Make a round hole in the container at a distance of 3 cm from the bottom.
- A little lower, we make a hole with a drill and insert a dowel into it. This will be a roost for the starling.
- We paint the bottle brown (2 layers).
- Next, we take the lid and drill small holes in it - 2 pieces, thread a wire through them and twist the ends. The result should be a loop through which the house will be attached to a pole or tree.
- Using a stencil with beige paint, paint the window with a brush or sponge.
- Cut the disk into pieces and paint them with light brown, black and green paint.
- Decorating the birdhouse. We glue double-sided tape onto the dried pieces of the disk, and then glue them to the neck of the bottle. Thus, we get an imitation of the roof.
Plastic house for starlings, without perch
Few people pay attention to protection from strange birds. We have learned to deal with cats and rats, but with pigeons and crows not everything is so smooth. They are the ones who most often survive beneficial starlings, tits and even sparrows from the local area. We have to make birdhouses for birds without perches or shelves. One of these safe options is shown in the photo below.
A plastic birdhouse is built using the technology described above. For the safety of the owners, the design of the house has to be improved somewhat:
- We remove the perch in front of the entrance;
- We increase the size of the inlet hole;
- We line the edges with soft but durable cambric, you can use tin plates;
- We use an old knitted hat as a roof.
The last element is required.
On the one hand, such a roof retains heat well and protects from heat, muffling noise in a plastic container. On the other hand, knitted roofing allows small and light birds to claw and even hang upside down before getting inside. Neither a pigeon nor a crow is capable of such acrobatic feats.
Key Requirements
Before you start preparing the house, you should first consider all the measures to protect the birds. Don’t even doubt that local and neighborhood cats will try to get inside and remove the chick. For this reason it is necessary:
- Do not make a perch (perch) in front of the hole, because the cat will be able to cling to it with one paw and calmly climb into the nest with the other.
- Make the canopy longer so that the cat cannot reach inside from the roof.
- If you have migratory birds nesting, you should check your birdhouse as spring approaches. During the winter period, other representatives of the animal world, such as bats or even squirrels, could have settled in it.
In addition to security measures, attention should be paid to the following things:
- You cannot make a birdhouse from coniferous wood. The resin that escapes from such boards will make the inside walls of the house sticky, which can make it difficult for birds to fly. Is it dangerous.
- The material used to make the house should be rough from the inside, so there is no need to plan the boards. If the material is initially smooth, for example chipboard, make notches inside so that the birds can easily move, clinging with their claws.
- Make the inside of the birdhouse as natural as possible, do not prime or paint it. Decorate only the outer part of the wall; inside, the birds will equip everything on their own, the way they need.
Recommendations
Anyone who had to make a birdhouse for the first time can be advised to follow one rule. If possible, do not use paints, varnishes, or glue containing organic solvents. With the help of modern chemistry you can make a very beautiful birdhouse, but it is not a fact that birds will want to live in it. You can do an experiment, put a house in early spring on the balcony or outside the window. If the birds like it, it will immediately become noticeable.
When making the body, you should try to make the smallest number of cuts. Water easily gets inside through joints or seams, and this is extremely destructive for the nest. If you really had to cut, you will need to make insulation from tape or film.