A couple of weeks ago I installed one of my wind generators to help with solar panels. I put the blades on it that I found, two blades from 160-gauge pipe and two from galvanized sheet metal. The propeller seemed to work, but I wanted to make a normal propeller, one that would be fast and have a good starting torque. Below in the picture is a windmill with prefabricated blades, the quality is of course disgusting, but I think it’s clear what is shown.
Pipes of 110.160 mm with a speed of 5-6 did not want to show a good starting torque in the program, and pipes with a larger diameter are difficult to find. A good result in the program for calculating blades made of PVC pipes was given by pipes of 250.315 mm, and the starting torque is high, and the speed with KIEV.
Then I decided to try to make blades from tin, or more precisely from scraps of professional flooring that remained after sheathing the house with professional flooring. Previously, in the program, I adjusted the screw from the 315th pipe for my generator. The three-blade propeller turned out to have a diameter of 1.5 m, high speed with a high KIEV of 5-7, the starting torque at 5 m/s is 0.25 Nm. Below are screenshots from the blade calculation program.
Here is the data for cutting the screw - all dimensions in millimeters, which I then used to make the blades.
From the scraps of professional flooring, I chose three suitable small pieces and cut them to 75 cm with a grinder. Next, using a hammer, I began to straighten the profile into something like a smooth sheet. I immediately folded the back edge with a 1cm grip.
Next, I outlined the dimensions from the program on the workpiece and drew a front line along which I would cut the blade. I added 1cm to the dimensions because I will also bend the front part for rigidity. Below in the photo you can see the line along which I will bend the tin with pliers. The thickness of the tin is 0.6mm, but I cut it with ordinary scissors, not a grinder, it’s smoother and easier.
The process of bending the edges of the blade. The hem is done using pliers and then tapping with a hammer.
The process of making the remaining blades is the same, one blade took about twenty minutes of work and the result was these still flat blades.
This is what the blades look like from the reverse side.
Next, by longitudinally tapping with a hammer, I gave the blades the shape of grooves approximately like those of the 315th pipe. To roughly guess, I drew a circle with a diameter of 320 mm on the floor and guided myself by it. I exposed the root part of the blades to 3 cm, and folded the blades together and drilled holes along the zero line. I drilled holes with a diameter of 6mm.
View from the back.
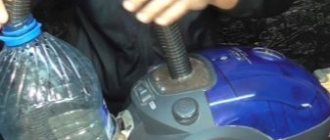
So, spending about an hour and a half, I made the blades for the wind generator. The blades turned out to be flimsy, of course, but as practice has shown, such blades can withstand winds of up to 15 m/s. Next, I cut out a hub from plywood and assembled the finished screw.
Below is a photo of this propeller already on the wind generator.
After installation on the wind generator, the new propeller immediately showed its good side. There was a wind outside of about 3-6 m/s and the propeller was spinning well with a noticeably higher speed. It instantly responded to changes in wind speed and spun without stopping. Before it, a prefabricated four-blade propeller first melted, but somehow it did not gain high speeds. Then I removed two pieces of tin blades and two blades from the 150th pipe remained there. I connected the windings of the generator with a triangle and in this form the windmill worked with a two-bladed propeller, but the propeller periodically stopped and then had difficulty starting. The charging current was unstable, but in today's wind gusts it reached 4A.
With the new three-bladed propeller, the charging is almost constant, 0.5-1A is visible on the ammeter constantly with an increase to 2A. We'll see how it will be in stronger winds, but it's not bad. Because of the speed, charging does not stop and the propeller starts easily, which is what I wanted to do. I think the screw is strong enough, but time will tell. I haven’t come across screws for windmills made of tin on the Internet, and of course, in terms of strength, they cannot be compared even with PVC pipes, but this is also a solution when it is problematic to get large-diameter sewer pipes.
Many owners are trying to find a highlight for the exterior of their home, but there are not many such devices. A weather vane is ideal for this. It simultaneously performs both practical and aesthetic functions.
Features of a weather vane with a propeller
This device can be of different shapes, most often the weather vane has the shape of a domestic or wild animal, an angel, a fairy-tale hero, or an airplane.
A weather vane is not only a functional device, but also a decoration for the roof of a house.
Selecting material for making a weather vane
The main criterion when choosing material for a weather vane should be the ultimate purpose of its manufacture. But despite this, it is recommended to choose the material that will make the structure a decoration of your home for a long time. A weather vane can be made from almost any material, but each of them requires different tools and equipment.
For more information about what you can make your own weather vane from, read our article - Where the wind blows from: how to make a weather vane with your own hands.
Wood weather vane
A fairly light and easy-to-work building material that does not require specific tools and skills. High quality raw materials are suitable for a weather vane. Before use, it is recommended to impregnate the wood with mixtures to protect it from dampness and harmful insects. However, such a product will not last long.
Video
Http://womanadvice.ru/vertushka-iz-plastikovoy-butylki
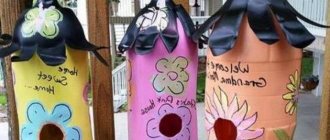
Summer is the time for delicious berries and fruits. But there are still a lot of feathered thieves when ripening cherries or cherries, which can greatly spoil the harvest, to the chagrin of the owners. And such simple devices as turntables can help protect the garden from uninvited guests. Making them is easy and inexpensive, all the material is at hand, and decorating a garden or vegetable garden with budget pinwheels is also a good thing! So, arm yourself with the necessary tools and empty bottles - and get to work!
Basic elements of a weather vane
Regardless of what shape your weather vane will be, it must contain certain elements, the main ones being an axis and a flag with a counterweight.
Vane body and axis
The body serves as a support for the entire structure. Both steel and brass pipes with a diameter of 1 inch are suitable for its manufacture. The body has a strictly vertical axis - a rod, usually made of steel reinforcement.
The main function of the support rod is to hold the windmill. The diameter of the reinforcement is about 9 mm, this is enough to withstand strong winds and any other mechanical load that will act on the weather vane.
The weather vane body is the support of the entire structure
Flag with counterweight (wind vane)
The main part of the device located on the vertical axis. The flag shows which direction the wind is blowing. The counterweight serves to balance the flag and is located on the opposite side. The main difficulty in the manufacture of this element is that the flag and the counterweight must be located evenly on both sides of the axis, that is, have the same mass.
Of the entire structure, it is the weather vane that is of artistic value. An experienced craftsman is able to make a part of any shape without disturbing the balance between the flag and the counterweight.
When making a weather vane, it is important to maintain an even distribution of mass on both sides of the axis
Protective cap
The protective cap has the shape of a circle or a cone and is located on the axis of the weather vane, most often directly above the body. Its main function is to protect the housing and bearings from moisture and dirt.
Rose of Wind
A cardinal direction indicator consisting of two rods crossed at an angle of 90°. As a rule, the rods are attached to the top of the lid in a stationary state. At the ends of the pointer, letters are installed to indicate the cardinal directions. To fix the element in the correct position, you need to use a compass.
To set the cardinal direction indicators in the correct direction, you need to use a compass
Bearings
They are located inside the body and ensure free movement of the supporting rod under gusts of wind. The internal diameter of the parts is 9 mm.
Fasteners
The choice of fasteners depends on the material used and the method of fastening. These can be corners, overlays, bolts, rivets.
Propeller
It helps determine wind speed. You can make the propeller yourself from plastic and wood or use ready-made parts.
It is the airplane with the propeller that looks most organic, since this detail is also present in the original design. And it’s much easier to model this shape than others.
The plane is ideal for making a weather vane with a propeller
How to make a turning mechanism
In order for the weather vane to perform its actions, it must be movably fixed. And so that at the slightest wind it turns. To do this, the “body” of the weather vane itself is attached to a rod, and the lower part to the roof or chimney (if a weather vane is made, a chimney cap with a weather vane). These two parts are connected movably - using bearings or other similar connections.
Using a ball
You can find any bearing and weld two parts of the “holder” to it. You can make a turning mechanism without a bearing, but with a ball of a suitable size or cone.
Vane device and rotating mechanism
To make a rotary vane mechanism, you will need two metal pipes of different diameters or a pin of a smaller diameter and a pipe of a larger one. Moreover, they must be selected so that one fits into the other with a minimum gap (2-3 mm).
The weather vane body is attached/welded to the wider pipe. Moreover, it is necessary to make sure that the upper part of the pipe is sealed. The lower tube or pin is used to attach the cardinal direction indicator. This is what is attached to the roof. Its upper part should also be welded or sealed.
To make it a little clearer
If you don’t have a welding machine, you can use wooden plugs - they are driven tightly into the pipe. For reliability, you can lubricate the walls with universal glue. But this option - with wooden plugs - cannot last too long. Frequent turns will wear away the wood, so after a while the rotating mechanism of the weather vane will have to be restored.
One of the metal weather vanes
When assembling the weather vane, a ball from the bearing is placed on the installed pin, and the weather vane body with a welded pipe is placed on top. For smoother rotation, you can add oil to the mechanism. After this, you can consider that you have already made a weather vane with your own hands. True, you still need to secure it, and this is far from easy to do - working at heights with a heavy and bulky product in your hands is quite a challenge.
With a machined cone
If you can’t find a ball of the right size, but you know a lathe or you can work with metal, you can grind a cone that will replace the ball.
Rotating mechanism for weather vane with cylinder
The weather vane assembly diagram itself remains the same: we attach the body to the upper pipe, and fix the lower one on a pole, roof ridge, etc.
Drawing of an airplane weather vane with a propeller
A weather vane is usually located on the roof, so high aesthetic demands are placed on it—its appearance will judge not only the taste of the owner of the house, but also his wealth. Therefore, it is very important to design the structure correctly, while showing maximum imagination and creativity. The drawing of the future model should be as detailed and accurate as possible.
The drawing of the future aircraft model should be as detailed as possible and with exact dimensions
The effectiveness of homemade scarecrows
Outwardly, moles look like cute and harmless animals. But at the same time, they can cause significant harm to the garden plot. Moles by nature are blind animals. Thanks to this, their hearing is highly sensitive.
Attention! Taking into account the special influence of sounds, the irritating effect of homemade devices is much more effective than in cases with other animals.
Accurate determination of the permanent habitat can be difficult because the family has several exits from the burrow. Therefore, determining its location is not easy. The task is further complicated by the fact that the depth of the hole can reach several meters. As a result, the right solution is to make homemade turntables from available or scrap materials.
Step-by-step instructions for making an airplane weather vane
This device will become the hallmark of the house only if the element is properly made and installed.
Metal weather vane
It is performed in the following sequence:
- Cut a pipe 120 mm long. Make small holes in it for fastening to the support with rivets or bolts. The holes must first be tapped.
- Insert bearings from each end into the pipe, securing with welding. Additionally, the bearings can be fixed by heating the pipe into which the bearing must be inserted. After the pipe has cooled, the bearings will sit quite firmly in it. Fill the pipe itself with grease.
Bearings help the weather vane to easily rotate around its axis
It is very easy to cut steel sheets with special metal scissors
Weather vane made from plastic bottles
You can make an airplane weather vane from plastic bottles. To do this you need:
- Collect empty containers and wash them thoroughly. For a weather vane in the shape of an airplane, 4 bottles are enough. Cut off the top part of two bottles with the cork halfway. As a result, you should have 2 cut tops with cork and 4 bottoms, the height of which is 5 cm.
Advantages of using a turntable
During the hunt, the animal is capable of digging up an area even in a short period of time. A bottle spinner for repelling moles will scare them away and protect existing crops.
Interesting! From experience, some summer residents know that underground inhabitants cannot tolerate various noises.
For example, this could be the sounds of an alarm clock, knocking on metal, or plastic crackling. Since the goal is not to destroy the guests, the trap will solve the problem in a humane way.
DIY weather vane: components
For reference. A decorative element for home decoration can have a different shape: a weather vane on the roof can be found with images of animals, angels, fairy-tale characters, etc. There are accessories on the roof in the form of a family coat of arms or an entire composition depicting some action when exposed to wind.
Main design details:
- the central vertical axis of mounting on the roof, rotation is performed around it;
- weather vane - an element indicating where the wind is blowing from; it is fixed on the main axis;
- pins crossed in the horizontal plane with a designation on them in letters representing the sides of the horizon;
- a metal plate in a vertical hanging position (counterweight), changes its angle under the influence of wind.
For a weather vane to become a real calling card of the house and its owner, the element must be made and installed correctly.
Empty plastic bottles: use as intended
Four empty plastic containers can become material for making a simple weather vane. You will also need a cutting knife, a metal rod, and a pole used as the axis of the structure. We start making a weather vane from plastic bottles... by collecting empty containers.
Bottles are cut differently. For two of them, the upper part (with the stopper) is cut off for further use, almost half the length of the container. The bottoms are also not thrown away, but are used together with two others, cut off from the remaining two bottles. The result is two cut “tops” and four bottoms the height of a 200-gram glass.
On each of the four containers, using a sharp knife at an angle of about 45 degrees at the cut line, make one cut along the oblique in the form of a hangnail. This is a kind of fastener to which the weather vane parts will cling with the same burr. With the upper parts of the bottles, prepared in advance, proceed as follows:
- the plug of one of them is unscrewed;
- in the center of it, using a knife or a hot rod, a hole is made - a groove for the axis on which the entire structure will be supported;
- a plug with a hole is screwed onto the neck.
- the other “top” remains without a lid.
The weather vane is assembled in the following sequence. First, the two tops are joined using cut surfaces with pre-cut grooves. Like a nesting doll, they are connected to each other by easily screwing one into the other. They attach the resulting “body” with oblique cuts at the junction of the bottom. They should be located around the volumetric body in one direction.
A rod, branch, metal rod - anything that can be used as an axis - is threaded through the bottom hole of the bottle. The top limiter will be the bottle cap, into the hole of which the axis of the weather vane will fit tightly. The structure is ready. Can be installed in a convenient place. When the wind blows, the light plastic blades will begin to rotate.
Chimney Decoration
To enhance the efficiency of the chimney, as well as to protect it from precipitation and debris, you can design and install a weather vane deflector with your own hands. The height of the structure should be in a ratio of 1.7 to the internal cross-section of the chimney. The width of the deflector is 1.3 times the diameter of the smoke channel. Galvanized iron sheets, copper or stainless steel are suitable for manufacturing.
First, on thick cardboard, a sketch is made in expanded form of all the parts: cap, cylinder, diffuser. Using the templates made, these parts are cut out on metal. The entire structure is assembled together, the individual elements are bolted together, either welded or fixed with rivets.
The finished product is installed at the end of the smoke channel using a ring with a bearing assembly so that the housing rotates together with the deflector visor. A weather vane on the chimney pipe will not only provide a constant flow of fresh air into the room and effectively remove flue gases, but will also become a real decoration of the roof.
Additional tips and tricks
Moles, in addition to causing harm, can also be beneficial. They constantly need food of animal origin. The animals eat beetles, caterpillars and worms in large numbers. Therefore, when deciding on the need to fight, you need to correlate these two facts. In addition, during the digging process, moles loosen and mix the soil.
It is widely believed that the animals gnaw and expose tree roots. This is wrong. The damage is caused by mice and mole crickets. Moles, on the contrary, help in the fight against their excessive reproduction.
In addition to the methods described above, you can use simple alarm clocks. You will need a few pieces in total. Clock mechanisms are placed in glass jars and placed in pits . In the process of fighting, you will need to set alarms several times a day for different times. As a result, moles will quickly leave the area due to the regular and shrill ringing.
To increase efficiency, you can take a medium-diameter polymer pipe and drill many holes. When the clock mechanism is triggered, the hum will spread along its entire length and in all directions. Intense ringing will quickly force ferrets to change their habitat.
Repellers
Taking advantage of the fact that moles are very sensitive to various sounds. A number of manufacturers currently produce electroacoustic devices. First of all, ultrasonic devices. They do not cause any harm to humans, but for moles they become a problem for daily existence on the site.
8 effective DIY mole repellers
Among the advantages is the penetration of sounds and other vibrations everywhere, despite obstacles. Typically, such devices operate from autonomous power sources, so they can be placed anywhere in the garden.
Inefficiency is caused by the fact that the surrounding territories are occupied by other families. In this case, it is recommended to resort to more radical methods of struggle.
Airplane on the roof: an original weather vane in our own design
Wind direction and speed can be determined in different ways. For example, by making an airplane weather vane with your own hands. A mock-up of an aircraft with a length of 500 mm and a wingspan of 300 mm is preliminarily designed and manufactured.
Please note. The material for the aircraft should be light: foam plastic, plywood, etc. This will allow the aircraft to rotate freely on the axis of the rod.
A weather vane with a pole is attached to areas unprotected from the wind. Or installed on the roof. Two supports are taken or made with a hole in the middle of 5 mm: from wood, wire, metal plates, etc. The brackets are placed among themselves so that there is a gap of 20 cm between them. A rod is passed through the holes drilled in the support-brackets. It can be a thin tube, iron or wooden rod.
A nail (piece of wire) is attached to the top point of the rod. An airplane is strung on it - a toy model. The plane is at a slight angle to the axis. When wind occurs, the flow blows onto the wing, the aircraft with the rod rises to a certain height, which will be identical to the wind speed. If desired, you can install a graduated scale. Then, when the device rises up, you can read the approximate wind speed.
To decorate your yard with an original weather vane, you need to be smart, use your imagination, put your hands to work, and then it will become the exclusive calling card of your yard.