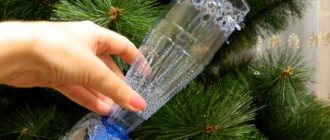
| Miracle of miracles - a ship in a bottle. Everyone has seen such magical things that fascinate with mystery and awaken a thirst for wandering in the soul. There's just one question that can't get out of my head. How did this ship, which is clearly much larger than the hole in the bottle, fit into the container? Many people think that the bottom of the bottle was first cut off and then glued. The secret is that the body of the vessel is small enough to easily fit into the neck of the bottle. This is how the base of the craft gets inside. But the sails and spars (masts and sail supports) are collapsible. They are placed at the end of the process using devices - threads and tweezers. |
What may be useful
A set of tools that you may need:
- Stationery scissors and stationery knife.
- Thick cardboard and plain paper.
- Glue (PVA or special silicone for crafts).
- Wooden skewers, toothpicks, unnecessary pencils (future masts).
- Scotch.
- Styrofoam.
- Ruler, simple pencil (for marking).
Materials
To make a sailboat, ship or boat, you need to prepare paper. Any variety will do. Previously, boats were built from newsprint. A significant disadvantage of toys made from newspapers was their fragility. Newspaper gets wet too quickly, the boats first lose their original appearance and then turn into a shapeless piece of paper.
At the moment, you can avoid using newsprint to create bulky toys, since there are alternative material options that are durable and moisture resistant.
In addition to thick cardboard, it is recommended to prepare:
- colored cardboard;
- corrugated paper;
- colored paper;
- decorative elements (drawings, ornaments, flags, figurines of sailors, etc.).
Some parents resort to a trick - they use ordinary paper to create paper boats, and dip the finished toy in melted wax or paraffin. Thanks to this trick, the toy becomes waterproof.
The tools you will need are scissors, glue, a glue brush, colored pencils, felt-tip pens or watercolor paints.
From paper
There are many tips on how to make a paper boat with your own hands without using tools.
Among them, the simplest way to make a paper boat with your own hands is done using the technique of folding a paper sheet:
- In order to make a ship out of paper with your own hands, you will need an A4 paper sheet, which is folded in half in width.
- The corners of the resulting rectangle in the folded part are brought together so that their lines touch to form an isosceles triangle, with a remaining distance of approximately 3 cm to the opposite edge.
- The two lower parts are bent towards the top, each on its own side, covering the base of the triangle. The corners are bent along the sides of the triangle.
- The resulting triangle (similar to a paper cap) is pulled apart and folded across, forming a square.
- The free corners of the square are also folded again, thereby creating a triangle that also bends across and turns into a square.
- The corners of the square are folded in about 1 cm short of the top. Then the closed parts of the top are simply moved apart.
- Your DIY paper boat is ready. A mast can be inserted into the protruding part (in the middle), and the hull of the ship can be painted.
Sail
An important part of the work is making the sails. It is the wind-filled sails that give the model lightness and swiftness. Therefore, working on them must be taken very seriously.
As you must have already understood, the masts, along with the sails, are pushed through the neck of the bottle separately from the hull. In this case, the sails practically do not wrinkle, so they can be safely given a shape filled with “wind”. There are many different ways to make sails. Each master necessarily has his own favorite method. We will tell you only about one thing.
First of all, you need to choose the right fabric. Thin white cotton fabric - cambric - is best suited. However, it should be remembered that only some clipper ships and modern ships carried white sails. The sails of ancient sailing ships had a gray or yellowish tint. Therefore, first of all, you need to dye the fabric in a suitable color. This can be done in different ways. A light gray color can be easily obtained by immersing the fabric in hot water, lightly tinted with aniline dye. But a more pleasant color is obtained by dyeing with ordinary tea. Pour a large amount of tea into boiling water and boil for 20 - 30 minutes. After this, the mixture is filtered and the fabric is boiled in the resulting solution until it acquires the desired color. The fabric is then wrung out and dried. Tea staining is durable and has a pleasant natural color.
The next operation is to apply the contours of the sails to the well-ironed fabric. It is convenient to do this with a thin simple pencil using pre-prepared cardboard patterns. To prevent the edges of the fabric from fraying later, the contours of the sails are outlined with a thin brush moistened with highly diluted PVA glue. Once the glue has dried, the sails are carefully cut out and glued or tied to the yards. But that is not all. The sails have various stripes: reef bows, stop battens, etc. In addition to them, do not be lazy to imitate reef seasons.
To make stripes, we will need a piece of our “canvas”, moistened with liquid PVA glue and well dried. A thin strip is cut out of it with a sharp razor and glued to the outside of the sail. This will be a reef bow. The stop batten is glued to the inside of the topsail. It serves to prevent the sail from rubbing against the top platform.
Having carried out these simple operations, you can start making reef seasons. They are passed through holes pierced with a sharp needle and secured with drops of glue. Of course, to make reef seasons you will need very thin, preferably cotton, threads. But don’t worry if you can’t find such threads in the store. They are literally at your fingertips. you just need to take a piece of cambric from which the model’s sails are made, and pull out a thread from it. It is good, in this case, to pre-dye the fabric in a darker color. (Looking ahead, let’s say that all the threads used to equip the model must be treated in advance with liquid PVA glue. After such treatment, the pile disappears, which is unacceptable when working with miniature models.) The finished reef seasons are leveled with scissors.
The sail is almost ready, all that remains is to give it an “inflated” shape. For this purpose, you will need special forms made of polystyrene foam, wood, plaster or any other suitable material. A shape is cut out of it, reminiscent of a ship's sail inflated by the wind. It is advisable to prepare molds of various sizes in advance. They will come in handy in the future if your hobby is not limited to building one miniature model. To ensure that a sail stretched over a mold and soaked in glue does not stick to it, you need to lay a very thin film between the sail and the mold (such film is often used for packaging products). The sail, together with the glued yard, is placed on the mold, pressed and wrapped with fishing line. The fishing line should lie exactly in those places where the “seams” between the panels are located on the drawing of the sail. Thus, the sail will have a more prominent shape (Fig. 26). In order for the sail to retain its shape, it must be moistened with liquid PVA glue. Once completely dry, you will have beautiful “wind-filled” sails for your model.
Rice. 26 The sail, together with the glued yard, is placed on the mold, pressed and wrapped with fishing line.
When attaching sails with yards to the masts, we must not forget that the entire structure must easily fit into the neck of the bottle. It is necessary to try to give the structure sufficient mobility, avoiding rigid fastening of the spar. On sailing ships, topenants, halyards, rax yokes, etc. are used to attach and lift the yards. For example, it is convenient to attach the yards of the main and foremasts of the model only with the help of topenants, and the yards of the mizzen mast, on the contrary, with the help of improvised rax yokes (in other words, simply tie them to the mast). The clew angles of the sails must also have significant freedom, otherwise, when trying to push the sails into a bottle with a narrow neck, they can become very wrinkled. For this purpose, the clew angles of the sails do not need to be glued to the yard located below at all. This operation is not difficult to do right inside the bottle. However, you can do it differently by combining the functions of the sheet and brace in one tackle. To do this, a small loop is tied to the end of the yard and a tackle attached to the corner of the sail is passed through it. In the future, this tackle will play the role of a brace and, after tightening, will allow the sail to take the correct position (Fig. 27).
Rice. 27 You can combine the functions of a sheet and a brace in one tackle.
When developing a spar design, you should strive to reduce the number of operations that will have to be done inside the bottle. First of all, this concerns the wiring diagram of the model’s braces. The easiest way to pass the braces of the lower yards is through the holes in the bulwarks. Very often, the braces are passed through a block attached to one or another forestay. In this case, it is useful to combine the starboard and port side braces so that, having passed through the block on the forestay (which can be a small loop), the tackle is passed alone into the next hole in the bulwark. The mizzen mast braces look somewhat different. As a rule, they are pulled not to the stern, but to the bow of the ship. Therefore, the braces can simply be attached to the corresponding stay of the mizzen mast (Fig. 28).
Rice. 28 Wiring diagram for the braces of the ship in a bottle model.
A ship sailing with full sails looks good. But still, the lower sails, as a rule, block the deck, making it difficult to carefully examine all the details on it. To prevent this from happening, it is better to make the lower sails “retracted,” that is, tied to the yards. There is one more trick here that will make our life easier: in this design, the need to make sheets and tacks for the lower sails disappears. It is clear that this reduces the operations carried out inside the bottle.
However, on sailing ships of the 15-16 centuries, which already carry few sails, it is still better to deploy the lower sails. Of course, sheets and tacks will also have to be made. Their wiring is simple. It is enough to insert the gear into the holes in the bulwark of the model.
The same applies to the manufacture of jibs and jib rigs. Their sheets, if possible, are combined together and passed through a hole in the bulwark of the model. The design of mizzen mast sails is quite simple and should not cause any particular difficulties. There is no need to make systems for attaching the gaff and boom to the mast. You can simply glue the gaff and boom to the sail, stepping back from the edge (from the luff) by 1-2 mm. The model's sail is rigid enough to hold the gaff and boom in the desired position. The sail glued to the mast, together with the spar, will receive sufficient flexibility to easily fit into the neck of the bottle.
From the box
Another paper boat, how to make step by step:
- To make a paper boat, you can use a paper box. On one side of a small box, preferably narrow in shape, the outlines of the bow of the future vessel are marked, and it is better to draw the outlines to the edges of the box.
- Using a utility knife, carefully cut out the silhouette of the bow.
- The bent part of the box “side”, which remains free, is divided in half and applied to the cut out nose part. The parts are fastened with tape and glued at the junction with the bottom.
- A base for equipment (masts, bowsprit, anchor) cut from foam plastic is installed in the middle. Masts are installed and paper sails are put on.
Craft in the shape of a boat for February 23
And finally, our selection ends with another master class, in which we, of course, will also make a boat. But not quite ordinary, but made from waste material. Namely, ordinary sponges and napkins will come in handy for cleaning. I wonder what might come of this? Let's see.
List of materials:
Simple pencil;
- Ruler;
- Scissors;
- Cleaning wipes;
- Awl;
- Double-sided red paper;
- Sponges;
- Wooden skewers for shish kebab;
- Toothpicks;
- PVA glue.
Stages:
Using a triangle-shaped template, we make a mark on one end of the sponge and cut it off so that we get the bow of the ship.
Now let's start making sails. To do this, we will need to cut out three rectangles from napkins: 5x7, 4x6 and 3x5 cm.
We will make the mast from a kebab skewer. If you take a sponge measuring 5x8 cm, it is desirable that the length of the stick is at least 15 cm. Place our rectangles on it as shown in the photo.
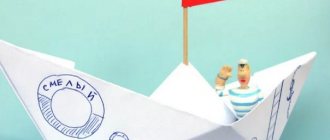
The next stage is making the flag. Well, where would we be without it?) Cut out a 1.5x5 cm strip from red paper, fold it in half and make a triangular cutout from the free edge.
Glue the flag to the mast. And another one, the same, for the toothpick.
Now we insert them into the hull of our ship.
That's all. The craft is ready. Very simple and cool, don't you agree?
If desired, crafts can be decorated in an unusual way.
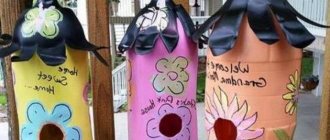
Waste material generally provides a lot of opportunities for creativity. For example, ordinary juice boxes are suitable for making ships.
Or even walnut shells.
An excellent option is a foam base.
Here is another variation of our craft.
Very interesting spring boats are made from plastic bottles.
From foam plastic
The components of the future vessel are cut out of a piece of foam plastic using a stationery knife:
- — body (for greater stability it should be wide);
- — superstructure (a rectangle half the size of the hull);
- - another rectangle, but half the size of the previous one.
A superstructure is glued to the top of the hull, closer to the aft part, and the smallest rectangle on top of it.
A toothpick – a “bowsprit” – is stuck into the bow, and a mast is placed in the middle.
A toothpick with a piece of paper - a flag - is stuck into the smallest triangle.
To make it more attractive, parts of the ship can be cleaned or painted a little.
From a plastic bottle
Additionally, you will need a plastic bottle (a yogurt box, juice box, or plastic canister will do).
- Approximately 5 cm away from the bottom of the bottle, use a stationery knife to make an incision approximately to the middle of the bottle.
- You will need to retreat a little less from the neck. An incision is also made to the middle.
- The notched part is removed, and a foam base for future equipment (masts, anchors, etc.) is installed in the remaining part, which has become the hull of the vessel.
- Masts with sails are installed. You can add an anchor and ropes.
From walnut shell
Additionally, you will need walnut shells and plasticine.
Oddly enough, but halves of walnut shells are ideal for use as the hull of a small boat.
- The shell must be completely cleaned of excess parts without damaging it.
- A small piece of plasticine is placed in the cleaned part.
- Plasticine is both a ballast that gives stability and a base for the mast, so it should be evenly distributed over the entire area of the bottom of the shell. Instead of plasticine, you can use candle wax.
- A mast (toothpick) with a sail is stuck into the base.
From egg packaging
Additionally, you will need a package of ten eggs. Of course, this type of boat does not have high performance, but it is highly stable.
In addition, this manufacturing method will require no more than five minutes:
- The top and bottom parts of the package are separated from each other.
- The sides of the lower and upper parts are trimmed.
- The halves of the egg packaging are connected again, but the outer sides are glued to each other. It is very important that the contours match.
- After gluing, the hull of the ship will consist of an inverted upper part (the bottom of the ship), and the former lower part becomes the deck.
- Masts with sails and other gear are stuck into protruding ribbed shapes (for laying eggs).
From food foil
Additionally, you will need a piece of food foil - the size is approximately equal to an A4 sheet.
- A piece of foil is folded in half so that the sides match.
- The edges of the sides of the resulting rectangle are bent by about 5 mm.
- The rectangle is folded again, but along the long side so that the edges match.
- The ends are bent: on one side at an acute angle, on the other at a straight angle - you should get the outline of a boat.
- The folded edges of the sides of the boat are moved apart, and the bottom is given a flat shape.
- The basis for installing the mast will be a small piece of foam.
In general, you can make a ship with your own hands from almost any available material, the main thing is that it has the ability to float on the surface of the water, and then, giving free rein to your imagination, you can create amazing toys.
Spar and rigging
The next important stage in building a model of a ship in a bottle is making the rigging. With the exception of a few nuances, the rigging of a ship in a bottle is no different from the rigging of a tabletop model. In the same way, in accordance with the drawing, masts are made with topsail platforms, salings and other details. In the same way, the shrouds are attached to the cable stays, which are pre-fixed to the channels, imitating deadeyes and blocks. The rest of the rigging is assembled in the same way. Many of the techniques used by modellers working with tabletop models are also applicable here. (Some tips for making miniature ship parts will be given below).
But everything is in order. The masts of the model must be made (as well as everything else) exactly in accordance with the drawing. They should be beautiful and graceful. There is no need to drill any holes in the masts, so they can be made thin enough without fear of them breaking. Good masts are made from beech wood. The finished masts are placed in the holes prepared for them in the body of the model. Of course, you shouldn't glue them yet. To avoid drilling holes in the masts, it is convenient to use small loops of thread for wiring gear. They are simply tied in the right place on the mast, bowsprit or any other element of the model. Passed through the loops, the rigging threads, which will need to be tightened inside the bottle, will be able to slide easily.
The shrouds are prepared using a device well known to modelers (Fig. 21).
Rice. 21 Device for making miniature cable stays.
This device allows you to quickly stick embeds onto the shrouds. There is only a slight difference in the design of the cables: in the place where the cables come together, you need to tie a long thread. This auxiliary thread will be passed through the hole in the mars platform. To do this, attach two loops to the mast on both sides, or place a piece of wire on the top platform (Fig. 22, 23). The auxiliary thread will then be lowered down and brought out through a hole in the channel or body of the model (Fig. 24).
Rice. 22 To pass the auxiliary thread holding the shrouds, a piece of wire is glued to the top platform.
Rice. 23 ... or tie loops on the sides of the mast.
For ease of installation, the installed gear must be temporarily secured in the position in which it will be on the finished model. For this purpose, you can use pieces of insulated wire. The insulation is removed and small pieces 5 - 6 mm long are cut. Such a piece is put on the desired tackle and pressed down by inserting a piece of wire 8 - 10 mm long. This makes it easy to secure any gear. At the same time, it can be quickly released by pulling the wire out (Fig. 24).
Rice. 24 You can temporarily secure the tackle using pieces of insulation and wire.
Once the auxiliary string is temporarily secured, the shrouds are tightened, attaching them to the shrouds on either side of the ship's hull. It is necessary to carefully consider this procedure, achieving uniform tension of the cables. Once the shrouds are installed, you can make tiny deadeyes. To do this, thick PVA glue is tinted with dark brown paint, and small drops are applied to the shrouds. It is convenient to carry out the work with a thin brush. (If necessary, the operation is repeated two or three times).
When making forks for a miniature model, you need to keep in mind that a large amount of standing rigging can ruin the appearance of the model. Since it is impossible to select threads that exactly match the scale of the model, it is better to reproduce only the forduns coming from the topmast. It is advisable to combine the forduns together at the bottom so that only one thread passes through the hole in the channel (Fig. 24). After installation, the fittings need to be temporarily secured by clamping them with a piece of wire, as described above.
The only thing left to do from the standing rigging is to attach the forestays. They are carried out in accordance with the model drawing. However, there is a slight difference. In order to reduce the number of wiring and facilitate the assembly of the ship inside the bottle, it is convenient to combine some of the mizzen, main, and foremast stays. For example, instead of attaching the mainstay to the topmast, it is passed through a hole in the saling and this tackle, having already turned into a forestay, is passed through a small loop on the bowsprit. You can do the same with other gear (Fig. 25).
Rice. 25 It is convenient to combine some of the mizzen, main, and foremast stays.