Illumination of paintings in the interior with your own hands - Ideas and Instructions.
Absolutely every person tries to furnish and decorate their home in a way that suits their preferences. Some people love wooden jewelry and furniture, while others love plastic and metal. But there is still one element that is indispensable in every apartment - lighting. Choosing good lighting is not as simple as it might seem at first glance. It is important to understand that even just by arranging lamps you can either visually expand or “eat” part of the space. At the same time, lighting elements can be installed not only in the form of conventional lamps, but also other lamps in various places. For example, you can install elements in the ceiling and floor. The lamps that are built into cabinets deserve special praise. But the article will talk about something else, namely, backlit paintings in the interior of an apartment.
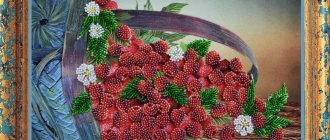
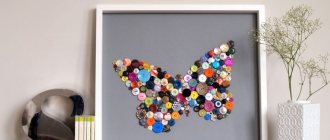
Pictures made of semi-precious stones
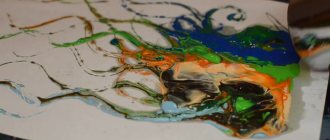
Original paintings made from semi-precious untreated stones will be a wonderful organic addition to any interior. You can order them, or you can make them yourself. To do this, you will need a canvas (preferably on a stretcher), a sketch of the drawing, a lot of stones of approximately the same size 1-1.5 cm in different colors, epoxy resin, a glue gun, a lot of time and a great desire to create a masterpiece.
This filler is round in shape and large in size; you will have to split it with your own hands using a cloth bag and a hammer. But then you can fully demonstrate your design qualities.
By assembling a mosaic from multi-colored glass or pebbles, you can create not only a natural landscape (which is very popular among Ural masters), but also create abstract mosaics for design or a canvas in the Japanese style. When decorating a room with plain painted walls, such a picture will be in perfect harmony with the red fans traditional for this style. Rooms with white walls will not look like hospital rooms in this design.
Built-in wall lighting
Among the variety of lighting elements, built-in lamps are very popular. They illuminate the room well, and there is no need for additional wall or hanging fixtures. The built-in elements can be turned on all at the same time or only one lamp. In most cases, such lighting is built into plasterboard walls and involves the following actions:
Before starting work, it is necessary to determine the areas in the room that need lighting and its intensity.
If you need to illuminate a certain place, you should calculate the power of the lamps so that the light does not turn out to be too bright. At the preparatory stage, you should also pay attention to the style of the room. Lighting should match the interior. It is not recommended to install lighting elements only in the central part of the wall
Symmetrically located lamps at an equal distance from each other will look more attractive. Thanks to this arrangement, the lighting will spread evenly throughout the room. Next, you need to designate the placement of the lamps in the wall. Since plasterboard sheets are mounted on a frame, the material should be pierced in designated areas to ensure that there are no crossbars. If profiles are detected in this way, the fastening areas must be shifted. Then you need to measure the diameter of the lamp and, using a compass, make the appropriate marks on the wall surface. A hole is cut in the designated place using a knife. Next, you need to remove the power wire and strip its ends. Connecting clips are used to connect the wire to the lamp. The electrical box is inserted into the hole and then secured with screws. Then a lamp is placed in it, which is fixed with a spring. This greatly simplifies the installation process. At this point, the backlit plasterboard wall is ready.
DIY LED lighting
A flexible LED strip is a flexible strip, one side of which is an adhesive base, and resistors and LEDs are mounted on the other. The tape is divided into sections, each section contains 3 diodes and cut points. The LEDs are connected in series. Tapes are either open or protected with tubing or silicone. The RGB tape has four outputs - one for ground, the other three - for red, blue and green colors.
LED strip installation diagram
When starting installation, you need to accurately calculate how much tape is needed: measure the perimeter of the area that we will illuminate. Now let's calculate the total power consumption of the tape. To do this, the power of one meter must be multiplied by the total footage of the tape. Based on these calculations, we will select a controller and power supply. An experienced store salesperson will help you understand this issue.
Let's prepare the base. We will make a ledge on the ceiling from plasterboard. We will attach our tape to this protrusion pi. We clean the base from dust. Remove the protective film from the adhesive surface from the tape and press it to the base. The installation of the tape itself is very simple. The most difficult thing is to cut it correctly and connect it correctly.
Step-by-step installation of LED strip
Types of modular canvases
Depending on how many separate particles the canvas consists of, the following types are distinguished:
- diptychs are an option consisting of 2 segments that fit perfectly even into the interior of a small room;
- triptychs - contain 3 segments, which are most common among users, and from this they began to be considered classics of the genre;
- penaptychs - consisting of 4 pieces, freely located on the wall;
- polyptych - from five or more elements of a single canvas.
In order to decorate a room, you don’t have to adhere to strict rules. With the capabilities of today's printing, you don't have to be a professional artist to create modular paintings at home. Isn't this a challenge for a truly creative person?
Stylish table made of wooden slats with your own hands
This bench can serve as a coffee table, extra seating, or a place to place indoor plants. This piece of furniture will “fit” well into almost any interior!
DIY coffee table photo
Materials:
- 3 boards 2.5×7.5 cm;
- 1 board 2.5×10 cm;
- 8 boards 2.5x5 cm;
- 4 leg mounts;
- 4 conical legs 30-40 cm long (depending on the required height of the table);
- 8 screws 3.5 cm long;
- 32 wood screws with a flat head, 3 cm long;
- 16 finishing nails 3.75 cm long;
- Gorilla Glue;
- wood putties;
- primer and paint for wooden surfaces;
- sandpaper 120 and 220 grit.
Tools:
- hacksaw;
- drill and drill bits;
- Kreg set for drilling countersunk holes at an angle;
- 2 short and 2 long clamps;
- roulette;
- hammer;
- grinding machine.
Step One: Using a hacksaw, cut the ends of two 2.5 x 7.5 cm boards at a 45 degree angle. Cut out fragments from 2.5x5 cm bars, the length of which will correspond to the internal length of 2.5x7.5 cm blanks.
how to make a coffee table with your own hands. Photo
Step two: Place 2.5x5 cm of the workpiece in the middle, and 2.5x7.5 cm on the edges. Make sure the ends of the inner slats are aligned.
Step three: Measure the distance between the outermost 2.5x7.5 cm bars and cut two pieces of this length from 2.5x10 cm boards. They will serve as lower supports for the bench. Secure them by screwing self-tapping screws into each longitudinal rail.
Step Four: Using a Kreg Jig, drill two pocket holes at each end of the support crossbars. These holes will be used to connect to the 2.5 x 7.5 cm edge bars.
Tip: It is difficult to give specific recommendations regarding how far from the edge to attach a Kreg Jig. This depends on the length of the screws used, the exact thickness of the board, etc. We advise you to first practice on unnecessary scraps of boards.
unusual coffee table with your own hands. Photo
Step five: Place 2.5x7.5 cm blanks along the edges of the structure. After making sure that their ends are at the same level, secure them with clamps.
Tip: If you use soft wood (for example, pine) to make the table, place unnecessary scraps of boards under the clamp supports. Otherwise, marks from the clamps will remain on the wood.
Step Six: Securely attach the outer 2.5x7.5 cm bars to the base of the bench by screwing 3.5 cm screws into the countersunk holes that you made a little earlier at the ends of the support crossbars.
coffee table made of wood. Master Class
Step seven: Measure the width of the manufactured base to determine how long you need to cut 2.5x7.5 cm blanks for the ends of the bench. We recommend that you make a cut with a small margin in length, and then slowly grind off the excess until you achieve the perfect fit.
Step Eight: Wet the ends of all slats with water and apply a small amount of Gorilla Glue.
Step Nine: Place the end boards in their designated locations and secure the entire structure with a strap to prevent it from falling apart while the glue is wet. For reliability, you can additionally secure the ends with several finishing nails.
Step Ten: Sand the surface of the bench with 120-grit sandpaper to remove any rough edges at the joints. Fill all gaps in the seams and recesses from nail heads (the latter must be recessed into the wood) with putty. Once the putty is dry, sand the surface again, this time with 220 grit sandpaper.
Step Eleven: Paint the bench. We recommend that you sand the surface again using 400 grit sandpaper and water before painting.
Step Twelve: Install special mounting plates on the lower support crossbars to secure the legs. When attaching them, make sure that you drill holes in places where there are no screws already screwed in. The distance from the fastening to the edge of the base of the bench should be about 2.5 cm. Screw the legs themselves into the fastenings.
Read with this
LiveInternetLiveInternet
—Categories
- Audio (47)
- Beads (356)
- Bead embroidery (73)
- Knitting with beads (29)
- Magazines and books on beads (29)
- Beadwork (213)
- Jewelry (220)
- Baking (379)
- Pancakes, pancakes, donuts. (18)
- Cupcakes, muffins. (31)
- Creams (5)
- Baking decoration (24)
- Cookies (72)
- Various pies (44)
- Cakes (14)
- Sweet pies (74)
- Cakes (50)
- Embroidery (2891)
- Alphabets (116)
- Angels (57)
- Butterflies (111)
- Bargello (5)
- Biscornu (151)
- Blackwork (80)
- Curbs (243)
- Magical villagers (50)
- Oriental motifs (81)
- Glad (33)
- Trees (63)
- Children's patterns (127)
- Houses (115)
- Dragons and other mythical animals (33)
- Animals (372)
- Books and magazines (331)
- Cats (145)
- People (87)
- Hems, hardanger (29)
- Mini circuits (283)
- New Year's (302)
- Ornaments (367)
- Easter (82)
- Landscapes (156)
- Pillows (214)
- Birds (322)
- Bees, ladybugs and other insects (21)
- Hearts (65)
- Fruits, vegetables, berries (103)
- Flowers (809)
- Knitting (2643)
- Mittens, gloves, mitts (46)
- Knitted jewelry (32)
- Jumpers (182)
- For children (217)
- For men (75)
- Homey, cozy (38)
- Doublet (51)
- Jackets and sweaters (146)
- Vests (30)
- Fashion magazine (52)
- Magazines (313)
- Magazines and books (124)
- Suits (9)
- Socks, slippers, knee socks (95)
- Coats and cardigans (122)
- Dresses and tunics (199)
- Pillows, blankets (146)
- Usefulness and master classes (254)
- Pullover (133)
- Tops, blouses, blouses (176)
- Patterns (353)
- Shawls and stoles (227)
- Hats, scarves and hats (195)
- Skirts and ponchos (85)
- Crochet (1507)
- Butterflies, hearts, bells, angels. (123)
- Bruges (17)
- Irish lace (111)
- Motives (402)
- Romanian lace (19)
- Napkins, collars (419)
- Braid, border (148)
- Tunisian knitting (25)
- Crochet patterns (214)
- Sirloin knitting (246)
- Freeform (7)
- Interior design (52)
- House. Ideas. Lifehacks (78)
- Washing (20)
- Cleaning (23)
- Health and beauty (112)
- Gymnastics, exercises (16)
- Masks, creams, scrubs (37)
- Toys (511)
- Knitted toys, amigurumi (364)
- Sewn toys (36)
- Felt (79)
- Art (303)
- Painting (141)
- Illustrations (57)
- History (266)
- 19th century (35)
- 20th century (116)
- Personalities in history (25)
- History in photographs (91)
- Clothes (28)
- Culinary (294)
- Meat and poultry dishes (75)
- Snacks (42)
- Lenten (69)
- Rybnoe (23)
- Desserts, sweets (48)
- Soups (23)
- Fashion and style (182)
- Unobvious, but probable (24)
- Useful programs (25)
- Holidays (495)
- February 23 (1)
- March 8 (3)
- Birthday, anniversary, name day (4)
- Maslenitsa (16)
- New Year and Christmas (313)
- Easter (151)
- About children (96)
- Education (22)
- Crafts with kids (13)
- Miscellaneous (209)
- Pedigrees (10)
- Handicrafts (478)
- Applique (14)
- Paper, made of paper. (59)
- Felting (24)
- Decoupage (22)
- Craft magazines (56)
- Needle lace (11)
- Macrame (24)
- My works (11)
- Patchwork (42)
- Tatting (22)
- LiRu Directory (4)
- Bags, handbags (111)
- Drawing techniques (37)
- Stained glass paints (10)
- Spot painting (6)
- Stencils, templates (32)
- Photos (95)
- Birds, fish and animals (22)
- Countries and cities (25)
- Sewing (144)
- Usefulness and master classes (49)
- Sewing for children (12)
- Sewing for women (55)
- Sewing for comfort (29)
- Humor (41)
Photos of paintings with your own hands
DIY light painting
The black and white painting will become a real decoration of any room. An interesting and original craft, in addition to its aesthetic function, you can also use it as a cute night light.
To create you will need the following:
A sketch on the basis of which the painting will be created. When creating it, it is necessary to take into account all the “highlights and gaps” so that the resulting picture looks solid and complete.
- Good quality cardboard or paper. In our case, the format is 210 by 297 mm.
- Knife for prototyping.
- Frame for fixing sheets.
- Box-frame. You can choose any deep frame that fits the size of your base.
- LED strip.
Sequencing:
First, prepare a space for creativity. To make a neat glowing painting with your own hands, cut out the work on a hard, clean surface.
- After all the necessary elements have been cut out, secure the frame of each layer.
- Install the selected lighting inside the frame and lay each layer together with the frame.
Ready! You can enjoy the painting you made yourself or give it to friends.
Some tips:
- Take your time - try to get maximum pleasure from the curly cutting process.
- When cutting long straight lines, it is advisable to use a ruler.
- Try to cut curves and circles with a slight indentation from the stencil - this way you can later correct the line.
- It is more convenient to cut out the most curved sections of a backlit painting with your own hands using nail scissors.
Step-by-step instructions with photos
So, let's quickly get down to the creative part of our plan and an exciting activity, because as a result of the work, a wonderful decoration for the interior awaits us - a New Year's picture made of paper.
Step 1: Design
The first thing you need to do is prepare the design for the decoration you want for your painting. You can draw it or design it on your computer and then print it out. Since we are not very good at drawing, we chose the second option.
We decided to go with 4 separate layers, one of which would have a pattern of water reflected from top to bottom.
An important condition for this design should be the complete absence of “flying” objects: all your silhouettes should be attached somewhere in the scenery. For example, the last deer in our design is connected to the top of the bell tower; trees, snowman and deer are connected to the earth, etc.
Be sure to include frames of the same size on all layers to help hold everything together!
Be sure to put all the layers together before assembling and make sure that they fit together perfectly and all their parts are clearly visible (unless you want them to be visible). To differentiate them, we printed each layer in a separate color.
Below are the templates that you just need to download and print on your printer.
Template 1
Template 2
For pattern 3, you simply need to cut out half the sheet. Don't forget to leave a frame!
Template 4
When you're done preparing the layers, print them separately and transfer each one onto thick white paper. To do this, attach the printed layer to the window and place the paper on top. This way you can easily see and trace the contours of the landscape.
The third layer has simple geometric shapes, so we just held it with our free hand (see next step).
Step 2: Cut out the layers
Once you've finished tracing the outlines of all your layers onto the white paper, use a sharp utility knife to cut them out.
Initially remove the parts you no longer need. Cut them out slowly and carefully, trying to be as precise as possible.
Be careful with narrow seams in your design, as they can easily break or be removed by mistake. At this point, use a durable backing or some scrap surface that you don't mind scratching.
As you can see, our third layer is a regular rectangle with one half cut out and no design. This is because we wanted to create a water reflection effect in this area.
Here's how it works: this layer will be located behind the lake layer and before the last layer with the moon and the top-down design. The paper goes into the third hidden layer, but when the light is on, the reflection will appear on the top layer. The effect will be very soft, and the play of light will not be as pronounced as it would be otherwise.
The reason we cut out the first half of the layer is because we didn't want the moon to be bright, but later we realized that it could be cut out not at this level, but at the fourth one! You see, our New Year's paper painting has already gradually begun to take on beautiful shapes and silhouettes.
Step 4: Glue the Layers Together
Now you need to cut out some cardboard spacers to create space between each layer for the light.
Cut individual strips of cardboard to the length and width of your frame. Alternatively, you can make entire cardboard frames to fit your frame for each layer separately. The second option requires large pieces of cardboard, so we used the first. In any case, make the width of the frame somewhat thinner than the frame in paper layers, and then your cardboard will not be noticeable from the side in the finished craft.
Glue strips of cardboard around the back of the first layer.
After this, attach the second layer on top of the strips, on the front side of the cardboard frame.
Next, glue a second cardboard frame along the outline of the back of the second layer.
Repeat steps until you have glued the fourth layer.
As you can see. It is precisely due to the multi-layering that our New Year's paper painting looks like a three-dimensional 3D image.
Step 5: Make a Frame
Now you need to beautifully design the landscape. Of course, you can use a pre-made frame, but we'll show you how to make your own!
To make the frame, cut 4 wide strips of cardboard the same width and length as your craft. These strips should be slightly wider than the thickness of the layers, since you need to save some free space on the wrong side for the LED strip.
Measure the thickness of the cardboard at one end of each strip and draw a line.
Using a cutter, carefully cut out this piece, but make sure that the bottommost layer of cardboard remains intact.
When you've finished doing this on all the strips, apply a little glue to the cardboard layer at the end of the strip and attach the second strip perpendicularly to it.
Do this with all 4 strips to create a rectangle.
This is a simple trick to hide edges and make your work more aesthetically pleasing.
Step 6: Make the Back and Frame
To make the back, simply cut a rectangle of cardboard the length and width of your frame.
Paint this piece of squirrel with paint or cover it with a piece of paper (like we did).
To make our New Year's paper picture look complete, we need a frame. So we drew a new frame on a piece of cardboard measuring the length and width of the painting. This cardboard was already white, but you can paint it if you want.
Step 7: Paste the Landscape into the Window
Apply a little glue around the inside of the frame and carefully press the landscape into it. Slowly lower the landscape down until it reaches your desired position.
We placed our New Year's paper picture a little away from the top of the box so that there was free space between the frame and the first layer.
Cut a small slit in the back of the box for the cable to fit through the frame. Try to make it closer to one of the corners.
Don't forget to glue a cardboard frame to the top of the window to complete your shadow painting!
Step 8: Add LED Strips
Measure the inside of the box around the perimeter and cut a piece of LED strip according to the measurements. Apply the tape to the inside of the window, starting from where you made the cut.
Connect the strip to the power source using an adapter or welding.
Place the back of the frame back in the box with the white side facing in so you won't be able to see any brown spots through the cut layers. The back fits perfectly into the box, staying in place when closed, and you can remove it whenever you want.
Step 9: Light!
Plug in the LED strip and admire the amazing result! Thanks to the thick white paper and the space between each layer, the light bleeds through the layers very nicely!
Your DIY New Year's paper painting is ready! How do you like her? You can not only use our templates. but also choose your own. Let us know in the comments what you did. Merry Christmas and Happy New Year to you!
If you liked creating this New Year's paper picture, then here is a video with another good creative idea:
8652 Nika December 9, 2016
6
Illuminated panel: we decorate the wall ourselves
To decorate a room with an original light panel, you don’t have to buy an expensive product in a store or order it from a workshop.
Most lamps are not difficult to make yourself, using available materials.
To do this, you only need to understand electrical engineering and have artistic taste.
Frame installation
The design options for such lamps are huge. One option involves making a box (to house the interior lighting), which is attached to the front decorative panel. To make it, you can use an ordinary photo frame with glass on which you want to make a stained glass window.
A simple drawing can be made even without artistic skills. On the reverse side, fix the sketch on paper and trace the outline of the stained glass window on the glass according to the finished template. Then fill it with color. Materials can be purchased at any specialized store.
A box is made of plastic, which must match the size of the front panel with the stained glass window. All elements will then need to be fastened with a special, very strong glue or use household brands (“Titan”, “Master”, etc.) For a better reflective effect, foil is glued inside the box.
Design of LED dots under the frame
To get uniform lighting, you need to choose an LED strip of low power and with a more frequent arrangement of bulbs.
You will also need a transformer of suitable power.
LED strips are glued to the foil evenly over the bottom area of the box.
They are connected to a transformer and output using a regular copper wire to the outlet.
If you have no experience working with electrical appliances, then it is easier to use a Christmas tree garland as a light element, choosing the one that is suitable in terms of power, size, and color of the bulbs.
Mounting a picture with backlight
When the blanks are completed, the front panel is glued to the box. All that remains is to install a reliable fastening element to the lamp, taking into account the weight of the structure, in order to place the finished panel on the wall.
Communities › DIY › Blog › Panel night light on the wall
Guys, hello everyone! Today I’ll tell you how I made a night light panel on the wall for my dacha. I bought a couple of boards at my favorite “wooden” store and went to the garage to make some! First of all, I assembled the shield.
This is what the shield looks like from the back:
And here it is from the outside:
I made a stencil out of cardboard in advance, in my case it was the silhouette of a shark.
Transferred the stencil to the workpiece
and cut it out with a jigsaw.
After cutting, the middle boards began to dangle. I reinforced them with thin plywood.
I refined the edges a bit.
And brushed it with a metal brush.
Added some more “old age” elements.
After all the dirty work was finished, I headed home. At home I messed up my product a little.
I drilled holes for future fasteners.
After which I started making the panel illumination. For illumination I decided to use two strips of LEDs. And also a 12 volt power supply, many thanks to comrade MegaLeonVolt for it
I soldered the LED strips with wire.
I connected the power supply and laid out the wire, glued the strips to the “Moment”.
The power cable was routed from below through the frame of the case.
I soldered the wires and insulated them with heat shrink.
Continuing the marine theme, I decided to use rope to attach the panels to the wall!
The back wall of the panel was covered with a piece of fiberboard. And this is what it looks like in complete darkness:
LED backlight selection
When searching for the optimal LED backlight model, you need to consider the following points:
- It is necessary to determine in advance where the paintings will hang, and then carefully prepare the electrical wiring diagram: terminals for lighting, type of sconces, lamps and other elements of technical and decorative lighting.
- For each individual case, you need to select a special backlight brightness. The level of softness of the light, as well as its temperature, also matters.
Attention! The optimal color rendering index is from 70 to 90. The best parameters for the color of the luminous flux are considered to be 2700-3000 K
Relevant information can be found on the packaging of lighting products.
- Before purchasing wall sconces, you need to make sure that they fit perfectly with the interior of the room.
- An original solution is an LED lamp built into a canvas or mirror. Such lighting allows you to highlight important details of the product. Thanks to the presence of a switch, the backlight can be used only when necessary.
Classification of lamps
At the installation location
The direction of the light flux is determined by the location of the lighting fixtures relative to the picture. Lamps are available for sale for installation on ceilings, walls, tables, and floors. Mounted, recessed and built-in units are also available. Regardless of the location, the lamp must fulfill its immediate task - to illuminate the picture, showing it from its best side.
Note! One of the lighting options is a battery-powered lamp. Such models are chosen when, for one reason or another, it is impossible to connect electrical wiring to the canvas.
Types of lamps
The type of light source is of no small importance for high-quality illumination. The following types of lamps are commonly used:
Note! If you want to use wall sconces in your interior, lamps of any type will suit them.
When choosing a light source, you need to take into account the color rendering index. For lighting paintings, values between 70 and 90 Ra are suitable.
You also need to look at the color temperature. The optimal indicator is from 2.7 to 3 thousand K.
Lighting methods
If the painting is presented as a bright spot in the interior, the best option is to use built-in or overhead spotlights. For canvases used for utilitarian purposes (landscapes and panoramic images are suitable for this), uniform illumination from an ordinary ceiling lamp is sufficient. Fluorescent lamps are best suited for lighting large areas. For concentrated lighting of small paintings, LED spotlights are the best option.
Historical paintings look best when illuminated with lamps with diffusers and reflectors. However, classics with a very diverse range of colors look better under the light of halogen rather than incandescent lamps.
How to choose a light panel for the interior
First of all, the light panel should match the style of the room and color scheme
When choosing, it is important to take into account the recommendations of designers:
- Panels look more impressive on light, plain walls.
- The room should not be overloaded with furniture and decorative elements.
- The panel should be organically combined with other furnishings and present a single composition with them.
- If a small light painting can perfectly complement other, more voluminous interior decorations, then a large panel on the entire wall is already the main bright accent and in the room besides it there should be no other decors of the same format, otherwise they will drown out each other.
- This piece of decoration provides an additional source of light. Therefore, when choosing and placing, consider how well the panel will look and illuminate the room. Combination with other lighting fixtures also plays a big role.
Take these nuances into account in advance so that there are no “surprises” later after installing the panel.
How to care
Glass panels have a fairly long service life and are not at all difficult to care for.
It is enough to periodically clean with a soft damp cloth using light detergents without caustic additives or abrasives. It’s not difficult to create your own masterpiece in the form of a light panel to decorate a room.
All it takes is a little patience, imagination and following the manufacturing recommendations. But what a pleasant impression such a panel will make on the owners and guests.
DIY light painting
The black and white painting will become a real decoration of any room. An interesting and original craft, in addition to its aesthetic function, you can also use it as a cute night light.
To create you will need the following:
A sketch on the basis of which the painting will be created. When creating it, it is necessary to take into account all the “highlights and gaps” so that the resulting picture looks solid and complete.
- Good quality cardboard or paper. In our case, the format is 210 by 297 mm.
- Knife for prototyping.
- Frame for fixing sheets.
- Box-frame. You can choose any deep frame that fits the size of your base.
- LED strip.
Sequencing:
First, prepare a space for creativity. To make a neat glowing painting with your own hands, cut out the work on a hard, clean surface.
- After all the necessary elements have been cut out, secure the frame of each layer.
- Install the selected lighting inside the frame and lay each layer together with the frame.
Ready! You can enjoy the painting you made yourself or give it to friends.
Some tips:
- Take your time - try to get maximum pleasure from the curly cutting process.
- When cutting long straight lines, it is advisable to use a ruler.
- Try to cut curves and circles with a slight indentation from the stencil - this way you can later correct the line.
- It is more convenient to cut out the most curved sections of a backlit painting with your own hands using nail scissors.
Multi-level lighting in home interiors
Uniform, bright and non-flashing light from LEDs does not harm our vision. Depending on what material the semiconductor itself is made of, the color of the backlight changes from classic white to any shade of the rainbow palette.
Today, when planning and decorating an interior, creating a variety of multi-level lighting, designers use the following types of LEDs:
- Lamps for main or additional spot lighting.
- Tubes - for illuminating the perimeter of large-area plasterboard or suspended ceilings, kitchen aprons or podiums.
- Soft and flexible LED strips with a lighting radius of up to 120 degrees are used in the most unexpected cases, on a wide variety of surfaces. Ribbons are used for both basic lighting and decorative purposes.
- LED cords with all-round lighting - 360 degrees are used in design in almost the same way as strips.
LED lamps are installed in specially prepared recesses, niches, and grooves.
You can create a starry sky on the ceiling
Varieties
For production, different types of lamps (spot, LED) and materials (glass, plastic, etc.) are used.
The main requirements for panel elements are resistance to prolonged exposure to heat from light sources. Paintings depicted on transparent materials are illuminated from the inside. To do this, not too bright lamps (LED strips are often used) are positioned so as to ensure uniform illumination of the surface. Using spotlights, additional lighting is created if necessary.
Common types of light panels:
Black and white paintings
It’s even easier to make a black and white picture with your own hands. To do this you will need the Internet, a printer, photo paper and a laminator. Black and white photography has never gone out of style. Photographers often resort to black and white film when shooting portraits, flowers, and animals.
It is this way of conveying emotions and natural phenomena that allows you to focus on the main thing, and not on the combination of colors. In addition, when making a printout from a color printer, you cannot be sure that color distortion will not occur.
They can be located in the walls between window openings, above rest areas. Such homemade paintings will fit perfectly into both a classic interior and a high-tech design.
General information
In the hands of a competent designer, a painting will help give the room originality and charm. Besides this, how do you look at the idea of creating a gallery from an apartment or a separate room? After all, they carry a certain emotional message. When creating his masterpiece, each artist gives a piece of himself, puts his soul into it. Perhaps it is for this reason that one feels enchanted when viewing the paintings. And you want to stand near some paintings for hours, as they beckon to you. To get the right feeling of presentation, you will need the right lighting for the paintings.
But keep in mind that the location of the lamps may vary. In addition, even the lighting elements themselves may differ from each other. You've probably seen and noticed more than once that different light bulbs produce different colors. Some of them emit white cold, others a radiance like the sun at noon.
With the right lighting, it will be possible to examine in detail each stroke, which emphasizes the overall idea of the picture and makes it more expressive. For this reason, choosing lighting becomes an important and responsible task.
Please note that to choose decent lighting you need to choose the right place in the interior of the apartment.
Determination of quantity
To create a cozy atmosphere in the room, when the lighting is not annoying, but there is no darkness, you need to choose the right power of the lamps, their location and quantity.
There is an easy method for determining the number of lamps: for five square meters of room volume, at least sixty and no more than seventy-five kilowatts of light power should be consumed.
If you turn to a specialist for this task, he will prepare a house lighting scheme with all the details and in various variations. In addition, you can get useful information on installation rules.
Successful options for the location of light sources and their quantity can be seen in the photo of house lighting.
Do it yourself!
Let's start making:
Below is a video on how to make LED lighting for a painting. It will certainly help the home master master the process.
LED illumination of paintings with lamps or strips is an excellent design solution that fits well into the interior. Installing such lighting does not require significant costs and can be done on your own. And a DIY painting with LEDs will look especially beautiful.
Source
Selection of images for the kitchen
For example, in the kitchen what looks best is not modern delights or abstraction, but realistic images of flowers, fruits, coffee beans, but it is better to avoid photographs with spiders, snakes and other subjects that can worsen appetite. The ability to abstract is not given to everyone, and having a little why in the house there is no guarantee that during a meal, he will not want to find out what this creature depicted in the picture eats.
The location of the canvas with a glossy surface under or next to the light source is not the best. A self-made panel with internal lighting solves this problem.
Electrical wiring diagram
You can make lighting for paintings yourself. Also at the interior planning stage, you should decide on the location of the paintings on the walls. Having marked the places for them, we begin to create conclusions for the lighting fixtures. Moreover, all electrical wiring must be hidden. After drawing up a general plan, they begin laying wires and installing electrical appliances. Electrical installation work for arranging lighting for artistic paintings is carried out according to standard rules.
Source
Operating principle of LED strip
LED lighting for paintings can be in the form of a strip and highlight the entire perimeter of the product or just the image (built into the frame). Such devices can be moisture-resistant and simple, single-color or multi-color. The moisture-resistant version is equipped with a silicone shell, which allows you to illuminate the space in rooms with high humidity. With the help of multi-colored ribbons you can emphasize certain interior details. Moreover, they have different luminous flux intensities. Such devices operate from a 12 V DC network and are connected using a power supply.
With the help of LED strips, wide possibilities open up for the implementation of any ideas, for example, you can highlight the entire perimeter of the picture, one or several sides. In addition, they have several more advantages:
- the ability to control the light flux;
- ease of installation and connection, since the device has a simple circuit and a small number of connected elements);
- low power consumption.
Design and types of wall lamps
Illumination of paintings with LED devices is in great demand because, despite their compact size, they shine quite brightly. They have a long service life, consume little energy, brighten the room and can be controlled by remote control. Among the disadvantages of such lamps are: the cost of purchasing a power supply, and dimness that appears over time.
LED wall lights are:
Wall lights consist of a housing containing LEDs and reflectors. To allow it to cool, it is equipped with a radiator. Before installing them, choose the model of the device and its location. Then it is disassembled, holes are marked on the wall, holes are drilled and the lamp is fixed. The last stage of work is its assembly.
Lighting options for paintings
Several types of lighting elements can be used to illuminate works of art:
- Fluorescent lamps. The most popular device for illuminating canvases and mirrors. They are characterized by a long service life and soft diffused light.
- Incandescent lamps. Great for illuminating handicrafts, but use too much electricity and can distort the light. Canvases with such backlighting will not demonstrate their true color range. When using this lamp, art objects should be protected with special glass.
- Halogen lamps. This is the best option for illuminating silk-screen printing. They tend to get very hot, which contributes to accelerated aging of the paint and the appearance of cracks. When illuminating an antique work, it is recommended to equip the lamp with a special coating.
- LEDs. A useful new product in the field of lighting elements. They save energy, do not heat up and can last up to 10 years.
The following lamps cannot be used as lighting for paintings:
- Infrared. They lead to fading of colors on works of art.
- Ultraviolet. When exposed to ultraviolet light, paint molecules disintegrate and the canvas deteriorates quite quickly.
Connection features
When installing LED lighting for paintings, mirrors and other products, it is important to follow safety precautions. The best option is hidden wiring with mandatory grounding. Now you need to decide how the device will turn on: a button, a sensor, a remote control. A button is the simplest option, and it can be located on the lamp or in any other place (top, bottom, side). Touch switches look very modern and will light up when you move or touch them. Place them away from shelves, hangers, and cabinets, otherwise they will get in the way. The control panel is easy to use because it allows you to control the lighting from afar.
When using an LED strip, remember that it must contain a power supply. With its help, the load will be evenly distributed, depending on the power of the device. Perform installation work in the following sequence:
How to choose a panel for the interior?
A mural can be an attractive centerpiece in any room. It can be placed on the central wall in the living room, where friends and guests often gather. In principle, such an installation can be placed in any room. But remember the basic rule - the decorative panel must be made in the style of the interior. Inappropriate frilly elements, no matter how attractive and bright they may be individually, can ruin the overall impression.
Designers claim that light panels on neutral-colored walls look more attractive. It is advisable that the premises have a minimum of furniture. In addition, the theme, color and accent “roll call” in the room will be an ideal addition to creating an attractive and unique interior.
Modern designers are noticing a high demand for porthole panels, which create the effect of an additional window in the house. Often the motives for installations are mysterious cosmic landscapes and the beauty of the seabed.
Light panels on the wall are used not only in the interiors of shops, restaurants and clubs. Such attractive things can fit perfectly into the design of a modern apartment.
How to hang pictures to create the perfect lighting
The geometry of the room plays an important role when choosing the location and organization of lighting. It is important to understand that with the right approach, the canvas will distract guests’ attention from defects in the room and make them less noticeable. A backlit picture on the wall will help with this.
Let's start with the simplest thing, or rather with the spatial orientation of the picture. It can be placed both horizontally and vertically. The second option is less preferable if the room has low ceilings. In this case, lighting will only aggravate this drawback and make the room less spacious.
And one more rule that must be followed when arranging paintings. Try to make the line of each canvas like the horizon. The human eye is sensitive to horizontal lines, and even slight disharmony will create discomfort. Most designers increasingly began to move away from the generally accepted concept and therefore you can often find a picture on a shelf or even on a fireplace. But in this case you will need a special type of lighting. In this case, a sconce would be an ideal option. This will help the painting fit harmoniously into the interior and not stand out from the overall symphony of elements.
Important! This option is not suitable for rooms with a classic design.
There is no need to hang pictures in the bedroom that depict historical events. Even with the best lighting, “The Battle of Waterloo” will look at least strange above the bed. Is the office a different matter? The theme will be more suitable for the work area.
If you are unsure about a particular painting, put it on a music stand and see how it will look in the chosen location. And until everything is thought through to the end, do not rush with lighting.
Height
This is probably one of the most important parameters when selecting a painting and lighting for it. First, choose a place so that the backlit picture can be clearly seen. To do this, you need to draw an imaginary line that should pass through the center of the canvas.
Please note that in museums paintings are hung at a height of 152 cm from the floor to the middle of the painting.
When placing and organizing backlit canvases, take into account the distance between the frames, but there is one more point. In the kitchen, paintings can be placed lower than the standard - this is necessary so that it is convenient to look at them even while sitting at the table. The same applies to the dining room, but there is no need to hang pictures lower than 60 cm. In certain design concepts, canvases are even placed on the floor. In this case, you also need good lighting. An excellent option in this case is floor lamps on both sides.
Furniture
Particular attention should be paid to furniture, since even a closet can have its own lighting, as we talked about at the beginning of the article. For this reason, you need to make lighting for your favorite painting taking into account the situation around it. Pay special attention to the various ledges and niches.
Also, don’t hang anything near the closet near the ceiling. The fact is that such an interior element will steal all the space and attention of the guests. The result is obvious - no one will notice the picture. Art canvases look incredibly beautiful if they are placed on top of the portal fireplace. Apart from this, the fire that burns from below will create an interesting effect. But this does not mean that you should forget about sconces or simple lamps; the former will be especially appropriate in this case.
Helpful advice! It is ideal if you can place the painting above large and at the same time low pieces of furniture. The best options are a chest of drawers or a sofa.
Composition
To organize a real gallery with good lighting for paintings in the interior of the apartment, group all the paintings on one wall. There is one method that, although not something new, is already time-tested. Draw an imaginary line from wall to wall and place canvases with equal spaces on it. Use music stands if necessary. This way you can take into account the fact that all the paintings are different, and differ not only in size, but also in theme.