The world map is fashionable! Over the past few decades, it has turned from a completely functional contraption into a full-fledged interior object that not only decorates the space, but also gives it individuality and originality. Buying a custom world map today is no problem at all, with many online stores offering prints in all sizes and on all media, but if you want your home to really look special, consider making your own world map . It is not simple. It's not fast. This is a definite challenge to your ability to overcome difficulties. But this is for sure - about the beautiful, about the stylish, about the cool and cool! To make a world map with your own hands , perhaps you should stock up on the main thing from the very beginning: desire. If it happens, everything will go with a bang, and our selection of DIY world map ideas will truly inspire and direct thoughts in the right direction.
How to make a world map with your own hands - 5 master classes:
What will you need for work?
In order to turn an empty wall into an original three-dimensional backlit world map, you will need the following:
- a template for making a card or a finished one, printed, in the required size;
- any substrate necessary for rooting and fixing moss, you can use scraps of cardboard, foam chips, or simply purchase a ready-made substrate mixture;
- optical fiber threads;
- separate LEDs (12V) for spot lighting of cities;
- LED cord or strip (12V) – to illuminate the contours of the card;
- power source, in this case 12V;
- set of MOS transistors;
- microcontroller;
- tools and materials for electrical installation, you will definitely need a soldering iron;
- artificial mosses and lichens in various shades of green, brown and white and matte;
- Elmer's glue, as well as hot and all-purpose glue;
- wall mounting, including French clamps;
- hardware and tools;
- plywood;
- drill;
- any saw, an electric jigsaw is perfect;
- sanding machine and sandpaper.
Simple PVA glue can also come in handy. It is most convenient for them to glue a regular paper card to the plywood, which has not been laminated in a printing house. Artificial mosses and lichens, as well as substrate mixtures, are sold in stores that sell craft supplies and construction markets.
How to make tomatoes produce a lot of fruit: fertilizing that increases yield
Nikolai Fomenko's secret daughter Darina forgave her father who abandoned her
Cold, water and air: how to check butter for naturalness
In the event that a backlit map is created on the external wall of a house, for example, on a terrace, it makes sense to use not artificial, but living, real mosses and lichens. But, of course, you will need a special substrate mixture.
The presence and use of CNC somewhat changes the list of necessary materials. For example, you won’t need a paper map or its template, and you won’t need a drill either.
Photo of the “World Map” plaster design in the interior of the rooms
Thanks to its originality and perfection, the “Map of the World” plaster is appropriate in the interior of any room.
Living room or hall This is what the decorative plaster world map looks like in the photo in the interior of the living room. The room looks luxurious. Wall decoration advantageously emphasizes the interior without attracting excessive attention. Admire the result and perhaps this is the option you will choose to decorate your living room
Study The simulated world map fills the study space with discreet austerity and at the same time gives the interior a special sophistication
Kitchen Having the best practical and aesthetic qualities, the world map finish will organically fit into the kitchen space and emphasize the overall design style. The decorative plaster “Map of the World” in the kitchen looks so impressive in the photo.
Bedroom A stylish, practical and environmentally friendly finishing option for the bedroom is “Map of the World” decorative plaster - the photo emphasizes how flawlessly all the accents are placed in the room. For example, imitation of delicate silk in combination with a contrasting headboard emphasizes the status of the room, looks noble and creates a relaxing atmosphere in the bedroom
Children's room With the help of multifaceted plaster that is absolutely safe for children, you can decorate your children's room creatively and brightly.
For girl
For boy
Balcony or loggia
For decorating a loggia or balcony, the “World Map” will be an excellent option. The finish with imitation of natural stones, such as granite, onyx or marble, looks especially interesting and stylish here.
Hallway and corridor
A world map imitating different colors and textures in the corridor and hallway gives the room an expensive look, makes the design complete and emphasizes the character of the entire apartment.
Stage one: glue the card to plywood or prepare a template for CNC
If the work does not involve a ready-made map, then the process of decorating the wall should begin by making a paper template of the required size. The task is simple, but requires time, accuracy and scaling skills.
However, if it is possible to use a large professional CNC machine, then the world map can be directly cut out of plywood. In this case, paper is not required at all. When cutting on CNC, it makes sense to use laminated plywood, especially if real mosses and lichens will be used in the decorative design of the wall.
As the main template for CNC cutting, you can use a map image that simulates the view of the Earth from outer space. Using such a template will allow you to cut out not only the outlines of continents on a “smart machine”, but also immediately design holes for spot lighting.
If it is not possible to use CNC, then in the first step you need to glue a ready-made paper map of the world or its template made on a large sheet of Whatman paper to a sheet of plywood. Of course, you need to let the glue dry before proceeding with further work. Regular wallpaper glue or PVA is perfect for fixing the card.
Short-lived happiness: how the life of the youngest daughter of “Mr. X” turned out
Note to beauties with oval nails: 10 trendy manicure ideas for 2021
They start with choosing seeds. How to get cucumbers without barren flowers
WebGL
The WebGL specification comes to the rescue.
A little history about what it is. WebGL is based on the OpenGL for Embedded Systems specification version 2.0, and is essentially the same with minor changes. OpenGL for Embedded Systems, in turn, is a subset of the OpenGL specifications, only designed for mobile devices. That is, the excess is cut out there.
WebGL version 2.0 is also supported by browsers, but is not yet widespread. WebGL Next is also currently being discussed, but it is unclear what it will focus on, or whether it will exist at all. Maybe on Vulkan - it’s not clear yet.
WebGL 1.0 is supported everywhere : on iOS, Android, etc. There are no problems with this.
By comparison, WebGL 2.0 isn't very well supported right now, so we'll have to wait for now.
2D vs 3D [2]
To get a deeper understanding of WebGL, let's compare two- and three-dimensional implementations.
Let's do a simple test: what two- and three-dimensional implementations of an ordinary red square will look like. The 2D implementation in Canvas is quite simple:
(function() { const canvas = document.getElementById('canvas'); const context = canvas.getContext('2d'); context.fillStyle = 'rgba(255, 0, 0, 1)'; context.fillRect( 25, 25, 50, 50); }()); There is a canvas element, we take its two-dimensional context, define a fill style, and draw a square.
The three-dimensional implementation seems to be similar at first: there is also a canvas element, the context is taken using canvas.getContext('webgl'). But then there are differences. Now I'll try to explain. You don’t have to go too deep into the implementation and don’t be afraid of incomprehensible terms; then I’ll explain how you can simplify it all.
(function() { const canvas = document.getElementById('canvas'); const gl = canvas.getContext('webgl'); // Initialize shaders // Create a program // Create a vertex buffer // Store a reference to the buffer object in attribute // Call rendering }()); What to do next:
1. Vertex shader - compile and transfer.
const vertexShaderSource = ` attribute vec4 position;
void main() { gl_Position = position; } `; const vertexShader = gl.createShader(gl.VERTEX_SHADER); gl.shaderSource(vertexShader, vertexShaderSource); gl.compileShader(vertexShader); 2. Fragment shader , which simply produces a red color at the output - compile again and pass const fragmentShaderSource = ` void main() { gl_FragColor = vec4(1.0, 0.0, 0.0, 1.0); } `; const fragmentShader = gl.createShader(gl.FRAGMENT_SHADER); gl.shaderSource(fragmentShader, vertexShaderSource); gl.compileShader(fragmentShader); 3. Program - we link both shaders to the program and use it. const program = gl.createProgram(); gl.attachShader(program, vertexShader); gl.attachShader(program, fragmentShader); gl.linkProgram(program); gl.useProgram(program); 4. Vertex buffer , in which the coordinates of the vertices of the square are specified; after creation, you need to bind it, pass the coordinates of the vertices, bind the position attribute from the vertex shader to the vertex buffer, and use it. const vertices = new Float32Array([ -0.5, 0.5, -0.5, -0.5, 0.5, 0.5, 0.5, -0.5 ]); const vertexSize = 2; const vertexBuffer = gl.createBuffer(); gl.bindBuffer(gl.ARRAY_BUFFER, vertexBuffer); gl.bufferData(gl.ARRAY_BUFFER, vertices, gl.STATIC_DRAW); const attrPosition = gl.getAttribLocation(program, 'position'); gl.vertexAttribPointer(attrPosition, vertexSize, gl.FLOAT, false, 0, 0); gl.enableVertexAttribArray(attrPosition); 5. Then we need to draw .
const vertices = new Float32Array([ -0.5, 0.5, -0.5, -0.5, 0.5, 0.5, 0.5, -0.5 ]); const vertexSize = 2; // ... gl.drawArrays(gl.TRIANGLE_STRIP, 0, vertices.length / vertexSize); So “easy” it turned out to be a red square! You've probably realized that WebGL is not that simple. It is quite low-level , there are a bunch of methods, and they have a million arguments. And this is still a simplified code - there are no error checks that are necessary in real code.
If you want to delve into native WebGL, there is an excellent book in Russian, Koichi Matsuda, Roger Lee, “WebGL: Programming 3D Graphics.”
I recommend reading it, it explains everything in an accessible way from the very basics.
Starting, for example, with drawing a simple triangle, and ending with the creation of full-fledged three-dimensional objects with shadows. If you don’t have time to figure it out, and most likely you don’t, even the project I did was implemented as part of a hackathon in a couple of days (the first prototype with 2 floors). That’s why your favorite (or not your favorite) frameworks come to the rescue.
I used Three.js as the most popular and used WebGL framework. The most important advantage of this framework is that they create convenient abstractions with which you can do everything faster and with less code, without delving into the low-level API. You may not write a single shader for the entire project.
This example is taken from the Three.js Readme:
var scene, camera, renderer, geometry, material, mesh; init(); animate(); function init() { scene = new THREE.Scene(); camera = new THREE.PerspectiveCamera(75, window.innerWidth / window.innerHeight, 1, 10000); camera.position.z = 1000; geometry = new THREE.BoxGeometry( 200, 200, 200 ); material = new THREE.MeshBasicMaterial( { color: 0xff0000, wireframe: true } ); mesh = new THREE.Mesh( geometry, material ); scene.add( mesh ); renderer = new THREE.WebGLRenderer(); renderer.setSize( window.innerWidth, window.innerHeight ); document.body.appendChild( renderer.domElement ); } function animate() { requestAnimationFrame( animate ); mesh.rotation.y += 0.02; renderer.render( scene, camera ); } By copying this code into your browser, in fact, we already have a full-fledged three-dimensional visualization. Moreover, this is not just some ordinary square, but a three-dimensional cube that also rotates.
Consider this example
- We have a certain scene (scene) - this is a virtual space. There may be several of these scenes, but usually there is only one. If there are several scenes, then they exist as parallel worlds.
- There is a camera - the point from which we will shoot and receive the image on the screen.
- Next comes the section of code where we create the object. Here we create the geometry of the cube and its material, in this case just a flat red color. When we combine the frame of the cube and apply material to it, we get a red cube (mesh), which we then place on the stage (our virtual space).
- The next step is to create a renderer object, create a canvas object in it and interact with WebGL. In this case, we set the size so that the rendering takes place in full screen, and add a canvas to the body of the page.
- After which we just need to call the animate() function, which, according to requestAnimationFrame, calls itself - plus the cube rotates.
This way we have a complete visualization.
If we take the section of code where we create the cube, it is easy to replace it with the code where there is a loader.
var loader = new THREE.ObjectLoader(); loader.load('model.json', function(mesh) { scene.add(mesh); }); We call the load method in order to load the model, and now we add not an abstract cube to the stand, but our model, and see it in the browser. This is actually pretty cool!
To obtain a model, the model must be of a certain format. Three.js has a ready-made exporter that you need to connect (it is not present in Blender by default) and use it to export the model into a format in which you can already import it into the scene.
But the picture turned out to be static, and we want to rotate the model, look at it from different angles.
Three.js already has OrbitControls . It is not located in the main Three.js folder, but in examples ( ). There is a lot of stuff there that is not included in the core code, but can be additionally connected.
We connect OrbitControls and create their instance by passing the camera object:
scene = new THREE.Scene(); camera = new THREE.PerspectiveCamera(75, window.innerWidth / window.innerHeight, 1, 10000); camera.position.z = 1000; new THREE.OrbitControls(camera); Our camera is now controlled by OrbitControls. After this, you can rotate our model with the mouse. We hold down the left mouse button and start moving it, you can also zoom in and out of the object.
This is an example from Three.js. There is just loading of the model and controls, in principle, this is already a full-fledged visualization. If we sell, for example, a watch, we can make a model or find it on the Internet, insert it into the browser and the user will be able to zoom in and look at it from different angles.
To delve deeper into the world of 3D graphics using the Three.js framework, there is an excellent course on Udacity. He is very funny, although in English.
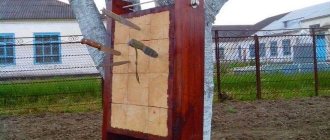
Stage two: cut out the card from plywood and drill holes for spot lighting
At this step of the work, you need to cut out the card elements from plywood and drill holes in them to accommodate individual diodes.
When using CNC, all actions at this stage are reduced to pressing the “Start” button. If the material is sawn manually, then you will need to do the following:
- securely fix the sheet of plywood with the glued card;
- cut out the elements, the blade of a jigsaw or any other saw should follow the contour of the images of continents and large islands;
- Drill holes to accommodate spot lighting.
Of course, you need to polish the edges of the structural parts. If the work involves thickened plywood, fiberboard or chipboard, then it is better to sand the edges using a machine. Thin materials, of course, are more convenient to process with sandpaper by hand.
What can such decorations be used for?
By itself, the carat is already a fairly functional item - it depicts our world and at any moment you can see where this or that country is located. However, this is not all the available possibilities. A lot will depend on where the card is located and what its design is. Depending on various factors, its purpose may vary:
- The usual diagram of the planet on the wall can be an excellent disguise for emerging surface defects. Made of wood, it will reliably cover even the largest flaws.
- It can be difficult to force a student to learn geography, but with such a visual aid things will go much easier - it is much more interesting to look at a decorative panel in your room rather than a diagram in a textbook.
- If you hide the LED backlight behind the wooden surface of the card, it will immediately turn into a source of dim light. It will be able to illuminate the space of a corridor or room in the dark without irritating the eyes with too bright light.
In addition, having such a panel at your disposal, you will be able to mark on it places you have already visited or are just planning to visit. The wooden surface allows you to use flags, beautiful pins and any other devices for this. They can also be used to pin various notes, photographs, drawings and other similar things to a wooden surface, turning your card into a huge organizer.
Stage three: assembly and securing of “land masses”
Continents, islands, archipelagos - all of these in the presented project are areas on which artificial or real moss is fixed. Of course, before fixing mosses and lichens, you need to create a foundation for them - “land masses”.
There is no need to cover the entire surface of continents or islands with mosses and lichens. They can be used to decorate only certain areas, for example, to create convex mountain ranges or to emphasize the greenery of the valleys and forests of the central parts of the continents.
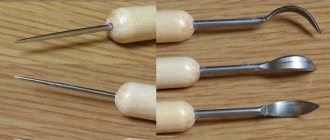
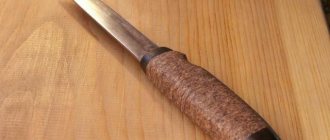
Individual fragments of the substrate mixture must be secured with metal staples. You can also use glue and epoxy resin. And, of course, to give the fragments the desired shape, you should use a sharp knife. “Land masses” are attached to areas on the map using glue.
Shepelev spoke about his son’s achievements - first place in a tennis tournament
7% went abroad: Russians talked about plans for summer vacation
Lettuce leaves will remain crisp for a month: the jar and water trick
Useful links:
✓ 3D graphics course on Udacity ✓ Book “3D Graphics Programming” ✓ threejs examples ✓ Video about text rendering in WebGL (slides) ✓ Video about WebGL performance (article)
Contacts:
https://twitter.com/gc_s9k [email protected]
Time flies, and there is very little left before the RIT++ conference festival; let us remind you that it will take place on May 28 and 29 in Skolkovo. We will publish the program soon, but for now here is a small selection of FrontEnd Conf applications:
- Dmitry Shagarov (Tutmee Agency). Animation on the website - a light sauce or a main course?
- Yuri Artyukh (Coderiver). Pixel path
- Nikita Filatov (Luxoft). Apollo GraphQL. A declarative way to communicate with the server
You can still book tickets, but don’t forget, the price is steadily increasing.
Stage four: cutting and placing artificial moss
Artificial mosses and lichens are sold in the form of rolled sheets; this material is cut with a knife and fixed with glue.
When applying for a card, you need to do the following:
- choose the main color, in the presented project it is dark green;
- cut out parts from a sheet of material that completely cover the surfaces of the wooden fragments;
- glue moss;
- wait for the glue to dry completely;
- trim off the excess with a knife.
The next step is decoration. Lichens and mosses should be selected so that the emerging color palette resembles a geographical map. Of course, it is not necessary to achieve complete similarity. Moreover, you can design a map that is completely different from the image of the Earth.
Decorative inserts of lichens and mosses are made from separate bunches or pieces that are glued to the main green covering.
Stage five: fixing mosses on the map
At this step of the work, you simply need to attach the moss fixed on the substrate to the card.
This is done very simply. Decorative elements are glued to the map in the required areas. If the map is not completely covered with mosses, then you must first trace the contours of the decorative elements and remove them from the map, and then paint the empty areas.
A double harvest is guaranteed: carrots need to be sown in boxes and insulated with spunbond
Not only carrots: nutritionist names foods that are good for eye health
Sense of community, success and more: how TV affects children's development
Stage six: backlight placement
At this step of the work you need to do the following:
- unfold the wooden elements so that the decorative layer is at the bottom;
- pierce the layer of moss by placing an awl or other sharp tool into the holes drilled in the plywood;
- place diodes and optical fiber;
- connect them with wires, solder them;
- place a box with a power supply and fuses;
- connect the electrical circuit and add a wire to connect to the outlet.
Of course, each piece of wood requires a separate box with power and fuses, because intertwined wires have no place on the wall.
When using conventional lamps, you need to place them in hoods to limit the direction of the light flux.
Material consumption
The total consumption depends on the number and thickness of layers. Both textured and structural plaster are applied in a layer whose thickness is equal to the size of the quartz or other filler. Therefore, if the inclusion size in the mixture is 1.7 mm, the consumption will be about 1.7 kg per 1 m².
Standard packaging - 25 kg. It is enough to treat a wall of 10 -15 m². When the actual area is slightly larger, the volume can be increased by adding water, but only in the proportions recommended by the manufacturer. Our decorative plaster calculator will help you with the calculations.
If you achieve a dense, saturated structure, the consumption will increase by 10-30% of that specified by the manufacturer.
Stage seven: attaching the map and backlight to the wall
In the presented project, map fragments are attached to the wall using French clips. But, of course, you can use other types of fasteners. For example, corner furniture brackets also work great.
You need to do the following:
- mark the wall for map fragments;
- fix the fasteners;
- place an LED cord along the marking contour;
- glue the power supply and adapter to the wall if you do not plan to connect the diode cords directly to the outlet;
- hang map elements on the wall.
It makes sense to think about placing network adapters on the walls, their use will minimize the number of wires hanging along the wall. Of course, the fasteners used must be such that all boxes and adapters fit freely between the wall and the wooden elements of the card.
Found a violation? Report content
Plaster application technique
Work on applying plaster is carried out at temperatures within +5...+35 degrees, humidity - less than 80%. Do not allow the temperature to drop below +5 degrees, especially to negative values. The plaster is diluted with water according to the instructions, stirred thoroughly with a construction mixer.
First layer
Most often, snow-white plaster is found on sale, which can be tinted or painted after drying. To complete the first layer, take the solution with a spatula directly from the container in which it was mixed, transfer it to a trowel, and spread it in a layer of 1.5-2 mm over the surface of the wall.
Rub the material with a wide spatula or a rule so that no joints appear, avoiding strong pressure. The coating should not be made too smooth - it should resemble a “fur coat”, which is facilitated by the grainy structure of the material.
Second layer and creation of a “map”
The plaster is continued to be applied in a second layer after the first has dried. Apply it in small islands in this way: take a little mortar with the edge of a trowel, spread it on the wall, rub it, creating the effect of a small area. They try to ensure that the edges of the islands are uneven: this way in the future they will look natural. Clear geometric shapes are not allowed to appear, otherwise a “world map” will not work.
The trowel must always remain clean while working, as dried lumps will cause scratches on the plaster. Also, you should not form huge “continents”, since small islands and “straits” between them look more impressive. Small inclusions that are formed with small strokes of a trowel also look beautiful. You can put either the same or different amounts of solution on the trowel - the choice is up to the master.
After filling the required area with islands and the spaces between them, glossing begins - rubbing the walls with a trowel. The tool is guided along the dry layer, applying more pressure in some areas and less pressure in others. The trowel should be made of durable alloy steel - any other device is not suitable for glossing, as it will cause the plaster to blacken. As a result of this procedure, the edges of the islands will be smoothed out and there will be no hard edge on them. Often double glossing is done at short intervals. If there are large roughnesses, grind with sandpaper.
To enhance the “world map” effect, do the following:
- put a little more solution on the trowel;
- apply slight pressure along the surface of the wall and remove the tool, repeat in several areas until the plaster completely transfers to the surface;
- as a result, additional zones with a fur coat are created on the wall;
- After drying, smooth out the new areas a little with a trowel.
Finishing
At this stage, a beautiful texture with a grainy first layer and an interesting pattern of the second layer will be clearly visible on the wall. To give a previously unpigmented coating a certain shade, it is dyed. One layer of paint is usually made darker, the second - lighter. In addition, special plaster wax, varnish or paint are used for this purpose. It is best to apply the wax using a sponge using circular movements to cover the entire surface evenly. Islands are most often made darker than rough areas.