The technology of manual metal processing goes back thousands of years. There are two main types. This is cold or hot forging. To process metal using the hot method, you need a forge or melting furnace and a properly prepared room. And the price for these devices is high.
Cold forging equipment can be placed in any suitable location, such as a home extension. If desired, some of the machines can be made independently. This circumstance significantly reduces the costs of organizing production. In addition, photos of the machines are easy to find on the Internet.
Cold forging machines: advantages of their use
The main advantage is that it is quite easy to make a cold forging machine with your own hands. And also, if necessary, you can do without electric drives.
In addition, working on such machines has the following advantages:
- fast learning;
- ease of operation;
- low labor costs;
- possibility of producing a series of parts;
- creating unique designs by combining basic elements;
- safety.
Stamping, forging and bending
So what is cold forging? It differs from stamping in that the metal hardly flows or flows weakly under the influence of the working element. Take a look at a beer can or, say, an aluminum or tin kettle. They are extruded with one blow of the punch of the stamping press; kettle, etc. products of complex shape - with a composite sliding punch. It is impossible to obtain the working force necessary to create such a high pressure at home, except in one case, see below.
Cold forging differs from hot forging, of course, in that the workpiece is not preheated. Actually, cold forging, which is forging, is the hardening (hardening) of a part with a long series of regular blows of a certain force. In this case, the structure of the metal changes significantly: the hardness of the surface layer increases, and the core provides overall toughness and fracture strength. Handicraftsmen - toolmakers and gunsmiths - literally hunt for buffers and wheel tires of railway cars, pieces of rails.
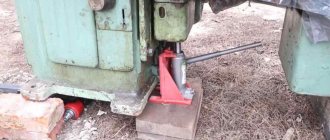
Steel hardening is carried out with a mechanical hammer.
You can do it yourself, and it’s even easier than some types of machines for cold artistic forging. But this publication is devoted specifically to the latter subject, and cold artistic forging is essentially bending (bending) metal: its structure in the part does not undergo significant changes, and changes in the physical and mechanical properties of the metal are not significant for the quality of the final product. Therefore, let’s leave cold forging, which is forging, until a suitable opportunity, and let’s deal with forging, which is bending. For brevity, we will simply call it artistic forging, and where it is necessary to mention hot forging, this will be specially discussed.
Types of machines
There are several main types of machines used in cold forging of metal:
- snail;
- torsion bar machine;
- gnutik;
- wave;
- press.
This is the minimum set of machines to start working with workpieces. And also you won’t be able to do without an angle grinder (angle grinder) and a welding machine.
In addition, devices such as a globe, a flashlight or a volumetric volume are often used in production.
Buy or make
It is better to pose the question in a different way. Do you need a large, high-quality batch of reference parts or just need to bend a couple of pipes? It’s still impossible to create a machine with minimal deviations using artisanal methods. And in terms of service life it will lose to the factory one. But for performing periodic (this is the key point) work, a homemade option is quite suitable. If the final parts do not require the highest dimensional accuracy. Otherwise, all that remains is to buy the necessary equipment.
Which machines are the most important?
Almost all fixtures used in the cold forging process are installed on the two main machines as add-ons.
A globe, flex or volumetric tube is placed on the base of the cochlea.
The flashlight device is mounted on a torsion bar machine.
Device for bending metal elements “Snail”
Do-it-yourself cold forging is impossible without the use of this machine. It is used to make rounded patterns from a profile pipe or rod. The resulting pattern elements are curls or volutes.
The workpiece is shaped by winding it onto a template using hands or levers.
In more complex designs, the workpiece is bent using a jig attached to the shaft axis.
You can buy such a machine or make it yourself.
Variety of forging equipment
When choosing equipment and tools for cold forging, you need to know the major manufacturers - market leaders. Important: when choosing between industrial equipment and devices of your own production, you need to know that purchased machines process workpieces with standard sizes from which it is impossible to obtain a product using handicraft equipment.
- "Hebo." A German company whose equipment has European quality and high resource indicators. However, the cost of the equipment is high. Financial investments, especially at the initial stage, have a high degree of risk.
- "OST". A Belarusian enterprise produces high-quality machines with Japanese control programs. Potential buyers are companies with great financial capabilities.
Universal machine for forging and bending BlackSmith MB21-30. Photo ForgingPRO
- "BlackSmith " . The Chinese manufacturer produces a large range of mechanized and manual equipment for cold forging at relatively low prices.
- “Master” are in demand . These are small machines that cover almost the entire range of cold forging elements.
- Enterprises from Russia “Azhurstal” and “Decor” are also quite competitive in this market.
However, novice entrepreneurs should first consider the possibility of starting production by making their own devices . There are not many such manual equipment (snail, torsion bar, flashlight, wave, bend, globe) and it is not particularly difficult to manufacture. The economic feasibility of this approach is obvious.
Do-it-yourself snail machine for cold forging
Manufacturing a machine consists of several stages:
- Drawing. When drawing up a drawing, it is necessary to strictly maintain the proportions of all parts. The gap between the central axis and the stop should be 3-4 mm wider than the workpiece. Then the finished part can be easily removed from the machine.
- A pipe with a diameter of 30 mm or more is welded in the center to a steel plate made of a sheet with a thickness of at least 3 mm. A central stop is attached nearby to fix the beginning of the workpiece. Then a metal strip equal to the width of the workpiece is welded to it, bent in a spiral at the required angle.
- The device is fixed to the frame. It is best to secure it with bolts so that it can be easily replaced if necessary.
- In order to facilitate the process of bending the workpiece, a handle is welded to the device. It is attached on the opposite side of the workpiece so that it does not interfere with installing and removing parts.
To make any cold forging machine yourself, you will need the following tools:
- welding machine;
- drill;
- grinder (angle grinder) with cutting and grinding wheel;
- drills of various diameters;
- metal crown;
- magnetic square;
- compass;
- vice.
You should start working after all the tools are available.
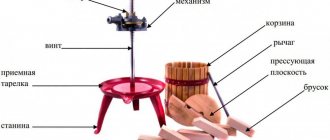
Snail with ploughshare
A ploughshare is a strip of metal bent to the shape of the desired part. The template according to which the curls will be made. Usually the ploughshare is made removable, since the curls are made according to individual sizes for each product.
Snail with lever
In the case of spruce, you simply need to twist the workpiece into a spiral, using a snail with a lever. The part is attached between the main shaft and the stop and, using a lever attached to the frame, the required number of turns is wound. The longer the lever, the less force must be applied to bend the workpiece.
Features of the snail
The author specifically decided to draw the reader's attention to a number of points. This will help you avoid some mistakes in the future. For example, having understood the structure of the snail and the principle of its functioning, someone will want to assemble their own device, different from those whose drawings will be presented below.
Such a device (if we are talking about equipment made by hand) will allow bending samples using the cold forging method with a cross-section (square side) of no more than 10 - 12 mm. This implies a “manually controlled” snail model. Almost no one has anything to do with larger samples in everyday life. The machine can be improved by installing a drive and an electric motor.
But how rational is this for a small home forge?
- Cold forging is carried out at low speeds. A sharp change in the geometry of the metal leads to the appearance of cracks (ruptures).
- You will have to not only select the power of the electric motor, but also the gear ratio of the gearbox. Plus, you need to mount the automation circuit with the installation of the corresponding elements (buttons, starter, and so on). All this significantly complicates the manufacture of the machine.
Machine components and required tools
To manufacture the machine you will need the following materials:
- profiled I-beam;
- vice (2 pcs.);
- steel sheet at least 4 mm thick.
Required tools:
- welding machine;
- Bulgarian;
- level;
- roulette;
- drill.
Manufacturing
A vice is rigidly attached to an I-beam of the required length on one side. For fastening it is best to use welding. And also, before installation, a steel sheet is welded onto the I-beam. This will help avoid deformation of the part during the tightening process.
Mobile system
It is assembled on the side opposite to the fixed vice. A vice is installed on top, which is equipped with a movable central part.
It is important that the vice on both sides of the I-beam is strictly in the same plane.
Instead of a lever, a wheel (steering wheel) is welded to the vice. The larger the diameter, the less effort will be required to manufacture the part.
One end of the workpiece is clamped into a fixed vice, the other into a rotating element. Using a steering wheel, the workpiece is twisted into a spiral with the required number of turns.
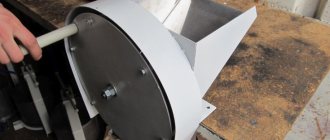
How to make a tin scoop?
Manufacturing stages:
- Take a steel rectangle measuring approximately 300x50 mm.
- Cut corners at approximately 45 degrees. Where the working part will be, the cut should be somewhat deeper.
- Having retreated about 10 mm from the pointed end, drill a hole with a diameter of 3 mm, after 25 mm - another one.
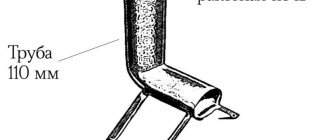
- At a distance of 150 mm from the end of the plate, a mark is made and the plate is bent at a right angle.
- Cut a steel circle about 400 mm long or any other convenient one. An M10 type thread is applied to one end to a depth of 10-15 mm, and two holes with a diameter of 3 mm are drilled at the other end: one at a distance of 12.5 mm from the edge, the second after another 25 mm.
- The metal plate is fixed with rivets on the circle.
- The handle is turned hollow, and a thread is applied inside to a depth of 10-15 mm. The handle is then screwed onto the threads on the circle.
Scoop capacity calculation
Since the shape of the scoop is an open half-cylinder, we will calculate the capacity of the scoop using the formula V = PRRL/2, where V is the volume of the scoop, P = 3.14, R is the radius of the back of the scoop, L is the length of the tray. Based on the fact that the workshop has a sheet metal blank measuring 21x22 cm, we will calculate the back radius. The length of the semicircle will be equal to C=2PR/2 or C=PR. Then R=С/П R=20/3.14=6.36 cm.
Round down and take R=6cm. With a radius of 6 cm, the width of the workpiece will be 3.14 × 6 = 18.84 cm. We round and accept a width of 19 cm. According to the requirements for the product, the volume of the scoop should be 800-1000 cubic cm.
We take the maximum value and find the length of the tray. L=2V/PRR. L=2×1000/3.14x6x6=17.69 cm. Since the thickness of the back is 1.6 cm, the total length will be 17.69+1.6=19.29 cm. Round to the nearest whole number and take the length equal to 19 cm.
Then the length of the tray will be 19-1.6=17.4 cm. We check the volume of the scoop:
V = 3.14 x 6 x 6 x 17.4/ 2 = 983.44 cc, which meets the product requirements.
Knowing the design and determining the materials of the product, we will present the data in the specification. (Table 1)
Table 1
| № | the name of detail | Col. | Material | Dimensions |
| 1 | Tray | 1 | Galvanized sheet | 190×190 |
| 2 | Back | 1 | Wood | R60 S16 |
| 3 | Pen | 1 | Wood | 0 32×110 |
| 4 | Nail | 5 | Steel | 1,5×25 |
| 5 | Nail | 1 | Steel | 1,5×35 |
Technology 5th grade
summary of other presentations
““Modeling an apron” 5th grade” - Artistic modeling. Applying the names of parts. Modeling the bib. Types of finishing. The process of creating clothes. Studying the material. Drawing of the base of the apron. Strap.
Familiarize yourself with artistic design techniques. Repetition of covered material. Pocket modeling. Modeling the bottom of the apron. Fixing the material.
Safety rules when working with scissors.
"Embroidery" 5th grade - Types of embroidery. Smooth surface. Five. Routing. History of embroidery. Embroidery. Physical education break. Your mood. Image. Magic chest. Get acquainted with the history of embroidery. Safety precautions. The young girl is not big, but she dresses the whole world. Counted embroidery. Safety precautions when working with an iron. Hand tools and materials.
“Natural fibers” - The finished fabric is dyed or printed with a design. Packaging in bales (pressing). The basis. Sewing materials science. In the spinning shop, threads are drawn and twisted from the roving. Carding shop.
Pre-cleaning. Classification of natural fibers. How is the fabric obtained? Tape shop. Get yarn. Edge. A thin thread obtained by twisting fibers. Dividing the fiber into narrow strips (roving).
Shuttle.
“Product manufacturing” - Selecting an option. Basics of design. Product.
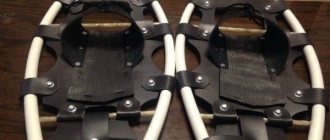
Flashlight device
Used for making elements in the shape of a “basket” or “lantern” from a square or round rod.
Design and principle of operation
The device is made on the basis of a standard torsion bar machine. A piece of pipe with a large diameter nut welded onto the end is clamped into a fixed vice, in which holes are drilled along the ends to the size of the workpieces.
Then the same part is secured in an opposite, rotating vice. Workpiece parts are inserted into the holes of the coaxial nuts.
A metal shaft is installed between the nuts. Its diameter should be less than the internal diameter of the nuts. Afterwards, by rotating one edge of the blanks, a figure of the required shape is made.
The edges of the rods are fastened together by welding or a clamp.
Types, structure and principle of operation of the cochlea
Several varieties of the popular machine are used. All of them, regardless of the details of the cochlea device, use a general operating principle. A strip or rod of metal is forcefully pressed against a stationary template or against a movable ploughshare of the snail, forcing it to take the shape specified in the drawing.
- monolithic non-separable volute using a fixed metal template. Used to produce series of identical products
- removable design - bending is carried out around pins inserted into holes on a solid plate. Suitable for the production of unique parts with complex configurations, the cross-section of the rod is limited.
- Collapsible volutes with rotation are more complex in design, but make it possible to obtain identical products of complex shape with great accuracy
"Globe" device
Designed to create elements with a large bending radius. Details are used in the design to highlight part of the decor. They often have a separate pattern inside. In professional slang, for this reason, it is sometimes called “volume”.
Design and principle of operation
Installed on a snail base. First, one edge of the workpiece is bent using a specially installed sleeve. It is the basis for the lever axis.
Then, using a second bushing, the workpiece is rolled according to a template made in the shape of an arc of the required radius. Both rollers are mounted on a lever, which is driven by hand. The opposite end of the workpiece is bent in the same way.
Afterwards, the required number of curved parts are connected to each other using welding or clamps.
Twisters
Since ancient times, blacksmiths have cold-formed curls according to a template-mandrel using a horn lever grip, pos. 1 in Fig. This method is low-productive and not for wimps, but it allows you to quickly and easily make various bending mandrels from an ordinary steel strip: the end (thrust) horn of the lever prevents the template from yielding under the pressure of the workpiece. It is advisable to make the middle (bypass) horn sliding with fixation: the work will go slower, but, especially in inexperienced hands, more accurately.
The simplest devices for cold artistic forging
Another simple device for manual shaped bending is a strong board with support pins - spacers, pos. 2; Ordinary M8-M24 bolts are suitable. Depending on how friendly you are with your home exercise machine, you can work with a strip of up to 4-6 mm. They bend the strip by eye, the work goes slowly, but you can draw patterns up to Ilya Muromets on a horse in full armor or Buddha in a lotus flower. The latter, perhaps, is completely handmade: people who have fully mastered hatha and raja yoga are able to curl steel reinforcements into a pattern with their hands.