What is this text about? In this text we will answer the following questions: how to felt felt boots master class how to make a last for felt boots how to felt souvenir felt boots How to properly stretch felt boots at home - 5 useful tips
As a result of improper storage and drying, felt boots shrink and sometimes become smaller by a couple of sizes. Professional services are offered in specialized workshops. There are also effective, proven methods for stretching felt boots at home .
Important nuances
To ensure that the product does not deform, you should follow simple rules. Before starting work, felt boots must be thoroughly soaked. There are several options for this:
- steam in a water bath;
- place in a container with boiling water;
- hold over the sink under hot water.
It is recommended to stretch warm felt boots carefully, in several stages. From time to time you need to tap with a rubber mallet or rolling pin on the surface of the sole and foot. This technique will make the product softer and allow the felt boots to be stretched correctly , evenly in all directions.
Required materials and tools
Instead of special tools you can use a rolling pin.
To make felt boots yourself, you do not need any special equipment.
The main thing is to have patience and time.
In addition to this, we will need:
- sheep wool (about 1 kg), not felt;
- polyethylene bubble cellophane;
- mosquito net;
- stencil for felt boots;
- wooden rolling pin;
- hot soapy solution.
Fast and reliable method
If the soles of the felt boots are a little smaller, wooden blocks that fit the size of your feet will help. You can buy them, make them yourself from a whole log, or using the typesetting method. Insoles cut from thick boards are a great option. All sharp edges of wooden parts should be rounded so that they do not deform the product. It is better to cover finished devices with drying oil to increase their service life. An alternative is foam pads. They must be placed inside felt boots when stored in the off-season. In this form, the shoes are guaranteed not to shrink or become deformed.
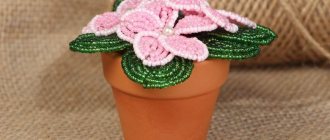
We decorate felt boots with natural fur
This method of decoration allows you to make an exclusive shoe accessory. For work we will need:
- Natural mink or arctic fox fur;
- Sharp knife;
- Thin brush;
- Adhesive composition for fixing fur parts;
- Drawing diagram.
Instead of fixing, we make marks. They will allow you to properly glue the fur elements. After this, using a thin brush, apply the adhesive composition on the back side of the workpieces. We apply them to the surface of the shoes.
Check it out here too!
- Do-it-yourself trolley - how and from what to build a decorative and tool trolley (135 photos and videos)
DIY nests for laying hens: drawings, tricks, best solutions and tips on how to make nests correctly (115 photos and videos)
How to hem felt boots with your own hands: materials, tools, useful tips for hemming. Step-by-step instructions with photos + master class with video!
In addition to fur trim, you can use large beads. They are attached at the top and bottom using thin fishing line.
Some needlewomen prefer to use rhinestones with a faceted surface. They make jewelry voluminous and bright. The photo of felt boots decorated with your own hands shows the finished products.
An easy and affordable way
A popular method of stretching shoes is based on the ability of frozen water to expand and increase in volume. Thick plastic bags or a durable balloon are filled with liquid and placed inside felt boots. They are left in the cold overnight. Then the products must be dried well. are also used to stretch felt boots . Wet shoes are stuffed very tightly and left to dry.
Stretch natural felt boots using a ball chamber. It is placed inside and inflated. It is important not to forget about the boot. You should find a suitable plastic bottle for it or fill it with paper. All these methods stretch the shoes slightly at one time. Therefore, to achieve greater effect, the procedure must be repeated many times.
Instructions for softening felt boots
Before you start manipulating your felt boots, pay attention to what material they are made of. The hardest felt boots are factory-made, and those felted by hand are always the softest and most comfortable. In addition, many modern felt boots are equipped by manufacturers with rubber soles, so it is almost impossible to soften them significantly and make them more comfortable.
To soften felt boots, you will need:
- Wool socks
- Newspaper
- Hot water and steam
- Rubber mallet (Rolling pin or wooden block)
- Wooden blocks
- Reiki
- Drying oil
- Polyethylene
How to make felt boots soft
Armed with the necessary props, proceed to active actions:
Method 1
Felt boots that are not made from very coarse felt can simply be carried around. Wear thick woolen socks and walk in the cold and snow in them every day. Over time they will become softer and more comfortable.
Method 2
The fastest way is to steam the felt boots. Hold felt shoes over hot steam until their surface becomes damp. Then quickly and tightly stuff the boots with newspaper, cover with a piece of fabric and gently tap the feet, instep and tops of the boots with a rubber mallet.
Method 3
Saturate the pads, planed from soft wood and matching the size of your feet, with drying oil and wrap tightly with plastic wrap. Place the pads in the felt boots, and insert the slats as spacers into the boot tops. Soak the felt boots in a bowl of hot water (about 50 degrees) and leave them for 3-4 hours. Using a hammer, beat off those areas of the shoe that are not adjacent to the lasts. Dry the felt boots and repeat the above steps 4 more times, and then, without removing the spacers and pads, leave the felt boots to dry at room temperature.
Attention: In order not to wonder in the future how to make felt boots soft, never dry felt shoes on heating partings. This is how felt boots lose their shape, decrease in size and become rougher.
Guaranteed result
The stretching mechanism is easy to make yourself. It consists of three parts: toe, heel and wedge. To make it, you will need a dry log with a diameter of about 14 cm. Its length should be equal to the size of the foot in cm minus 7 cm (radius of the log). It is cut lengthwise into two equal halves. The sock needs to be rounded to the shape of the front of the felt boot and placed horizontally inside. The heel half is slightly cramped so that it is convenient to drive the wedge, and is located vertically at the back wall of the felt boot. A spacer is driven between them.
For the second option, two bars are selected. The first is the length from the toe to the plumb line of the front of the boot. The heel part is shorter. In total, they should be 5 cm smaller than the size of the foot. A nut and an M16 bolt are attached to the toe part. A metal stop and a well for the heel are installed in the heel half. The second movable nut is rotated using a wrench and changes the distance between the bars.
Increasing the size of felt boots
Before you start stretching, you need to familiarize yourself with some important rules that may help you avoid mistakes in the future. When dealing with such fragile natural shoes, it is worth studying this topic in more detail.
- You cannot wear felt boots on your feet like regular shoes. Due to their rigidity, they can cause serious harm to the feet and fingers, but it will still not be possible to spread them in this way.
- Often the procedure is required for people who have no idea how to stretch felt boots at home. If you decide to do this for the first time and do not have the appropriate tools at hand, you should not “reinvent the wheel” by solving the problem with improvised means. The nearest shoe shop won’t charge you a lot of money for stretching, but the result is guaranteed to be positive.
- Particular attention should be paid to drying felt boots. They often become smaller due to moisture. When drying them on the radiator, it is necessary to place bottles of water in the toe and boot, then the shoes will not lose their original shape.
Stretching the felt boots
If your felt boots have become one size smaller and it has become impossible to wear them without pain, it’s time to start stretching.
The simplest option One of the helpers can be an ordinary double balloon, which should be filled with water and placed inside felt boots. Next, they should be taken out into the cold for 30-40 minutes and then defrosted. Alternately freezing and thawing felt boots will help both expand the felt boots and stretch them.
For more professional stretching, you need to make a sliding block from soft wood. With its help, felt boots need to be stretched for several days, however, if made correctly (see pictures), the result is guaranteed to be positive.
To stretch the pads faster, you can wrap them in polyethylene and soak them in drying oil.
Since it is impossible to wear felt boots at home due to their increased rigidity, many resort to soaking, which often helps not only to stretch, but also to soften the shoes. Soaking in warm (not hot) water lasts 3-4 hours, and then each boot is tapped with a mallet, as far from the shoe as possible. Next, re-soaking occurs for 30-40 minutes, after which the procedure is repeated.
More tips on how to expand felt boots at home on our website!
For a long time, felt boots were considered an indispensable attribute of village life. It was believed that they were needed only by hunters, fishermen, and summer residents. Now they are in great demand among city residents, especially in severe frosts.
Felt shoes are slowly conquering the catwalks. Elegant designs with bright patterns have gained popularity among the glamor community.
To enjoy wearing them, you should make your felt boots softer and more comfortable.
How not to stretch felt boots
In order for the felt boots to stretch , you should not try to carry them on your feet. This will result in chafing and painful calluses. More significant effort is required to achieve a noticeable effect. Do not use professional products or sprays. They are suitable exclusively for leather and suede shoes. During drying, it is not recommended to leave products near heating appliances. Felt boots may shrink.
Photos of felt boots with your own hands
Read here - Do-it-yourself greenhouse from pipes: step-by-step instructions on how to build a simple and practical greenhouse from pipes (100 photos + video)
How much time and expense does it take to sew felt boots?
If you have a ready-made pattern, it will take one day to sew the finished product. Creating a pattern takes no more than an hour if all the measurements are at hand. If you work only a couple of hours a day, the maximum it will take to sew is three days.
The difficulty level of the work is average. Sewing machine skills required. You can learn how to sew felt boots in a day if you wish.
Costs may vary depending on materials. If you use old things, the savings are significant. I don’t see the point in buying new fabrics for sewing felt boots. An old coat, shirts for lining, diapers, an old blanket or other worn items will do. You can buy an old coat at a second-hand store for pennies, rip it open and cut it into burkas. There are also plenty of fleece items for humanitarian aid. I’ll tell you a secret that my teacher uses an old mattress for insulation. The main thing is that the cotton wool in it is in a layer and not in lumps, then it will be convenient to sew.
How not to handle felt products
Let's look at what is prohibited in relation to felt products:
- To soften felt boots, you shouldn’t heroically try to wear them out through the pain. This rash step will end in damage to your feet in the form of calluses and wounds.
- Under no circumstances use products intended for the care of leather and suede shoes.
- Drying should not be done near batteries, because felt products may become deformed.
If previously felt boots were only suitable for the garden or fishing, today ladies in felt boots with appliqué or embroidery can also be found at fashionable parties.
Children will also like them, and they will not be superfluous in a country house. Indispensable winter shoes, an example of comfort - these are all our felt boots! Wear it with pleasure!
For quite a long time, Russian felt boots were considered shoes for children and villagers. Nowadays, “boots” and “boots” made from sheep wool are becoming increasingly popular in the city, especially during severe frosts. Felt products are even featured on the catwalks of fashion designers. It is important to choose a high-quality pair and break them in to make the felt boots softer.
Pay attention to the material used to make felt boots. If you pay attention to your purchase, then you won’t have to spend a long and painful time wearing out rough “pads.” It is recommended to opt for a product of medium hardness - felt boots that are too soft will quickly lose their shape. Keep in mind that factory models are always more rigid than homemade ones. The most comfortable felt boots are those made from fine-fleece wool of the highest grade - chesanki.
Wear the hard felt boots until they take the shape of your feet. If you choose felt shoes that are not too rough, then it is enough to put them on a cotton and thick woolen sock and walk every day in the cold and even in wet snow. Over time, felt boots become softer. Please note that at the same time they shrink a little in length, but widen in width.
Try steaming felt shoes. This is the fastest way to make felt boots softer in emergency cases, when you don’t have the time or opportunity to break them in. Hold the felt boots over hot steam until the felt is damp and soft. Then stuff them tightly with old newspapers; cover with a piece of cloth and beat with a rubber mallet, rolling pin or edge of a board: the instep, toes and the entire area of the foot.
What are felt boots made of?
These are warm boots made of felted sheep wool . They are shoes for walking on snow . There are both hard and soft ones, which are worn under other shoes. Let's look in detail at how to soften these shoes.
To soften felt boots, take:
- Thick yarn socks.
- Unnecessary paper or newspapers.
- Polyethylene.
- Drying oil.
- Wooden blocks.
- Rubber hammer.
- Laths.
Industrial technology
Previously, felting felt boots was done exclusively by hand. To do this, the craftswoman took special tools and already prepared lasts for the shoe size, and then began processing the wool. Nowadays, a lot has changed, and old sewing technologies are not suitable for production on an industrial scale. However, the process is not fully automated and some of the work is still done by humans.
Making felt boots is a rather interesting process. Before going on sale, boots go through the following stages:
- First, wool is purchased, usually sheep. It is sorted by hand, oiled and sent to the carding shop.
- Special devices carefully comb out debris (blades of grass, dirt, etc.) from the material. At the exit, the wool is wound on a special roller.
- The man starts working again. It is necessary to steam all the fibers - they must be well heated with hot air.
- Factory workers manually form the shape of the felt boots. At this stage, the fur takes on its familiar shape. Experienced specialists make the shape by eye, and if the master is just starting to work, then a special pattern will help him.
- The workpiece is again steam-treated and then sent to a special rolling machine. After using this device, the wool fibers adhere tightly to each other.
- Then again hand work - giving the wool a clearer silhouette of the boot. At this stage, the felt boots look very large - clearly not big enough for a human foot.
- The blanks fall into a drum of water, where the same wool felting takes place, after which the shoes are named.
- The boots are cut on other machines, and after that the production workers take them on again. They stretch the workpieces, and then “set” them on special blocks, which help to give the exact shape and size.
When the felt boots acquire their classic look, they are sent to dry. After this, a formal determination of the intermediate size, selection of a pair and gluing of the sole takes place. At this stage, you can start decorating the product, but in general the felted boots are ready.
Wool is sorted by hand
Special devices carefully comb out the material from debris. It is oiled and sent to the carding shop. At the output, the wool is wound on a special roller
The fibers are passed under steam
Factory workers manually form the shape of the felt boots. The blank is again steam-treated and sent to a special rolling machine.
Giving wool a clearer boot silhouette
The blanks fall into a drum of water, where wool felting takes place. Boots are beaten on machines
Stretching workpieces using a machine
Felt boots are put on special lasts and sent to the oven to dry.