SHARE ON SOCIAL NETWORKS
FacebookTwitterOkGoogle+PinterestVk
Processing of wood blanks is carried out using special turning equipment. Using a device of this type allows you to perform various operations with high precision. If necessary, you can make a wood lathe with your own hands. This will save money. To manufacture this device, you need to familiarize yourself with its design features and take advice from experts.
The design of a homemade wood lathe can be extremely simple, but to obtain the desired result you should understand in detail its specifics and application features
Features of wood lathes
In a number of cases, a hardworking owner has a desire to make furnishings and utensils that have a circular cross-section throughout their entire length.
Most often these things are:
- Holders for hammers and files;
- Stair posts, flowerpots, handles for railings;
- Rolling pins, potato presses, grape crushers;
- Vertical pencil cases;
- Cups, mugs, saucers, plates, trays, stoppers.
It will be impossible to cut such things with planes and saws. In this case, you will need at least the most primitive machine.
Buying a lathe
Today you can purchase such a device with a click of the mouse by going to a specialized online store. True, such a purchase will hurt your pocket, especially if you choose a high-quality model and not a cheap Chinese craft.
However, this does not mean that the idea of founding a miniature workshop will have to be given up. The problem of high cost can be solved by taking a different route. A simple and durable electrical unit must be made by hand.
Turning round architectural decorations
Such a mechanism will be an excellent help if you need to make inexpensive repairs to a cottage equipped with
- Flights of stairs with wooden balustrades;
- Decorative trims;
- Carved shutters;
- Window earrings.
Profitable and promising business
Having gained some experience in the production of decor, it will be possible to move from banal savings to a profitable business. This could be the production and sale of chess pieces. If you sell them through online auctions or retail chains, then an additional source of income will appear in the family budget.
Handmade items quickly find demand, especially if they are offered for sale at a reasonable price.
In the future, this hobby will develop into full-time commercial employment, giving you a chance to acquire professional tools and start earning very good money.
Main components
The most important components of such a device include
- Bed;
- Electric drive;
- Front and back headstock;
- Stand for accessories.
Support frame base
The bed is a frame that allows you to connect all the parts into a harmonious mechanism. The strength and reliability of such a support directly determines the stability and durability of the entire device. It is better and easier to use a steel angle to make the frame; another suitable material is a rectangular profile.
First of all, it is necessary to mark the dimensions of the assembled automatic sharpening machine. These parameters are determined by what exactly this machine will be used for. As a rule, a stand for an apartment or garage modification does not exceed eighty centimeters in length.
Choosing an Electric Motor for Woodworking Operations
An equally important element of the machine is the engine. The main characteristic that needs to be given enough attention is power. Regardless of the type of motor - single-phase or three-phase, the power can range from 1200 to 2000 W.
Perfectly suited engines:
From a washing machine, if a lathe is needed for small-volume work and the size of the workpiece will not exceed 30–40 cm, in this case the exact maximum length is selected experimentally. Such engines can help in processing small items, dishes, small knobs for stairs and similar interior elements.
Some models of washing machines are equipped with an asynchronous electric motor, in which, by changing the winding, you can step by step change the shaft rotation speed. Similar motors are also installed in floor fans, only there they have a lower power of about 40–100 W. This motor is enough for a mini-machine for small household products.
Frame manufacturing process
The slats selected for assembling the frame must be laid so that their upper edges are strictly in the same plane. The parallelism of these guides is checked by measuring the distances between their ends on each side.
- Longitudinal fragments are secured with clamps. The transverse parts are made from the same profile.
- There will be three crossbars in total. Two of them are fixed at the edges of the device, and the third is placed a couple of tens of centimeters from the left end.
At the next stage, all components are joined by welding into a solid composition. It is important that the resulting connecting joint is strong and smooth.
How to make a milling machine with your own hands: instructions
You can assemble a milling machine of both vertical and horizontal type with your own hands. The choice of option depends on the purpose of the machine, the availability of space in the workshop, planned costs and other specific circumstances.
Vertical milling machine
The vertical type milling machine is most popular in home workshops. Before starting production, it is necessary to decide on the design, taking into account the tasks assigned to the equipment, select the necessary materials, prepare the tools, and calculate the technical parameters of the future machine.
Selecting materials for the router
When choosing materials for the manufacture of a machine, these recommendations should be taken into account.
Bed. It must withstand significant dynamic loads, which requires the use of metal. A square or rectangular steel pipe is most suitable. You can use a corner measuring 100 millimeters or more. Assembly can be done using a welding machine or bolted connections. The second option is preferable because it provides mobility.
Tabletop, work desk. The tabletop can be made from the following materials: multilayer plywood, board, chipboard or MDF. The surface must be smooth. It should be protected as much as possible from damage. Often a covering made of plastic, sanded boards or metal is used. The design of the table should allow you to store all the necessary tools and consumables. The photo shows examples of execution.
Electric motor. Both asynchronous and commutator motors are suitable. Asynchronous is easy to operate, does not limit the size of the cutters, but is quite noisy. The commutator motor is accessible, but its brushes wear out much faster.
Important! The material should be selected taking into account the expected loads (working on wood or metal) and the size of the machine.
Making a fixture for a stationary router
You can make cutters for the machine yourself. To do this, you need to prepare a cylindrical blank. Half the diameter is cut off on it in the area where the cutting zone is formed. The transition that appears is smoothed out. Next, another quarter of the diameter is removed, and the border is smoothed. The processed area of the workpiece is given a rectangular appearance by cutting off the lower part. As a result, the thickness of the metal in the working area should be 3–5 mm. Operations are carried out using a grinder or drill with an attachment, and sharpening of the edge is carried out on a sharpening machine.
It is recommended to sharpen the cutter at an angle of 7–9 degrees. Using diamond-coated files, you can give the edge any desired shape. When making a milling cutter of complex shape, the workpiece is flattened and bent.
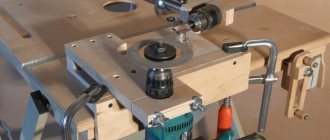
Equipment for a homemade milling machine
We can highlight some critical elements of the machine design that require special attention.
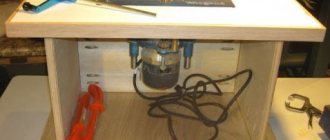
Drive plate and suspension. In order to hang the drive from the machine plate, it is necessary to make an opening (window) in it. Based on technical considerations, a round shape is better, but a square shape is easier to manufacture. The suspended electric motor must not touch the surface of the plate. The photo shows an example of a suspension.
When making the slab itself, it is necessary to ensure optimal cutting. A durable coating is needed on the motor board, and the rest can be made from cheaper material. A gap of about 0.6–1 mm is left between the motor board and the machine board.
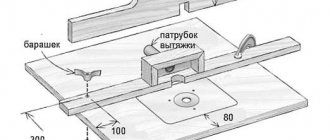
Emphasis. A drawing of a fairly simple stop is shown in the photo. Multilayer plywood can be used as a material. 4-5 holes are drilled for the comb and the lifting stop at a distance of 5 cm from the edge of the cutout. Drilling pitch – 26–30 mm. The side supports are secured with a clamp.
Dust collector. To organize such an important procedure as collecting emitted dust, a vacuum cleaner is usually used. It is advisable to provide a dust container with a volume of 15–20 liters. The photo shows an example of a machine dust collector. An inlet pipe with a diameter of about 20 mm is installed, and an exhaust pipe with a diameter of 30 mm is installed.
Comb. It is made from hardwood (oak, beech). Installed on both sides. The first tooth of the comb is shortened by 3–4 mm. It is attached to the side support with bolts. The drawing is shown in the photo.
For a vertical milling machine, it is important to ensure maximum vibration resistance of the equipment.
Do-it-yourself milling machine manufacturing technology
Assembling a homemade vertical milling machine with a bottom drive is carried out in the following order:
- Development of drawings. Carrying out marking of the movement of moving parts.
- Selecting an electric motor. Any motor with a power of 1–2 kW for a voltage of 220 V with a rotation speed of 700–3000 rpm will do. Often a motor from a washing machine or vacuum cleaner is installed. You can install an electric drill with high rotational force. It is important to consider that a motor with a power of up to 2 kW allows for a processing depth of up to 100 mm. To increase this parameter, you will have to install a 380 V motor.
- Assembly of the frame. It may have a bolted connection or a welded structure.
- Cutting and installation of the machine plate, including the formation of a hole for the working element.
- Fastening the guides.
- Suspension and fastening of the electric motor.
- Installing a spindle with a chuck on a lifting bar (vertical lift). Securing the drive.
- Installation of stops and limit strips.
- Installation of the dust collector.
- Completing the installation of the desktop.
After installing the electrical panel, electricity is supplied and testing of the machine begins.
To carry out the assembly you will need the following tools: a welding transformer, an angle grinder, an electric drill, a screwdriver, a jigsaw, a hacksaw, a hacksaw for metal, files and needle files, pliers, screwdrivers, wrenches and socket wrenches, calipers, a ruler, a square.
Horizontal milling machine
The second common version of the milling cutter is a horizontal machine. It has a simpler design compared to the vertical type, but can perform fewer functions.
Selecting materials for the router
The difference between the vertical and horizontal arrangement of the spindle only leads to a change in the principle of movement of the part and the working body. The cutting tool has the ability to move horizontally to adjust the depth of processing, and the spindle with slide moves vertically. The workpiece moves along the plate mainly longitudinally. The requirements for materials for a horizontal machine are similar to the requirements for the elements of a vertical unit. This is primarily a high-strength metal frame. The worktop is large, which requires increasing the strength of the countertop.
Making a fixture for a stationary router
For horizontal milling, the same cutters are used as for vertical processing. You can make them yourself using the technology described above. Most often, horizontal machines provide the following operations: grooves on the ends and edges, drilling horizontal holes, grooving planks, forming skirting boards and various long products with relief.
Equipment for a homemade milling machine
The main components of a horizontal router have certain features:
Spindle. It is positioned horizontally, for which a special support system is made. The photo shows drawings of a device that can be used in a horizontal router.
Stove and countertop. There is no hole made in the plate of a horizontal machine for the working element. The tool is fed from the side. When cutting, a simple rectangular slab is formed. The most common size is 75 × 50 cm. The layout of the table for the milling machine is shown in the diagram.
Important! For a horizontal milling machine, an asynchronous motor of increased power is usually installed to ensure the ability to process large products.
Do-it-yourself milling machine manufacturing technology
The horizontal router is assembled in this order:
- Development of drawings with elaboration of trajectories of movement of moving parts.
- Selecting an electric motor.
- Assembling the frame (frame) using bolts or using a welding machine.
- Installation of the electric motor in a horizontal position on special brackets, with the shaft extending sideways beyond the tabletop.
- Cutting and installation of the slab (countertop).
- Installation of a “vertical lift” of the spindle.
- Securing the spindle and belt drive.
- Installation of the device for feeding the workpiece, stops and limit bars.
To supply electricity, a panel with a circuit breaker and a switch is installed.
Copy milling machine
Nowadays, copy milling machines based on 2D and even 3D technologies are moving into the category of standard equipment. In the first case, milling cutters with a tabletop or mounted pantograph are manufactured. The desktop version is simpler, but the copying accuracy is only 1 mm. A mounted pantograph makes it possible to ensure high precision processing and even engrave.
Selecting materials for the router
The following materials are recommended for the manufacture of a copy router:
- knee cemented polished shaft with a diameter of 16 mm;
- linear bearings – 2 pcs.;
- guide rails 90 cm long – 2 pcs.;
- rectangular pipe 30 × 60 mm and 40 × 40 mm with a wall thickness of no more than 3 mm;
- metal plate 90 × 10 cm;
- end posts – 2 pcs.;
- rocker arm for attaching the copier and cutter – 2 pcs.;
- movable coupling – 2 pcs.;
- crown type coupling for turning the part and the template.
The dimensions of all elements are specified when developing a detailed drawing.
Making a fixture for a stationary router
The operating principle of a copy router is based on repeating the movements of the copier according to a template. The cutter must exactly repeat the shape of the template. This requires high-quality high-speed steel tools. Processing is carried out on flat and curved surfaces. Engraving cutters are widely used. The types of cutters are shown in the photo.
Equipment for a homemade milling machine
An important element of the machine is the pantograph, which is used to set the task for the milling cutter. The photo shows the principle of operation of a drawing and drawing pantograph with scaling. Such a simple device allows you to copy parts at different scales by moving the cutting tool relative to the zero point.
For the production of a 3D machine, the copier has 4 degrees of freedom, which allows you to recreate three-dimensional models. Such a device is shown in the photo.
Do-it-yourself milling machine manufacturing technology
The milling and copying machine is manufactured in the following order:
- The base of the machine and small vertical posts are formed from a 40 × 40 mm profile pipe.
- Supports for rail guides are made from 30 × 60 pipe.
- The frame and main structure are assembled by welding. The seams are cleaned.
- The guides are fixed strictly parallel.
- Installation of base with rail guides.
- Holes for bearings and struts are drilled on the metal plate.
- The movable element is manufactured by attaching rocker arms 300 mm long.
- The moving element is mounted on the shaft through bearings.
- The structure is placed on a plate 100 mm wide.
- The suspended structure is mounted on guides through split bearings. The limit switches are fixed.
- Movable couplings, a probe and a cutter are fixed at the ends of the rocker arm.
After connecting all the elements with couplings, the structure acquires the required mobility.
Selecting an Electric Powertrain
When choosing a motor to power the turning system, it is necessary to clarify how powerful it is. For the construction of a homemade self-heating unit, an indicator in the range of 1.2 - 2 kW is quite sufficient. In this case, you should find out exactly what scheme the connection is made according to.
For desktop woodworking, a motor from a household centrifuge is sufficient. Although he is not able to provide turning of a massive workpiece, he will definitely master the processing
- Miniature souvenirs;
- Kitchenware;
- Various types of furniture accessories.
A simple way to make your own frame
The reliability of the bed is a key characteristic of the machine. Human safety and the quality of the product depend on the properties of the material and the quality of the connection of the parts of the frame.
Based on these requirements, the choice falls on metal profiles, chipboard, plywood or solid wood (preferably solid wood: oak, birch or the most common: pine).
If the choice is on a metal frame, then you need to choose a channel, an I-beam or a profile pipe that will carry the load-bearing functions of the machine. Here the choice depends solely on the availability of the material, its price and ease of installation. However, the metal frame is the simplest in design: you only need two I-beams, on which the engine, tailstock, tool rest and caliper are then mounted.
If the choice is wood or chipboard, then based on a preliminary sketch-drawing with the existing dimensions of the engine and all other elements, the design of the frame is formed. As a rule, it consists of a table top, which acts as a base, a stand for the tailstock and a box on which the motor and headstock axle are mounted.
In addition, two parallel slats are run between the headstock racks, on which a movable support board is attached. A gap of 5 cm is maintained between the slats. Afterwards, it is necessary to weld the frame with a welding machine - this will give additional strength to the structure.
If the machine is supposed to be a tabletop machine, then there is no need for legs, but when processing heavy and massive elements, the bed should be independent and its stability should not raise questions. In this case, it is necessary to provide legs. They are made from rolled steel, for example, angle or timber.
The dimensions of the machine primarily depend on the goals pursued by the master. Most operations at home are performed with products up to 80 cm in length, so most often the length dimensions of the machine are 80 cm. If the frame is made of metal, then two blanks of equal length are cut with a grinder.
Functional front lock
For figured turning, the workpiece is fixed between two clamps, which are usually called headstocks. At the same time, torque from the electric motor is transmitted to the front, and therefore it will be somewhat more difficult to assemble it.
The front clamp of a home lathe is an iron U-shaped structure, between the sides of which a shaft and a pulley system are mounted on bearings. The body is assembled from thick rolled steel segments.
Installing the headstock and tailstock
One of the most important parts of the machine is the headstock and tailstock. The workpiece is clamped between them. The headstock directly rotates the product.
Important!
To make the base of the headstock - the spindle shaft - you need to turn to professional metal turners or find a finished part or generally ready-made headstock modules in specialized stores.
The design of the front tank consists of two bearings of type S, V or U, which are bolted to the frame of a shaft machined from carbon steel with a diameter of 40 mm, a chuck for clamping the part.
The shaft is equipped with three or four pins that help eliminate vibration. The shaft is passed through the bearing and pins are attached to it with a key or other fastener for cylindrical parts, after which the shaft is fixed on the second bearing, which is already tightly bolted to the steel corners or the board of the frame.
The tailstock also produces rotational movements, but does not set the product in motion. It is especially important to fix the tailstock on the same axis as the front one, because all subsequent work will depend on this.
Reference. For subsequent control of the axis, the headstock can be designed with adjustment screws, which will allow slight changes in the axis of rotation of the headstock.
The tailstock consists of the following elements:
- A base of angle steel or similar material, similar to the base of a headstock.
- Guide pipe.
- Inner tube or quill. It is made in such a way that it can be placed in a guide pipe, and then a drive screw can be passed through the quill.
- Drive screw. A screw with a nut thread for the quill tube. An 8 mm thread is provided for mounting the flywheel on the rear.
Installation of the second clamp
The purpose of the rear analogue is to support the conditional cylinder to be sharpened and provide it with freedom for rapid rotation. The more firmly the tailstock holds the workpiece, the better the final result will be.
- An indispensable condition for proper installation of the second clamp is maintaining alignment with the first.
- Faced with great difficulties at this stage, it makes sense to significantly simplify the task by purchasing a completely finished unit.
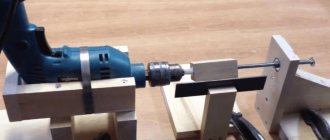
The use of an electric drill chuck will allow you to significantly modify the engineering solution. A shaft is clamped in it, the end of which must be pointed.
Mini machine for small jobs
Often there is a need to turn several small wooden parts, in this case it is not at all necessary to make a full-fledged machine; you can get by with a mini-wood lathe. Its production does not require much labor and will not take much time.
The design of such a machine is extremely simple. A motor from an old tape recorder, powered from an external power supply, is ideal as an electrical component. The bed of the mini-machine will be a piece of board of the required length.
The engine must be secured. Of course, a belt drive is not suitable for a small machine; the workpiece will have to be mounted on the motor shaft. The best device for this is a faceplate. The drive housing is a U-shaped plate, in the center of which a hole is drilled for the shaft. The engine in the housing is mounted on the frame using self-tapping screws.
The main part of the machine is ready, all that remains is to make the tailstock. Its body is made of a block of suitable size. A hole for the shaft is drilled in it exactly at the height of the engine; a dowel-nail of suitable length is used as it. The headstock is attached with glue and several screws.
Using a power source with the ability to adjust the output voltage, you can create a machine with variable rotation speed. It is convenient to regulate the speed using the foot control pedal. The design of this device can be very diverse, it all depends on the available parts.
Convenient turntable
All that remains is to make a tool rest, where needle files, jigsaws, sandpaper, planes and hacksaws will be laid out during work. Its outlines are not regulated in any way, but it must be completely comfortable.
It is better to design such a table with the participation of the master who will become the main user of the automatic sharpener.
The best option is a swivel stand in the shape of a trapezoid. It is cut out of a thick iron sheet, after which it is mounted on a rotary hinge with a large two-way angle. It will be easy to move such a table in order to bring files closer to you or move them away for a while.
Specifications
The design of the faceplate is suitable for machines not only of wood, but also of metal. It is presented in the form of a disk with workpiece assemblies made on it. The materials can be either cast iron or steel. Other materials are used in rare cases.
Tapered hubs and threaded holes serve as a tool for attaching the tooling to the spindle. Specific parameters are selected for certain dimensions of the output end of the shaft. Provided that the fixture, which is clamped directly into the machine chuck, is provided with a cylindrical hub.
The workpiece is secured using clamps, crutches, various clamps and other clamping devices. For this purpose, a lathe chuck is installed and used. It can be assembled on a faceplate either along the axis or with its offset. It is worth paying special attention to the faceplate when using production safety precautions.
Large dimensions, non-standard fastenings and non-cylindrical shape of surfaces pose a serious danger both to the turner himself and to others. At the beginning of work, it is necessary to balance and secure all the elements so that the structure does not fluff up and individual components do not fly apart.
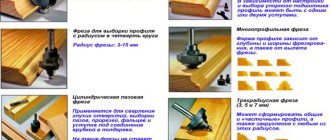
Cutters of different calibers
Cutting attachments are sold in every major hardware supermarket. At the same time, it is possible to buy both single cutting parts and sets.
With a wide selection of cutters available, the turner will create any complex and intricate configurations, including
- Grooves;
- Chamfers;
- Cones;
- Dashed lines;
- Edging;
- Wavy lines.
Why is it needed and how does it work?
A lathe is designed for the manufacture of wooden products that have a cylindrical or similar shape. This is an indispensable thing when renovating a country house with a wooden staircase, a carved porch, but not only.
If you have some experience, a turning tool will allow you not only to save on purchased decorative elements, but also to earn money, because handmade wooden products are highly valued.
Whether such a machine is needed in a home workshop is up to the master to decide.
Of course, if you need several handles for chisels, it is easier to buy them, but if you want to make an all-wood staircase, then a set of balusters will cost a very large sum. It is much cheaper to make them yourself. By the way, you don’t even have to spend money on buying equipment - a simple machine can be made in your own workshop using scrap materials.
The operating principle of a wood lathe is not particularly complicated. The cylindrical workpiece is fixed along the axis of rotation. Torque is transmitted to it. By bringing various cutters or grinding tools to the workpiece, it is given the desired shape.
Main parts of lathe:
- a frame on which all components are fixed;
- electric drive;
- headstock;
- tailstock;
- handyman
For ease of operation, schemes for changing the rotation speed are used. In professional equipment, this is a real gearbox, a system of gears that allows you to regulate speed within a very wide range. This is difficult; it is enough to equip a homemade wood lathe with a belt drive with several pulleys of different diameters.