The solar oven is made using different technologies, so its design differs from each other. Such products produced in an industrial version are distinguished by a high price. You can make many models yourself with a minimum of money and maximum effort. Before we start analyzing homemade models, let's look at one industrial oven for general development - GoSun.
This solution is based on two technologies: a vacuum tube receives concentrated energy from a mirror stand - a concentrator. Thus, the temperature inside the tube reaches 280°C in a few minutes, which makes it possible to cook, steam, or fry any food. There are a number of sites with recipes adapted for such an oven. This cooking method is in no way inferior to the usual existing ones, it only adds environmental friendliness to the process.
Technical characteristics and features of solar ovens
Solar ovens have long been available in stores or online. They are equipped with many useful devices that make working with the equipment easier.
The solar oven is lightweight, it can be folded like a suitcase in a few minutes and just as quickly unfolded into its working position - it is an ideal tool for traveling.
The solar oven is lightweight and can be folded in a few minutes.
Furnaces manufactured on an industrial scale combine all the positive properties of solar parabolic cylindrical concentrators, as well as vacuum tubes. Thanks to this, the heating temperature reaches 300 degrees Celsius.
To control the temperature, a thermometer is also built into the equipment - this is an integral part of the control unit.
A thermostat with a specific operating temperature setting, as well as a mirror rotation system, is also installed in the oven.
A modern device is equipped with a timer, which, after a certain time, will begin to close the mirrors located inside the solar oven. When the set time arrives, the timer will also beep to indicate the food is ready.
The electronic part of the equipment is powered by solar energy through a battery installed in the housing.
When assembled, the suitcase has the following dimensions:
- length 75 cm;
- height 40 cm;
- thickness – 11 cm.
The weight is quite light and comfortable for carrying over long distances - only 4 kg.
Using the oven you can cook vegetables, mushrooms, meat or even bake pies. The main advantage is environmental friendliness and energy savings. The equipment does not pollute the environment at all.
Where to begin?
There are always at least two ways to solve any problem: study yourself or entrust the solution to someone else. The first option involves studying theoretical materials, reading forums, communicating with owners of solar power plants, fighting internal toads and, finally, purchasing equipment, and then installation. The second option: call a specialized company, where they will ask a lot of questions, select and sell the necessary equipment, and maybe install it for some money. I decided to combine these two methods. Partly because it’s interesting to me, and partly in order not to run into sellers who just want to make money by selling something that’s not exactly what I need. Now it's time for theory to understand how I made my choices.
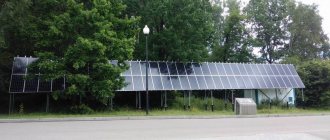
The photo shows an example of “using” money for the construction of a solar power plant. Please note that the solar panels are installed BEHIND the tree - so no light reaches them and they simply do not work.
Types of solar ovens
Modern devices are available in three main varieties:
- Boxed.
- With mirror concentrator.
- Combined.
Box oven
The equipment is a heat-insulating box covered with mirror material or plastic. To increase heat collection, several mirrors are added inside to serve as reflectors.
Box solar oven
This type of equipment is used for slow cooking. Since the box can be of any size if you make it yourself, you can use it to prepare large volumes of food. Store samples are not large in size.
Furnace with concentrator
The device is a concave mirror that collects the sun's rays at its focus and redirects it to a point set by the user. When making it yourself, there is no need to maintain the perfect geometry of the mirror, since a large pan or other container with food will be in focus.
A special feature of the structure is the achievement of high heating temperatures. The equipment is convenient to use when you need to heat up a small amount of food.
But the stove also has a design drawback: it is necessary to constantly monitor the rays of the sun and from time to time turn the mirror to redirect the beam in the required direction. If you do not handle the stove skillfully, you can burn your hands and eyes. But by following safety precautions, this trouble can be avoided.
Combined
The combined type is a combination of the two previous options. A pan of food that needs to be heated is placed in a box, which is framed on one side by a concave plate with a mirror surface. The oven quickly folds and assembles into working position.
How to summon bosses in Terraria
You can summon bosses in Terraria using certain items. There are several different types of bosses, such as pre-hardmode, hardmode, and mini-bosses (during events). Defeating them gives the player an advantage in obtaining items, upgrades, accessories, things and other materials to level up. Therefore, it is worth learning how to make summons for new bosses.
Below is a list of summoners for creating all bosses and methods for crafting them. The list includes simple instructions on where to get each ingredient, who it's for, and what it contains.
Most summoning items must be used at night, which starts at 7:30 p.m. The day starts at 4:30 am, when many bosses disappear. You can summon several bosses at the same time, but not the same one.
Summoner of the Slime King
Summoning Item: Slime Crown; Materials to make a slime crown:
Summoner Eye of Cthulhu
Summoning Item: Suspicious looking eye; Materials to create a suspicious eye:
Comment: You can create it at the Demonic or Crimson Altar at night. May appear randomly when you reach 200 health or 10 defense and there are several NPCs living in your city. The eye can be found in chests during exploration.
World Eater Summoner
Item for summoning: Bait (food) for the worm; Materials for making worm bait:
Comment: Created at the Demonic or Crimson Altar. Corruption must be used in the biome. Also triggered when the player breaks 3 damaged balls using a hammer. Every 3 will summon the Eater of Worlds.
Cthulhu Brain Summoner
Summon Item: Bloody Spine; Materials for crafting Bloody Ridge:
Commentary: Crafted at the Demonic and Crimson Altar. Must be used in the Crimson biome. Triggered when the player breaks 3 scarlet hearts with a hammer. Every 3 will summon the Brain of Cthulhu again.
Queen Bee
Summoning Item: Bee Mass; Materials for crafting bee mass:
Comment: Create manually (PC) at the altar of Demon or Crimson (Console or Mobile). Use anywhere in the jungle.
Skeletron
Summoning Item: Guide Voodoo Doll; Required to resummon Skeletron:
Wall of Flesh
Summoning item: guide voodoo doll; Required to summon a wall of flesh:
Commentary: The Wall of Flesh will appear on the side of the map that you are closest to. It is possible to farm again after the Guide is revived.
Bosses in Hardmode
Destroyer
Summoning Item: Mechanical Worm; Materials for crafting a mechanical worm:
Comment: Created on a mithril or orichalcum anvil. Can appear randomly in front of any enemy with a very low chance. Until this point, it may appear randomly.
Twins
Summoning Item: Mechanical Eye; Materials to create a Mechanical Eye:
Comment: Crafted on a mithril or orichalcum anvil.
Skeletron Prime
Summoning item: mechanical skull; Materials for crafting a mechanical skull:
Comment: Made on a mithril or orichalcum anvil.
Plantera
Summoning Item: Plantera Bud.
Commentary: All three mechanical bosses must be killed. Bud planteras will grow regularly in the jungle. Break it with a pickaxe to start a fight at any time. This gives access to the Jungle Temple and Golem.
Golem
Summoning Item: Lizard Battery. How to get a battery:
Okram (Boss of mobile and console versions)
Summon Item: Suspicious looking skull. How to create a suspicious skull:
Comment: You will have to load a new world if you did not receive adamantite. Okram drops Souls of Corruption, which are used in exclusive equipment for consoles and mobile devices.
Duke of Fishborne
Summoning Item: Truffle Worm. How to get truffle worm:
Comment: Use bait when fishing in the ocean biome. Throw a fishing rod and Fishbron will be summoned.
Cultist-Lunatic
Summon Item: No
Moon Lord
Summoning Item: Heavenly Symbol. Crafting materials:
Comment: Crafted from an ancient manipulator (100% dropped by Lunatic Cultist). The Moon Lord can be summoned at any time. It's better to call it by executing the event first since you need those fragments.
Step-by-step instructions for making a solar oven with your own hands
Assembling a solar oven with your own hands is not difficult. You can use different methods based on the drawings, which are very simple and intuitive.
Users may have questions about oven sizes. It is advisable to rely on the following tips:
- If you need to make a stove for a summer house or a country house, then you need to think about a more solid and fixed structure.
- If the device is needed for hiking, then the design should be collapsible and as light as possible for ease of transportation.
- If the furnace is planned to be moved by car, then the design can be made more complex, but it must still be collapsible.
The simplest option for a solar oven is to use a regular umbrella. There is no need to use drawings for manufacturing, since the device is as simple and understandable as possible.
A mirror film or aluminum foil is glued to the open umbrella from the inside. The handle needs to be detached so that it does not interfere when placing the dish in the center for heating. This is all the necessary work. The oven is completely ready for use.
Now you need to stick a stand into the ground where the pot and kettle will be attached, and place an improvised mirror near the objects and focus the sun’s ray on the container with food.
Some craftsmen use a broken mirror and cover the inside of the umbrella with a kind of mosaic. But in this case the structure turns out to be heavy and not collapsible.
Boxed
When assembling a box structure, you need to consider several main factors:
- The walls located on the inside of the box are covered with foil and should have a very good reflection.
- The pan placed inside must absorb the sun's rays, and therefore it is advisable to paint it black or smoke it.
- Thermal insulation must be at a high level. The walls of the box should fit tightly to each other so that the heat does not escape outside. To provide high-quality thermal insulation, use ordinary cardboard or other natural materials that will not emit harmful substances when heated. After assembly, the temperature inside the oven can reach 170 degrees Celsius. But you shouldn’t be afraid of the box catching fire, since this temperature will not be enough.
If you approach the construction of the structure with all responsibility, the stove will last up to 10 years or longer.
DIY box solar oven
Non-dismountable unit:
- A reliable box is made from boards.
- Black paper (compacted) is placed inside over the entire area. This is necessary so that the solar energy is absorbed as much as possible by the device.
- Based on the dimensions of the resulting box, reflectors are cut out of tin. Before installation, the edges should be rounded and sanded to avoid cutting.
- Reflectors are fixed on top of the box. Ordinary hinges or screws are used - at the discretion of the master. Afterwards, the sheets are bent at the desired angle to accumulate the sun's rays on a specific object inside the unit.
- The lid must be made of glass. Thus, ultraviolet rays are converted into thermal energy necessary to heat food.
- It is advisable to build a small platform of bricks under the stove. They will accumulate the resulting heat.
- If you want to monitor the temperature, you should attach a thermometer to the box.
This type of solar oven is ideal for summer cottages. You won’t be able to take it with you on a trip due to its relatively large weight, dimensions and inseparability.
Mirror with reflector
To make a mirror stove with a reflector, you can use the option with an umbrella, which was presented above, or assemble the structure according to the drawing.
- You will need to cut out 12 cardboard petals.
- Afterwards, all the parts are connected along the long side.
- Next, the inner part of the resulting “plate” is fastened.
- All parts are tied together with wire or a good rope at the base.
- The plate is covered with foil, which reflects the sun's rays well.
Combination oven
The combined type is the easiest to manufacture and is a concentrator made from several flat mirrors. You will also need a pan with good thermal insulation.
To isolate the internal object, use ordinary plastic bags.
As a mirror, you can use thick cardboard to which aluminum foil is glued.
The design is notable for the fact that it can be folded and carried. Approximate dimensions are 33 by 33 cm. But larger sizes can be assembled if desired.
Build process:
- First you need to prepare the base for the body. It is advisable to use a sheet of plywood. An aluminum or steel rod is placed in the center and securely fastened. Length - half a meter. A thread is first made on the rod so that the stand can be placed on it later.
- Grooves are made into which plywood stiffeners are placed.
- The walls are assembled from the same plywood. You will need four rectangular sheets. On one side they should be cut with a curved arc, and grooves should be made with the arc for fastening to the ribs.
- The parts to be joined are covered with high-quality glue and connected. For additional fixation, it is advisable to use paper clips. After the box has dried, you should shake the workpieces and gently pull the walls to make sure they are secure. If the design has passed the tests, you can proceed to the next stage. But if some part is loose, it will need to be put in place and filled with glue again.
After creating the box, you can move on to the mirror.
- You need triangular thick cardboard with a smooth texture.
- All cardboard parts are overlapped and placed on the top of the attached ribs.
- After fixing, the cardboard is covered with a layer of glue. Afterwards aluminum foil is applied.
- A stand is placed on the rod at a point equal to half the radius of the mirror surface.
A DIY solar oven is ready for use. Instead of wood, aluminum is also used for the box. It conducts heat well and is not subject to corrosion.
The instructions will answer the question of how to make a solar oven at home.
How to summon bosses in Terraria
You can summon bosses in Terraria using certain items. There are several different types of bosses, such as pre-hardmode, hardmode, and mini-bosses (during events). Defeating them gives the player an advantage in obtaining items, upgrades, accessories, things and other materials to level up. Therefore, it is worth learning how to make summons for new bosses.
Below is a list of summoners for creating all bosses and methods for crafting them. The list includes simple instructions on where to get each ingredient, who it's for, and what it contains.
Most summoning items must be used at night, which starts at 7:30 p.m. The day starts at 4:30 am, when many bosses disappear. You can summon several bosses at the same time, but not the same one.
Summoner of the Slime King
Summoning Item: Slime Crown; Materials to make a slime crown:
Summoner Eye of Cthulhu
Summoning Item: Suspicious looking eye; Materials to create a suspicious eye:
Comment: You can create it at the Demonic or Crimson Altar at night. May appear randomly when you reach 200 health or 10 defense and there are several NPCs living in your city. The eye can be found in chests during exploration.
World Eater Summoner
Item for summoning: Bait (food) for the worm; Materials for making worm bait:
Comment: Created at the Demonic or Crimson Altar. Corruption must be used in the biome. Also triggered when the player breaks 3 damaged balls using a hammer. Every 3 will summon the Eater of Worlds.
Cthulhu Brain Summoner
Summon Item: Bloody Spine; Materials for crafting Bloody Ridge:
Commentary: Crafted at the Demonic and Crimson Altar. Must be used in the Crimson biome. Triggered when the player breaks 3 scarlet hearts with a hammer. Every 3 will summon the Brain of Cthulhu again.
Queen Bee
Summoning Item: Bee Mass; Materials for crafting bee mass:
Comment: Create manually (PC) at the altar of Demon or Crimson (Console or Mobile). Use anywhere in the jungle.
Skeletron
Summoning Item: Guide Voodoo Doll; Required to resummon Skeletron:
Wall of Flesh
Summoning item: guide voodoo doll; Required to summon a wall of flesh:
Commentary: The Wall of Flesh will appear on the side of the map that you are closest to. It is possible to farm again after the Guide is revived.
Bosses in Hardmode
Destroyer
Summoning Item: Mechanical Worm; Materials for crafting a mechanical worm:
Comment: Created on a mithril or orichalcum anvil. Can appear randomly in front of any enemy with a very low chance. Until this point, it may appear randomly.
Twins
Summoning Item: Mechanical Eye; Materials to create a Mechanical Eye:
Comment: Crafted on a mithril or orichalcum anvil.
Skeletron Prime
Summoning item: mechanical skull; Materials for crafting a mechanical skull:
Comment: Made on a mithril or orichalcum anvil.
Plantera
Summoning Item: Plantera Bud.
Commentary: All three mechanical bosses must be killed. Bud planteras will grow regularly in the jungle. Break it with a pickaxe to start a fight at any time. This gives access to the Jungle Temple and Golem.
Golem
Summoning Item: Lizard Battery. How to get a battery:
Okram (Boss of mobile and console versions)
Summon Item: Suspicious looking skull. How to create a suspicious skull:
Comment: You will have to load a new world if you did not receive adamantite. Okram drops Souls of Corruption, which are used in exclusive equipment for consoles and mobile devices.
Duke of Fishborne
Summoning Item: Truffle Worm. How to get truffle worm:
Comment: Use bait when fishing in the ocean biome. Throw a fishing rod and Fishbron will be summoned.
Cultist-Lunatic
Summon Item: No
Moon Lord
Summoning Item: Heavenly Symbol. Crafting materials:
Comment: Crafted from an ancient manipulator (100% dropped by Lunatic Cultist). The Moon Lord can be summoned at any time. It's better to call it by executing the event first since you need those fragments.
Advantages and disadvantages
Self-assembled solar ovens vary in size, but are identical in structure, and therefore there are no difficulties with assembly. Ovens can easily store heat to heat food. The principle of operation is based on absorbing the energy of the sun's rays and redirecting them to the desired object.
Solar ovens have the following advantages:
- Cheapness. To operate, you do not need to buy fuel or use additional energy sources. To work, you only need sunlight.
- Food is prepared as safely as possible - there is no fear of fire, as when lighting a fire.
- The stove is easy to care for and simple to use - you just need to direct the sun's ray to the desired object through the mirror surface.
- Mobility. The stove is quickly assembled and disassembled. Therefore, there are no problems with transportation.
- Environmentally friendly.
- Food heats evenly and there is no risk of burning. There is no need to stir the food.
These qualities have made solar ovens very popular among travelers. The stove is easy to cook food on. To cook food, you just need to direct the sun's ray to the desired object.
Monsters
After killing mechanical bosses:
| Reaper | Motron (Console/mobile versions) | Mothron Cub |
After killing Plantera:
Dropped Items
| Death Scythe - from the Reaper |
| Broken Hero's Sword - from Motron |
| Broken Bat Wing - from a Vampire |
| Eye on a spring - from the observer |
| Moonstone - from a vampire |
| Neptune's Shell - from a creature from the depths |
| Deadly Orb Staff - from Deadly Orb |
| Butcher's Chainsaw - from Butcher |
| Flask with toxins - from a human fly |
| Eye of Cthulhu - from Motron (after killing Plantera) |
| Knife Psycho - from psycho |
| Nailgun - from pinhead |
| Wings of Motron - from Motron (after killing Plantera) |
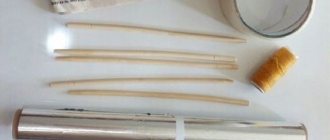
Foil battery
In addition to the two methods described above, the power source can be assembled from foil. A homemade solar battery, made according to the step-by-step instructions described below, will be able to provide electricity, although of very low power:
- For homemade products you will need copper foil with an area of 45 square meters. cm. The cut piece is treated in a soap solution to remove fat from the surface. It is also advisable to wash your hands so as not to leave grease stains.
- Using sandpaper, it is necessary to remove the protective oxide film and any other type of corrosion from the cutting plane.
- A sheet of foil is placed on the burner of an electric stove with a power of at least 1.1 kW and heated until red-orange spots form. With further heating, the resulting oxides are converted to copper oxide. This is evidenced by the black color of the surface of the piece.
- Once the oxide has formed, heating must be continued for 30 minutes to form an oxide film of sufficient thickness.
- The roasting stops and the sheet cools down along with the stove. When cooling slowly, the copper and oxide cool at different rates, making the latter easier to peel off.
- Remaining oxide is removed under running water. In this case, you should not bend the sheet and mechanically tear off small pieces so as not to damage the thin layer of oxide.
- A second sheet is cut to the size of the first.
- Place two pieces of foil in a 2-5 liter plastic bottle with the neck cut off. Secure them with alligator clips. They must be positioned so that they do not connect.
- A negative terminal is connected to the processed piece, and a positive terminal is connected to the second piece.
- A saline solution is poured into the jar. Its level should be 2.5 cm below the top edge of the electrodes. To prepare the mixture, 2–4 tablespoons of salt (depending on the volume of the bottle) are dissolved in a small amount of water.
Foil battery
All solar panels are not suitable for providing a cottage or private home with electricity due to their low power. But they can serve as a power source for radios or charging small electrical appliances.
I'm starting to collect
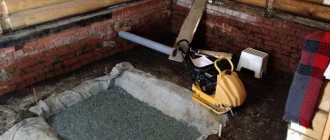
Before purchasing and assembling, it is necessary to calculate the entire system so as not to make a mistake with the location of all systems and cable routing. From the solar panels to the inverter I have about 25-30 meters and I laid two flexible wires with a cross-section of 6 sq. mm in advance, since they will transmit voltage up to 100V and a current of 25-30A. This cross-sectional margin was chosen to minimize losses on the wire and maximize energy delivery to the devices. I mounted the solar panels themselves on homemade guides made of aluminum corners and attached them with homemade fasteners. To prevent the panel from sliding down, a pair of 30mm bolts point upward on the aluminum corner opposite each panel, and they act as a kind of “hook” for the panels. After installation they are not visible, but they continue to bear the load.
The solar panels were assembled into three blocks of 3 panels each. In the blocks, the panels are connected in series - this way the voltage was raised to 115V without load and the current was reduced, which means you can choose wires of a smaller cross-section. The blocks are connected in parallel to each other using special connectors that ensure good contact and tightness of the connection - called MC4. I also used them to connect wires to the solar controller, as they provide reliable contact and quick closing/opening of the circuit for maintenance.
Next we move on to installation in the house. The batteries are pre-charged with a smart car charger to equalize the voltage and are connected in series to provide 48V. Next, they are connected to the inverter with a cable with a cross-section of 25 mm square. By the way, when you first connect the battery to the inverter, there will be a noticeable spark at the contacts. If you have not mixed up the polarity, then everything is fine - the inverter has fairly capacious capacitors installed and they begin to charge the moment they are connected to the batteries. The maximum power of the inverter is 5000 W, which means the current that can pass through the wire from the battery will be 100-110A. The selected cable is sufficient for safe operation. After connecting the battery, you can connect the external network and the load at home. Wires are attached to the terminal blocks: phase, neutral, ground. Everything here is simple and clear, but if it is unsafe for you to repair the outlet, then it is better to entrust the connection of this system to experienced electricians. Well, the last element is connecting the solar panels: here, too, you need to be careful and not mix up the polarity. With a power of 2.5 kW and incorrect connection, the solar controller will burn out instantly. What can I say: with such power, you can weld directly from solar panels, without a welding inverter. This will not improve the health of solar panels, but the power of the sun is really great. Since I additionally use MC4 connectors, it is simply impossible to reverse the polarity during the initial correct installation.
Everything is connected, one click of the switch and the inverter goes into setup mode: here you need to set the battery type, operating mode, charging currents, etc. There are quite clear instructions for this, and if you can cope with setting up the router, then setting up the inverter will not be very difficult either. You just need to know the battery parameters and configure them correctly so that they last as long as possible. After that, hmm... After that comes the fun part.
Warnings
- Be careful when removing food or utensils from the oven or removing glass (if present). The oven may become very hot. Use oven mitts or tongs when handling ovens or stovetops.
- A light stove is not protected from wild animals. Therefore, hide it in a protected place.
- Never wash the glass of a high-power oven in cold water while it is still hot. The glass will burst due to a sudden change in temperature.
- Never put your hands into a hot oven without any protection - you will get burned.
- A light oven is effective almost anywhere you can capture sunlight, but you won't be able to set the temperature and determine the cooking time like you can with a conventional oven. Make sure food is cooked to the recommended temperature by using a meat thermometer.
Which panels to buy
All products of this class are divided into:
- Monocrystalline (more expensive).
- Polycrystalline (amorphous).
The first ones have a more uniform structure, which is why the efficiency is much higher than that of amorphous ones. Actually, this is what causes the price increase.
It is very easy to distinguish these photocells from each other, both by color (dark blue monocrystal) and shape.
What to choose is up to the buyer to decide, but you should know that cheaper amorphous cells are made in small Chinese enterprises with deviations in the quality of materials, but at a lower cost.
To calculate the number of photocells, you need to focus on the projected output data of homemade panels.
According to the passport data, 0.12 kW/hour of electricity is removed from one square meter of panels. For domestic needs, it is enough to receive 280–320 kW per month from the device.
All elements must be the same size and denomination.
If you purchase a photocell with a protective wax coating, it must be removed after purchase.
Sequence of actions for preparing photocells:
- Unpack the panels.
- Treat with hot (90±5 degrees Celsius) water.
- After the wax has melted, separate all the elements from each other.
- Clean each panel of wax residue with hot water.
- Lay the treated panels on a soft cloth and dry.
Assembly of photocells
Before proceeding to this stage, it is necessary to study what the solar panel circuit looks like. Carefully arrange the elements on the base. It is important to maintain a distance between them of 3–5 mm. You can use crosses for installing tiles.
You need to prepare for soldering - bring out the contacts in order. Positive on one side, negative on the other.
The contacts on the panels may already be ready and fixed in place. If this is not the case, you will have to prepare and solder them yourself.
A homemade solar battery is made from crystalline elements. This is a rather fragile material, so you need to work with them with special care.
The manufacture of solar panels requires special treatment. To solder solar plates correctly without damaging them, you need to handle the parts carefully. Choose the right soldering iron with a permissible power of 24/36 W.
When all the plates are soldered, the circuit must be supplemented with self-discharge diodes (charge controller) and an acoustic cable at the output for connection.
Fix all panel elements with your own hands using sealant.
Now all the elements are selected and placed inside the frame.
Diode battery
A solar battery made from D223B diodes can really become a source of electric current. These diodes have the highest voltage and are housed in a glass case coated with paint. The output voltage of the finished product can be determined from the calculation that one diode in the sun generates 350 mV.
- Place the required number of radio components in a container and fill it with acetone or another solvent and leave for several hours.
- Then, you need to take a plate of the required size from a non-metallic material and make markings for soldering the components of the power source.
- Once soaked, the paint can be easily scraped off.
- Armed with a multimeter, in the sun or under a light bulb we determine the positive contact and bend it. The diodes are soldered vertically, since in this position the crystal best generates electricity from the sun's energy. Therefore, at the output we get the maximum voltage that the solar battery will generate.
Diode wiring
When to test a module
After fixing the plates to the base, you should check the panel for functionality and obtain preliminary results. One plate produces 0.5 W, one square meter produces 120 W, ten square meters produces approximately 1.0 kW. These indicators should be taken as a basis when calculating the number of panels.
It is advisable to carry out such functionality tests during the process of soldering plates with a photocell. If three people permanently live in a private house, then using an area of solar panels of 20 square meters, the module will produce 2.0 kW of electrical energy per hour.
This is quite enough for the normal operation of the refrigerator, TV, computer and for lighting at night. As necessary, such solar panels can be expanded, thereby increasing the power of the modular installation.
Testing the battery before sealing
The work is nearing completion, but before further assembly of the panel with elements from China, it is necessary to check whether the assembled structure works at all?
There is a high probability of poor-quality soldering of contacts. As a matter of fact, it is better to do such a check after soldering each row of photocells - this will greatly simplify the detection of places of poor-quality connections.
Testing is carried out in an open area in sunny weather at noon, when the sun is not covered by clouds. A regular digital tester is suitable for measurements.
The prepared battery must be taken outside, pointed at the sun at the desired angle of inclination, which is calculated in advance. We switch the tester to current measurement mode and measure short circuit currents.
In theory, the panel current should be 0.5–1.0 A lower than the short circuit current. If the tester shows a current strength above 4.5 A, then the solar battery is assembled normally and is fully operational.
If the readings differ downward, you need to look for a weak soldered contact in the connection of the photocells.
Panel selection advice
To get an output power of 145 W at a voltage of 18 V and not go too far out of your budget, it is better to take a closer look at class B kits.
Class B kits account for the main share of the entire solar battery market. For those who want to try to assemble panels with their own hands, it is better to take a closer look at these manufacturers. But there are currently a lot of such companies and, as a rule, they are not engaged in production, but in the resale of finished components. Or, in order to save money, they actively use manual assembly of panels, which naturally leads to a decrease in quality. Therefore, you need to be prepared for the fact that the declared characteristics may not coincide with the actual parameters. And you shouldn’t count on warranty obligations from such little-known companies either.
If you purchase 36 pieces of Chinese panels on the Alibaba website, it will cost 3,200 rubles. With the price of a ready-made kit with the same characteristics being 6,250 rubles, the benefit is quite tangible.
Consequently, the idea of making solar panels for your home with your own hands becomes even more relevant.
A little theory
The main material for the production of panels is silicon, with the addition of boron and phosphorus. They are located on different sides of each other. Under the influence of sunlight, free electrons are separated from phosphorus (n-type side) and begin to move towards the boron plate. The boron plate, having free elements, or peculiar holes (p-type side), accepts free electrons. Or a p–n junction appears. Now all that remains is to remove this movement of electrons from the plate in the form of electric current.
List of required tools
A good soldering iron is the key to quality work. In the process of assembling a solar panel from polycrystalline photocells, you will need the following tools:
- soldering iron 25-30 W, rosin, tin;
- soldering acid;
- pencil for preparing the soldering area;
- wire cutters;
- tweezers.
To assemble the case:
- wooden beams or aluminum corners (sizes are individual);
- screwdriver;
- silicone glue or sealant;
- bolts, nuts or other fastenings (hardware);
- saw and hacksaw for metal (for cutting plexiglass).
This article is about the types of solar power plants.
Read an article about different types of solar panels here.